Tag Archives: tools

LInks of Interest, 5 Sept 2014

Just to prevent this place becoming all-Blood Bowl, all the time, some semi-random interesting links.

Over on Lead Adventure Forum, I found the information on this thread about paint add-ins, matte/gloss mediums and related substances very useful. Going to have to visit on of the good local art stores soon, I think…

I’ve also just bought new greenstuff putty finally, to replace the very, very old strip of the stuff that’s been hanging around my desk for far too long. The old stuff had the consistency of used old chewing gum and was pretty much impossible to work with; the new stuff (along with a couple of new sculpting tools!) has reminded me how much fun messing around with greenstuff is. There’s a pile of YouTube video tutorials showing basic greenstuff sculpting techniques – one I rather like is The Dizmo’s skull tutorial.

Green Stuff Industries host a good mix of basic messing-with-green-stuff tutorials, including this Sculpting Bas-Relief Flames tutorial that I want to try out sometime soon.

One final sculpting-related link, this one from Kings Miniatures on making your own simple sculpting tools from dowel and paperclip wire.

I’m off next week to northern Alberta for three to six weeks of field work, helping run a project up there, so posting might continue to be fairly light but I’m going to take some putty and sculpting stuff with me and practice the art – it should be more forgiving of hotel suite lighting than painting, which I’ve tried in hotel rooms in the past and always quit because even at a hotel room desk the light tends to be lousy…

Fiskars Circle Cutter Review, and Markers for M&B

Back one of the before-Christmas sales, I picked up a Fiskars circle cutter on deep discount from one of the local art supply stores. It’s been on my toys-I-want list for ages, and a chance to get it at 40% was too good to pass up.

It’s proven to be a useful gadget, although with some limitations. It will cut paper, light card and styrene up to about .020″ or .030″ thickness no problem; anything heavier than that it’ll score but not cut. With thicker styrene you can score then clean up with a file or sandpaper later, but this obviously means cutting heavier card is out.

Exact alignment of the circle to be cut out can be a bit tricky, but the central rubber “foot” does pull off to reveal a more compass-like needle foot which makes alignment easier. Of course, I only realized the needle foot option existed a few days ago, when I finally got around to reading the “Instructions and Tips” PDF from Fiskar’s site. Amazing what you learn when you read the instructions, isn’t it?

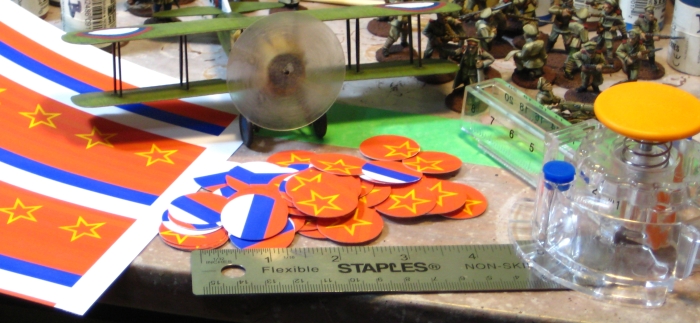
The other work-around for imprecise cutting is to design graphics that don’t have to be cut terribly precisely, of course. That’s what I did when I laid out the graphics for a batch of 1″ circular markers for use in our Russian Civil War games.

fiskarcutter
On the right, the Fiskars Circle Cutter. Central, the prop disc and M&B markers cut with it. On the left, the sheet of markers I made in Inkscape.

The markers will mostly be used for showing which Big Men & units have activated in any given turn, as we noticed it can be easy to loose track of which units have been activated with multiple Big Men running around in Through The Mud & The Blood. They can also be used to mark things like sustained fire lanes for machine guns or similar, of course.

On the left of the photo, notice the sheet I laid out in Inkscape for the markers; except for the star the solid colours are fairly forgiving of cutter placement. A few of the Red star markers have had their tips clipped by the cutter, but they’re still obviously Red Army stars, so I’m not fussed. Now that I’ve discovered the cutter’s needle foot option, I should be able to cut out the remaining marker discs perfectly.

The SPAD’s prop disc was cut from leftover heavy clear plastic from a blister pack, then put down on a sheet of 600 grit sandpaper and spun by hand to get the hint of motion blur in it. I wound up taping the piece of plastic to my cutting mat, then the cutter worked nicely on it.

So, the Fiskars Circle Cutter. A useful piece of kit, within it’s limits. I’m sure I’ll get years of use out of it — but wait until you find one on sale before getting it!

Small Tools of Great Use

sprayer
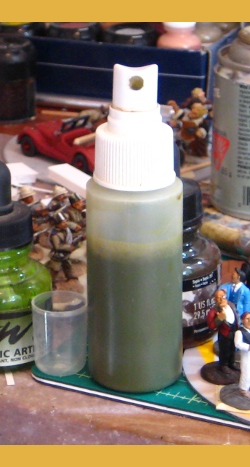
2oz spray bottle. Useful little thing.

Here’s something I bought largely on a whim from a local craft store that has proven unexpectedly useful. It’s a 2oz (60ml) sprayer, cost about $2, and I find all sorts of uses for it.

Filled (as it is here) with a dilute mixture of acrylic artists ink and water, it’s a highly controllable way of applying washes or stains to scenery projects. In this case it’s got a grungy-looking mix of green and brown inks in it as part of an ongoing experiment in making grassy fields from fake fur (more on the fake fur experiments in a future post!). Due to lack of bench space, I often put projects on an old plastic tray and work on them there; I can spray with this little sprayer without having overspray all over the tray and the table I’m working on.

When basing figures or adding texture to scenery, I’ll put sand or flock down, paint it if required, then once that’s all dry, do a second coat of heavily diluted white glue to really lock the scenery material in place. To get the glue to flow easily into and around the scenery material, I fill the sprayer with plain water with just a tiny dab of dish soap added. The soap destroys any surface tension in the water, making what’s known as “wet water”.

A quick spray of wet water gets a second coat of dilute white glue applied by eyedropper to flow nicely in and around the scenery material. Once it’s dry the flock/sand/whatever is pretty nearly bombproof. I’ve got figure bases a decade old done this way that still haven’t shed a noticable amount of flock.

You could probably spray dilute white glue directly with a sprayer like this, but it might also be a great way to clog the nozzle, and especially when basing figures, I don’t exactly want glue sprayed on them.

Got a favourite small or slightly odd tool? Share in the comments!