Tag Archives: terrain

Half-Timber Dovecote, Dampfpanzerwagon Style: Part One

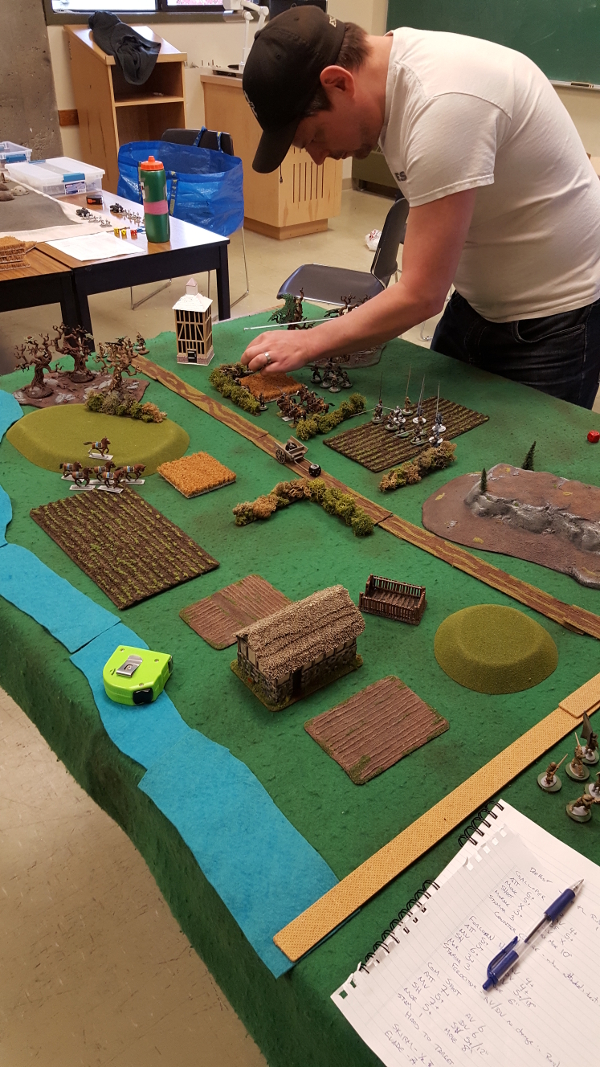
As I mentioned in my last post about the things I brought home from Trumpeter Salute, one of them was a copy of Issue #87 of Wargames, Soldiers, and Strategy, their ECW special. One of the articles in there was by Tony Harwood, also known as Dampfpanzerwagon around the internet, including on the Lead Adventure Forum.

Wanting more buildings suitable for an English Civil War game (and possibly for early 20th C pulp games set in the English countryside!) I decided to build my own version of Tony’s dovecote. It’s a great building for wargaming, having a minimal footprint but nice presence because of it’s height.

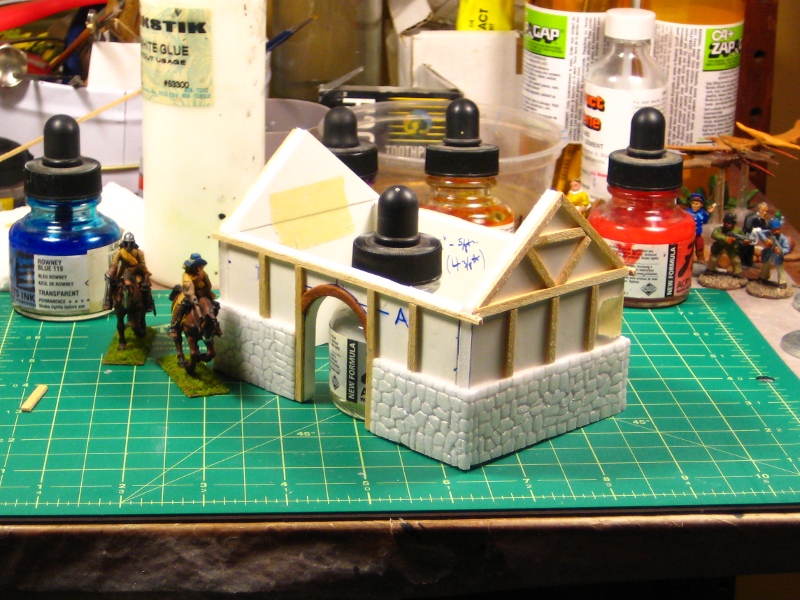
My version of Tony’s dovecote has walls 60mm wide and a total footprint, including minimal base, of about 65mm by 65mm. It’s 120mm (12cm) to the tops of the walls. I haven’t actually measured to the top of the roof, but it’s somewhere around 20cm or so total height.

Dovecote started, with the finally-completed barn on the left! Click for larger.

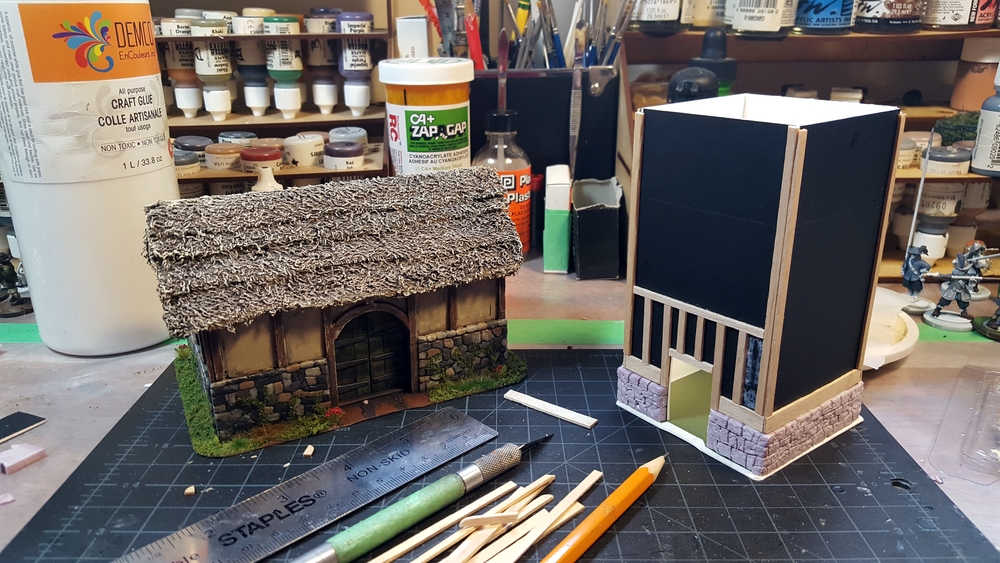
The walls and base are 1/16th” matt board (picture framing card). The stone foundation is thin (about 1/8th” or so) styrofoam insulation, carved with an Xacto blade and pencil. The half-timbering is all wooden coffee stir sticks, most of them split lengthwise to make narrower beams.

The half-timbering took a couple of hours all told, done in bits and pieces in between household chores on a Saturday. Do the big vertical corner beams first, then the horizontals, then the infill verticals or diagonals. The pattern of the half timbering is slightly different on all four walls, which seems pretty typical of this sort of Medieval/Renaissance building!

Roof structure installed, half timbering done. Click for larger.

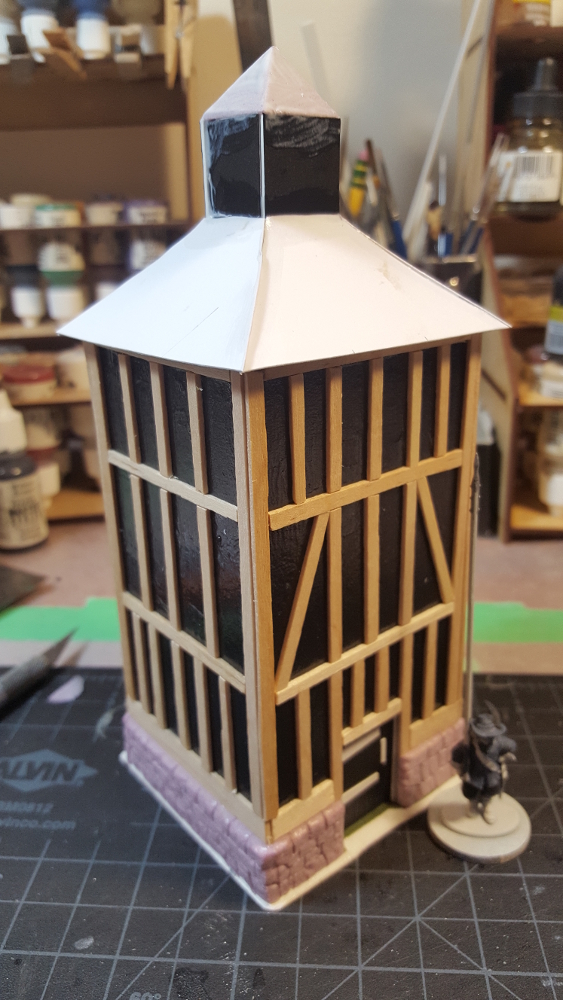
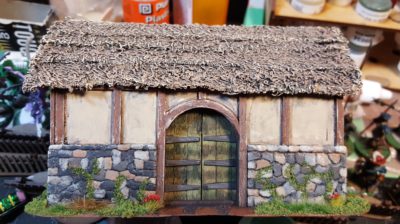
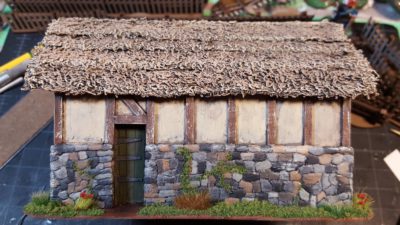
The central “tower” on the roof is more 1/16th matt board, 20mm a side. The sloping pieces of the main roof are lighter card, cut to fit by trial and error. The tower roof is a scrap of styrofoam insulation, cut with a fresh Xacto blade into a four-side pyramid. All eight roof surfaces will get “slate” tiles from medium weight card, and the top of the tower will get some basic detailing from card as well.

For texture in the panels between the timbers, Tony uses air drying clay in his original dovecote. Lacking air drying clay, I’m trying out stippling a fairly heavy coat of white glue over the card. I’ll slap some paint over it soon and see how it looks; the white glue I’m using currently dries very glossy which makes it hard to see how much texture I’m actually getting.

The dovecote at the far end of the table during our first games of Pikeman’s Lament. Good game, look for a proper review here sometime soon! Click for larger.

On to roof tiling and paint!

Half-Timber Barn, Finally Finished!

Way back in June of 2011, I started a fairly small half-timber barn for 28mm, for either my ECW/TYW stuff or early 20th C pulp gaming.

I’d gotten most of the painting done on the building six years ago, then moved on to other projects as the 16th C ECW/TYW gaming failed to grab my attention. The barn has floated around the edges of my painting bench, almost but not quite finished, ever since.

Earlier this week I was off sick and needed something sedentary and easy to do, so I pulled the barn out and started adding doors, some final paint touchups, and flocking and terrain around the outside of the walls. I’d originally planned, long ago, to do hinged arched doors on the big front doorway of the barn, but decided that six years of not figuring out how to do that in a wargamer-proof way was long enough and have gone with simple closed doors across the back of the arch!

Here’s what it looked like back in June 2011:

barn01
A stone-and-halftimber barn, work in progress. Click, as usual, for larger.

Here, all finished and detailed, is the barn in April 2017!

The big front door is wooden coffee stir stick planks over an offcut of picture framing card (matt board), cut to size, and then roughed up with sandpaper, an Xacto knife, and a razor saw. The back door is just card, with planks scored into it with the back of an Xacto knife. The hinges on both are scraps of light card painted with Tarnished Steel. Both doors got all-over washes with several different colours of wash, including green on the front door to stain the wood.

The roof is towel thatch (this was the first thatch building I’d ever done!) with thin foam for the stonework on the bottom half of the walls. The greenery is a mix from all over, including the nice red flowers from Rain City Hobbies over in Vancouver.

For more details on building the barn, check the two 2011 articles I linked to right up in the first paragraph of this post, there’s lots of detail there.

Nice to finally get this building done and dusted after nearly six years of three-quarters finished limbo! Now I need to consider other buildings for an English Civil War or Thirty Years War hamlet… some cottages, maybe a version of the interesting dove cote seen in the ECW edition of WS&S I picked up at Trumpeter Salute. We shall see!

More Jungle To Rumble In

Scored another big paper towel roll from our recycling bin, so I decided to make a fallen tree instead of another upright one.

Like the other trees, the fallen tree started with a paper towel roll, scrap cardboard, some CDs, and my hot glue gun. I made the root ridges lower so the tree would sit mostly level, and glued on a few random bits of cardboard to break up the surface of the paper towel roll a bit. All the ridges are made of two strips of cardboard, so they’re a bit thicker.

Tree assembled, with Infinity Ghulam light infantry on a 25mm base for scale. Click for larger.

I used a pair of CDs as a base, and didn’t bother filling in the gap between them.

Right after assembling the fallen tree (I love hot glue, there’s no waiting for glue to dry or cure!) I got to work with white glue, some paper towel, and toilet paper for bark texture. I filled in the two ends with scrap cardboard and a bunch of paper toweling, added some ridges of paper towel here and there, then covered the whole thing with toilet paper, pushed into place with a damp brush and sometimes my fingers, with extra white glue drizzled on as needed to make sure everything was well stuck down.

Bark texture done with toilet paper. Click for larger.

That needed to dry overnight, so the next evening I got the basecoat done, mostly brown paint with a bit of black and some tan to add a bit of variation, with a squirt of white glue mixed in for extra strength.

Basecoat all done, still wet. Click for larger.

After the basecoat had dried overnight again, I did some drybrushing with tan and white paint to bring the bark texture out, then splodged on some green paint in two different shades here and there. That didn’t really need any drying time, so I got the hot glue gun out again and the box of random plastic plants and other greenery. I finished the fallen log off with a mixed batch of plants and foam, then ground foam grass over the base and here and there on the log as well, and declared it done!

Finished fallen log, same Infinity figure on 25mm base as the other photos. Click for larger.

The finished piece is about 9″ long, 3″ wide, and 2.5″ tall. I’m looking forward to adding it to my jungle themed tables!

BS2017: The Bloodyear Blomp, Part 8

Blomping along…

Primer! Got the gondola spray-primed grey and the balloon envelope brush-primed black.

All primed up, except the base. Click for larger.

The LAF Build Something 2017 contest rules ask that you not post painting progress photos of your project past the priming stage, so this will be the last photo anyone sees of the Blomp itself for a while. I’ll try and remember to take some in-progress shots and save them for a post-contest photo gallery, though.

Up next is finishing the base with a bit more putty and then paint and flocking, and then working on the half dozen or so goblins who are going to be crewing this thing!

Deadline is Feb 18th, which is coming up awfully fast!

In the Jungle, the Mighty Jungle…

Several years ago now I did a whole banker’s box full of jungle terrain, but it was all fairly low-lying stuff, thickets and bushes and that sort of thing.

I’ve always intended to add some bigger trees to the set, inspired by the nice trees DM Scotty does in this video…

[su_youtube url=”https://www.youtube.com/watch?v=bJ-ZvGMnTIM”]

…and Dr. Mathias’ extravagantly photographed jungle tree tutorial over on Lead Adventure forum!

Our paper towel dispensers at work are the large commercial models, and staff are expected to refill them on their own when they’re emptied, so I’ve brought home a few of the heavy cardboard tubes from the centres of the big rolls of brown paper towelling, as well as a couple of lighter tubes from home, and a few shorter toilet paper tubes.

This weekend I sat down to crank out a few trees! I started with the hot glue gun, the tubes, some CD-ROMs salvaged from the recycling bin, and some scrap cardboard to produce four trees and one big stump.

Fourth tree and stump all covered in paper towel. Three other trees drying in the background. Click for larger.

The three big trees and the stump basically fill the entire CD base edge to edge, with space between the buttress roots for figures to duck for cover. The smaller tree (from a tube that originally held glow-ropes) covers about half the CD it’s on.

I used lots of white glue to attach a layer of brown paper towel to the trunks, let that dry, then slapped on a base coat of reddish-brown and black mixed. After that dried I gave the trunks a heavy drybrush of tan, then blotches of two different shades of green here and there to suggest moss or jungle fungus.

Basecoated trees drying, before drybrushing and foliage. Click for larger.

After that had mostly dried I broke out my box of random plastic plants, gathered from craft stores over the last couple of years. Vines, random bushes, and some low-lying lichen filled some of the gaps around the trunks and provided some colour, then I put a generous layer of flock around the bases and declared these things done!

All flocked and foliaged. The white primered figure in the lower-right is an Infinity Ghulam infantry on a 25mm base. Click for larger.
Stump speech! Using the toilet paper roll for a giant stump gives the tabletop some vertical tactical possibilities, which always makes games more interesting. Click for larger.

It’s nice to have a quick down-and-done project, sometimes, and I’m really pleased with how these all came together. Looking forward to getting them onto a table for a pulp or Infinity game!

BS2017: The Bloodyear Blomp, Part 7

Greenstuff all over the place this time!

Base greenstuff work – on the troll, the barrel, and the base itself. More to come! Click for larger.

I’ve started on the heavy leather harness that the troll uses to tow the Blomp along, as well as structural greenstuff to secure and cover the magnets in his base, hold the barrel in the right position, and secure the steel plate the barrel magnetizes to.

There’s at least one more round of greenstuff here, the front and belt parts of the troll’s harness don’t exist yet, and the base needs some more patching up.

Greenstuff on the piping around the Engine. Click for larger.

Up on the gondola the various joints in the pipes have greenstuff seals added. I’ll be painting them up as leather, which has historically been used as a seal and still is to this day in some applications. I also smoothed out a few parts of the hull, and on the first photo above you can see the putty filling in the underside of the bridge wings to secure the three eye-bolts on each end.

The eye-bolts are jewelry making supplies, intended to be posts on earrings or something. I have a little baggie of dozens of them, and I think they’ll come in handy for all sorts of things – parts of railings, for example. It pays to cruise slowly down the random aisles of your local craft store, the jewelry and bead aisles are full of all sorts of interesting things!

The greenstuff work on the gondola means it’s finally ready for priming and painting. I didn’t get a photo but the fabric patchwork is also finished on the balloon, so painting will start on that this weekend. I also need to get stuck into the (mostly minor) conversions to the half dozen Reaper Bones goblins who will serve as crew!

The Feb 18th deadline looms like an irritated troll with a big club!

BS2017: The Bloodyear Blomp, Part 6

Progress, the purpose of the troll revealed, and IT FLIES.

Well, sort of!

I got most of the structural parts of the base done today, barring more greenstuff putty to solidify everything. The big troll – an old prepainted WotC figure that I’ll be repainting – has a hole drilled between his shoulder blades and one end of a length of heavy steel wire inserted. The wire goes up to a detachable section of keel on the underside of the Blomp gondola, then comes back down and ends in the small barrel behind the troll.

There’s four rare earth magnets in the troll’s base, one in the bottom of the barrel, and two more in the keel piece at the top of the wire. Everything seems solid enough to hold the thing up, although I did have to shorten the wires from their original height because everything was flopping around like a lying orange liar’s toupee in the wind.

The Blomp’s base, with ground crew troll. I’ll use greenstuff to add a heavy leather harness around him. Click for larger.

Here’s how the whole thing looks at present! Since this photo I’ve added more to the keel assembly at the top of the wires, which strengthens and stabilizes everything a bit more.

The entire assembly at present. It flies! Click for larger.

I’ve also added wires disguised as piping on the gondola, coming out of the central Improved Non-Explosive Flautulator Engine. The piping into the lower part is largely decorative, but the upper piping will be the structural supports connecting the gondola to the balloon envelope overhead.

The plumbing going in around the Improved Non-Explosive Flautulator Engine. See text for details; click for larger!

I’ve also gotten almost all of the fabric glued on to the Blomp’s envelope, but didn’t get a photo of that.

The next round is going to be more greenstuff putty action on the plumbing, base, and troll. I also need to get started on converting Reaper Bones goblins for camera operators, flight crew, and famous Blood Bowl announcer & personality Gobb Cherry, host of BB Nite in Gobada! I’m looking forward to puttying and painting a suitably loud suit and tie onto Gobb!

Tables From Last Weekend’s Infinity Tournament

We had another one-day, three round Infinity tournament this last weekend, our first of 2017. We had two players come over from Vancouver on the ferry to play with us, which was awesome, and while we only had eight players total it was a good event overall.

I did the terrain for two of the five tables, and other players put the other three together.

I didn’t get any in-play photos during the tournament, but I did get some reference shots of some of the tables when we set them up on Friday night! See the captions on each picture for a few details!

BS2017: The Bloodyear Blomp, Part 5

Progress! Greenstuff! An incompletely explained troll!

I broke out the greenstuff and went at the gondola this evening. I filled in under all the various discs where piping will come out, and then ran lines of greenstuff across the two spheres of the engine to make it look like it had been roughly welded or soldered together, probably by terrifyingly incompetent trolls under the direction of intoxicated, insane goblin engineers!

Greenstuff on the engine, pipe connections, and the start of the base. Click for larger.

I also started on the base, with a rectangle of craft plywood, a big thick washer, and extra greenstuff.

Base, troll, and such. Click for larger.

The big troll on the right is going to be part of the base, forming part of the “flying” part of the flying base. Magnets will be involved. More in due course!

Finally, I got another round of fabric bits onto the envelope. Hopefully one more round of gluing fabric bits down will finish off that part of the envelope, then it’ll be time for some detailing and paint!

Envelope, with fabric patchwork in progress. Click for larger.

Painting might start as soon as this weekend, although I have an Infinity event all day Saturday and I’m not sure how much time I’ll have after that for even more gaming stuff! The deadline for this Build Something contest is February 18th, which is closer than it appears, so I need to keep the momentum up!

BS2017: The Bloodyear Blomp, Part 4

Good progress on the Blomp gondola this weekend, with all the major structural assembly finished, skinning done in styrene sheet, and the start of the lifting-gas engine and associated pipework.

The bow and stern have “masts” (not sure what else to call them, really…) that will eventually have lines connecting to the envelope overhead, with metal strapping reinforcing them both. The flying bridge has more detail now, too.

Just a couple of quick photos!

Der Blomp, front-quarter view. Rivet lines on the hull tanks, rear camera station finished, and bow- and stern-supports in place. Click for larger.
Der Blomp, stern-quarter view showing the start of the Improved Non-Explosive Flautulator Engine midships and the circular rear camera station. Click for larger.
Holding the partially-complete envelope over the gondola to give some idea of the size and proportions of the finished article. Click for larger.

On to greenstuff next to clean up some parts and strengthen others, especially around the Improved Non-Explosive Flautulator Engine, which will connect all the wire pipework that will actually connect the envelope balloons to the gondola!