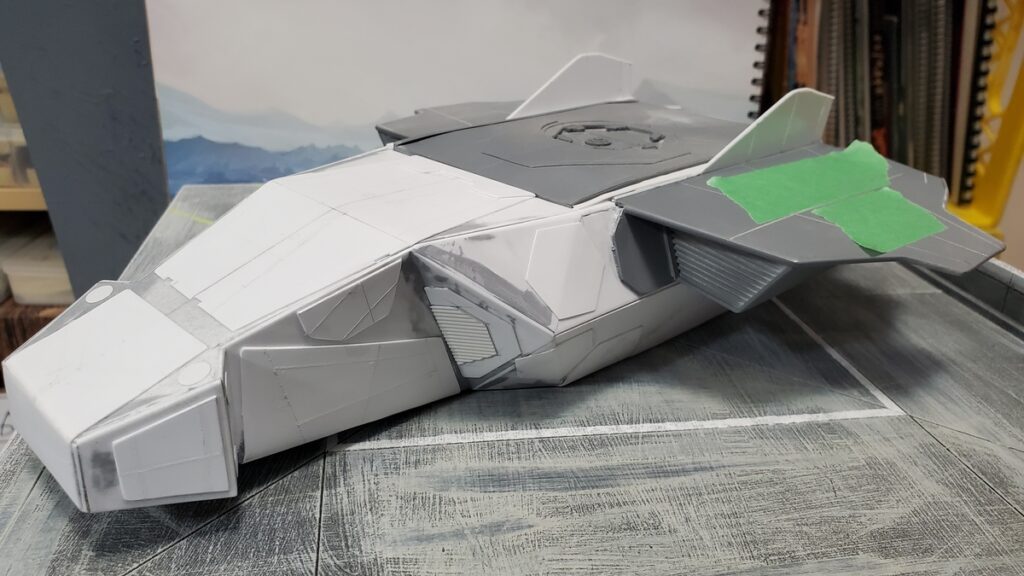
The last of this project’s posts until I can show off the painting work in progress photos and all the extra finished photos I didn’t use for the Lead Adventure Forum Build Something Contest 2025!
There was a bunch of pre-priming sanding, puttying and fiddling. The side walls of the fuselage pulled slightly skew during construction somehow, so the side rails that hold the roof panel in place had to be custom-fitted on each side.
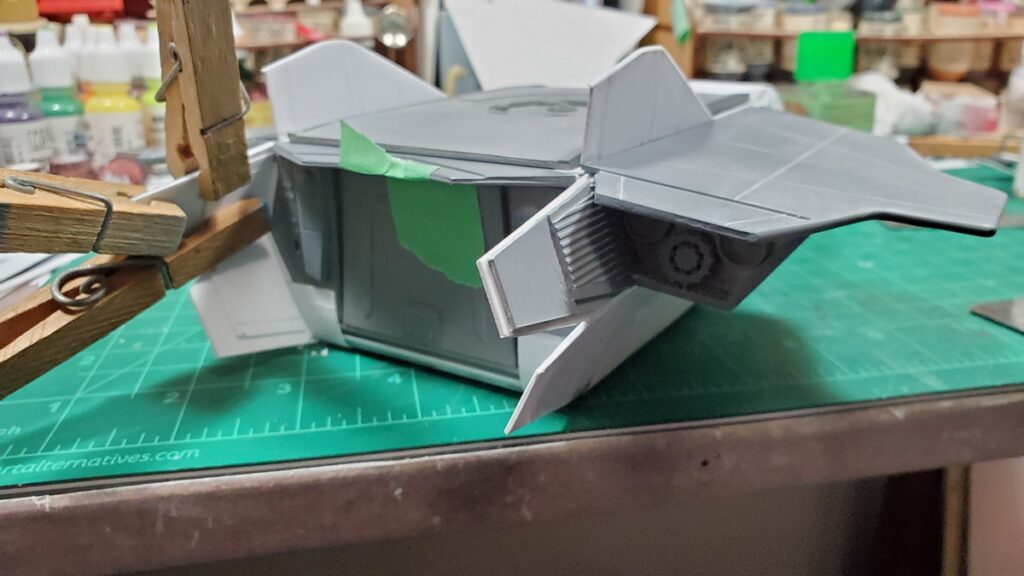
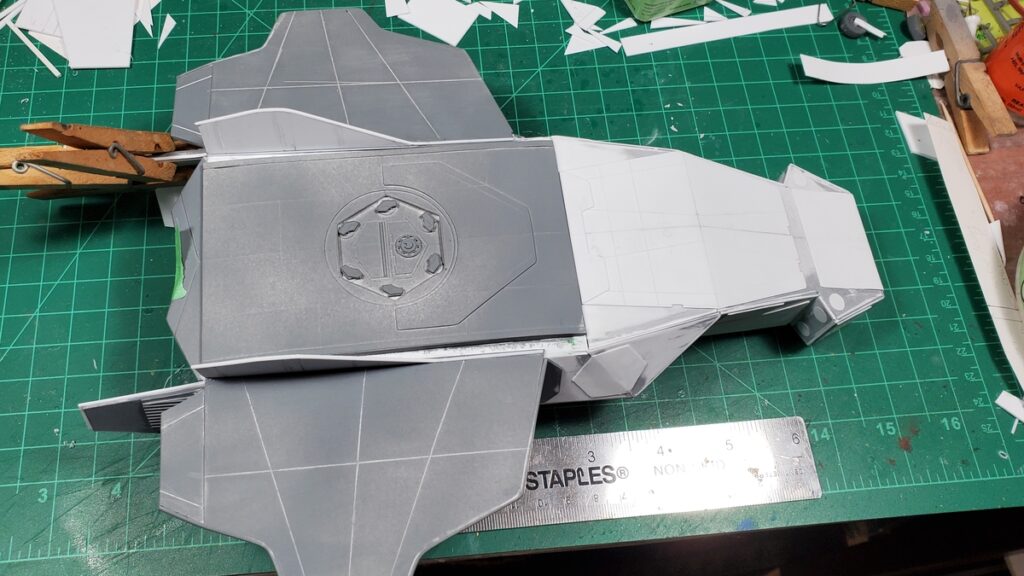
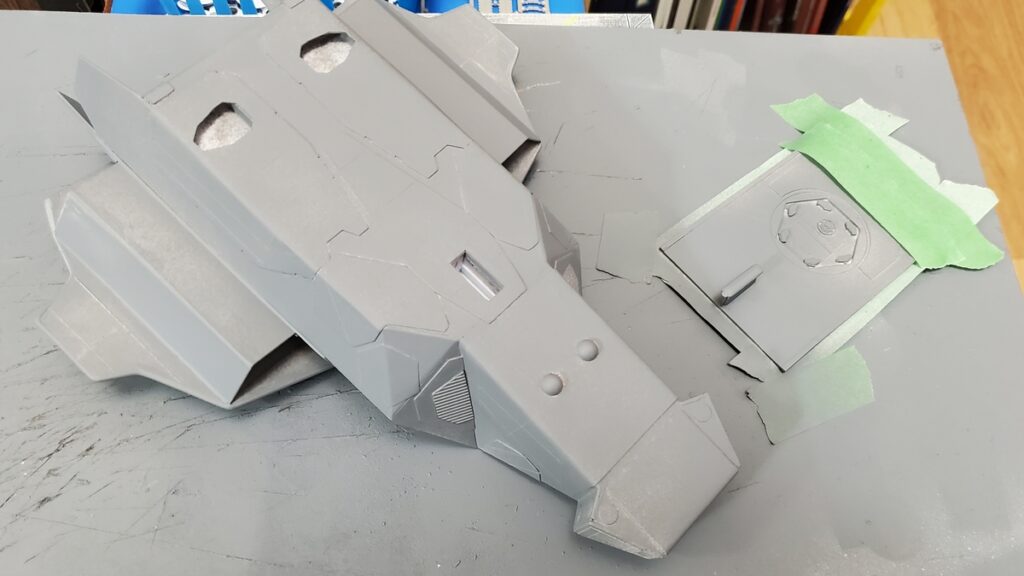
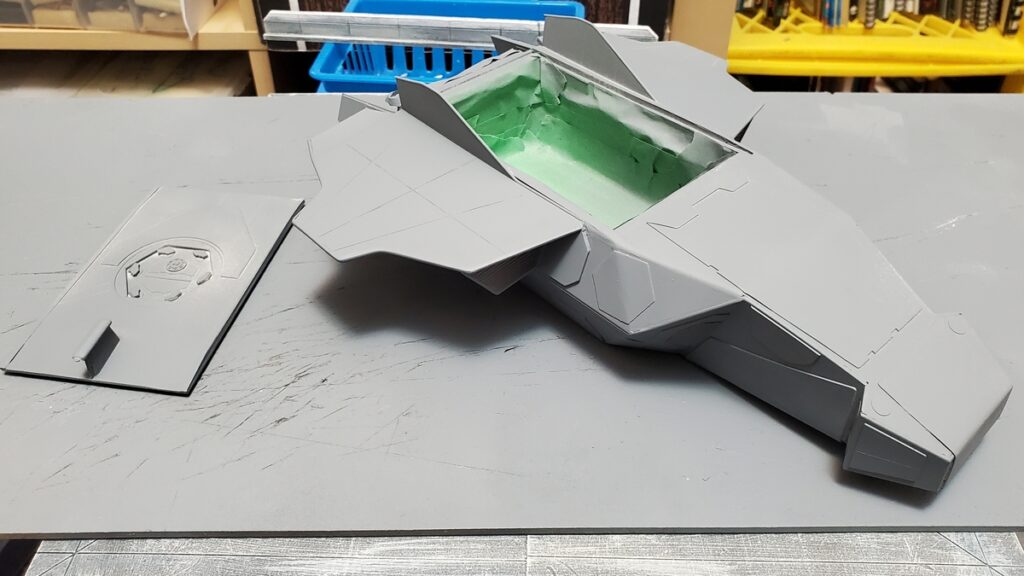
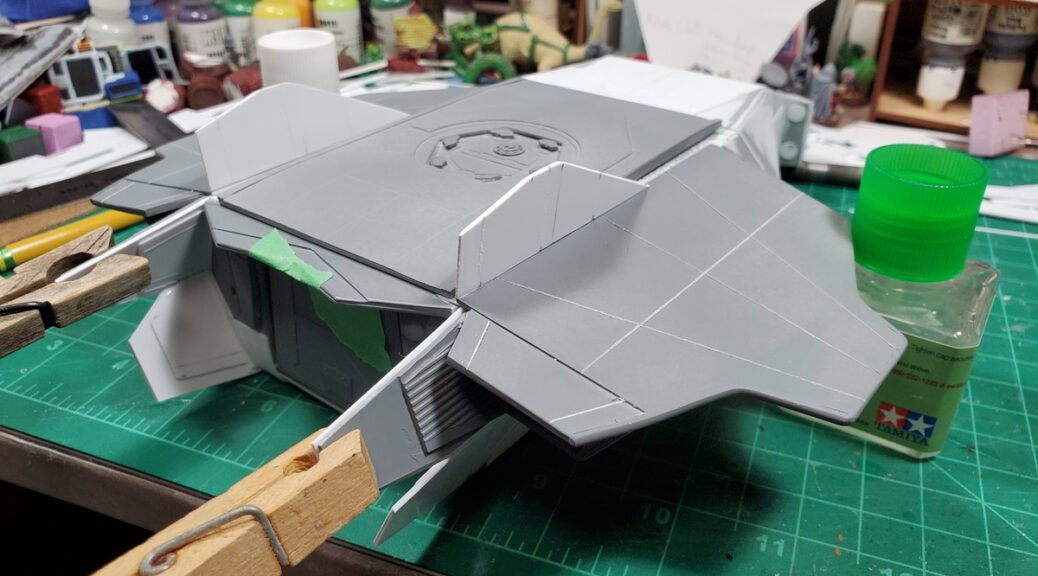
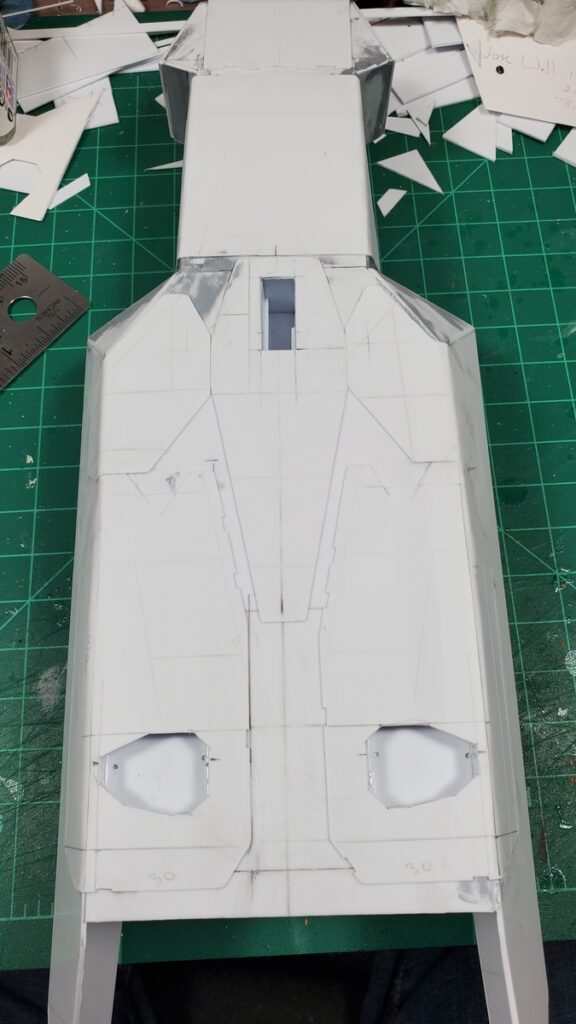
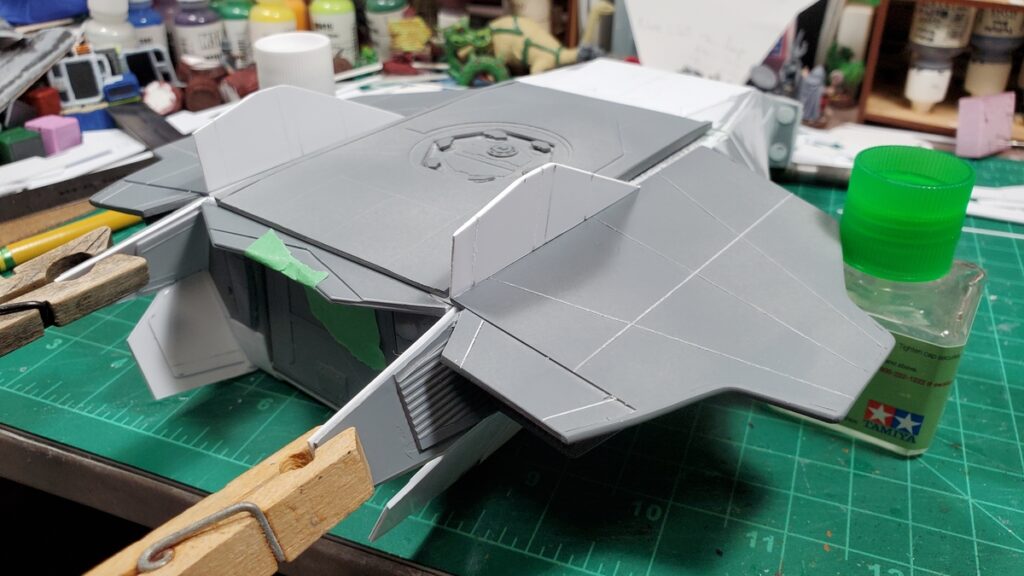
The shuttle, complete except for landing gear and roof rails, front quarter view.Rear view of the shuttle, with some final glueup of one of the rear baffle panels in progress.Top view, showing the engraved panel lines in the wings nicely.PRIMER! Here’s the underside, complete except for landing gear, all primered.Primer, top view, with the already finished, painted, and decaled cargo bay masked off.Proper supervision is essential to all well run projects. Sophie la Floof spent quite a bit of time on the rug under my project bench making sure things went smoothly.
The landing gear only went on after painting, decals, and weathering were all done, so I don’t have any photos of that to show off yet.
By the time this posts audience voting on Build Something Contest 2025 should have started over on Lead Adventure! Go check out all the great entries! BSC rules say no sharing WIP or finished painted pictures until either the contest is over or you’re eliminated from it, so there will be a bit of a pause in shuttle pix here, but I do have a gallery fully of painting photos to show eventually.
If you want something done, give it to a busy person to do is a saying that floats around. It’s often true that when you’re in a certain creative groove, you can spin off other projects much faster than you might otherwise get to them!
I had extra plastic kits parts around from the 1/72 LeClerc MBT kit I bought to pillage for kitbashing parts, I had some rather cool pieces of offcut styrene around, and I wanted a landing pad to stage photos of the shuttle on, so it all came together in a trio of related projects.
The Drone
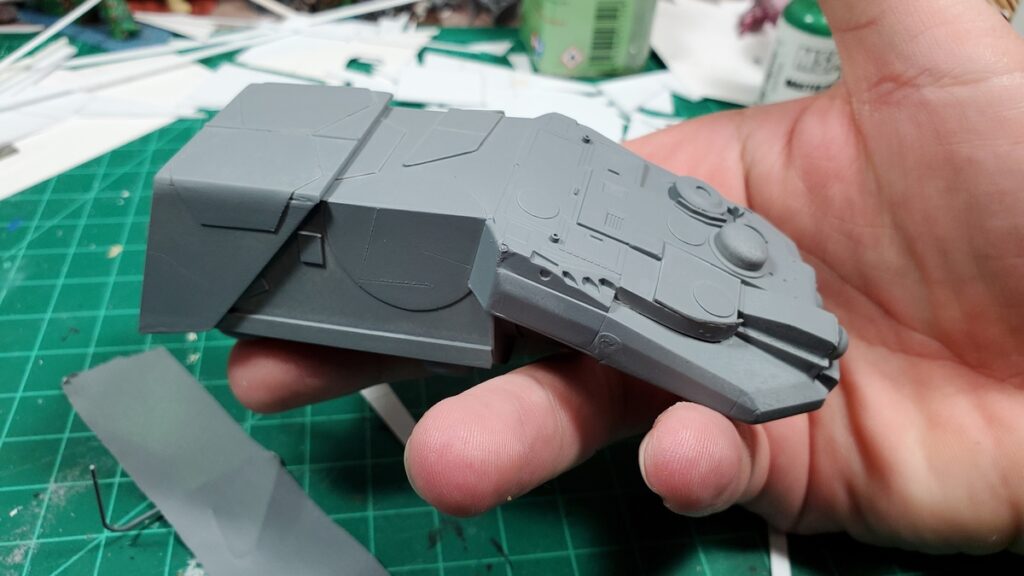
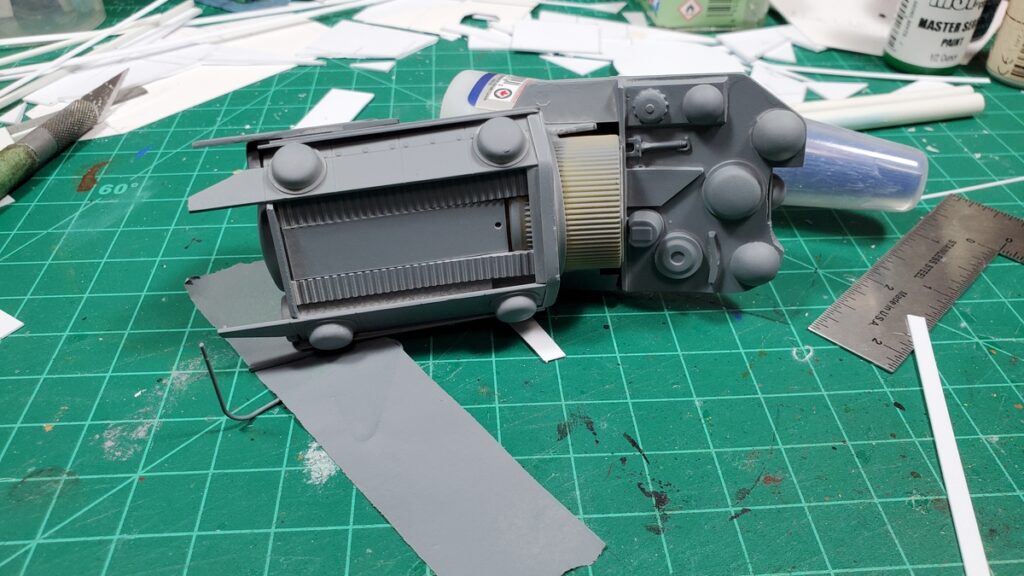
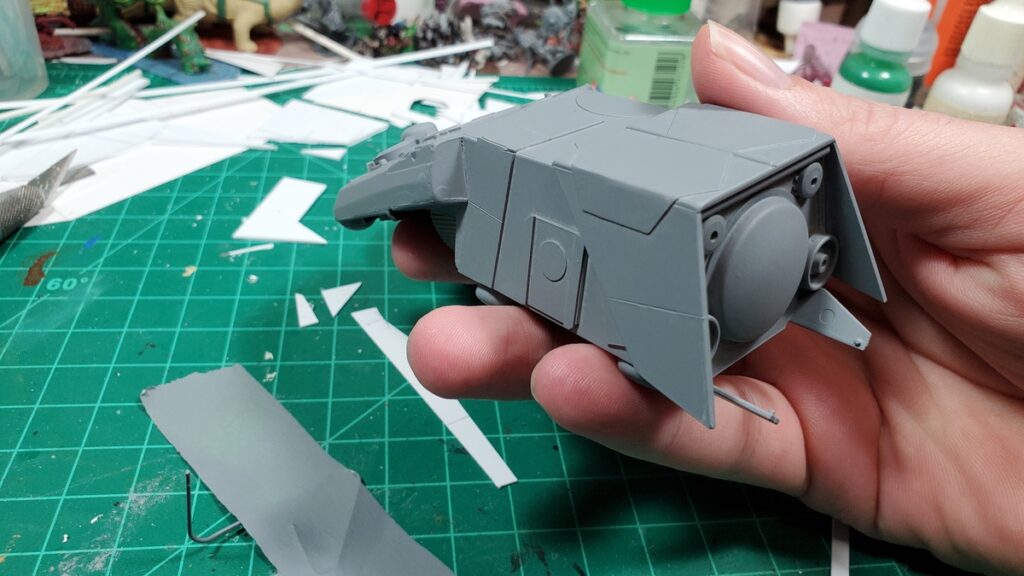
This started life with the top of the LeClerc turret, the cap off an Angosturna bitters bottle rescued from the recycle bin, some googly eyes and other bits from the dollar store, and various styrene bits.
The angosGMBH Distraction-class Autonomous Sensor Drone is set up for planetary and space surveying and exploration, with various sensor loadouts depending on mission. No crew space is available, although the tiny cargo/sample bay on the port side could accommodate a human-sized sophont in a space suit for a very short, very uncomfortable ride, if it hasn’t been adapted into a drone bay for auxiliary sub-drones. Some Distraction-class are themselves autonomous intelligent citizen-drones, although most have only limited-ML minds, and some platforms are old-fashioned remotely operated vehicles.
The drone went together in a single evening and was primed and painted the next day. I got zero photos of it in raw styrene.
Drone primed, side/top view.Primed, underside view.Primed, rear quarter view.Paint in progress.Paint in progress.Paint finished, no decals or weathering yet.Side profile with paint finished.
The Distraction-class has since been decaled and weathered; I’ll try to remember to get some proper finished photos of it soon and post them.
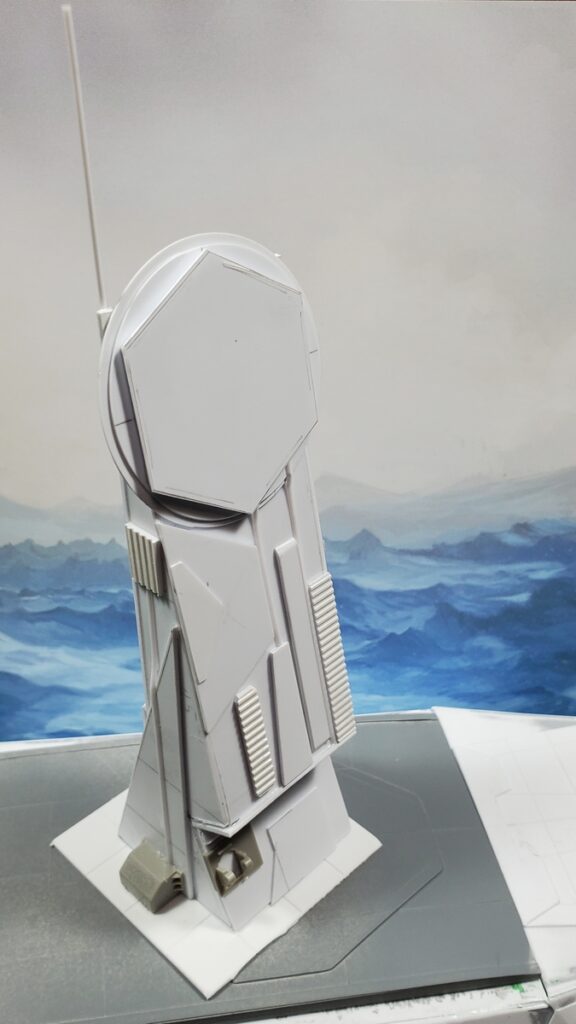
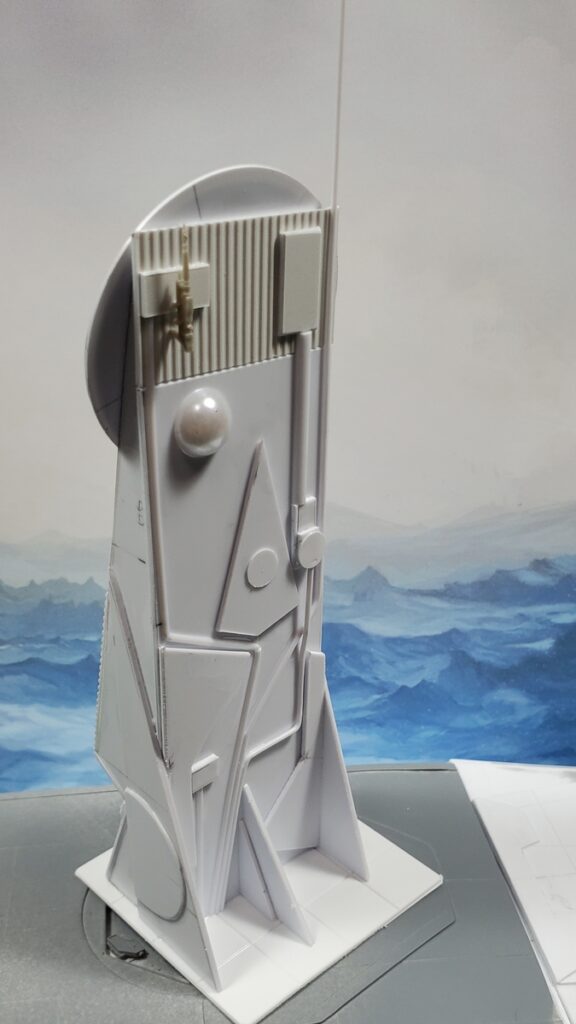
The Sensor/Comms Tower
This started with the increasing amount of styrene offcuts piling up around the edges of my workbench. Many of them were too large and too interesting in shape to just throw away, so I started fiddling around while waiting for solvent cement to cure on the shuttle and built this little tower in a couple of evenings.
It’s about 5″ tall to the top of the actual tower. The side profile is the offcuts from the nose skin of the shuttle, the various circles and hexagons are from building the docking port in the roof of the shuttle. The rest of the thing are either random offcuts from shuttle building or just stuff from my raw materials stash.
The tower, front view, bare styrene.The tower, rear view, in bare styrene.
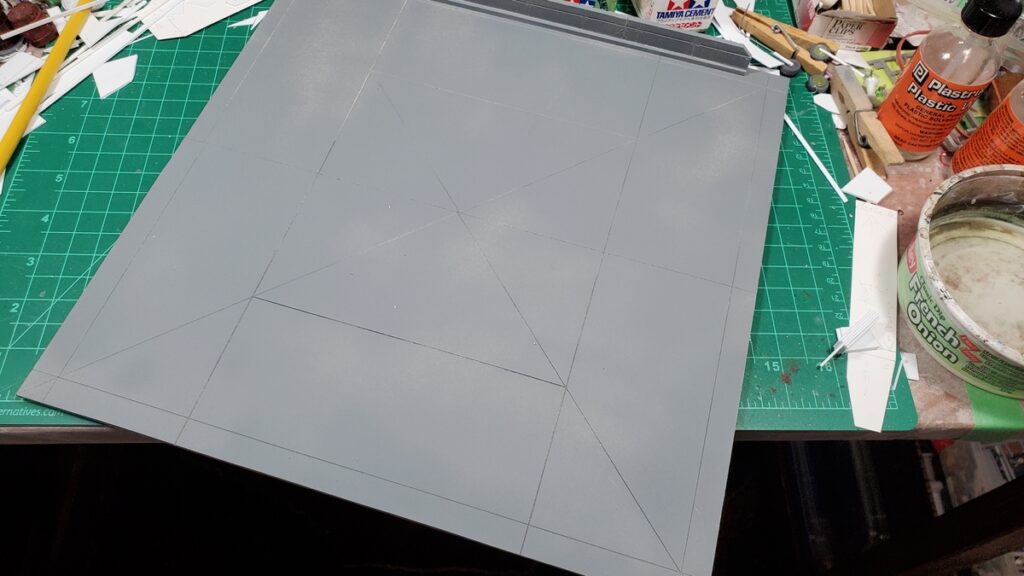
The Landing Pad
This is from the last big piece of 1/8″ foamed PVC in my stash; I’m going to have to go get more from our local signmaking/plastic supply shop because it’s wonderful to work with. Stronger, cleaner, and easier to cut than foamcore, it can be embossed and engraved easily and cleanly, and it’s less murderous on knives too.
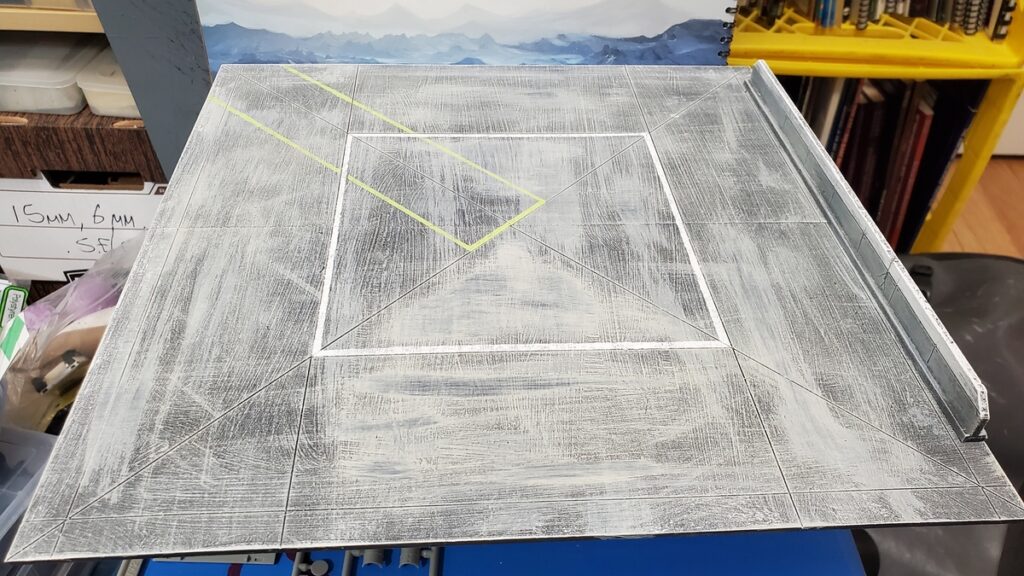
The whole thing is 12 inches by 12 inches, assembled from two 12×6 pieces with some connection strips underneath. It got grey primered, then a messy dampbrush/drybrush combo of various tans and greys over that, followed by a few washes in black, grey, and dark blue. There’s expansion cracks engraved right into the PVC, and after the main paint had dried I did a couple of marking lines with tape and a stippling brush in white and bright yellow-green. (Reaper’s Dungeon Slime paint. Highly recommended if you want an obnoxiously bright hazard warning colour!)
I also did a low wall piece with PVC offcuts. It’s 10″ long and about half an inch high. It got the same paint as the pad, with the top third or so painted white when I did the pavement markings on the pad.
Primed and waiting for paint.Painted and marking lines done. Nice and simple, just a few minutes work over a couple of days. Painted wall piece off to the right.The mostly-complete shuttle posing on the finished landing pad.
I’ve got a few final complete primered shuttle photos to show off soon, and after the Build Something Contest rules allow, I have a bunch of painting progress photos to post. The shuttle was a big painting project and painting took most of March and the first week of April!
The long-overdue fifth installment of my Build Something Contest blog posts! This one takes us from the end of Part Four, where we had the start of detail panels, no wings yet, and the cargo bay just primed.
Per BSC rules I can’t share WIP or finished painted photos yet, so there’s still going to be gaps in this build log. I have a bunch of WIP paint photos taken and will share them when the contest has begun.
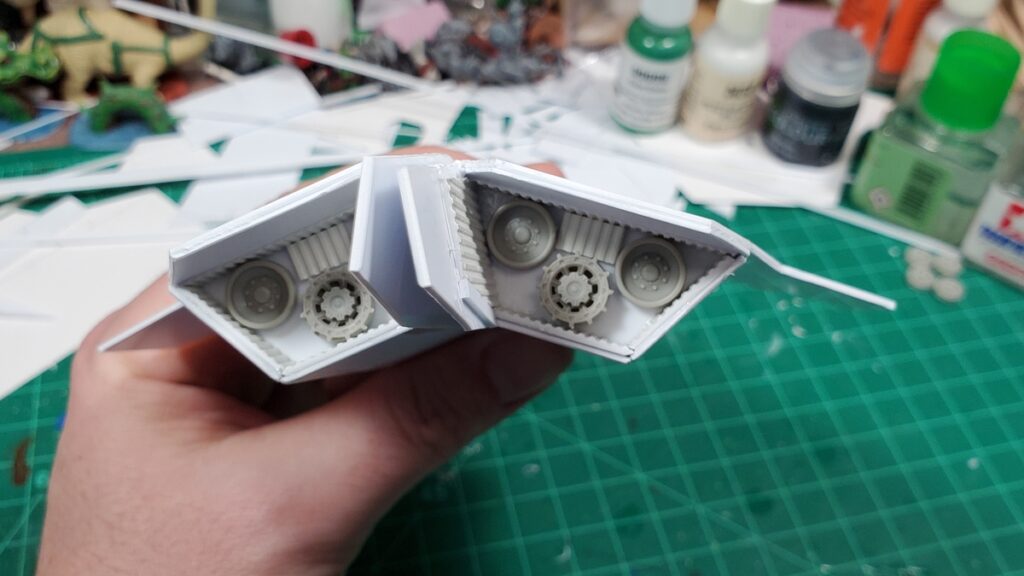
Feb 22 – the underside gets detail panels.Feb 22 – underside detail panels, looking aft.22 Feb – the engine pod assembly begins.22 Feb – layout of the two wings on 1mm styrene sheet.22 Feb – engine and wing subassembly taped in place on the fuselage.22 Feb – wings taped to fuselage.22 Feb – wings temporarily mounted to fuselage, overhead view.24 Feb – wings and engine pod details.. Front view, showing the intake grilles.24 Feb – wing and engine subassembly, rear view with jet/rocket nozzles.24 Feb – another view of the rear of the engine pods.2 March – putty work on the engines and wings.3 March – putty and test fit of roof and wings on the fuselage.3 March – decal sheets assembled. There are almost three dozen decals in the cargo bay and another twenty or so on the outside of the finished shuttle.9 March – final test fit of the wing/engine subassemblies9 March – the wings get the vertical stabilizers added.9 March – rear ramp view with detail panels on the insides of the rear fuselage extensions.9 March – the wings finally get glued on! Major construction is finished, on to priming and painting!
Along the way while finishing the shuttle, I built a 12″x12″ landing pad as a photo prop and gaming scenery, a small ‘drone’ using some of the LeClerc MBT parts that hadn’t be used in the shuttle build, and a 6″ tall sensor tower that used up a bunch of the offcut styrene from the shuttle that was too interesting to just throw away. I’ll share photos of them in another post.
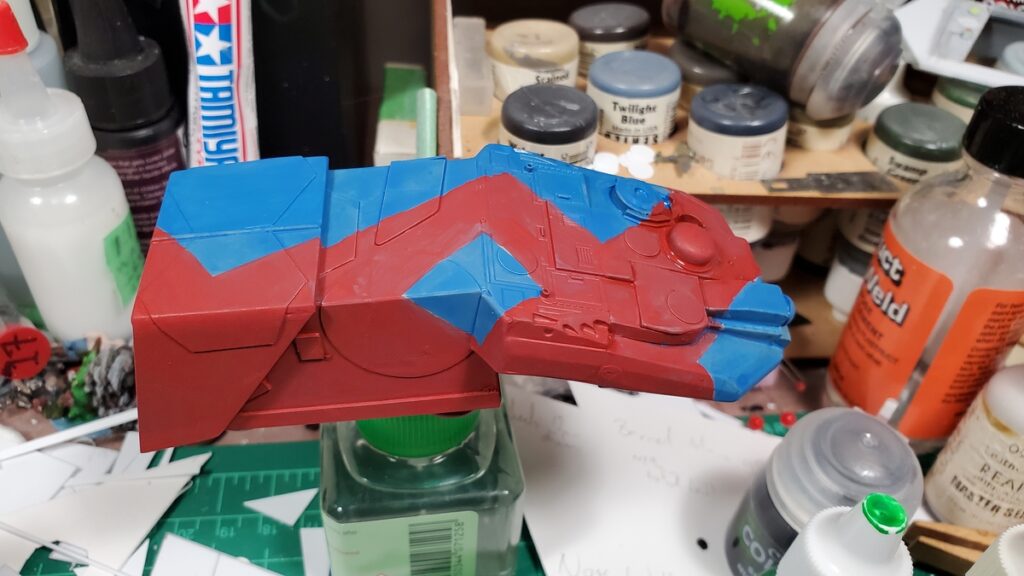
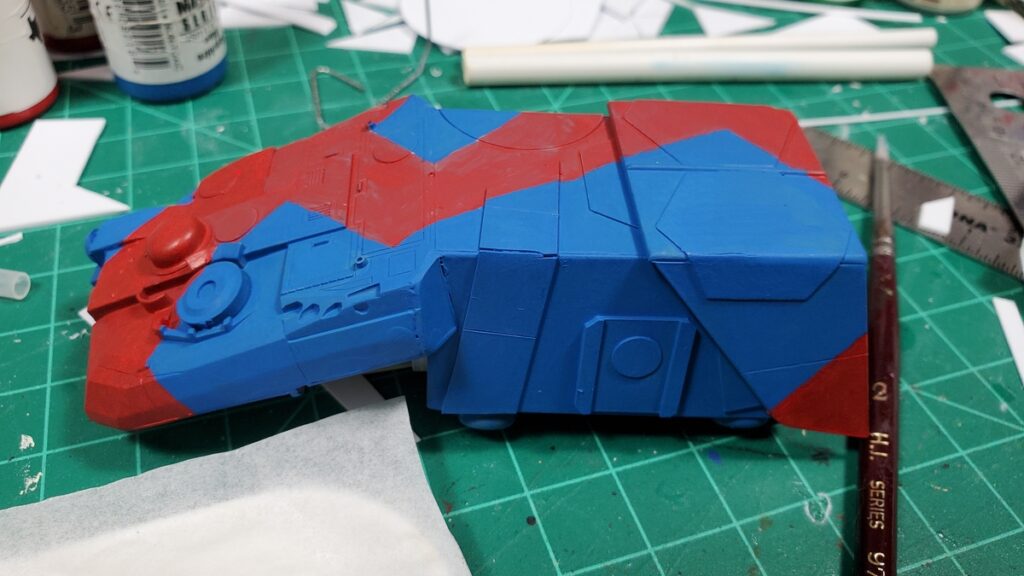
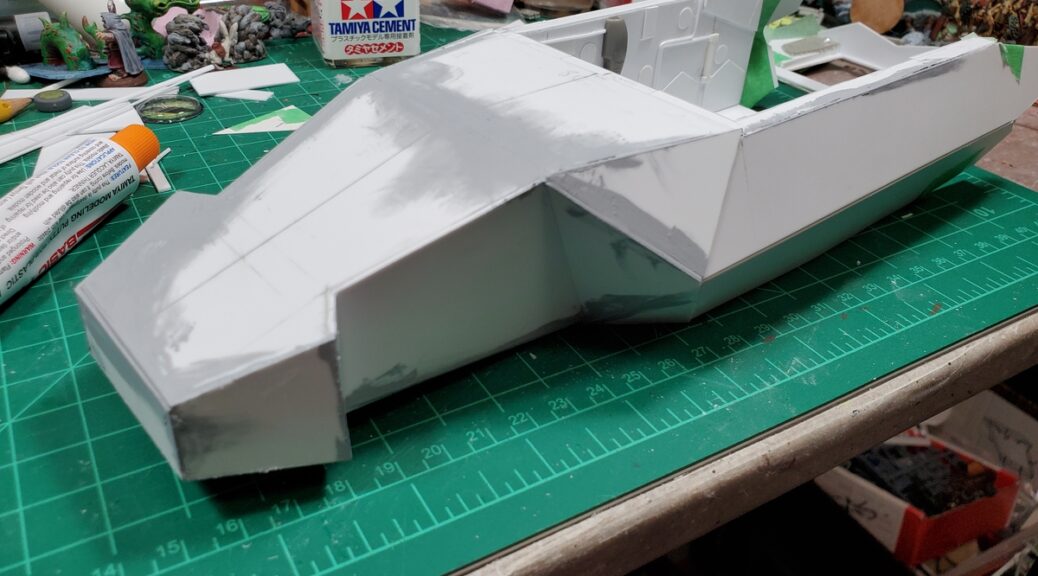
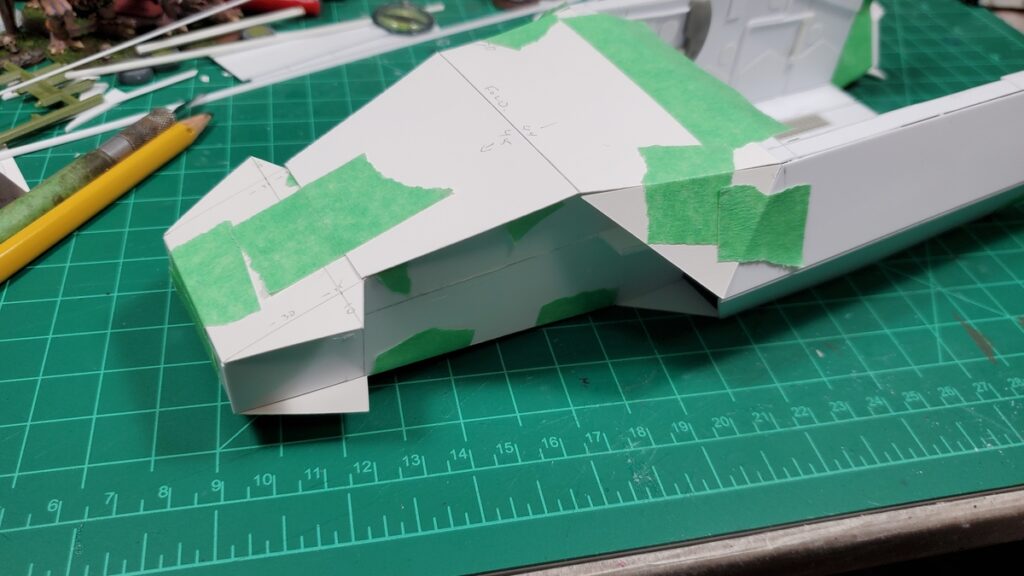
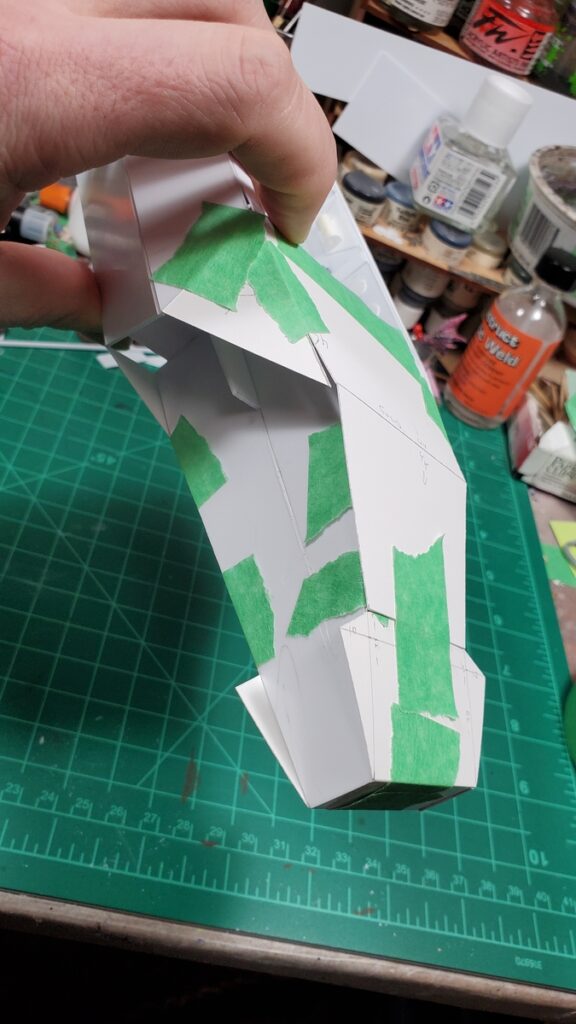
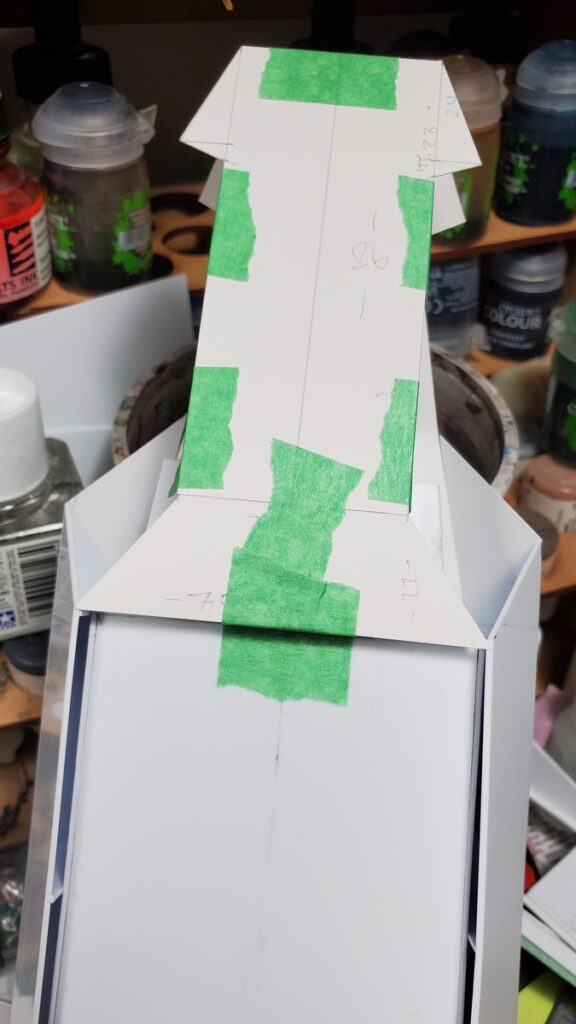
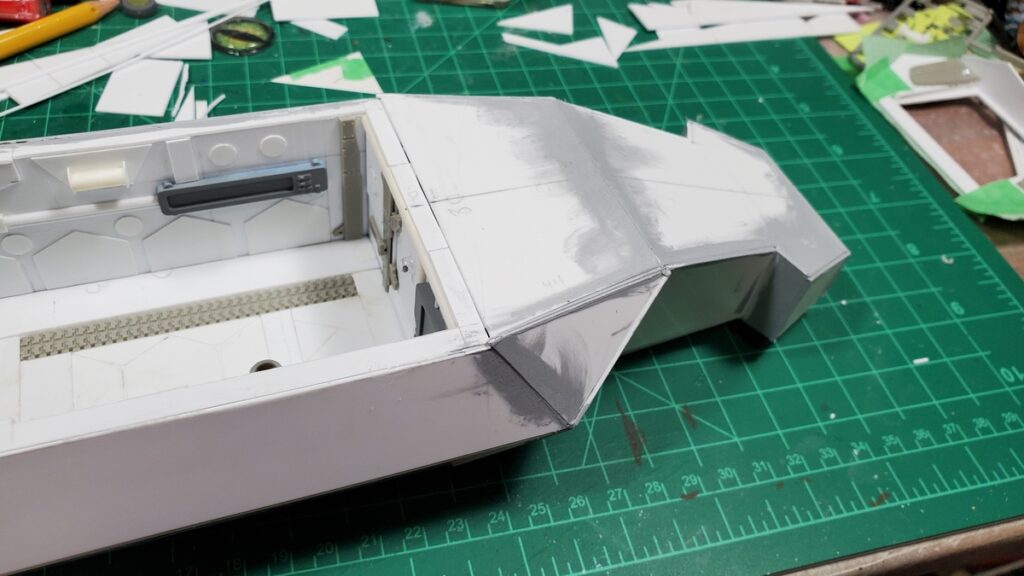
Decided to go with the nose next instead of the wings and engines, and as predicted in my last post, it required a lot of mockup work, in two stages.
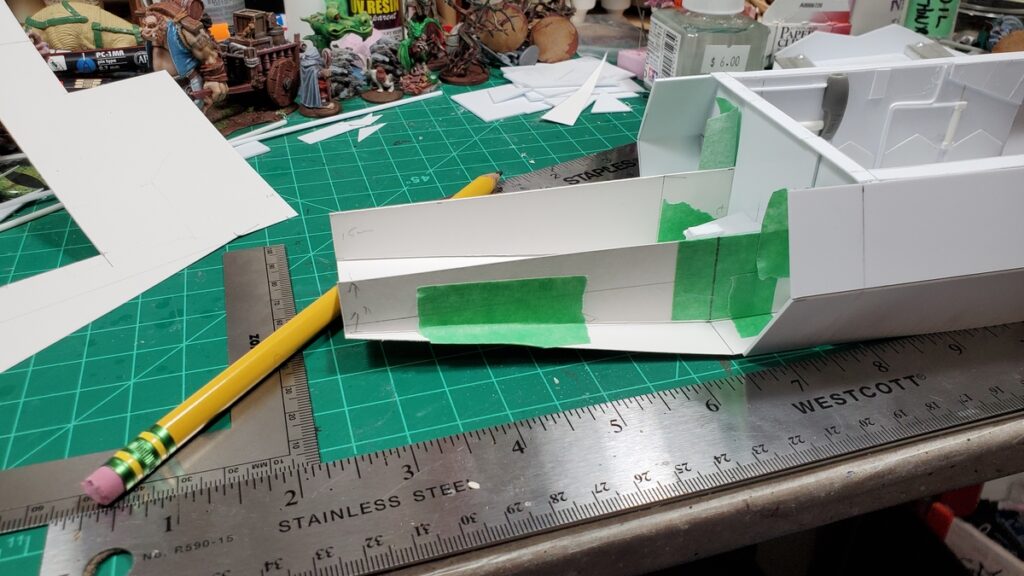
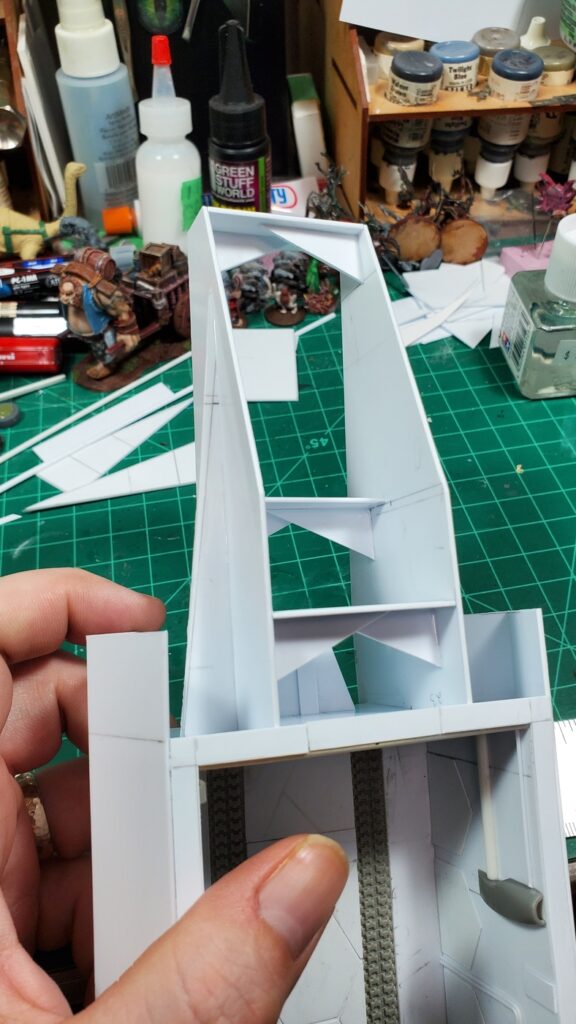
First, I did an internal frame to establish the basic proportions of the nose and give me a nice solid frame to hang the skin from.
I redid parts of the skin mockup three times, including scrapping round three for part of the sides and going back to round two’s ideas. The advantage of all of the fiddling with cardstock and masking tape, of course, is that I knew what I was doing (mostly) when I switched to 1mm sheet styrene and started the real thing.
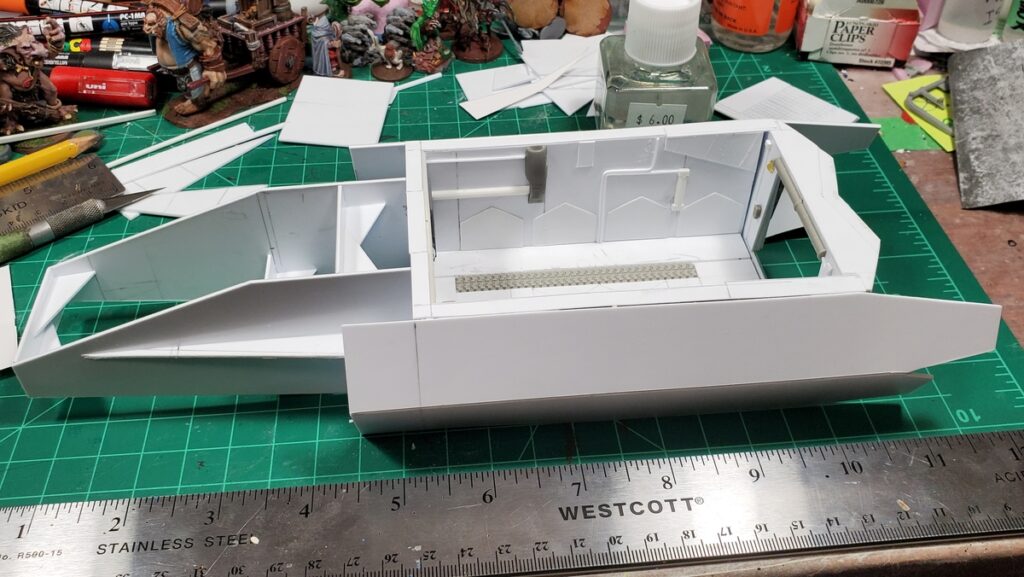
I also cut back the outer (top/bottom) corners of the sides where they extended forward, and that was the right call, it made integrating the nose and sides easier.
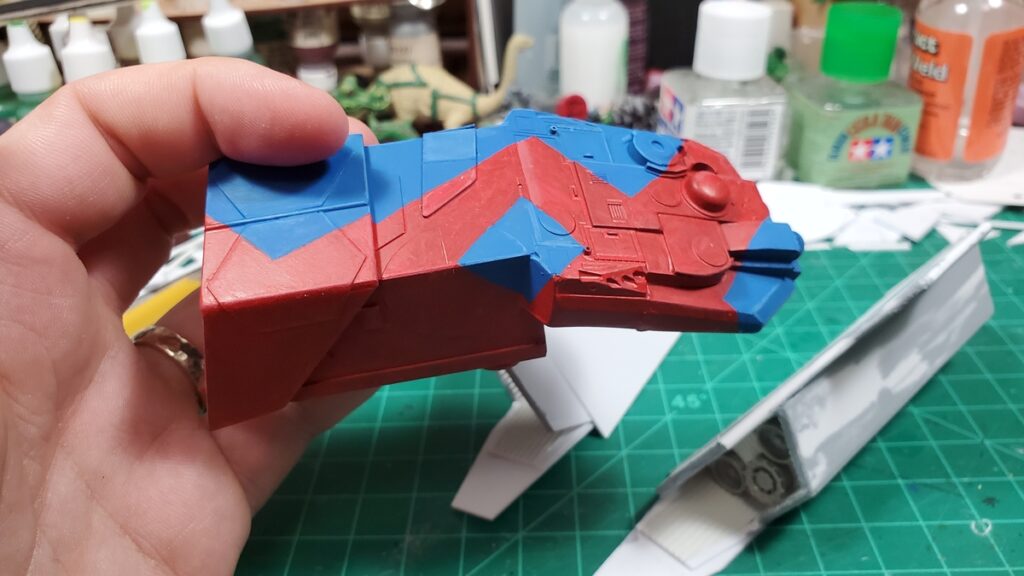
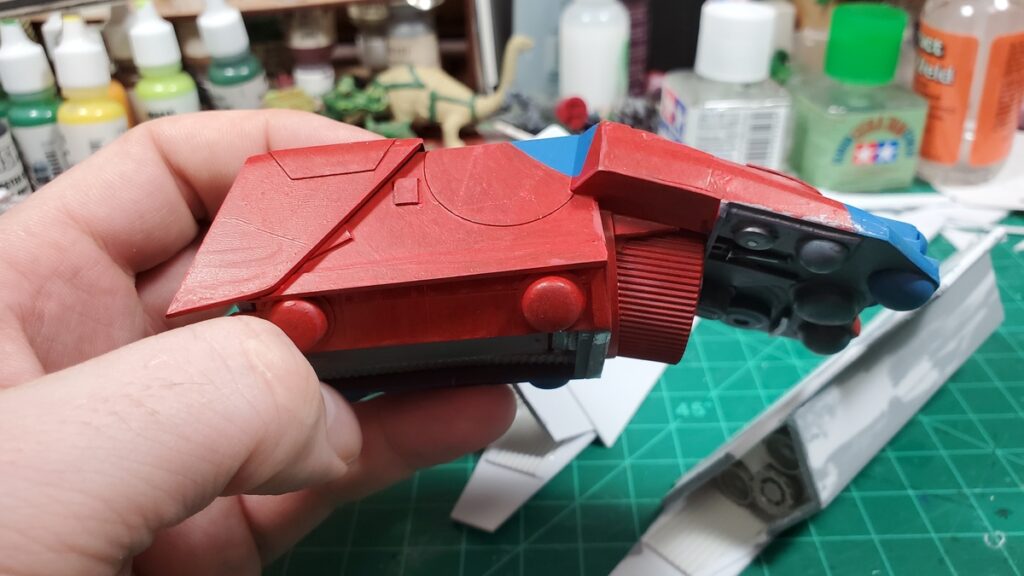
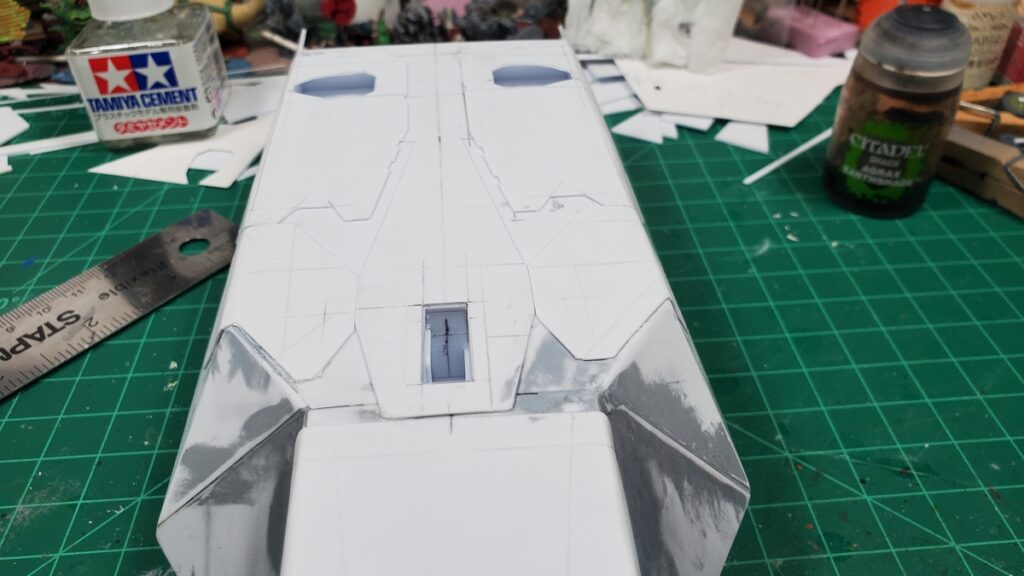
The hammerhead nose was a spur of the moment idea while planning the first mockup piece and I really like how it’s come together; the hammerhead let me play with the angles and bulk of the nose area more than a more straightforward taper would have.
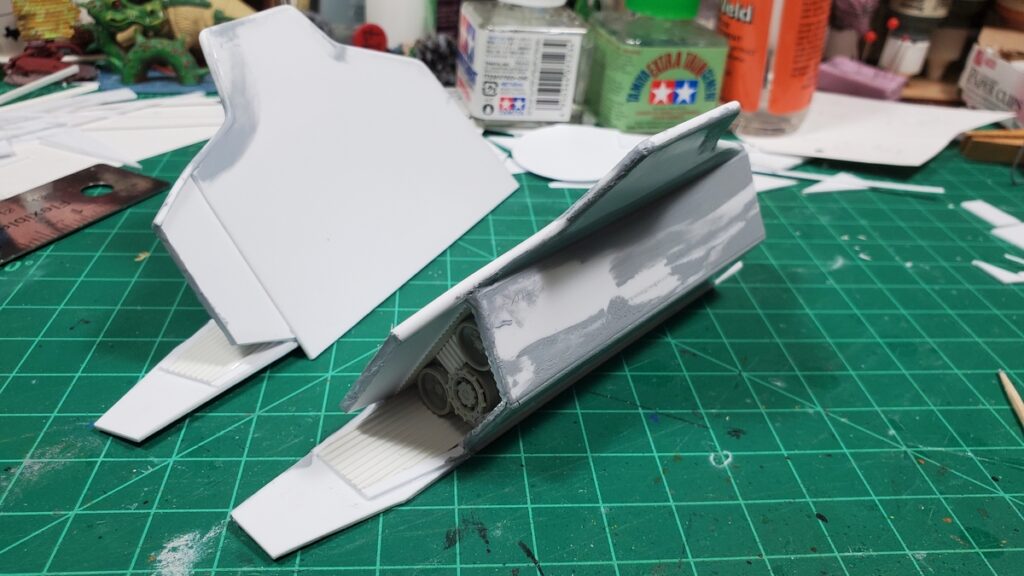
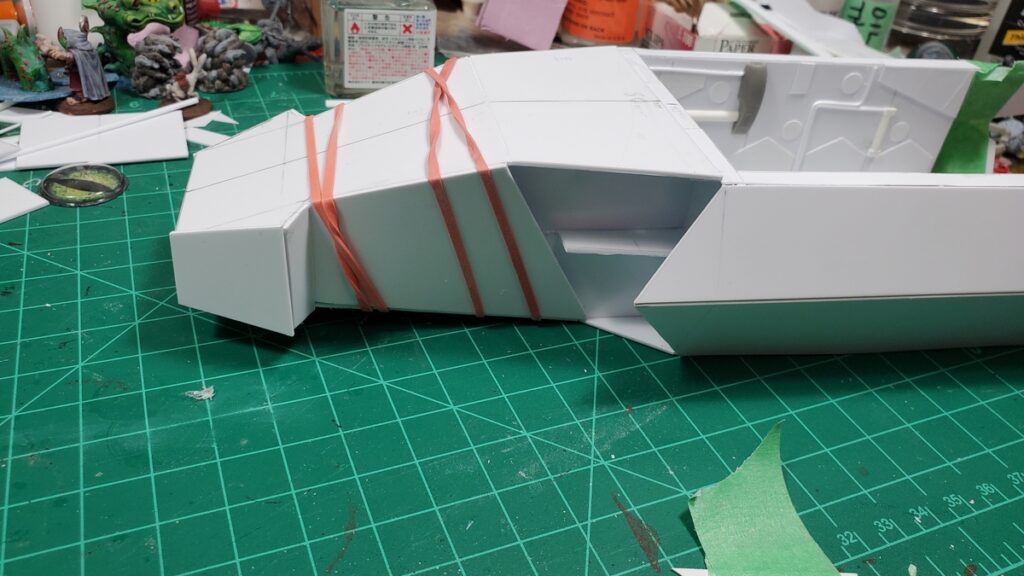
Mockup for the nose frame.Nose frame finished in 1mm styrene. I wound up cutting most of the long thin brace on the outer side off, but all the internal bracing gave me a nice solid, trouble-free start to doing the skin.Finished nose frame. The whole beast is just under 11 inches long, nose to back end, which is perfect.Closeup of the top left with skin mockups in progress.Nose skin mockup in progress, figuring out what to do between the hammerheads and the start of the body/sides.The underside of the nose, mockups in progress.Finally cutting styrene! The big panel behind the hammerheads has a twist to it, so it got anchored down with elastic bands and left for the plastic cement to cure for a bit.Styrene skin in place, sanding and puttying cleanup started. There is going to be a LOT of sanding.Current state of the nose, with putty smeared around a lot of the seams and sanding in progress.
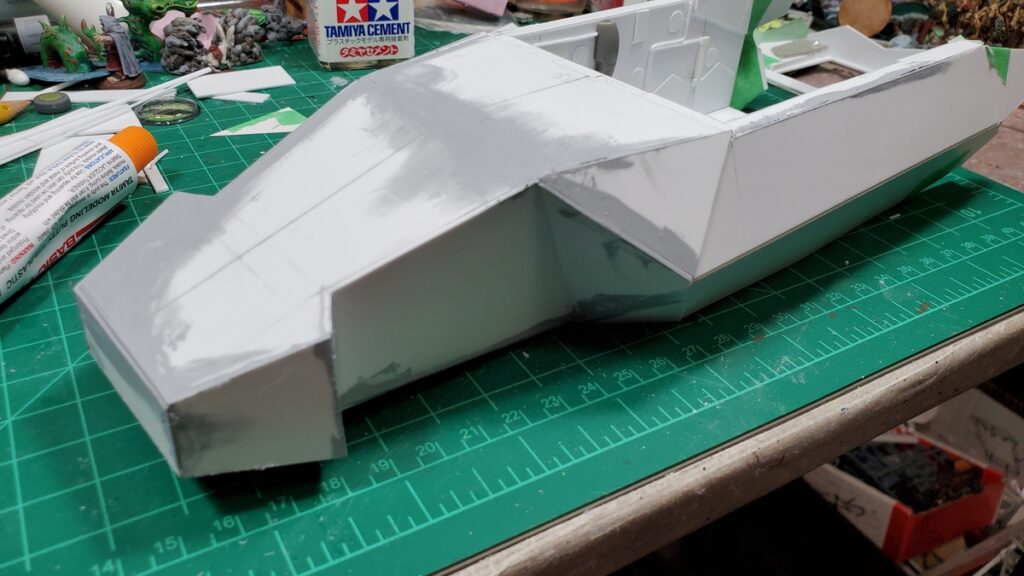
I really like how the whole thing is shaping up, it has a good bulky angular look to it. There’s going to be a round of detail panels over this initial skin, after the endless sanding and puttying is done – some of the seams didn’t come out quite as well fitted as I’d like, so there’s going to be some remediation before detailing can start!
Still to do, in rough order of size/complexity of the subassembly: the engine pods and wings; the roof for the cargo bay; landing gear and landing gear bay doors; skin on the belly.
I’m away this coming long weekend and have some things to get organized before we go away for the long weekend, and as mentioned, the next while is likely to be mostly sanding, so it might be ten days or so before there’s another blog-worthy update to this project!
My Build Something Contest 2025 thread on LAF is here; the rest of the contest has some very cool entries – there’s another couple of shuttles or dropships, some neat magical walking constructs, and a bunch of other cool concepts among the other contestants! Entries just closed on February 8th so everyone who’s in for this year is in!
It’s Build Something Competition on the Lead Adventure Forums again and once again I’m running them, so have been a bit behind on my own entry (unlike Brian, who is racing ahead with construction).
This year’s theme is Vessel or Conveyance, so most are doing movable things like shuttles. Although we have law firms, we do have two alcohol-related entries – my distillery and Tarnegol’s brewed. May the best booze win!
Inspiration and initial thoughts
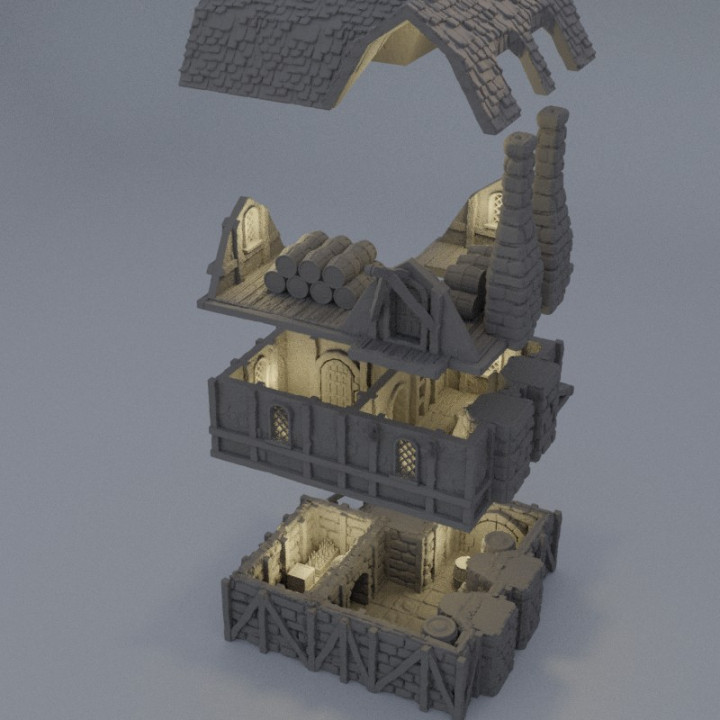
to start, I did a bunch of Googling to find good images. There’s actually a whole 3D printable stl for a distillery by MiniatureLand on MyMiniFactory, so that was a good place to look for inspiration:
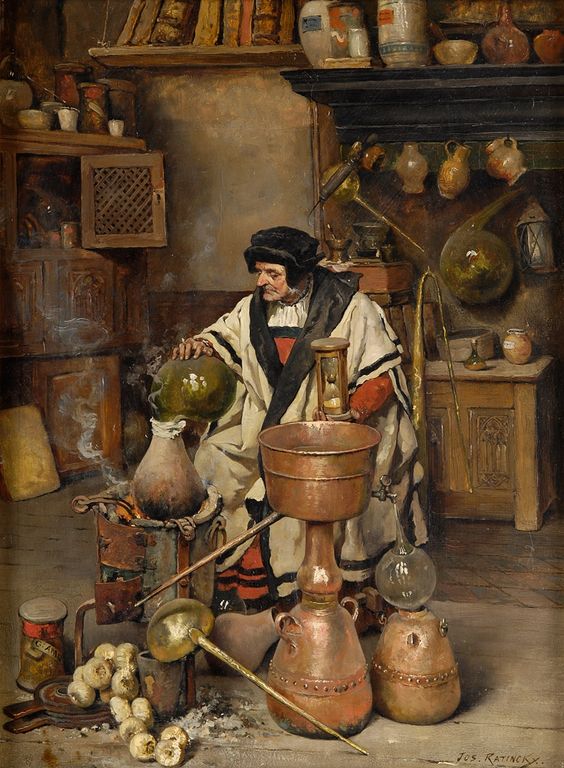
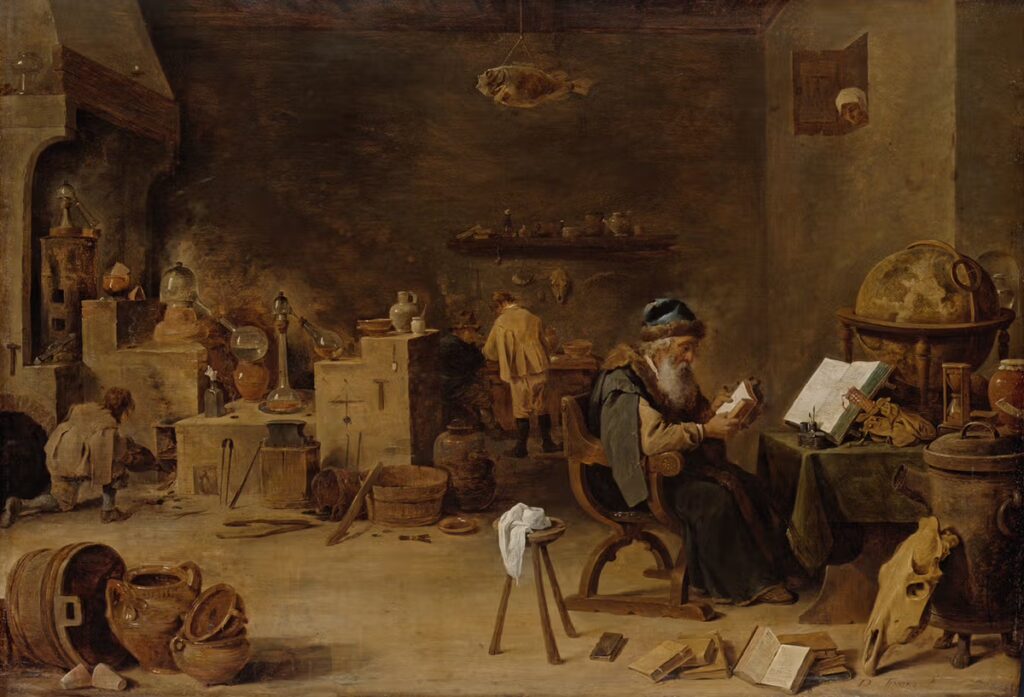
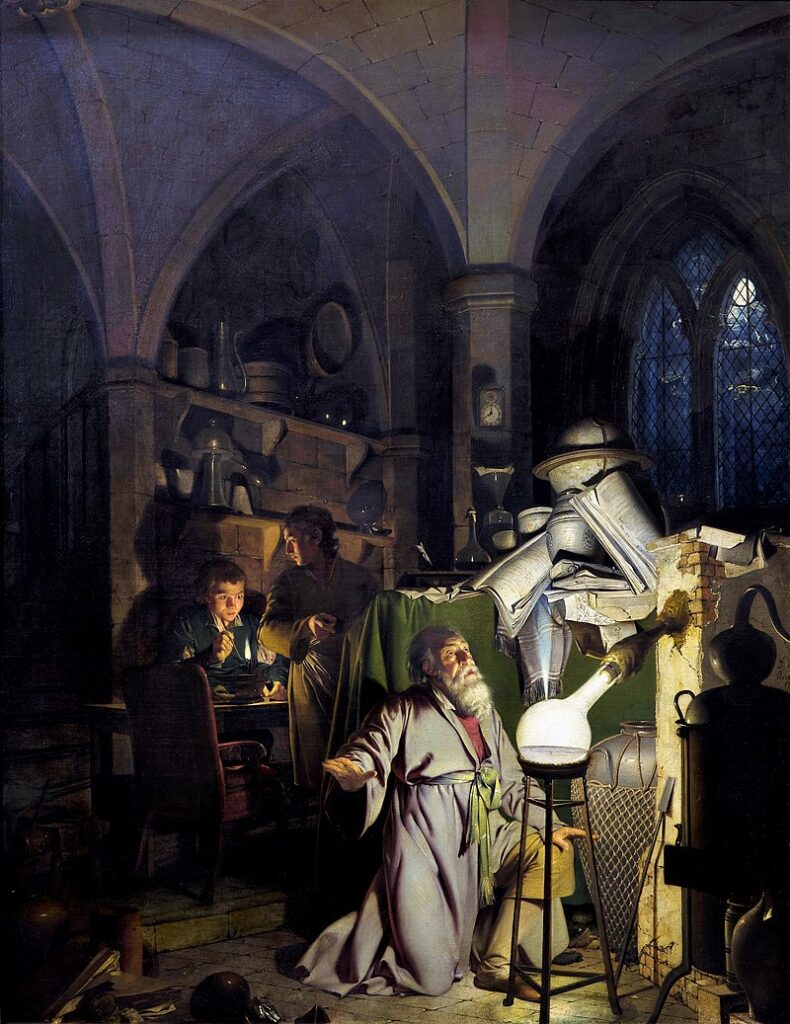
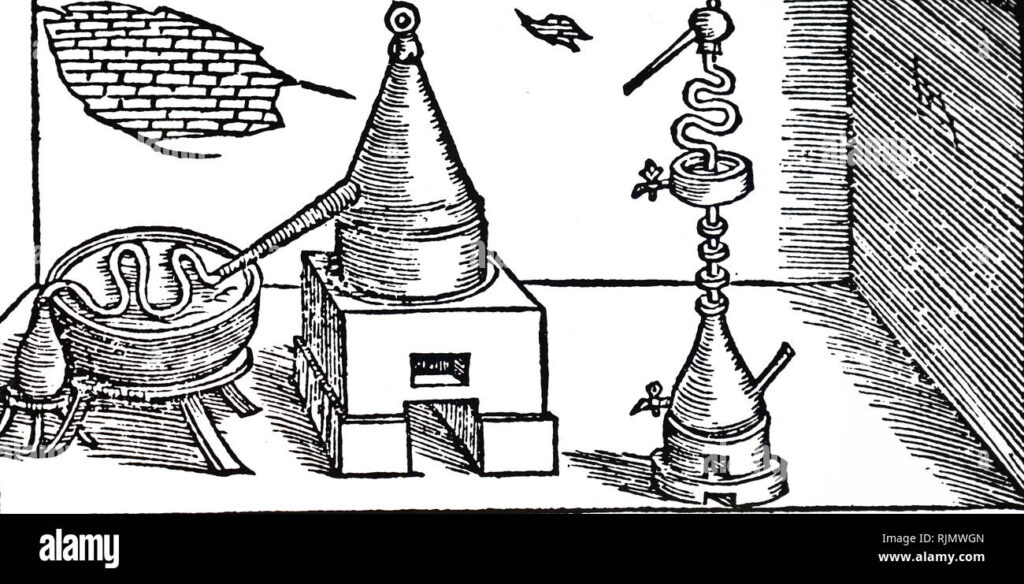
Distilling itself is a product of alchemy, which are basically the same art with different outcomes. And historically, people did a lot of a alchemy, but strangely really only started distilling drinkable alcohol in large quantities in the early Renaissance, right as European alchemists started building on what the Arabic scholars had done. That does mean we get lots of great art about alchemy:
Il laboratorio dell’alchimista by Giovanni StradanoThe Alchemist by David Teniers the YoungerThe Alchymist, In Search of the Philosopher’s Stone, Discovers Phosphorus, and prays for the successful Conclusion of his operation, as was the custom of the Ancient Chymical Astrologers, by Joseph Wright of Derby
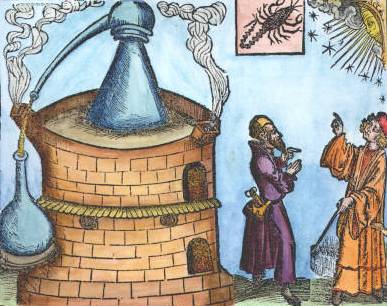
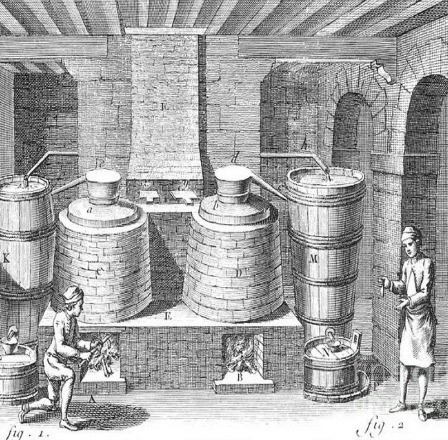
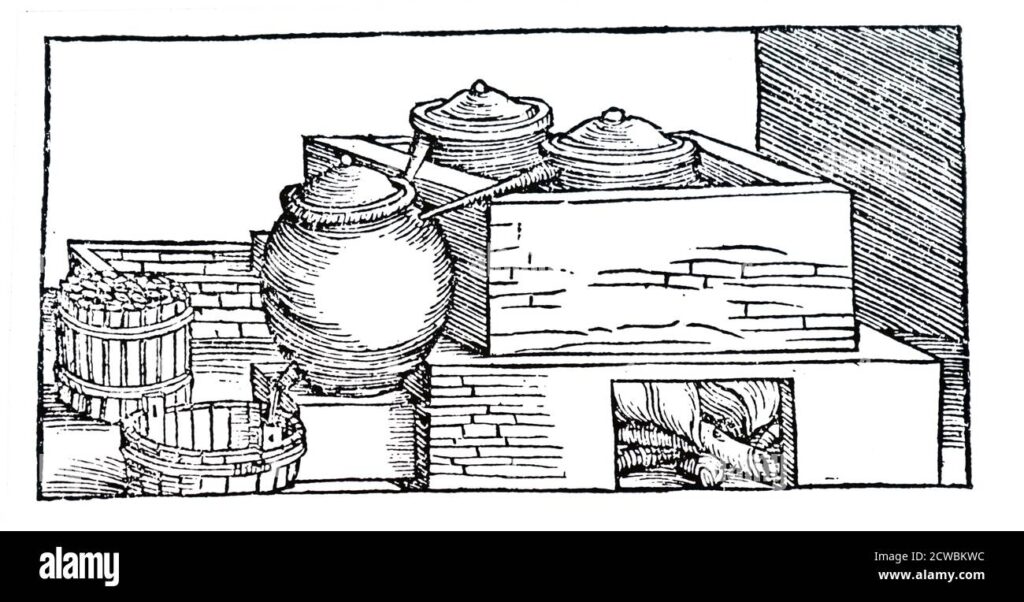
And of distilling itself, it really flourished in Renaissance Italy, which happens to be what I’m based on fantasy city on, so happy times. There are lots pieces of art of the key part of distilling: the still (the vessel from the competition theme):
Planning the building
With all those inspiration pieces done, I start the process of figuring out how big I wanted to make the building. I really want to tie it into my planned sewer/basements I’m doing for my city, so that fixes one part of the building: one edge must be 3″ tall for the basement, with the building on top.
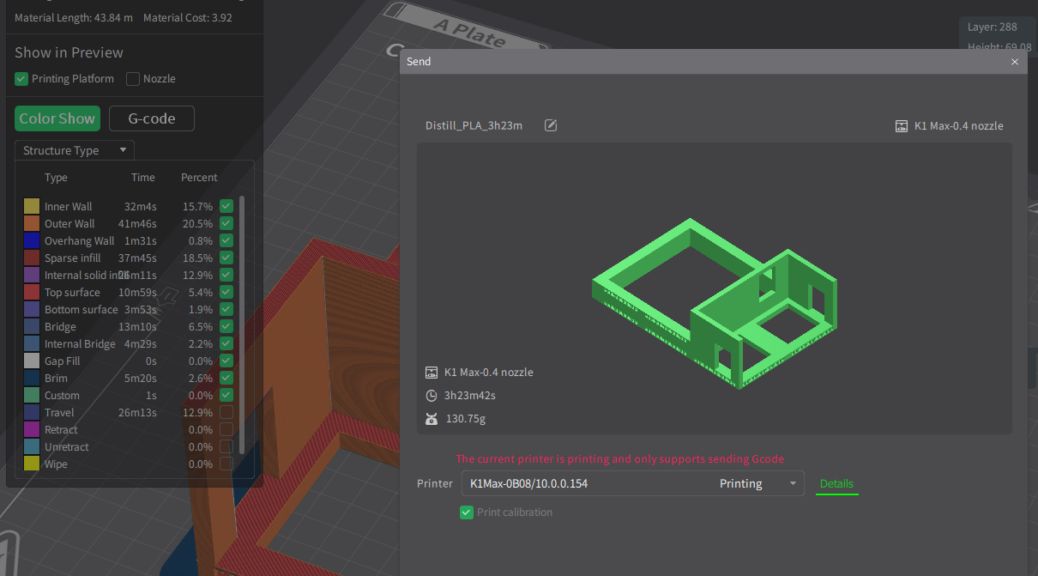
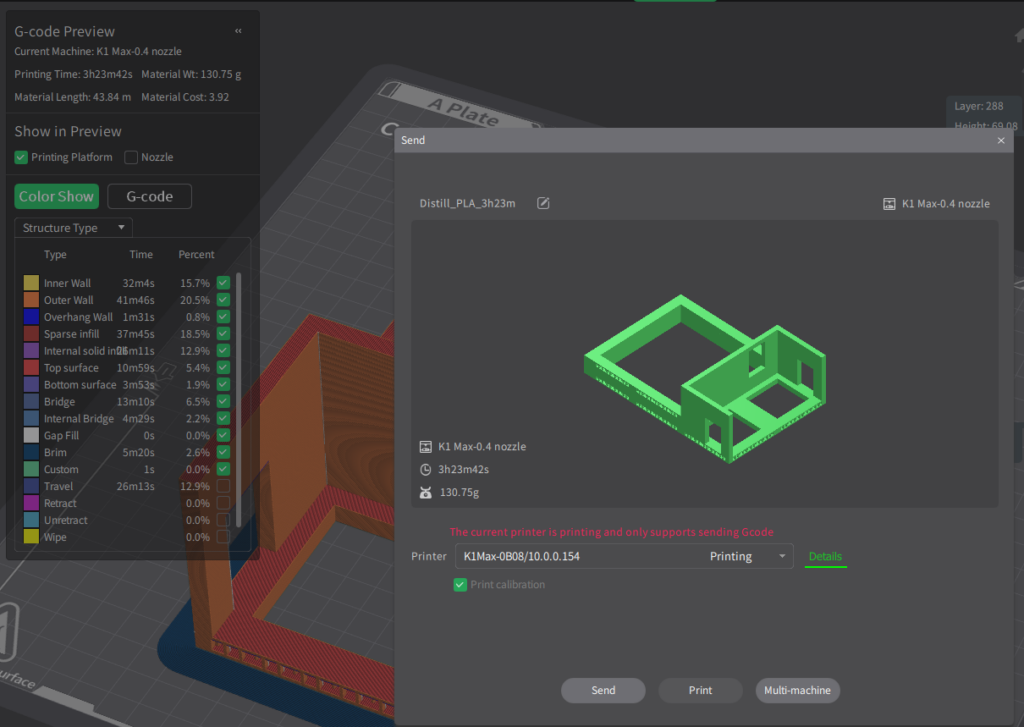
With that set, I drew up some simple plans, ultimately deciding on a 6″x9″ building, with big double doors in the long end. The base of the building will be 3D printed, with foam building on top.
Base of the building including the basement.
And thus ends today’s post – with an initial base printing. Onward to actual construction tomorrow
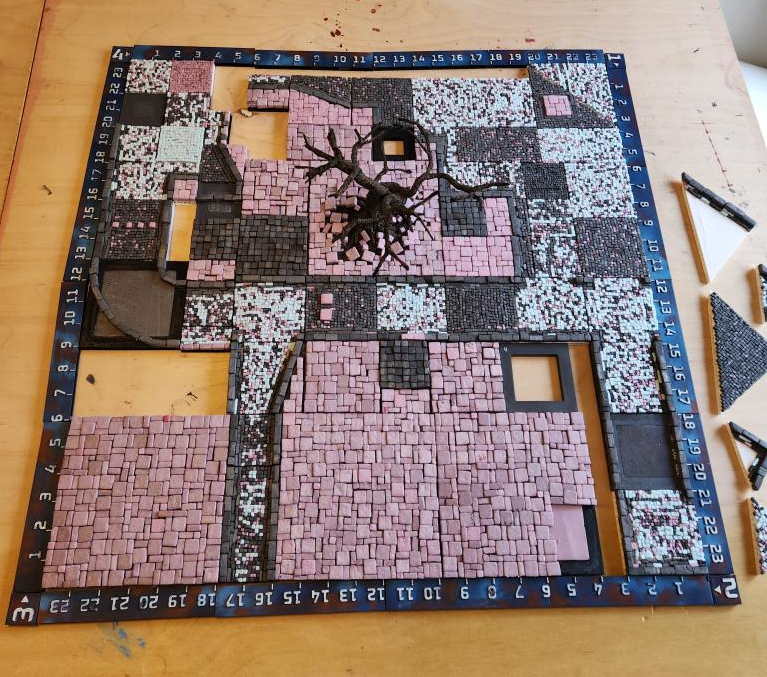
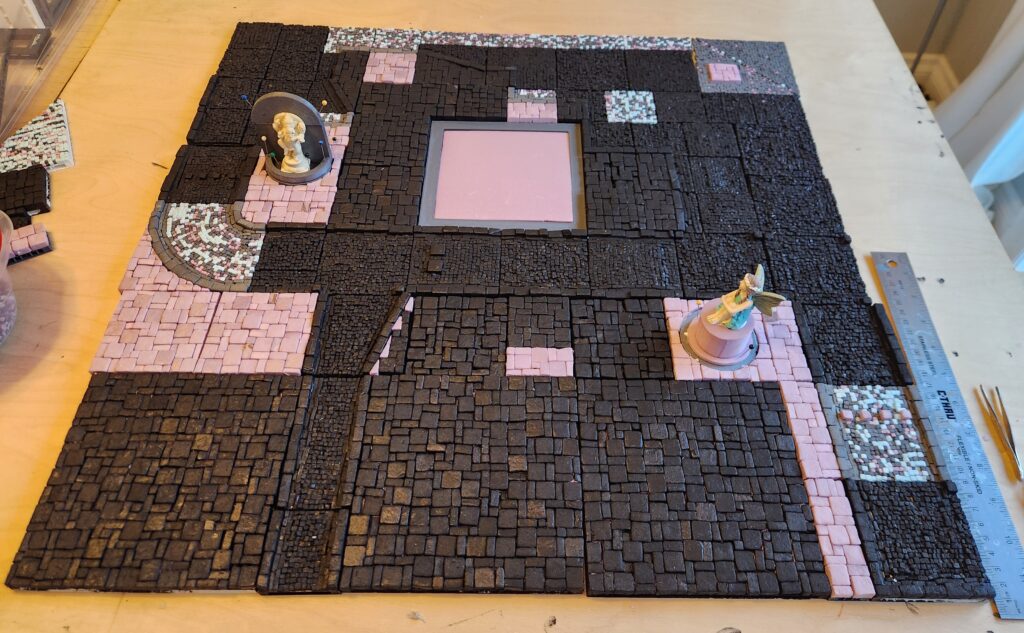
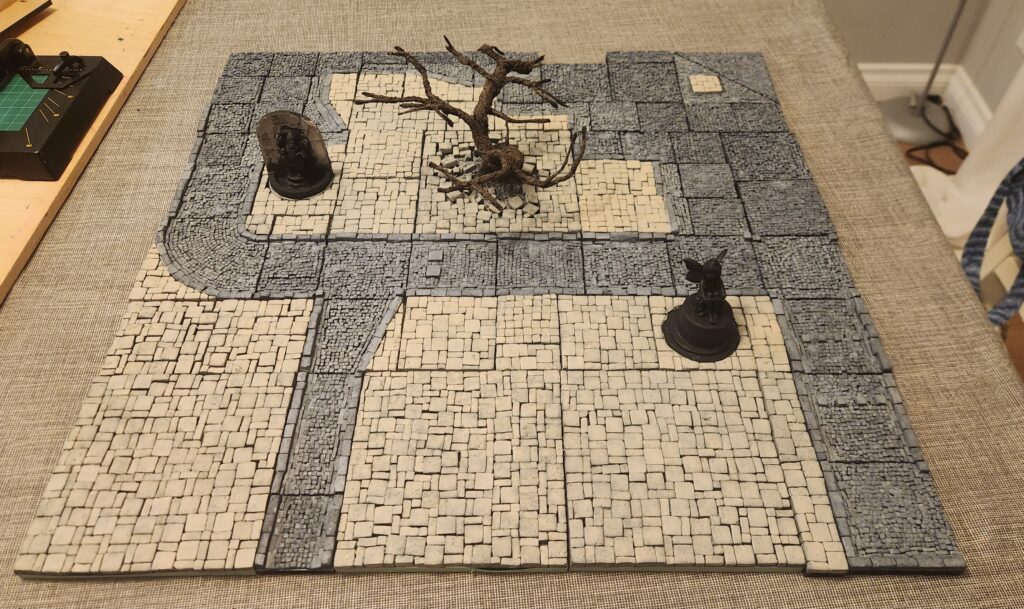
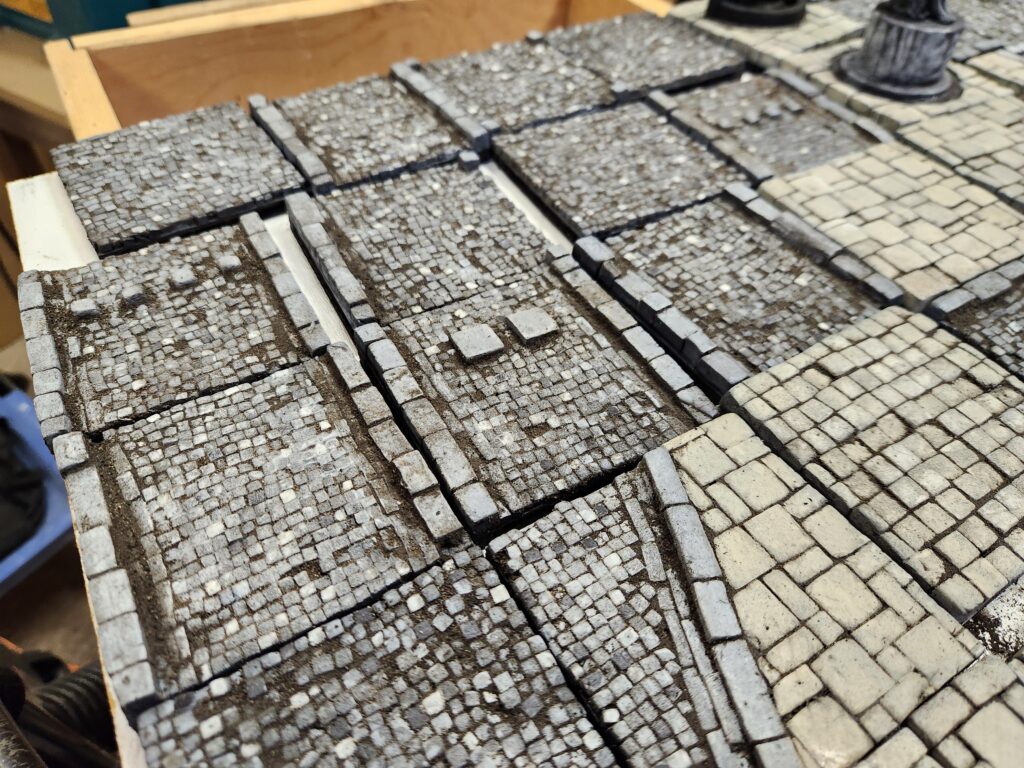
For the past year I’ve been building some modular fantasy/medieval city tiles for our Sellswords and Guilders games. It has been a long process of building as I’ve chosen the hardest method possible – laying the cut foam stones individually. But I finally have a full 2′ x 2′ square of them done. The impetus this time was our local move into Mordheim and yet another competition – this time the quarterly painting competition on Bloodbeard’s Garage Discord, which had a theme of “unfinished”. Talk about the ultimate un never finished project!
Building the tiles
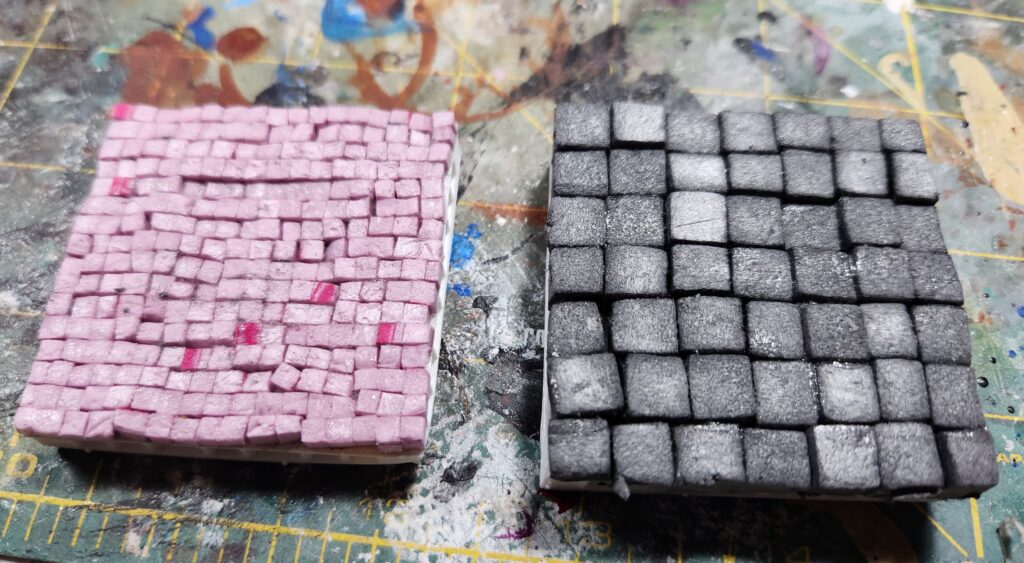
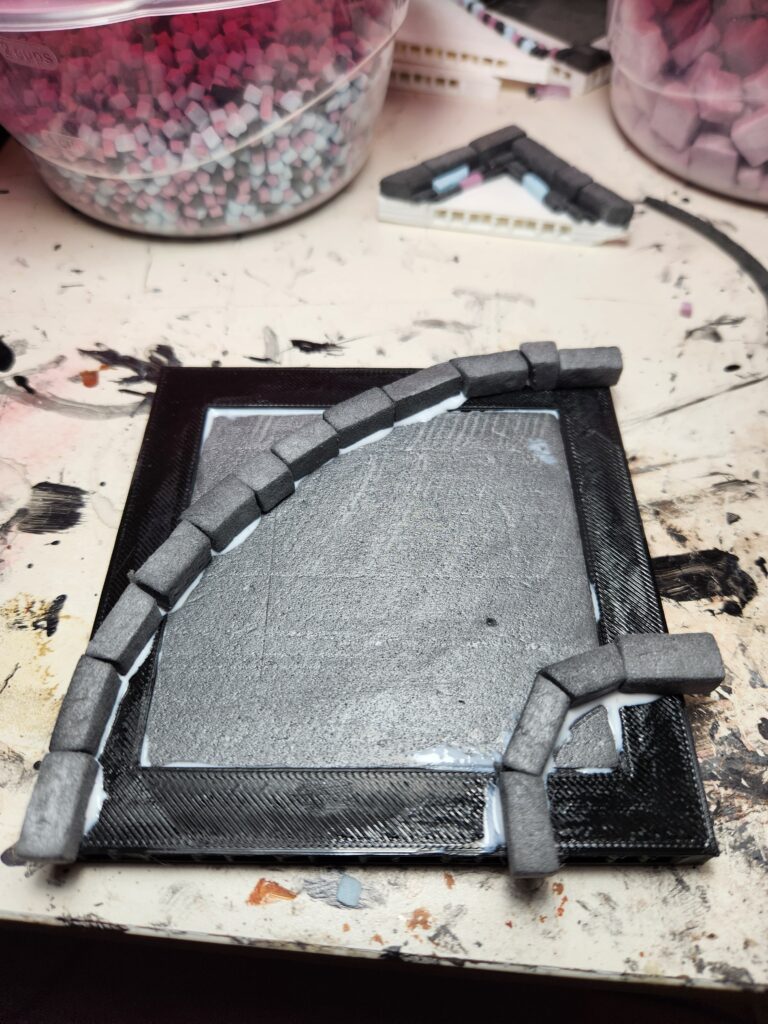
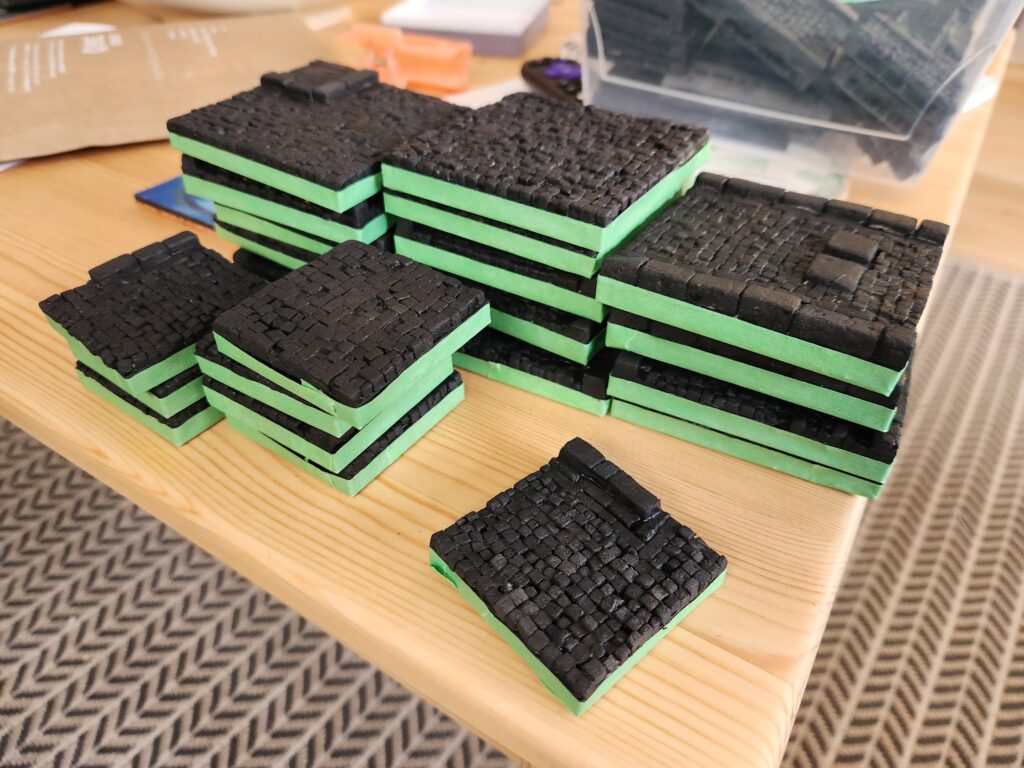
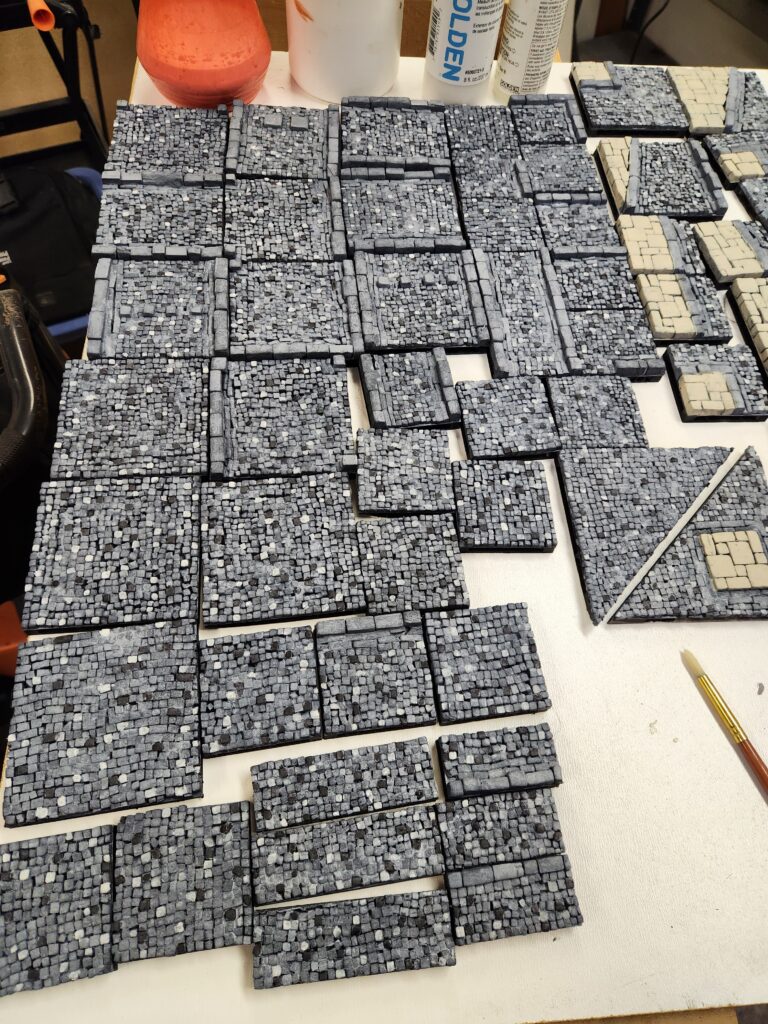
As with my other modular boards, these are all based on 3D printed Open Lock tiles. I then used my Proxxon hot wire cutter to cut a few different sizes of tiles. I tested two initially: 1/8″ and 1/4″. Ultimately, I liked the look of 1/8″ (as did my wife, but she thought it was nuts).
First test tiles
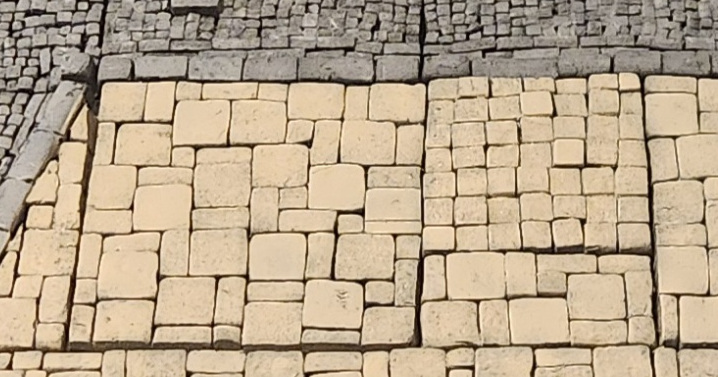
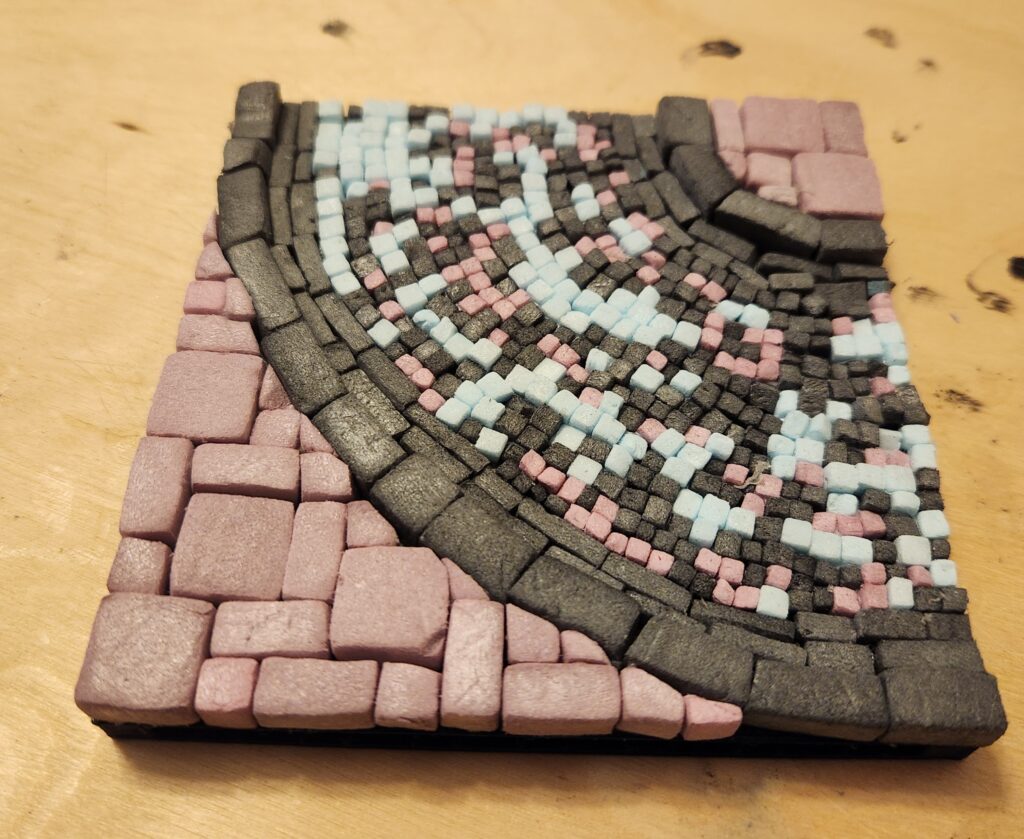
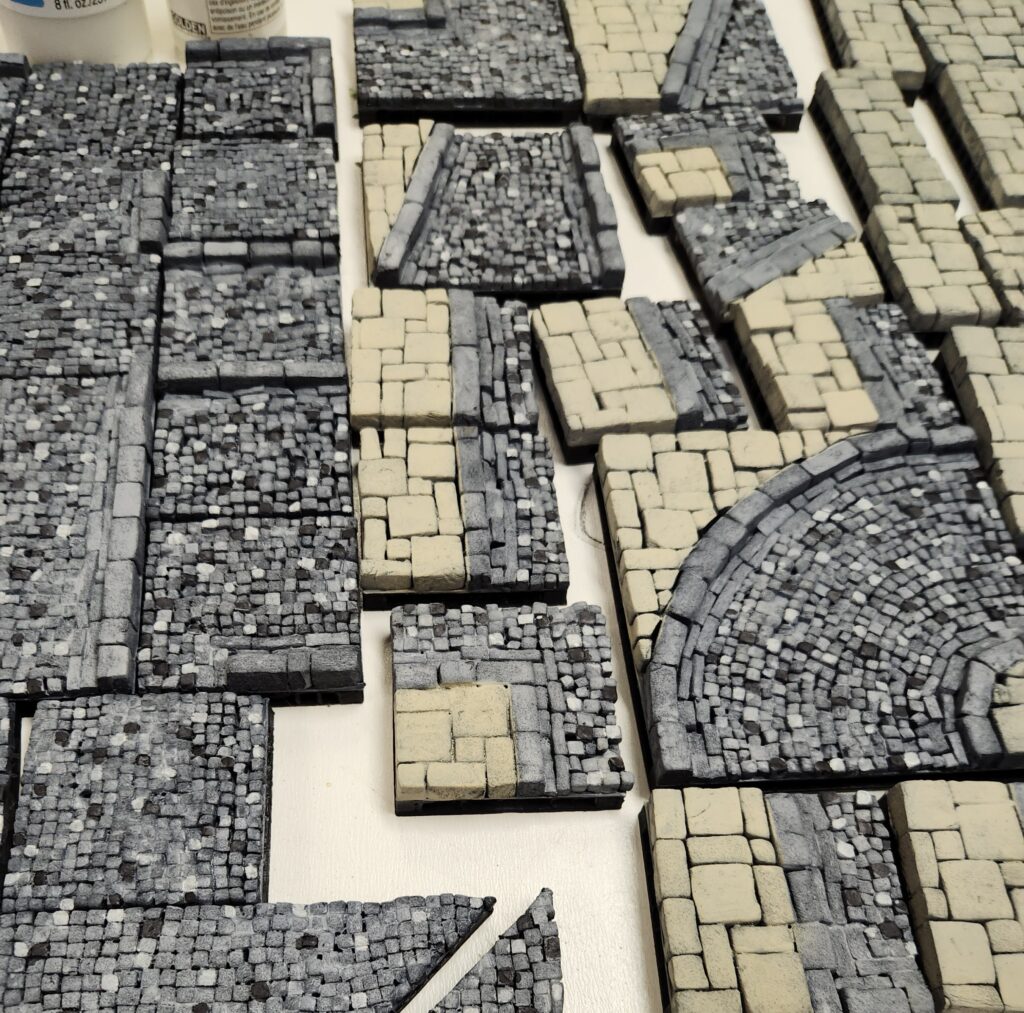
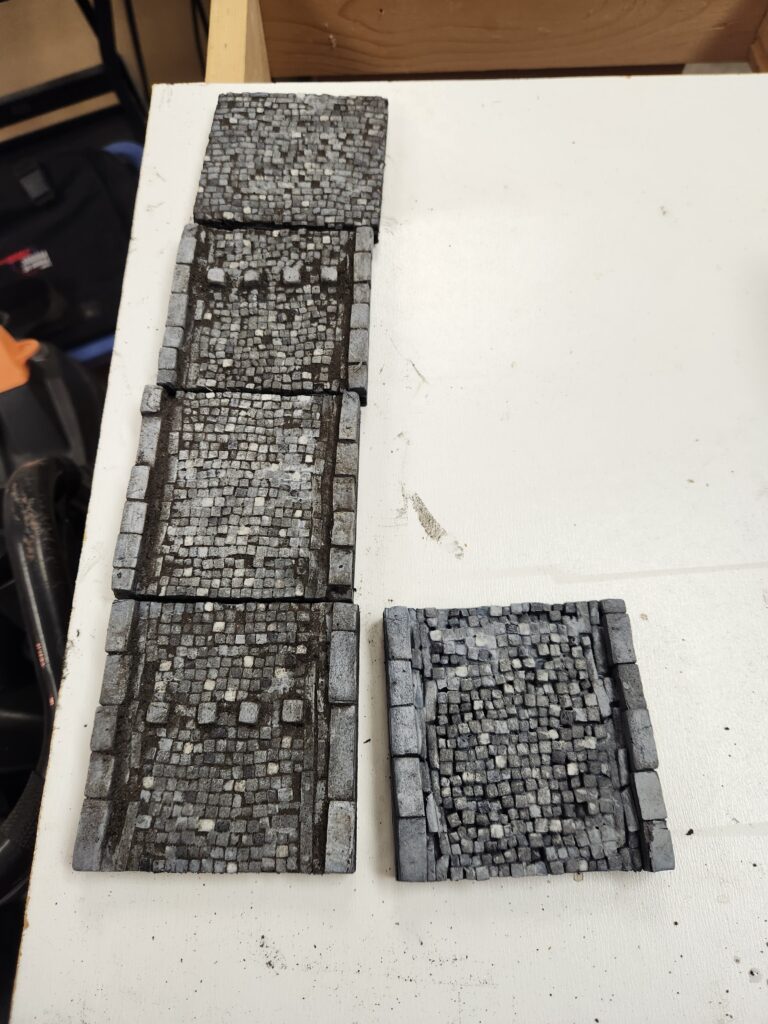
I also made a 2nd change early on – for the sidewalk I moved from just 1/4″ cubes to a mixture of 1/2″ squares, 1/2″ by 1/4″ rectangles and 1/4″ cubes, always tessalated so that no two of the same touched fully on their long side.
Original style in the upper right, new style in the other pieces
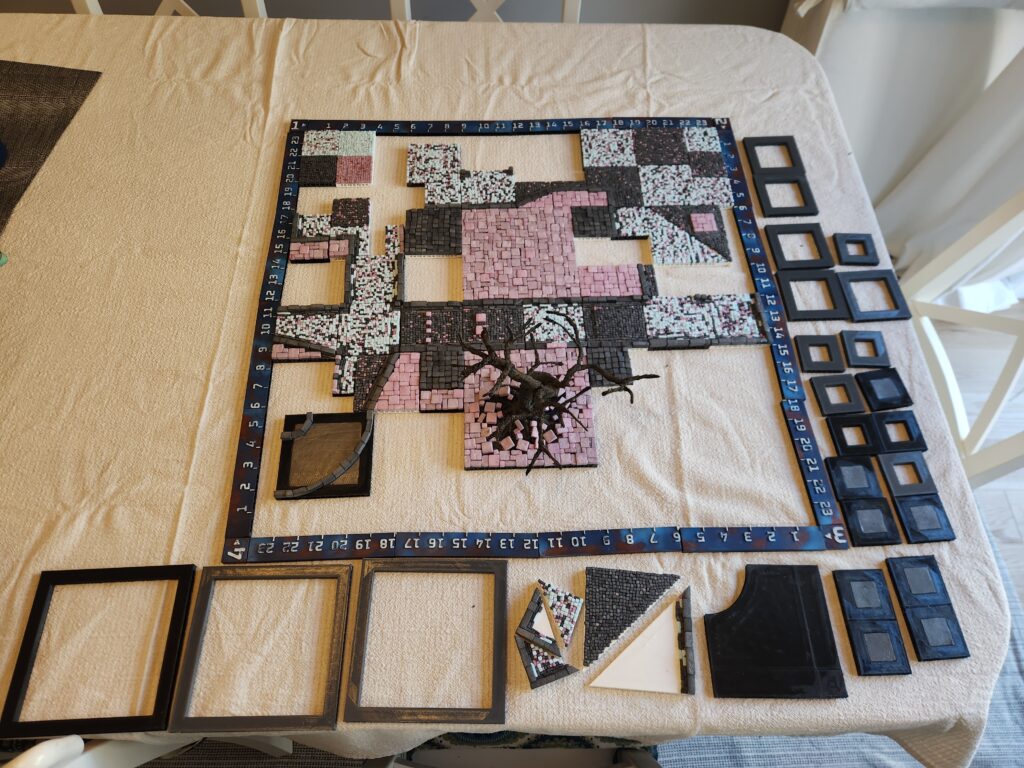
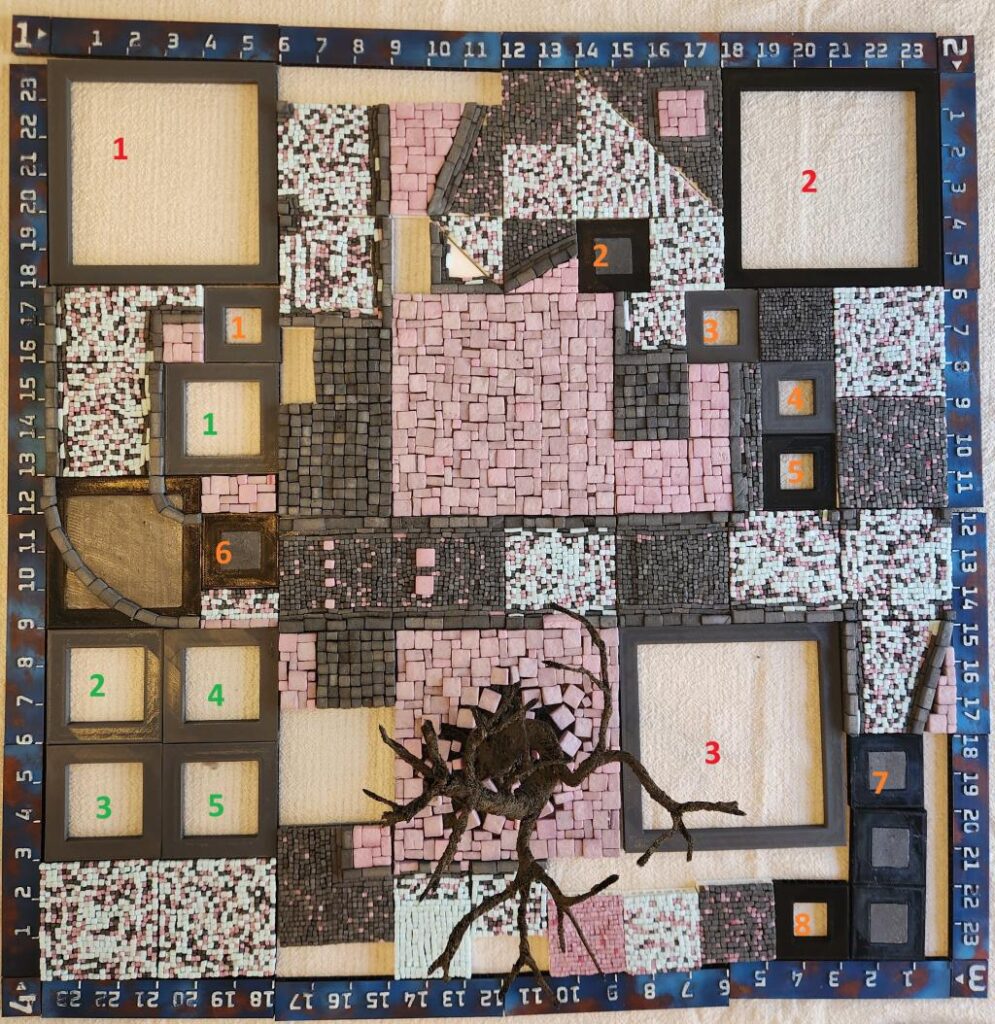
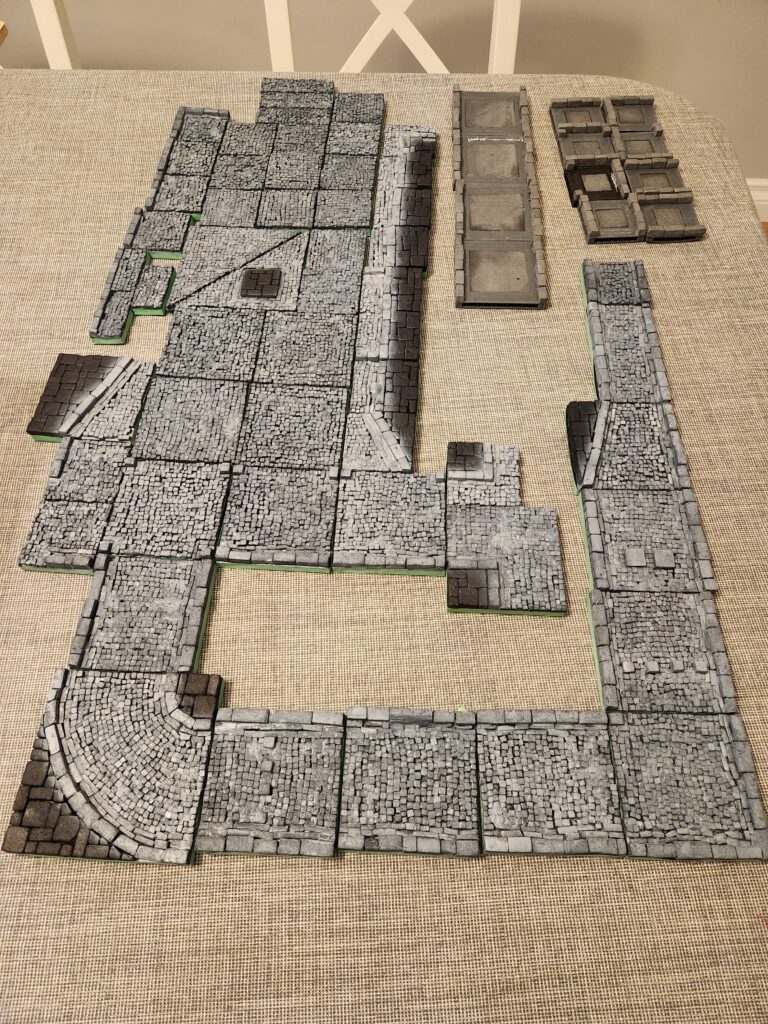
After a lot of work, I had bits and pieces of a table, but certainly nothing enough for even a 3’x3′ (our standard board size). After a hiatus, I got moving again. I also switched glues – from standard PVA to Aleene’s Tacky, which sped up production. So I planned out my initial 2′ x 2′ planned out (well, sort of, I tweaked it almost immediately):
Initial layout2nd layoutFinal layout
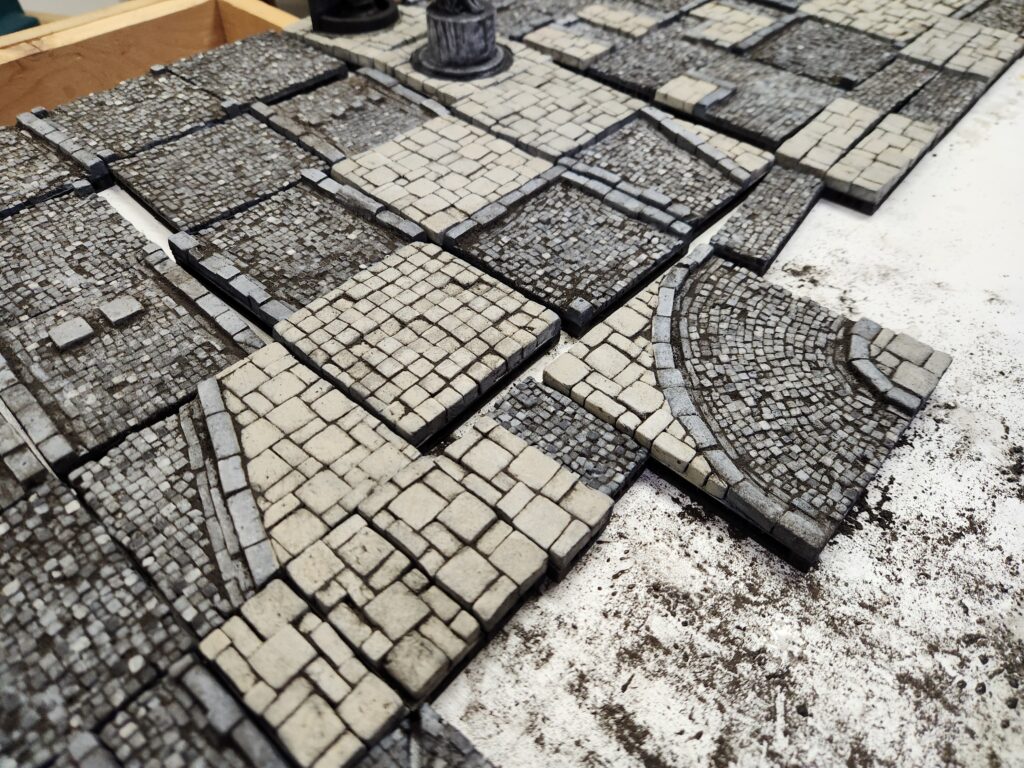
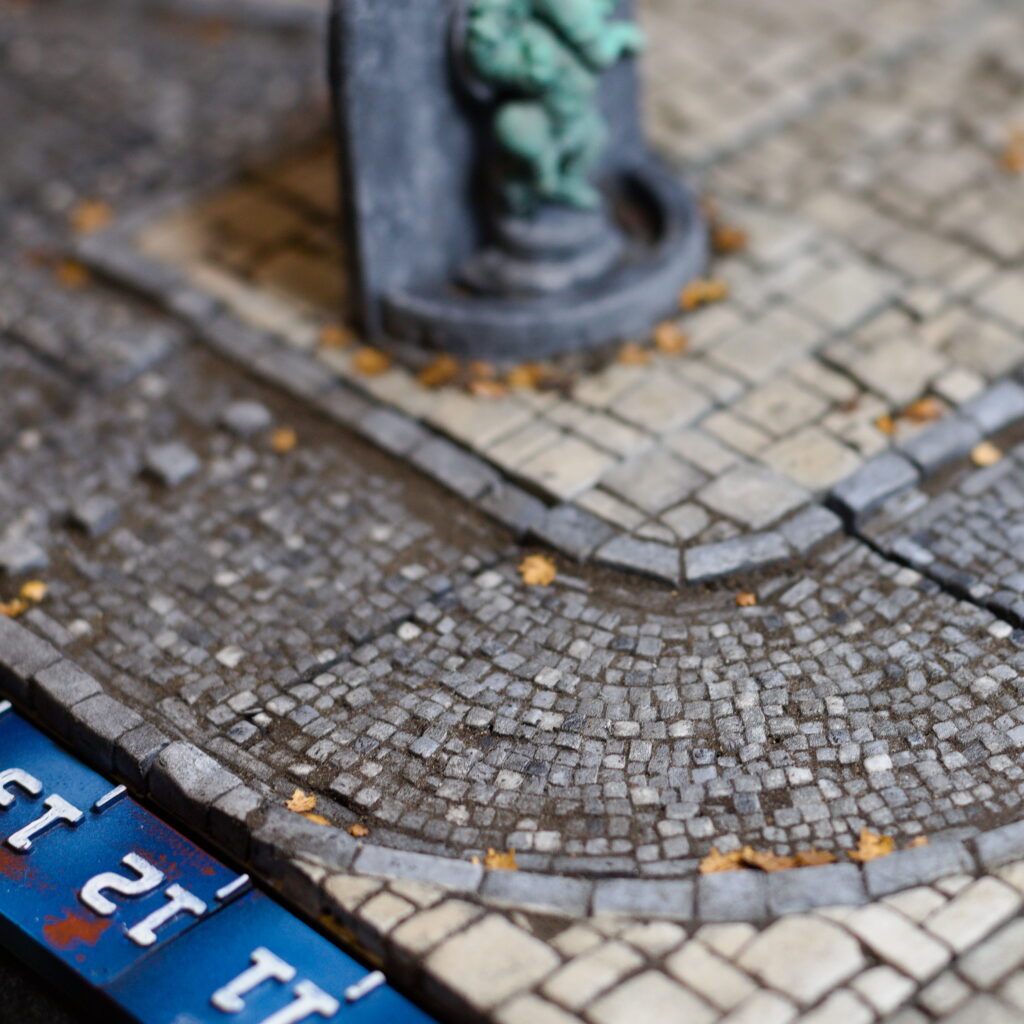
One of the pieces I’m most proud of is the curved road section. I was (w)racking my brain to figure out how to make it look good, thinking I was going to have draw lines at angles, but then I realized I could just lay the stones outward from the inner curve.
Outer curbs laidFully laidPainted but not yet dirty
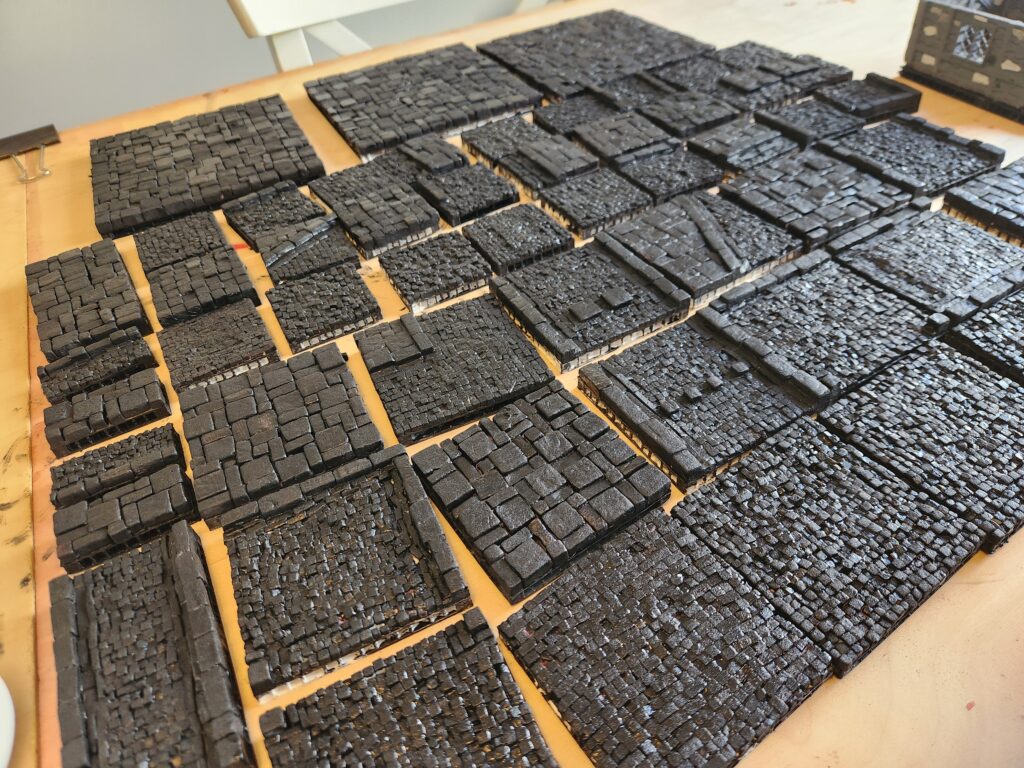
And then, a few (a small number, really) of hours later, I was finished tiling:
Construction done
Painting
For painting, I started simple – a coat of craft black paint mixed with white glue (and a bit of wetting agent to make it flow better), and then airbrushed on some thinned Vallejo Black Surface Primer (a hateful paint if I’ve ever used one).
The first black primer, to tie to all togetherTaping the edges prior to painting
I then re-watched RP Archive’s inspiring city tile video again and decided to follow his painting and weathering method as much as possible. I highly recommend it – it certainly inspired me in my project.
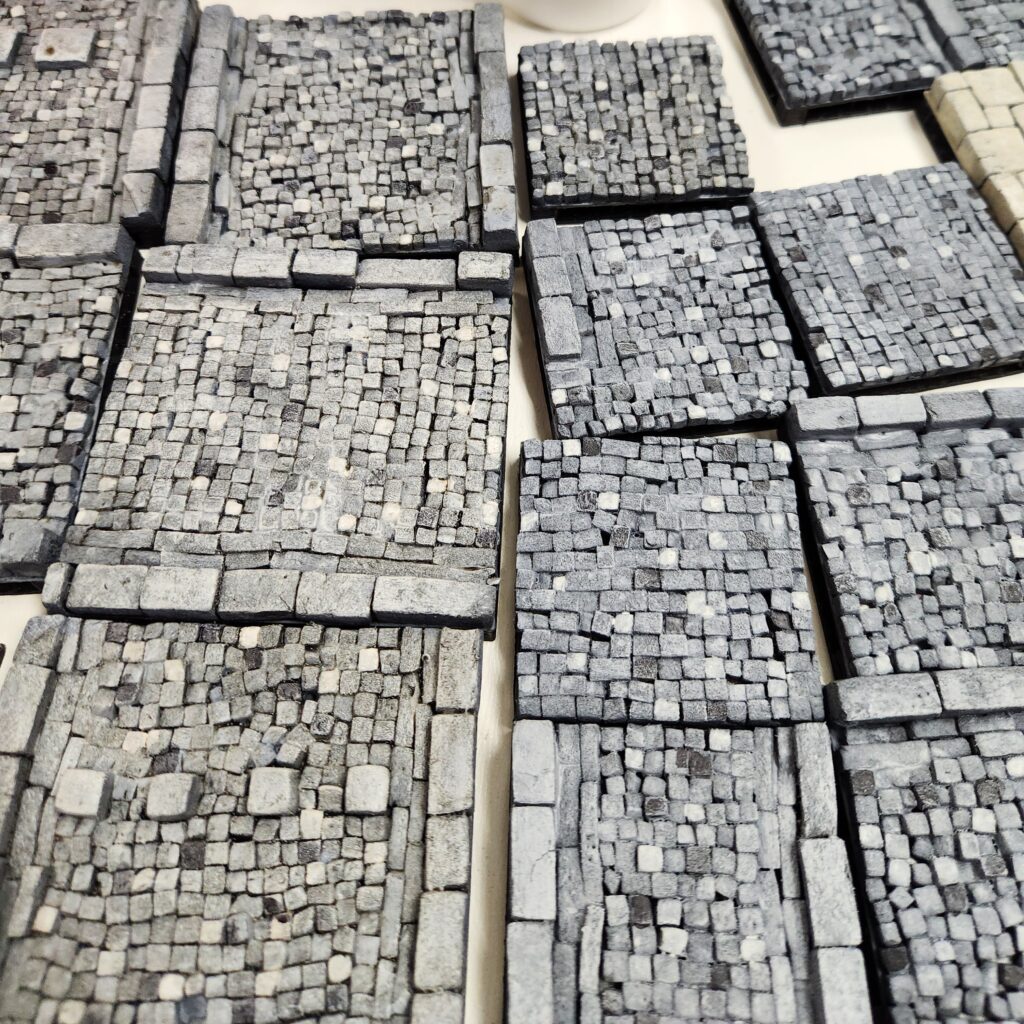
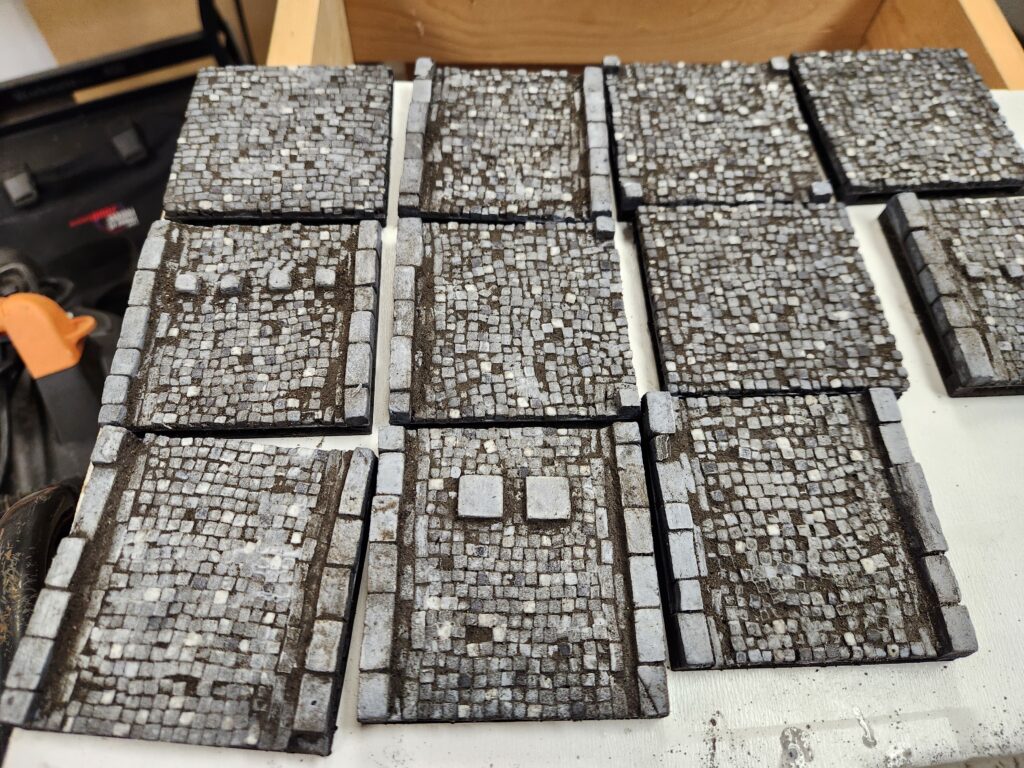
To start the colour, I airbrushed a neutral grey (Demco Artist acrylic) onto the cobblestones and linen (Folkart craft paint) onto the sidewalks. This is also when I noticed I’d left one 1″ x 3″ piece in the painting box. Oops.
Grey cobblestone base layer (with new tiles in the upper right)Whole board painted
Next up I highlighted some of the cobblestones with a dark grey (Army Painter Gravelord Grey Speed Paint) and light grey (Reaper Paint Misty Grey mixed with a satin glazing medium). I wasn’t too fussed about painting exactly here – there were multiple additional layers of paint and weathering coming to hide any issues.
With highlighted cobblestonesOnly cobblestones, not sidewalk, were highlighted
And then a white dry brush across the whole thing:
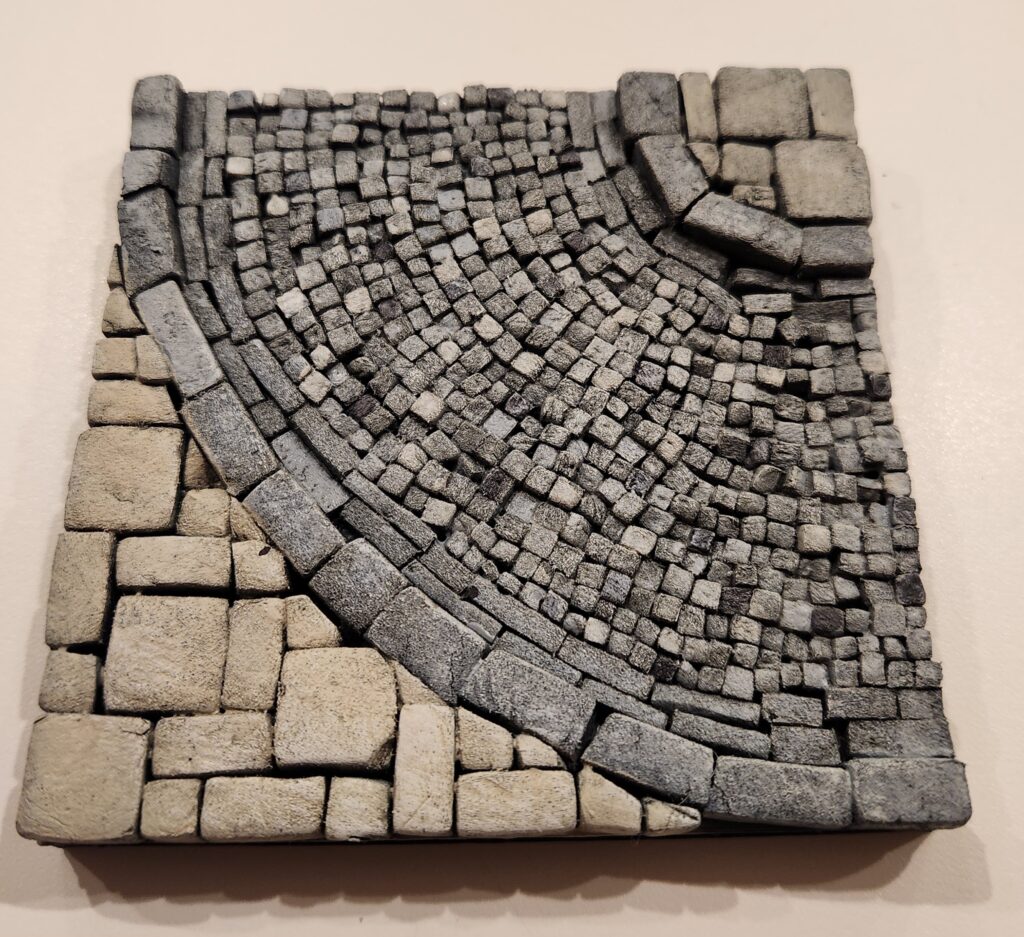
To finish off painting, I did a black-brown wash. Unlike RP Archive, I did it a bit heavier in pigment – 6 drops of carbon black, 3-4 of burnt umber and 3-4 of sepia in 50ml (all were Liquitex acrylic Inks). It took ~100ml to coat the full 2′ x 2′ board.
Washed tiles on the left, unwashed on the right
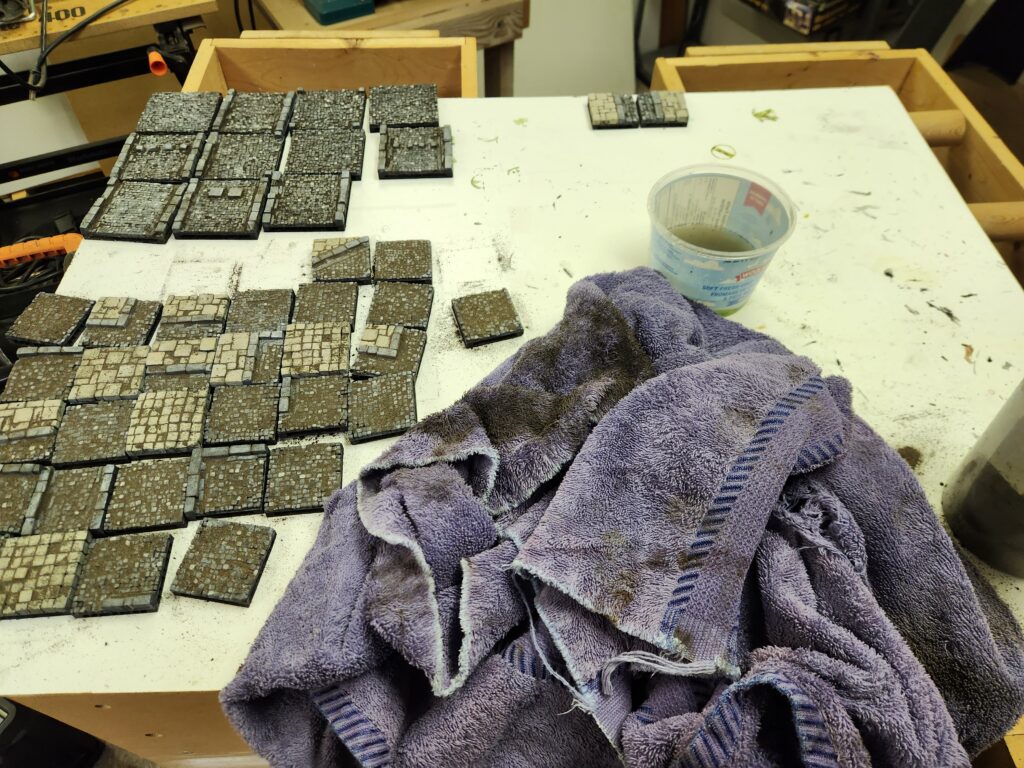
And then we get onto dirt. Here I also differed slightly from RP Archive. I had a dark brown grout, so I mixed it 50/50 with dirt, which I sieved with a 1/4″ chicken wire, then baked for a few hours and then sieved a second time in an old tea strainer. This left me with a very fine powder mixture of dirt/grout.
To apply the dirt, I tried the method he suggested in his video but found it didn’t work for me. So I changed it up:
Sprinkle on dry
Spray lightly with watered PVA + wetting agent
Use my fingers to smear the damp mixture around the tile
Dip my hand in water, thoroughly soak the tile
Use a towel to clean off the tile
Repeat 4 and 5 until I was happy with the level of dirt
I left a fair amount of dirt on the cobblestones, especially in the corners and in deeper pockets, and almost none on the sidewalk pieces. I found the grout and dirt dried almost instantly, so by the time I was finished all the tiles, they were dry enough to take outside and soak in watered PVA to seal them in. I’m going to have to do a 2nd coat, as some of the dirt is still a bit loose.
Comparing dirty (on left) with just painted (on right)Very dirty process of dirty-ing up the tilesDirty tiles 1Dirty tiles 2Dirty tiles 3
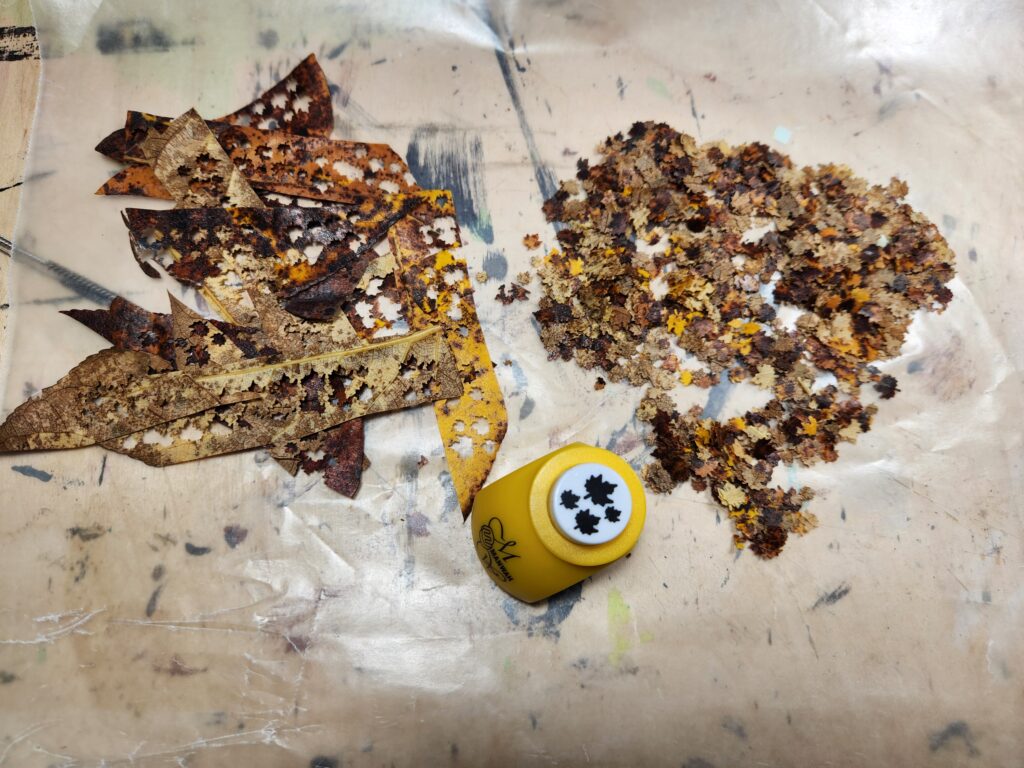
Lastly, I had punched a bunch of leaves using an AliExpress leaf punch (non-affiliate link – I used the 05 colour). I dried some straight and soaked some in glycerin first, then dried. I found the glycerin ones were slightly translucent and showed the tile through them, so I’ll use them for something else (I’m going to try dyeing with inks and fabric dye next). Note that some of the colours were lost as they were dried, which was a bit unfortunate but expected.
Punching leaves from leaves.
I glued them down on the edges where leaves would naturally blow to, a truly finnicky process as the dried leaves were quite stiff. I tried soaking them in watered down PVA, but that didn’t seem to help – although I suspect I could rehydrate them by soaking them overnight. Some definitely will still lift (and have), but they are trivial to replace.
Leaves glued in the corners
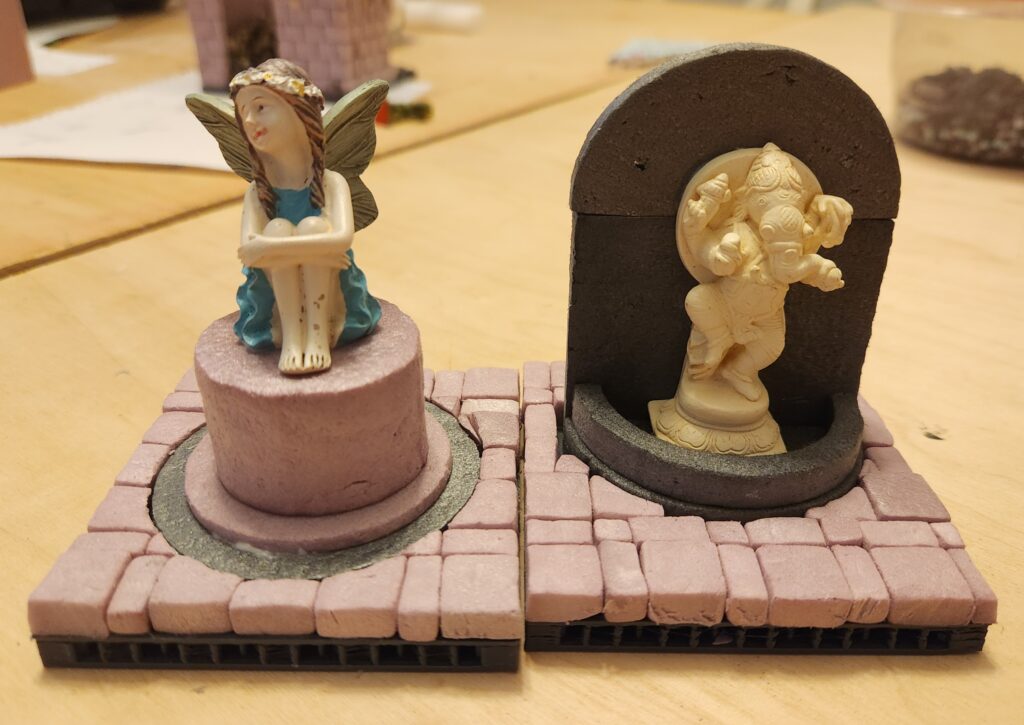
Painting the Statues
For the statues, I painted them fairly simply. They were both on foam plinths or backgrounds. They were base-coated along with the tiles.
The bleeding eyes girl was quite simple – dry brush various greys on her and her plinth, along with some thinned greys for the streaks. Her eyes are painted with Reaper Fresh Blood.
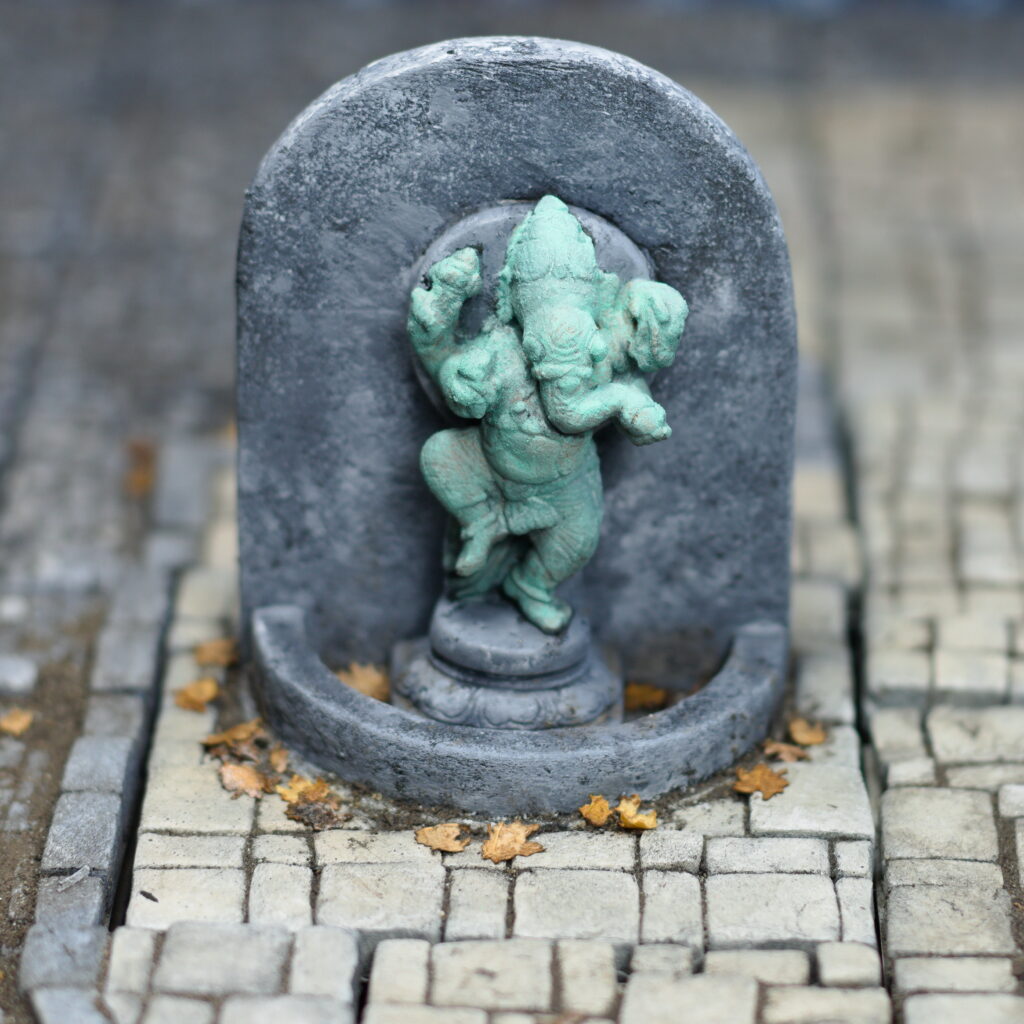
For the Ganesh statue, I painted the statue itself with Reaper Old Bronze and then found Army Painter’s Verdigris Technical Paint, which I applied in a couple of coats. It works, but honestly this paint job is a bit simple and for larger statues I’d want to follow something like Garden of Hecate’s excellent tutorial. For the stone backing, I tried some stippling and washes, but ultimately went with sponged on greys and whites.
The Tree
The tree is fairly simple – a bunch of pipe-cleaners twisted up and then melted, with a texture paint (in my case, a DIY texture paste of brown paint + sawdust). It isn’t done, but eventually am going to try and match some of the look here:
Finished Look
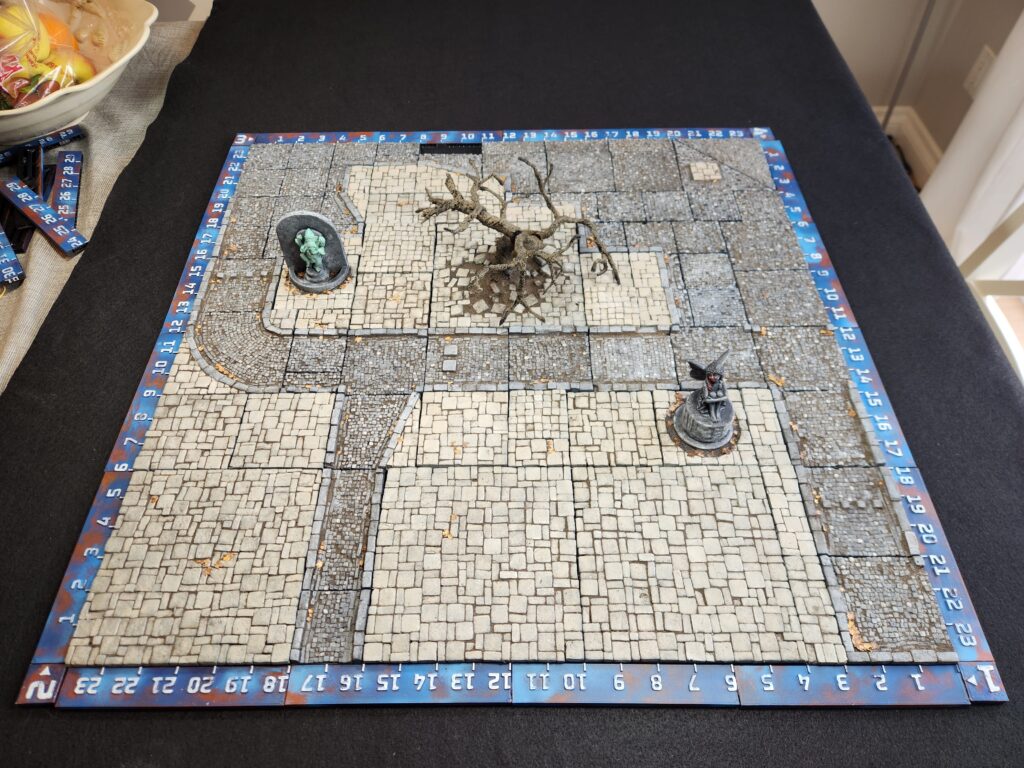
And just like that, this 2′ x 2′ set of tiles was done.
The finished tiles
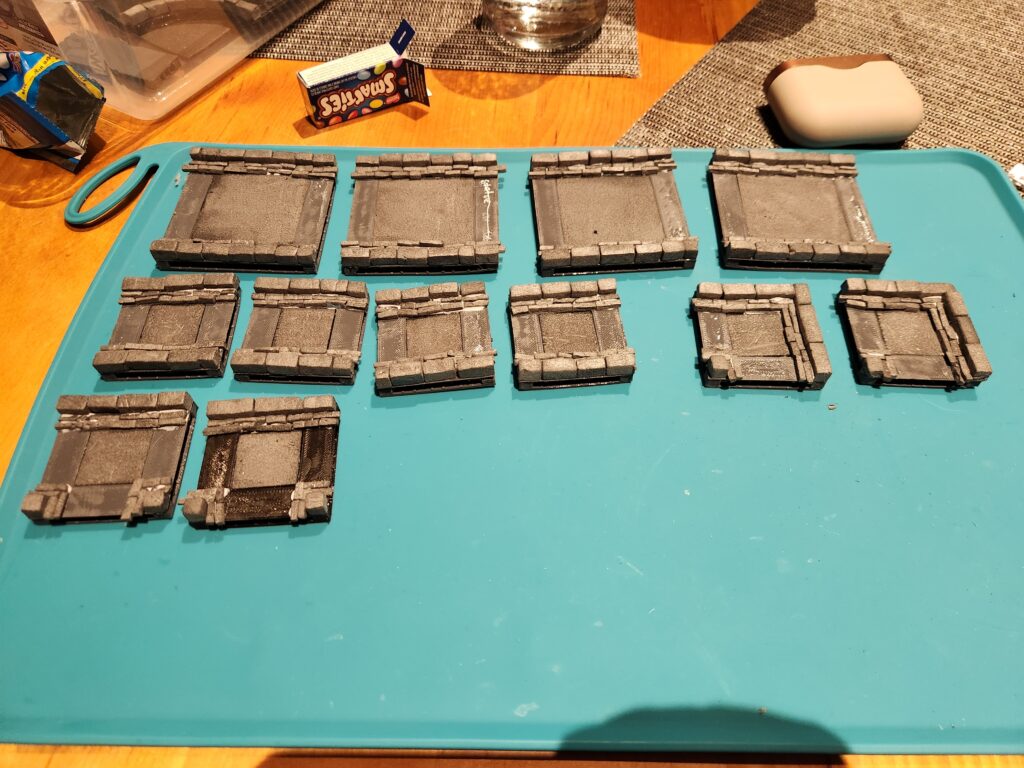
But of course, I need a lot more, especially if I want to get a full 4′ x 4′ Mordheim table done. So the next set is already underway:
Well, maybe not. The next set already underway, aided by Halloween candy.
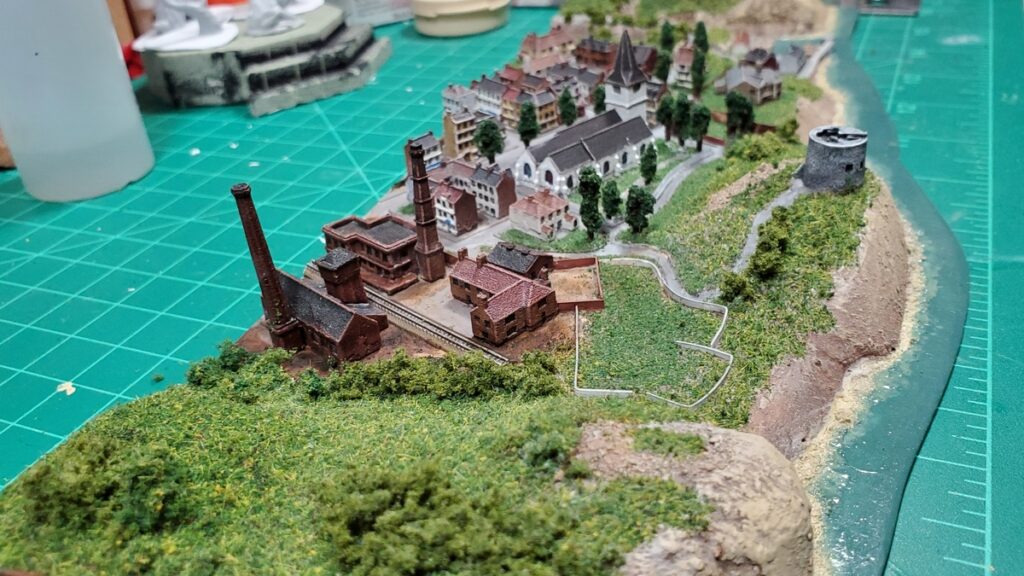
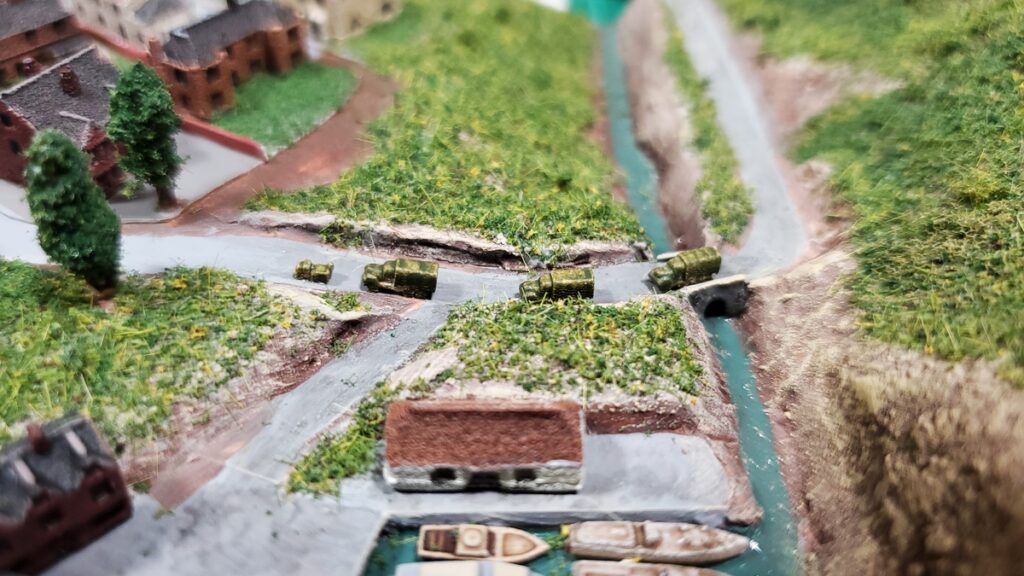
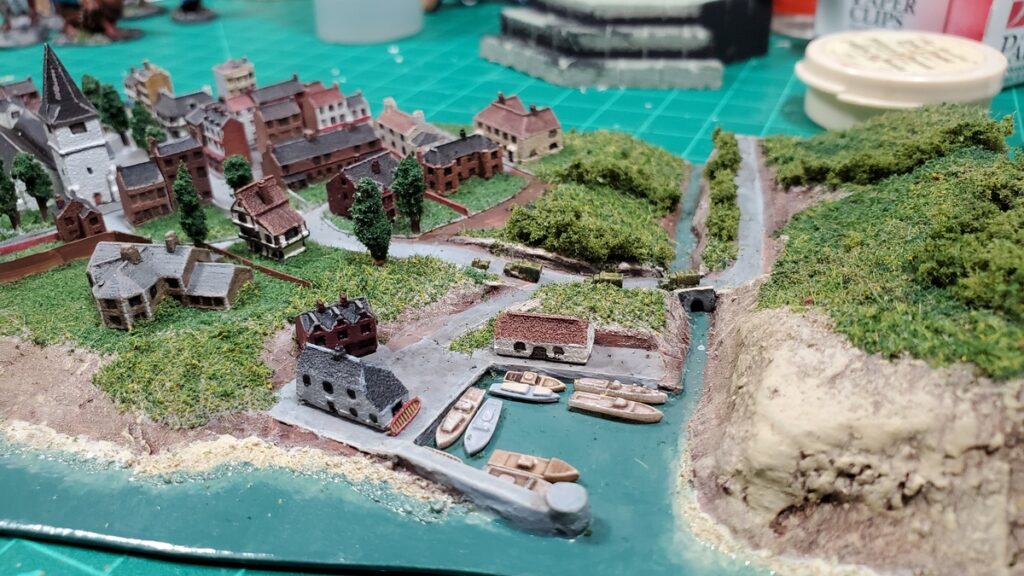
I’ve finally finished another module for my 1/1200 scale coastal naval terrain. This is another 12″ long by 4″ deep piece with part of a reasonable size town on it, and has been sitting around for two years or possibly a bit longer, so it’s nice to get it finished and out of the way!
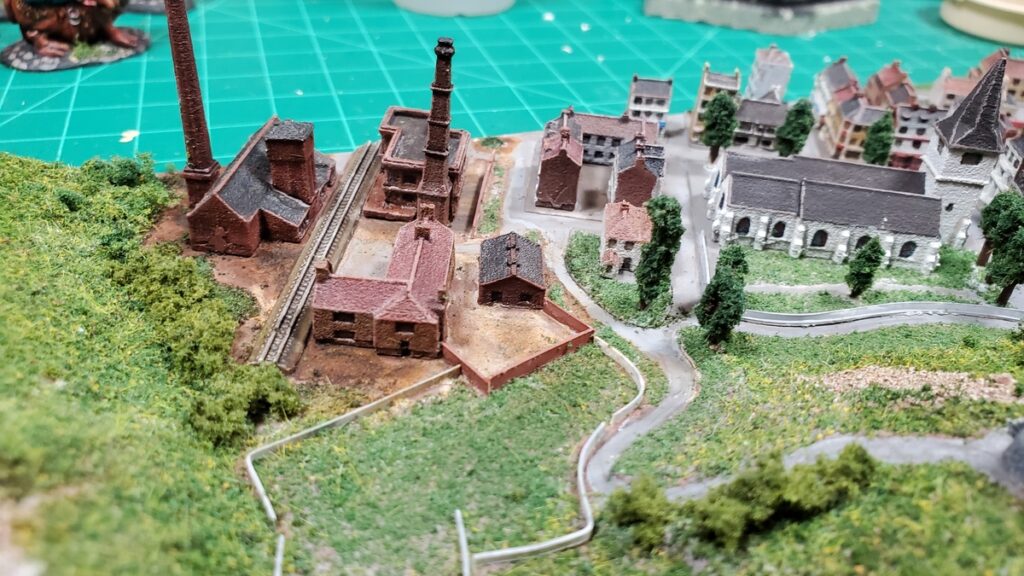
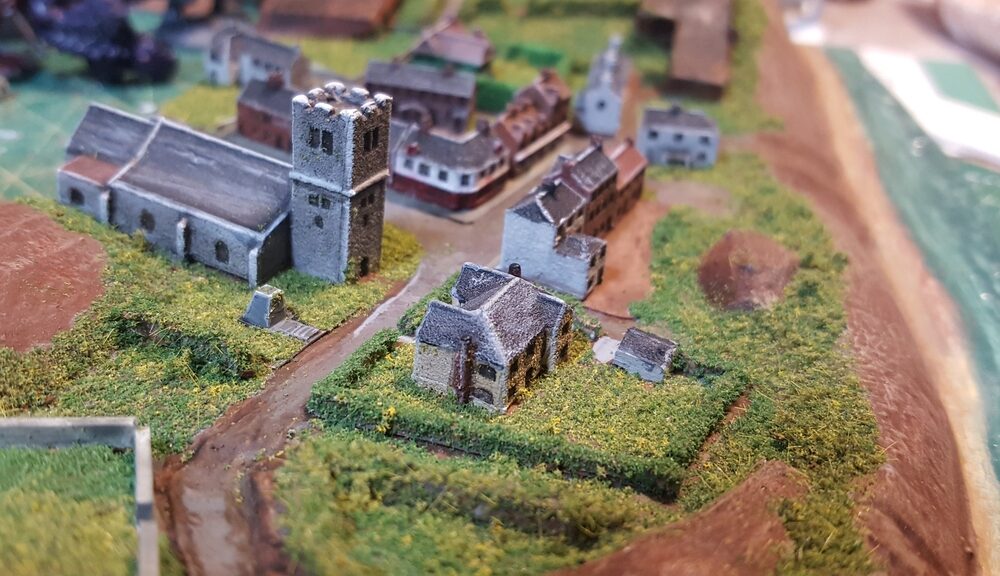
New coast module from one end, looking into the industrial part of town toward the church. Click for larger.
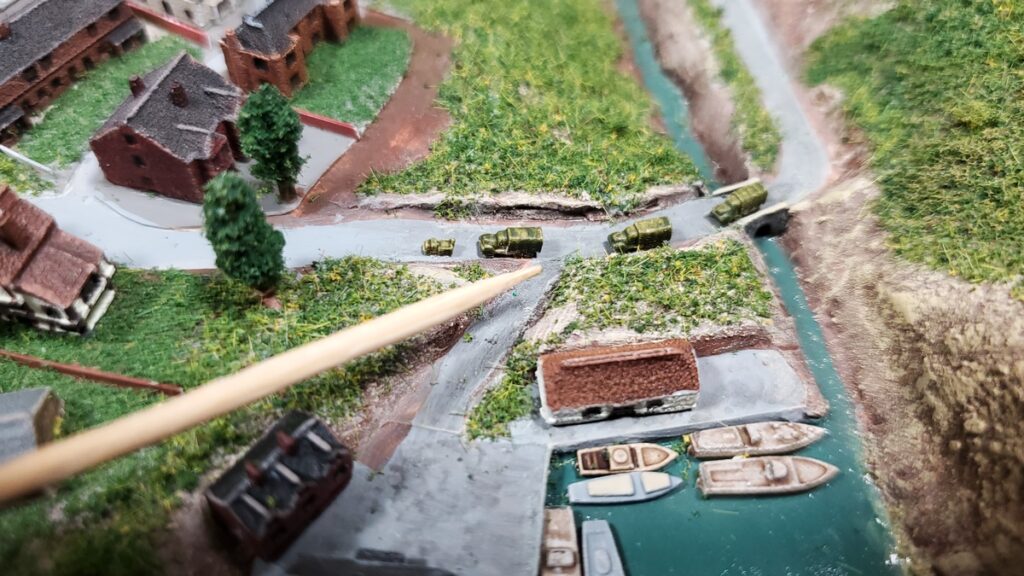
The other end, looking into the harbour & bridge and down the main street. The breakwater is a bit of sprue from plastic figures, which got me that nice round end and curve. Click for larger.
The construction is my standard setup, written about previously (see other related posts at the bottom or my naval scenery summary post) with a base of 1mm styrene sheet, a mix of materials for the basic ground forms, and a lot of different flocks for ground cover.
The Shapeways trucks, a small military convoy driving into town.With a toothpick for scale.
The one thing I might still add is some more of the marvelous Shapeways vehicles here and there…
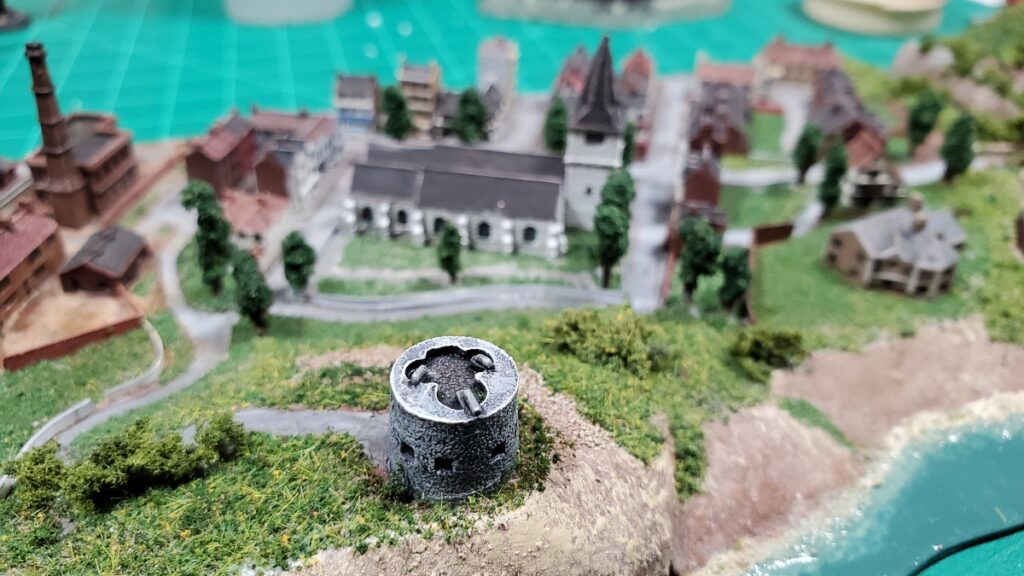
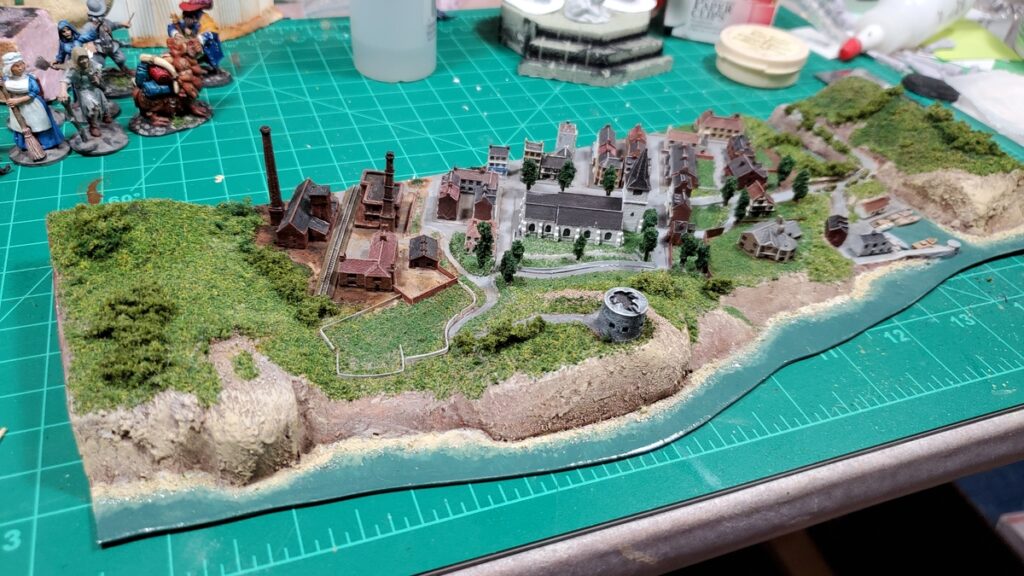
Left end, looking from seaward, mostly industrial.The centre, looking over the old Martello tower toward the church and centre of town.The harbour, stream, and bridge end.The whole module from seaward.
I don’t have any immediate plans for more coastal modules… but I do have a lot more buildings and vehicles to put to use, and I was thinking that a coastal gun battery would be an interesting addition – the British coastal batteries seem to have had a pretty quiet war, mostly engaging aircraft, but the Allies reported regular engagements with German batteries especially along the occupied French coast… so maybe a half-length 6″ module with a bit of a headland, some gun pits, and a couple bunkers? We shall see…
Last Update: Shapeways being dead, I’ve disabled those links. I’ve tried tracking a few of the artists who posted their microscale stuff on Shapeways but haven’t actually had any success. If you find microscale 3d prints or STLs out there, please comment below! Prior: 29 December 2023, Resources section with Shapeways link.
Here’s all of my posts on 1/1200 coastal naval scenery so far… I’ll try to remember to add to this post as I create future articles!
…and from 2020 when I started doing coastal naval as a scale and genre, the posts on my 12″ x 4″ coast modules, and painting Brigade’s Small Scale Scenery buildings.
I did a Shapeways order in August 2020 for a whole bunch of 3d printed 1/1200 scale stuff and am slowly using up those vehicles and such in various projects. I maintained a Shapeways list, but of course that died when Shapeways went into receivership. Pity.
If you have links to the current web stores of some of the folks who used to use Shapeways for their microscale scenery and ships, please leave a comment below!
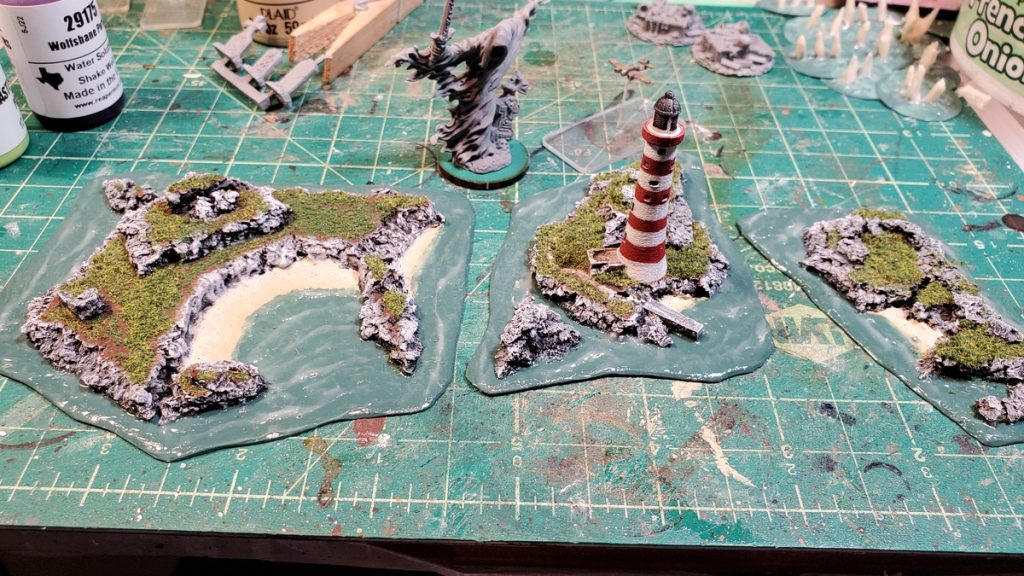
To round out the current run of small scale scenery for coastal naval games I decided on a trio of islands, one of them with a lighthouse.
As with the rest of these small scale naval terrain pieces the base is .040/1mm styrene plastic card, bought in bulk from my local plastic supplier, with the edges shaped and sanded.
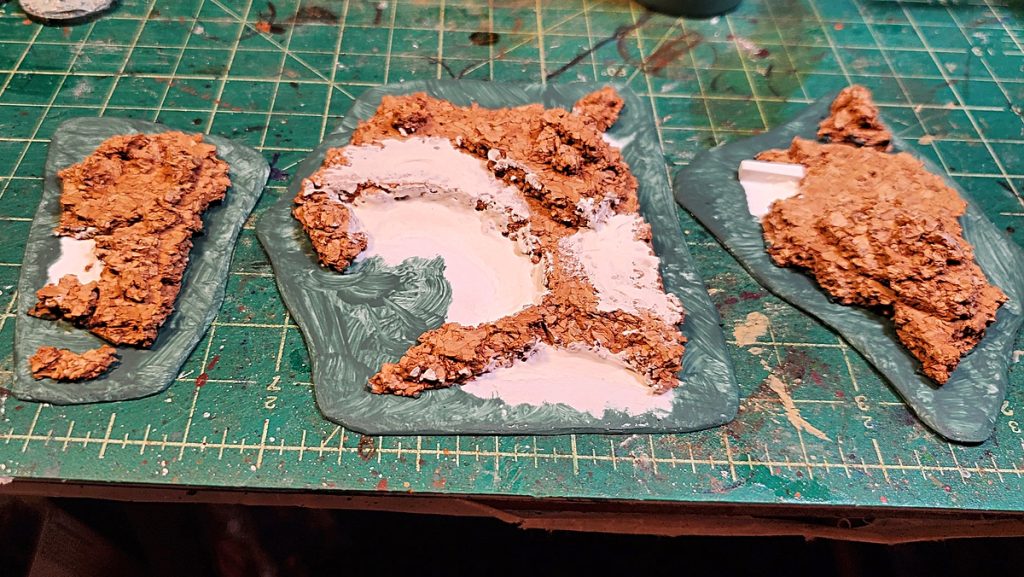
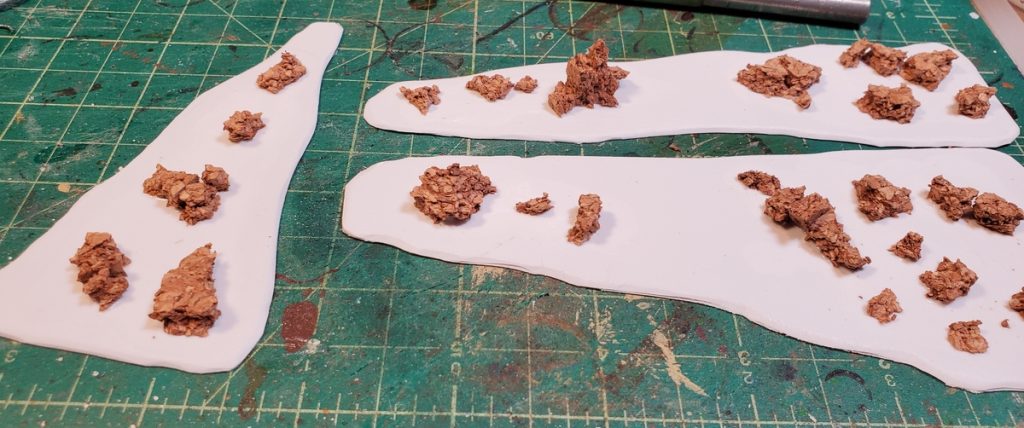
I forgot to take an unpainted/unplastered photo, and this one is blurry, but you get the idea. Cork for the island shapes on plastic card bases, then premix plaster for the beaches and to provide a bit of variety on some of the flat areas.
The basic structure was more quarter inch cork board, in larger pieces than I used for the rocks. I broke pieces of cork by hand and shaped the edges mostly with my fingernails.
The beaches are premixed patching plaster, applied with a wet sculpting tool and mostly smoothed with a wet fingertip. The concrete jetty on the mid-sized island is a little sliver of styrene plastic square rod.
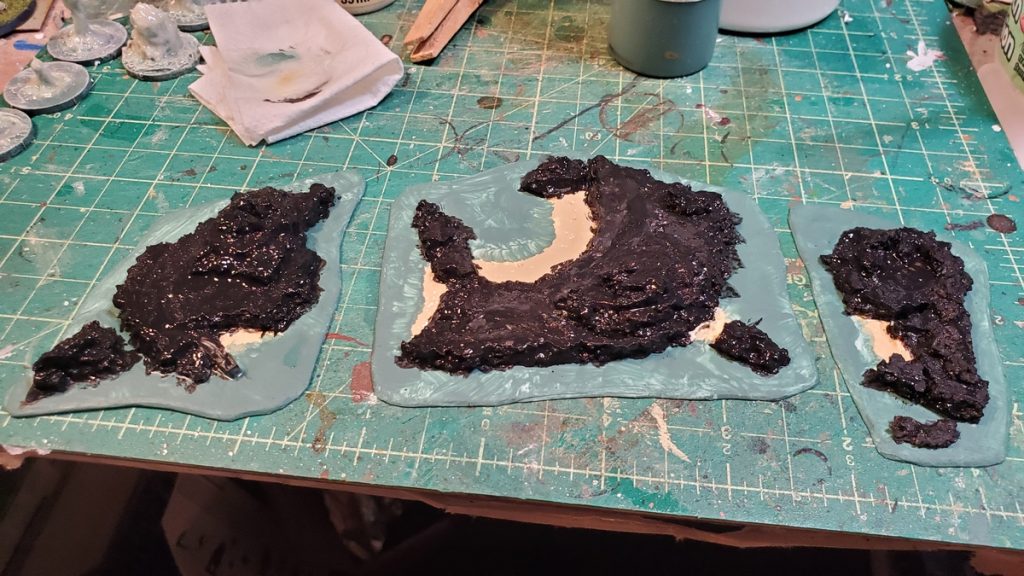
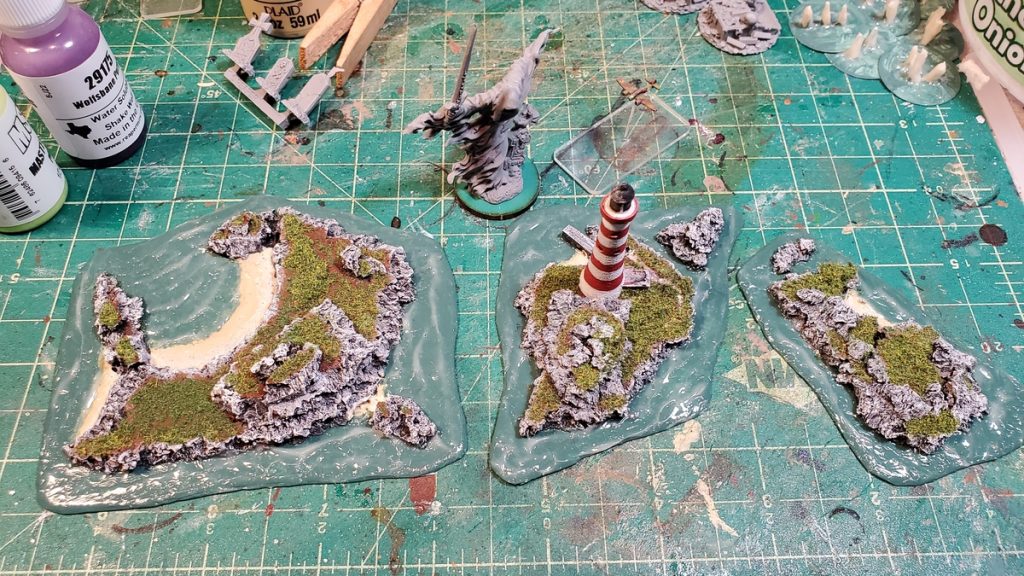
Basecoats in progress – my usual blue-green ocean colour, black on the islands, sandy on the beaches.
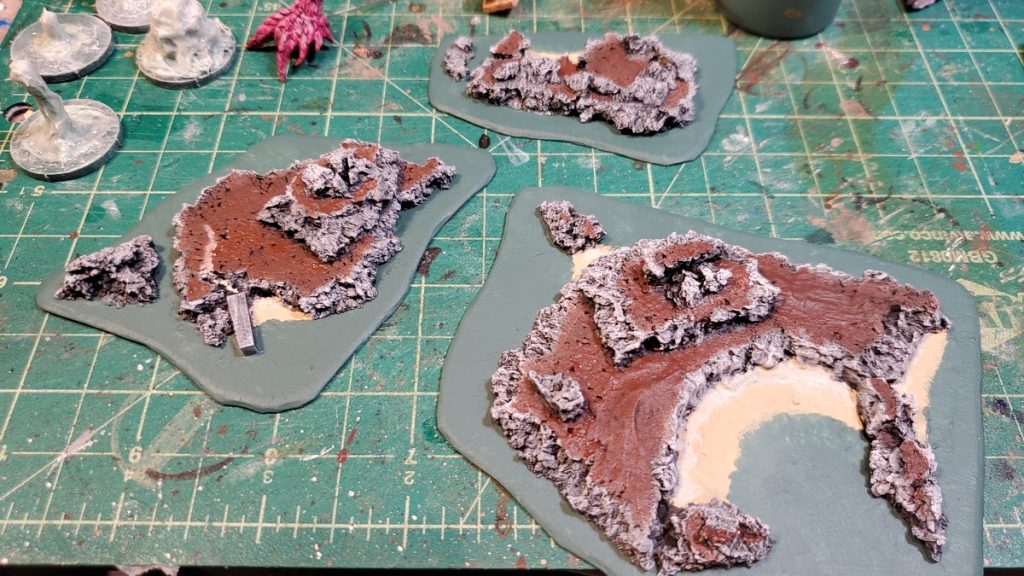
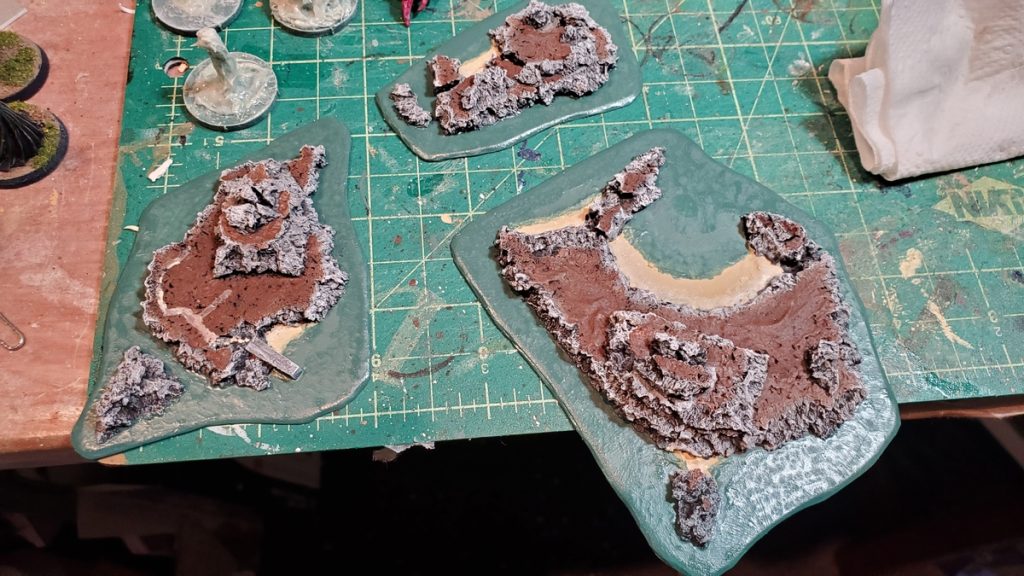
The paint is my usual ocean scenery set – a blue-green for the water, Camel and Parchment for dark and light sand, and the rocks were drybrushed up from black with a dark grey, a pale grey, and finally pure white. The flattish areas of the islands that will eventually be flocked green were painted brown.
Painting all done. The largest island (lower right) is about 4″ x 3.5″, the midsize one (left) is about 3″ x 2.5″ max, and the small one (background) is about 2″ x 2.5″.
For drybrushing, incidentally, I highly recommend heading to your local dollar store/pound shop/etc and getting a set of cheap makeup brushes. They’re fantastic for drybrushing and available in a variety of sizes.
First coat of gloss varnish on the water parts. These wound up with three coats of gloss varnish before I was happy with the look, and then the usual treatment with gloss gel for waves and water texture.
The water got the usual treatment, several coats of gloss varnish with a minimum of 24hrs drying time between each coat, and then acrylic gloss gel for waves and water texture, as detailed in the previous articles in this series. After all the water stuff was thoroughly dry I attached the lighthouse with superglue and did a quick flocking job with two or three different flock mixes.
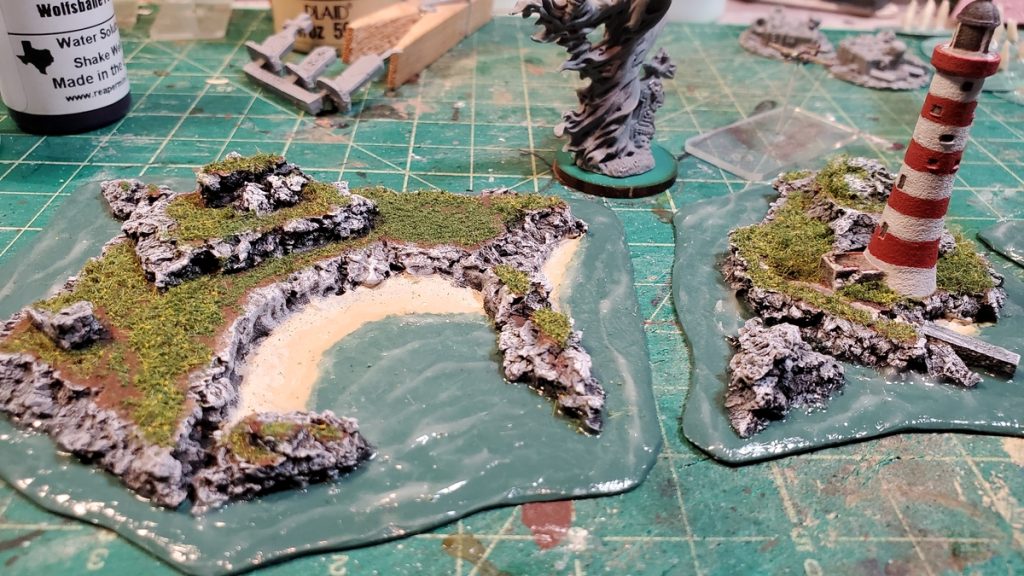
All three islands finished, flocked, and ready for the table. Really pleased with the wave patterns in the large bay of the largest island on the left.
A bit of a closeup of the large and lighthouse islands. Broken cork makes great rock formations and cliffs.All three islands from overhead. For scale, that wraith is on a 25m wide base and the 1/1200 RAF Beaufighter is on a 20mm W x 40mm L base.
These took a bit longer than I’d planned, due mostly to drying times of all the paint, water effects, and such, but they came out great and I look forward to them being a damned nuisance during 1/1200 naval games for many years to come!
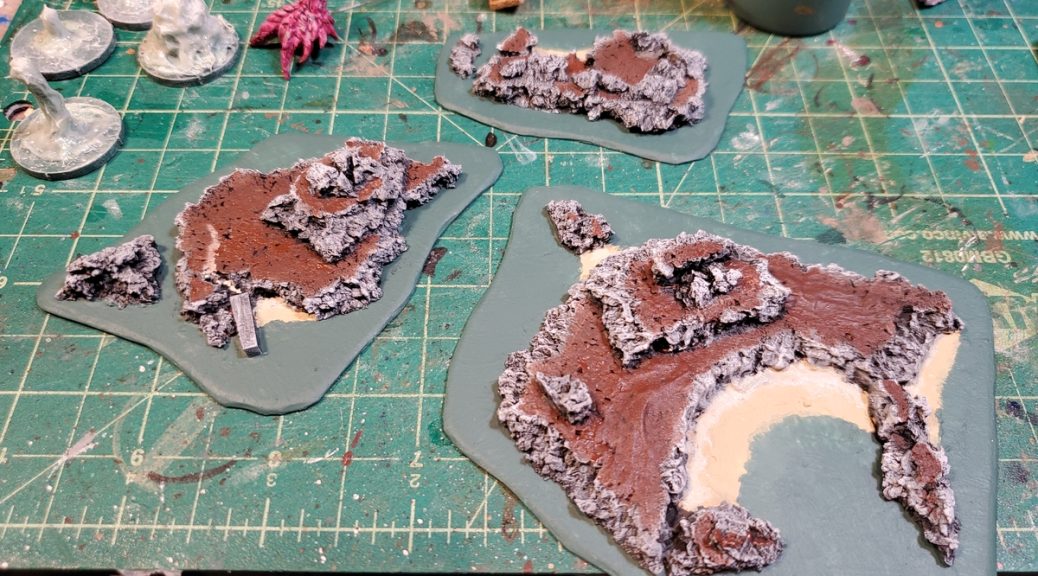
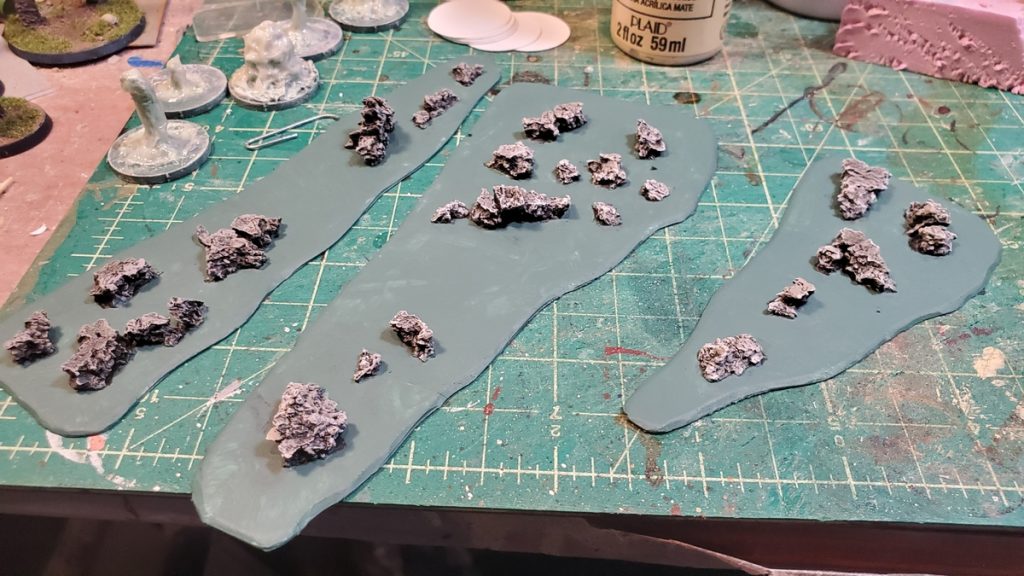
After doing a pair of new sandbanks, I wanted to do something slightly different but still on the theme of “stuff to crash boats and ships into” and decided on a trio of rocky reef pieces.
As with the sandbars I started with a chunk of .040/1mm plastic sheet, cut it up into three roughly triangular pieces, and carved and sanded the edges down so they met the table smoothly. Then I took some scrap quarter inch cork board, the stuff cheap bulletin boards are made of, and broke it up into crumbs and small pieces for rocks.
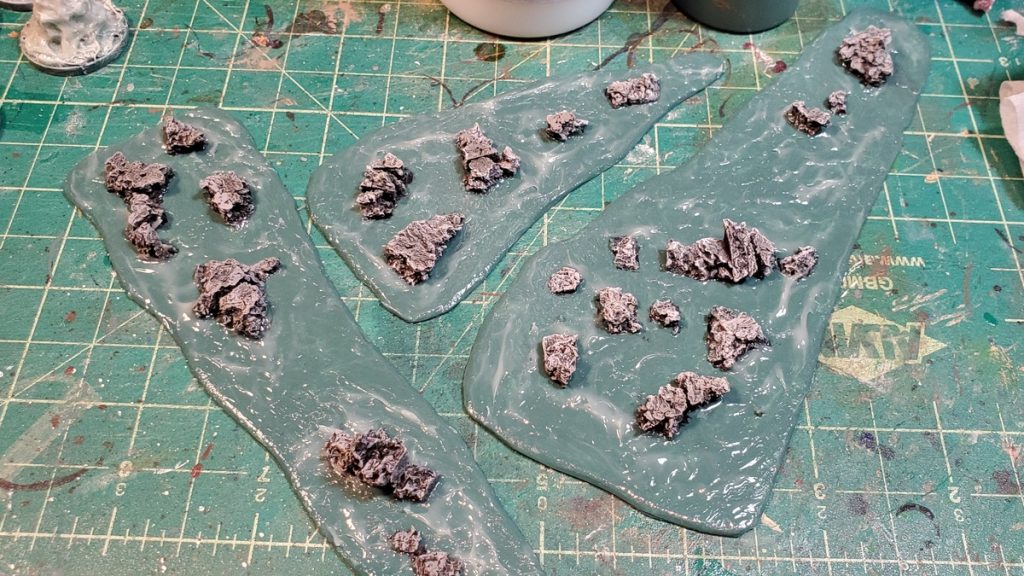
Cork rocks glued down to plastic card. I just used ordinary white glue, nothing fancy.
It helps to remember that 1″ = 100 feet in 1/1200 scale, or 1mm = 4 feet in scale – so a rock big enough to seriously inconvenience a ship can still be just a few millimeters high! I wanted rocks and islets, not proper islands (those are coming!) so I kept most of the cork bits small, breaking it up with my fingernails as needed.
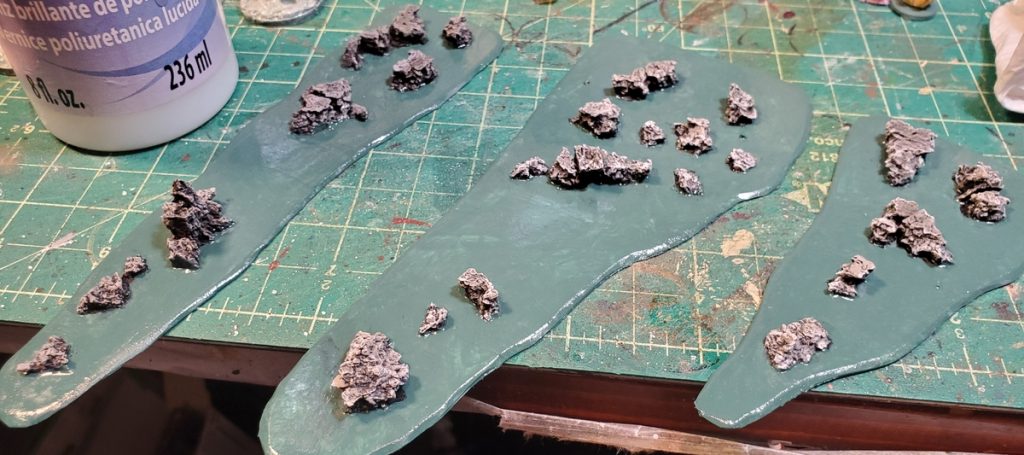
The bases got my usual blue-green ocean colour while the cork rocks got a black basecoat, and then successive drybrushes of grey-brown, pale grey, and finally just a bit of pure white.
Rocks after painting and drybrushing and a second coat of ocean colour. All ready for water effects!
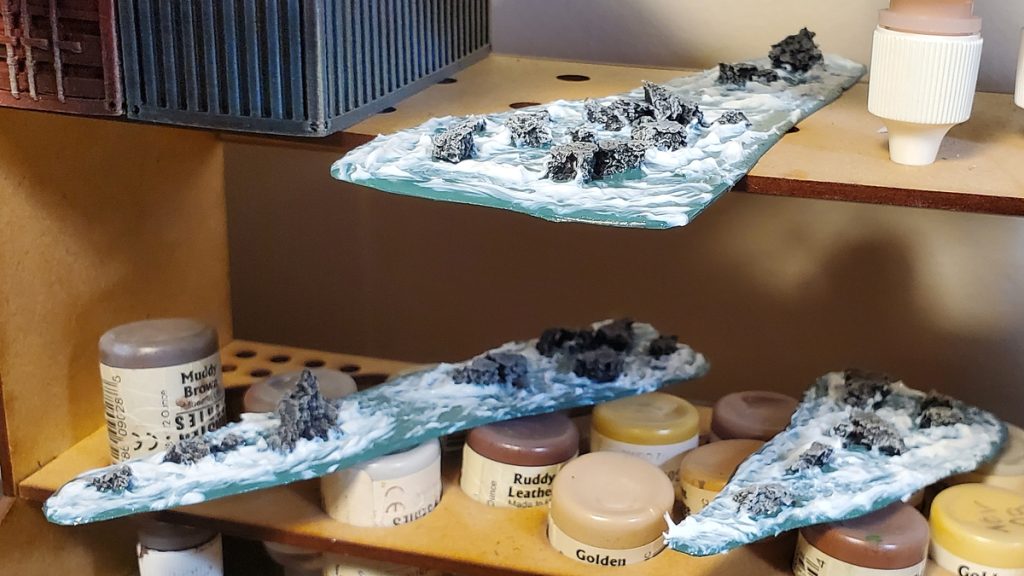
As with the sandbars, I did two coats of gloss varnish over the water parts and then a thick layer of gloss gel for waves, pushed around with a really old brush.
Gloss varnish down.Gloss gel down and pushed around to make some lines of breakers and waves around the bases of the rocks.Finished rocks after the gloss gel has dried for several days, all ready to ruin the cunning plans of 1/1200 scale captains!
These were almost as quick to create as the sandbars, you use literally crumbs of cork for the rocks so one small piece of cork will go a long, long way, and they look good. I’m looking forward to seeing them on the table menacing players who forget that no matter how dangerous the enemy is, the sea is even more deadly and far, far more unforgiving!