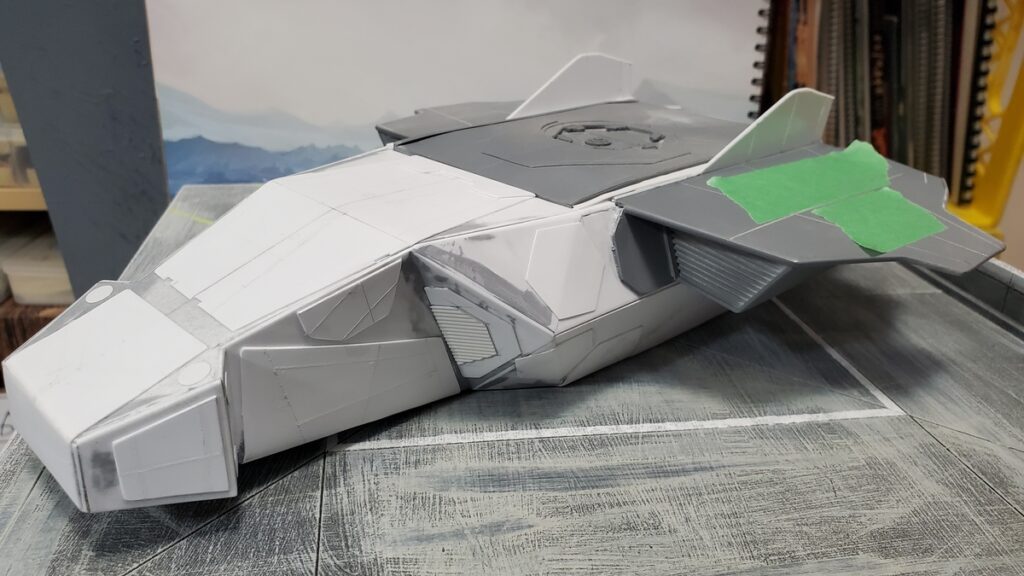
The last of this project’s posts until I can show off the painting work in progress photos and all the extra finished photos I didn’t use for the Lead Adventure Forum Build Something Contest 2025!
There was a bunch of pre-priming sanding, puttying and fiddling. The side walls of the fuselage pulled slightly skew during construction somehow, so the side rails that hold the roof panel in place had to be custom-fitted on each side.
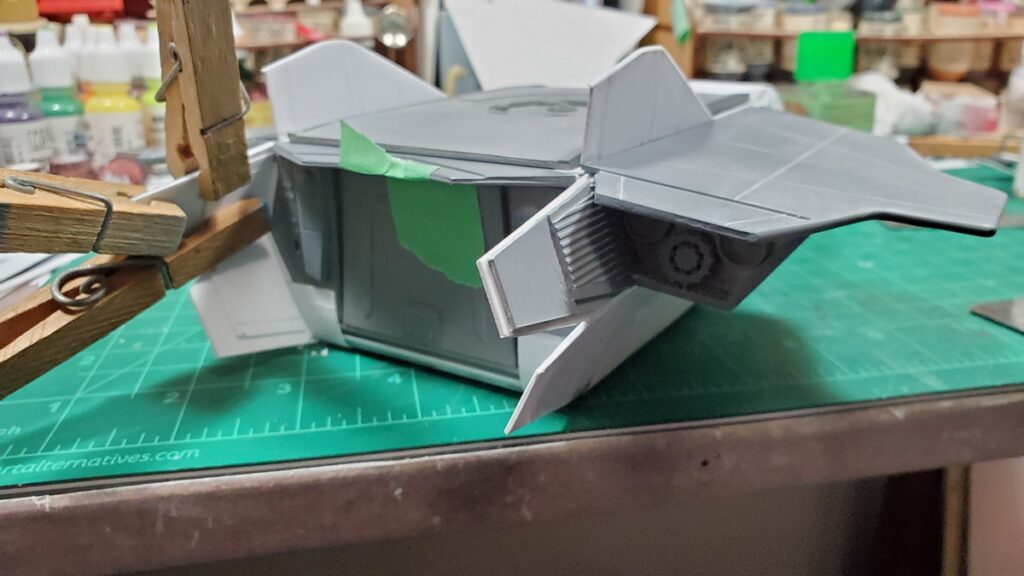
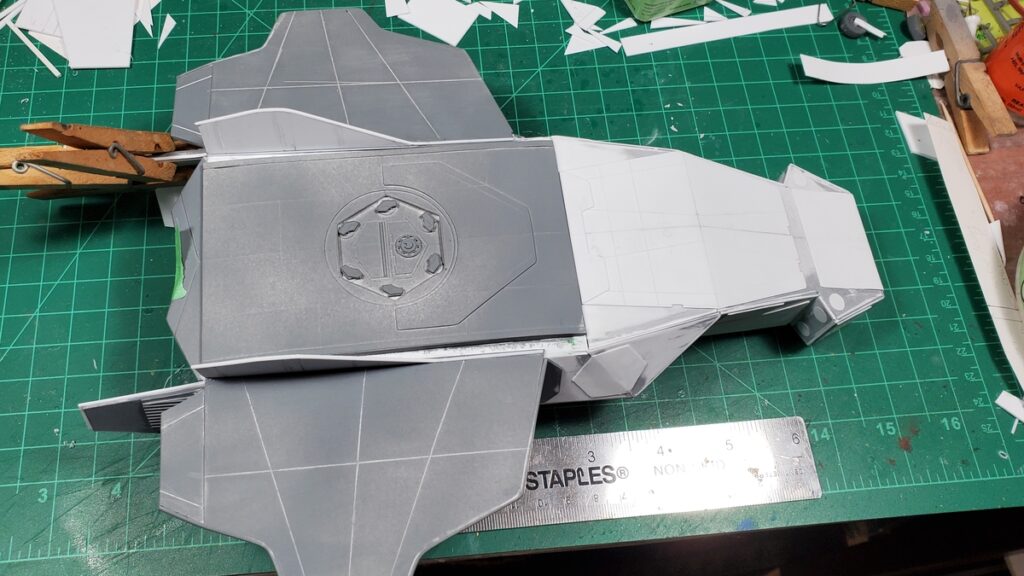
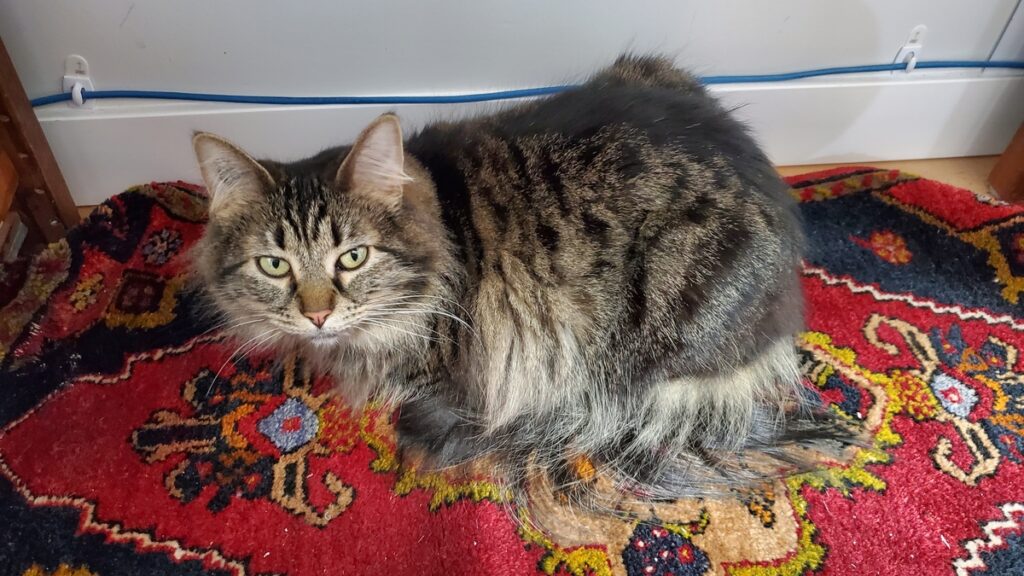
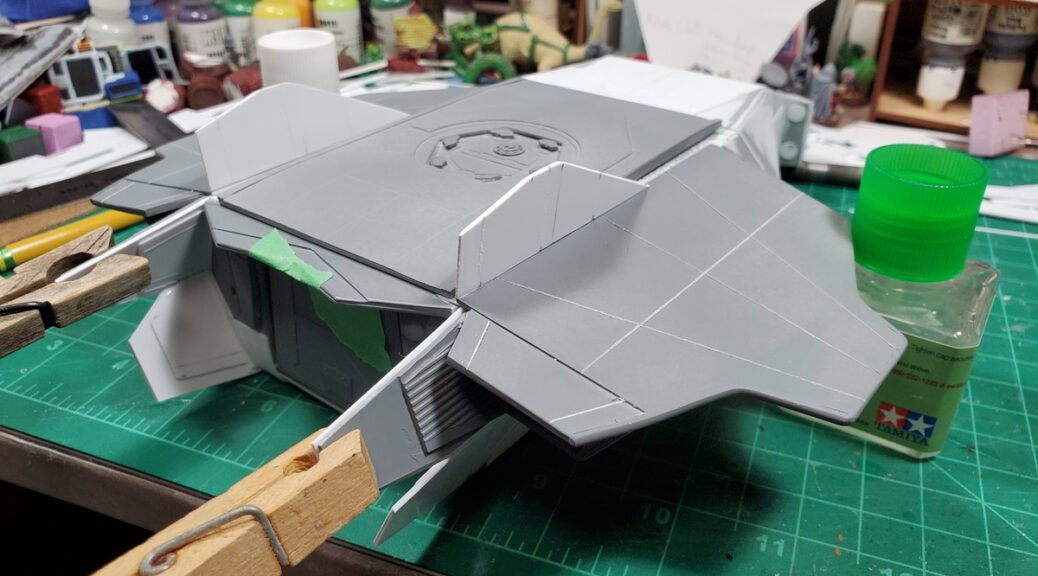
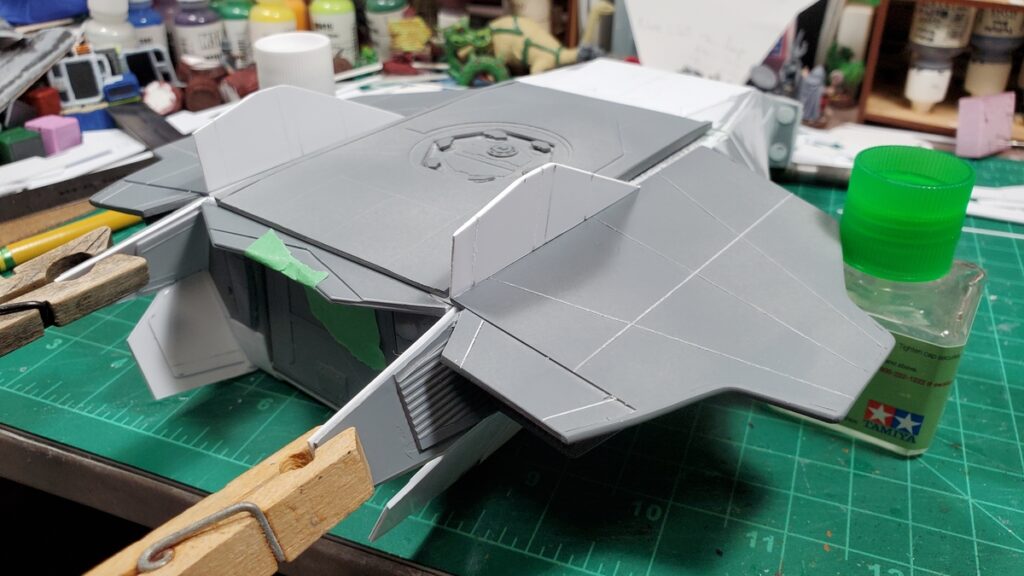
The shuttle, complete except for landing gear and roof rails, front quarter view.Rear view of the shuttle, with some final glueup of one of the rear baffle panels in progress.Top view, showing the engraved panel lines in the wings nicely.PRIMER! Here’s the underside, complete except for landing gear, all primered.Primer, top view, with the already finished, painted, and decaled cargo bay masked off.Proper supervision is essential to all well run projects. Sophie la Floof spent quite a bit of time on the rug under my project bench making sure things went smoothly.
The landing gear only went on after painting, decals, and weathering were all done, so I don’t have any photos of that to show off yet.
By the time this posts audience voting on Build Something Contest 2025 should have started over on Lead Adventure! Go check out all the great entries! BSC rules say no sharing WIP or finished painted pictures until either the contest is over or you’re eliminated from it, so there will be a bit of a pause in shuttle pix here, but I do have a gallery fully of painting photos to show eventually.
If you want something done, give it to a busy person to do is a saying that floats around. It’s often true that when you’re in a certain creative groove, you can spin off other projects much faster than you might otherwise get to them!
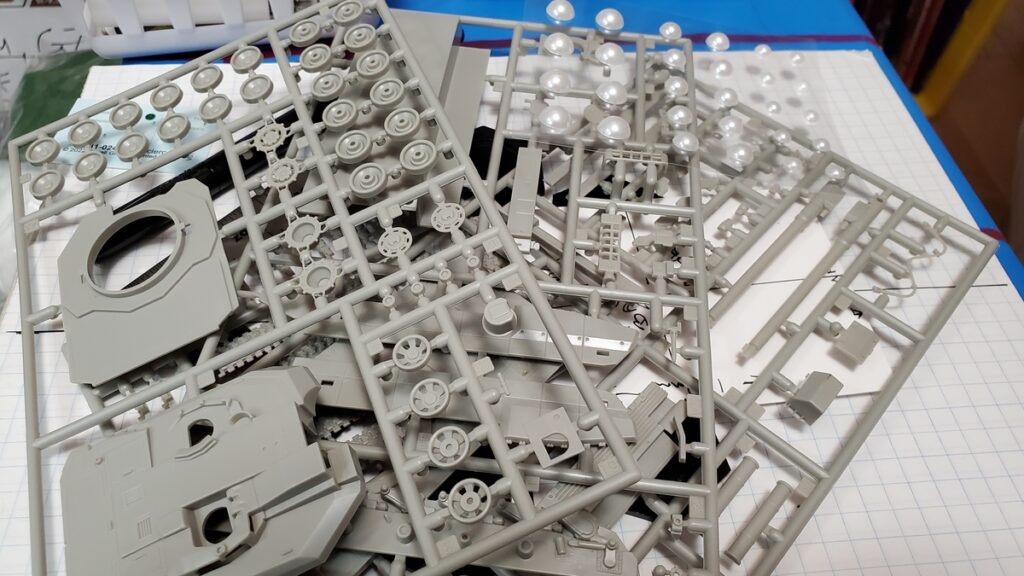
I had extra plastic kits parts around from the 1/72 LeClerc MBT kit I bought to pillage for kitbashing parts, I had some rather cool pieces of offcut styrene around, and I wanted a landing pad to stage photos of the shuttle on, so it all came together in a trio of related projects.
The Drone
This started life with the top of the LeClerc turret, the cap off an Angosturna bitters bottle rescued from the recycle bin, some googly eyes and other bits from the dollar store, and various styrene bits.
The angosGMBH Distraction-class Autonomous Sensor Drone is set up for planetary and space surveying and exploration, with various sensor loadouts depending on mission. No crew space is available, although the tiny cargo/sample bay on the port side could accommodate a human-sized sophont in a space suit for a very short, very uncomfortable ride, if it hasn’t been adapted into a drone bay for auxiliary sub-drones. Some Distraction-class are themselves autonomous intelligent citizen-drones, although most have only limited-ML minds, and some platforms are old-fashioned remotely operated vehicles.
The drone went together in a single evening and was primed and painted the next day. I got zero photos of it in raw styrene.
Drone primed, side/top view.Primed, underside view.Primed, rear quarter view.Paint in progress.Paint in progress.Paint finished, no decals or weathering yet.Side profile with paint finished.
The Distraction-class has since been decaled and weathered; I’ll try to remember to get some proper finished photos of it soon and post them.
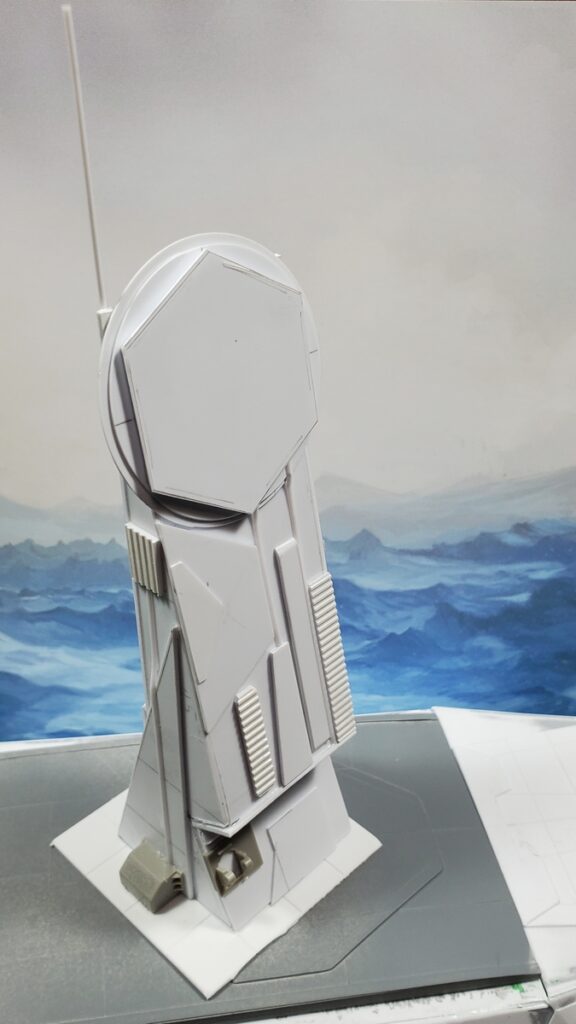
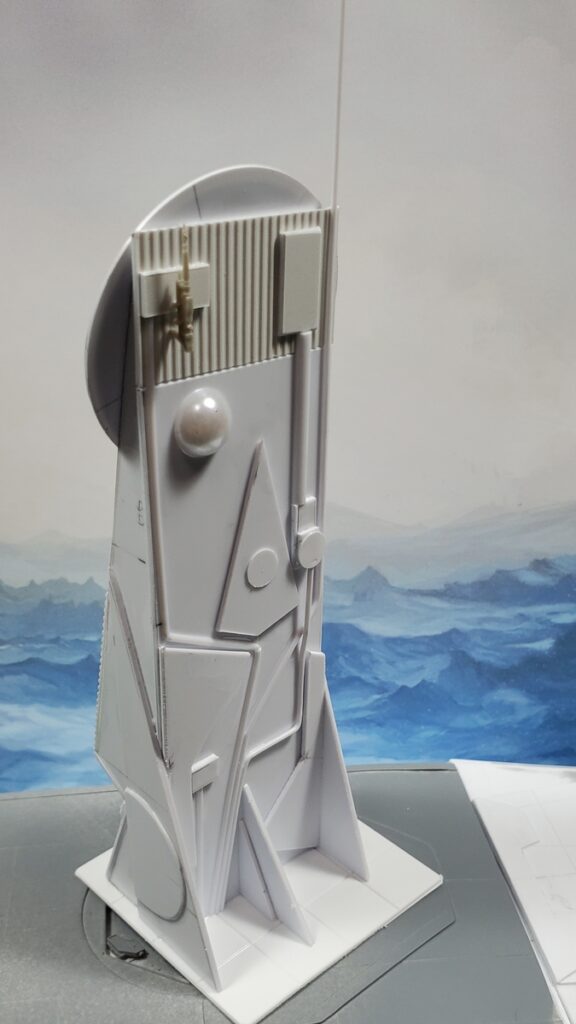
The Sensor/Comms Tower
This started with the increasing amount of styrene offcuts piling up around the edges of my workbench. Many of them were too large and too interesting in shape to just throw away, so I started fiddling around while waiting for solvent cement to cure on the shuttle and built this little tower in a couple of evenings.
It’s about 5″ tall to the top of the actual tower. The side profile is the offcuts from the nose skin of the shuttle, the various circles and hexagons are from building the docking port in the roof of the shuttle. The rest of the thing are either random offcuts from shuttle building or just stuff from my raw materials stash.
The tower, front view, bare styrene.The tower, rear view, in bare styrene.
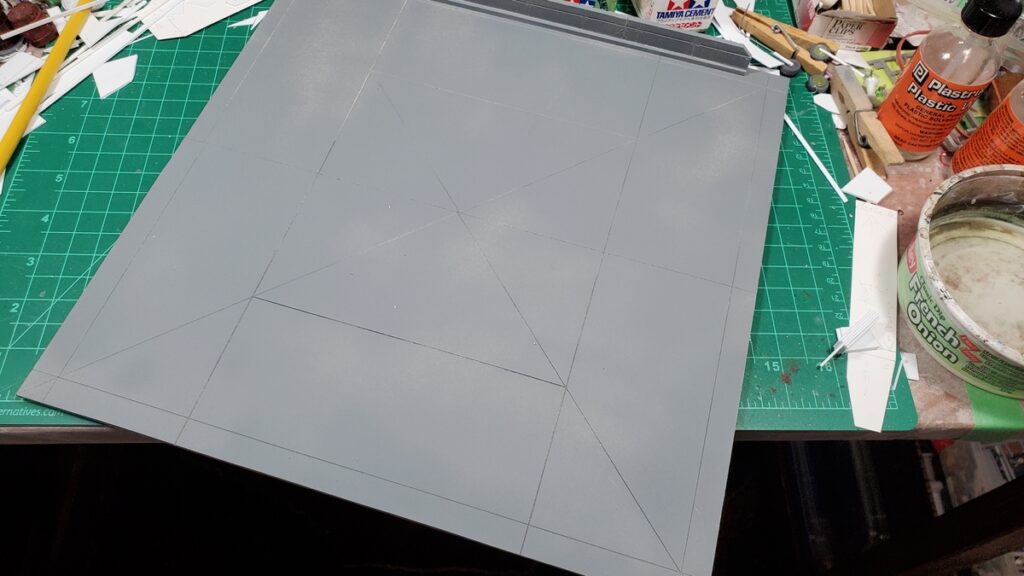
The Landing Pad
This is from the last big piece of 1/8″ foamed PVC in my stash; I’m going to have to go get more from our local signmaking/plastic supply shop because it’s wonderful to work with. Stronger, cleaner, and easier to cut than foamcore, it can be embossed and engraved easily and cleanly, and it’s less murderous on knives too.
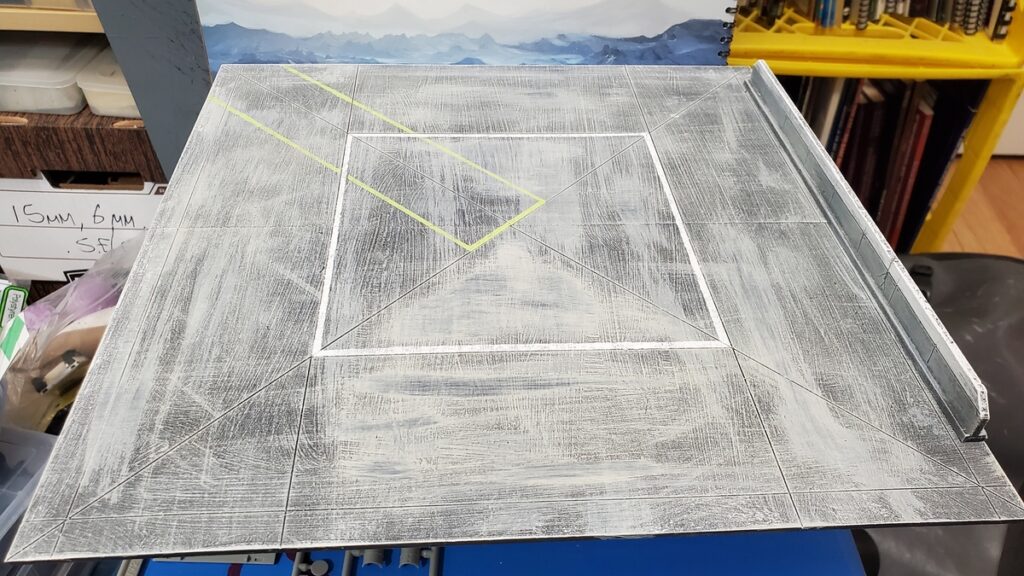
The whole thing is 12 inches by 12 inches, assembled from two 12×6 pieces with some connection strips underneath. It got grey primered, then a messy dampbrush/drybrush combo of various tans and greys over that, followed by a few washes in black, grey, and dark blue. There’s expansion cracks engraved right into the PVC, and after the main paint had dried I did a couple of marking lines with tape and a stippling brush in white and bright yellow-green. (Reaper’s Dungeon Slime paint. Highly recommended if you want an obnoxiously bright hazard warning colour!)
I also did a low wall piece with PVC offcuts. It’s 10″ long and about half an inch high. It got the same paint as the pad, with the top third or so painted white when I did the pavement markings on the pad.
Primed and waiting for paint.Painted and marking lines done. Nice and simple, just a few minutes work over a couple of days. Painted wall piece off to the right.The mostly-complete shuttle posing on the finished landing pad.
I’ve got a few final complete primered shuttle photos to show off soon, and after the Build Something Contest rules allow, I have a bunch of painting progress photos to post. The shuttle was a big painting project and painting took most of March and the first week of April!
The long-overdue fifth installment of my Build Something Contest blog posts! This one takes us from the end of Part Four, where we had the start of detail panels, no wings yet, and the cargo bay just primed.
Per BSC rules I can’t share WIP or finished painted photos yet, so there’s still going to be gaps in this build log. I have a bunch of WIP paint photos taken and will share them when the contest has begun.
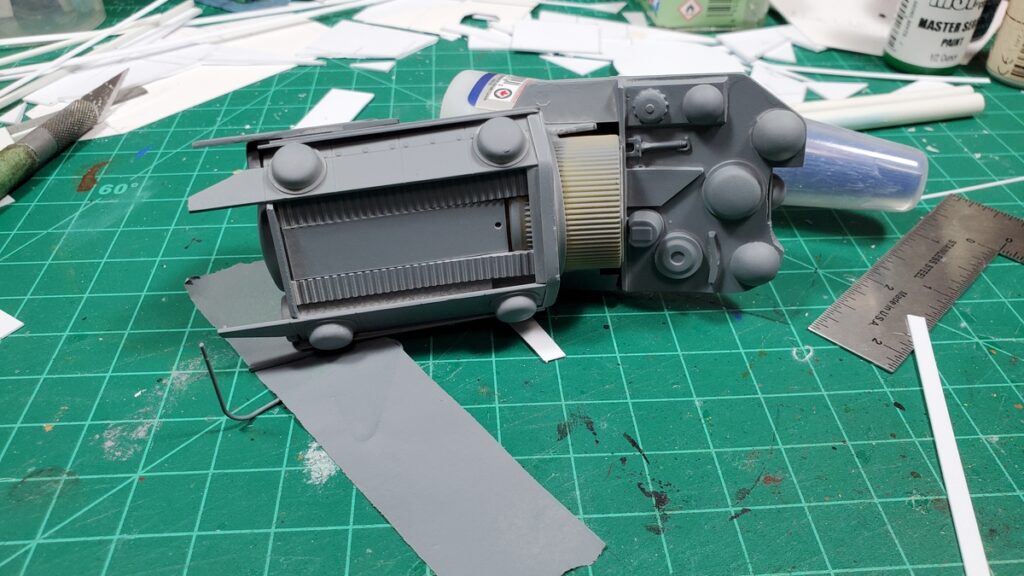
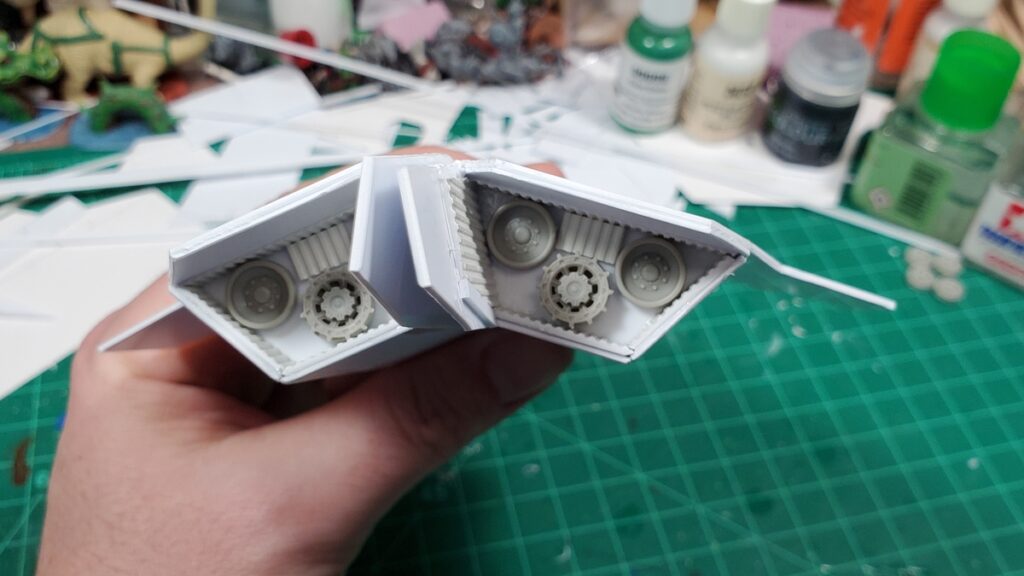
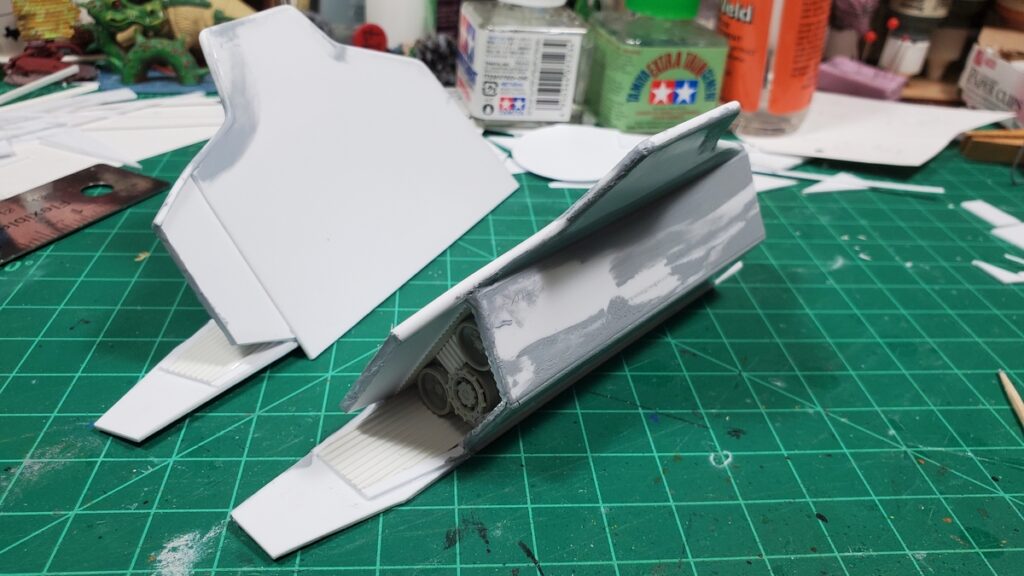
Feb 22 – the underside gets detail panels.Feb 22 – underside detail panels, looking aft.22 Feb – the engine pod assembly begins.22 Feb – layout of the two wings on 1mm styrene sheet.22 Feb – engine and wing subassembly taped in place on the fuselage.22 Feb – wings taped to fuselage.22 Feb – wings temporarily mounted to fuselage, overhead view.24 Feb – wings and engine pod details.. Front view, showing the intake grilles.24 Feb – wing and engine subassembly, rear view with jet/rocket nozzles.24 Feb – another view of the rear of the engine pods.2 March – putty work on the engines and wings.3 March – putty and test fit of roof and wings on the fuselage.3 March – decal sheets assembled. There are almost three dozen decals in the cargo bay and another twenty or so on the outside of the finished shuttle.9 March – final test fit of the wing/engine subassemblies9 March – the wings get the vertical stabilizers added.9 March – rear ramp view with detail panels on the insides of the rear fuselage extensions.9 March – the wings finally get glued on! Major construction is finished, on to priming and painting!
Along the way while finishing the shuttle, I built a 12″x12″ landing pad as a photo prop and gaming scenery, a small ‘drone’ using some of the LeClerc MBT parts that hadn’t be used in the shuttle build, and a 6″ tall sensor tower that used up a bunch of the offcut styrene from the shuttle that was too interesting to just throw away. I’ll share photos of them in another post.
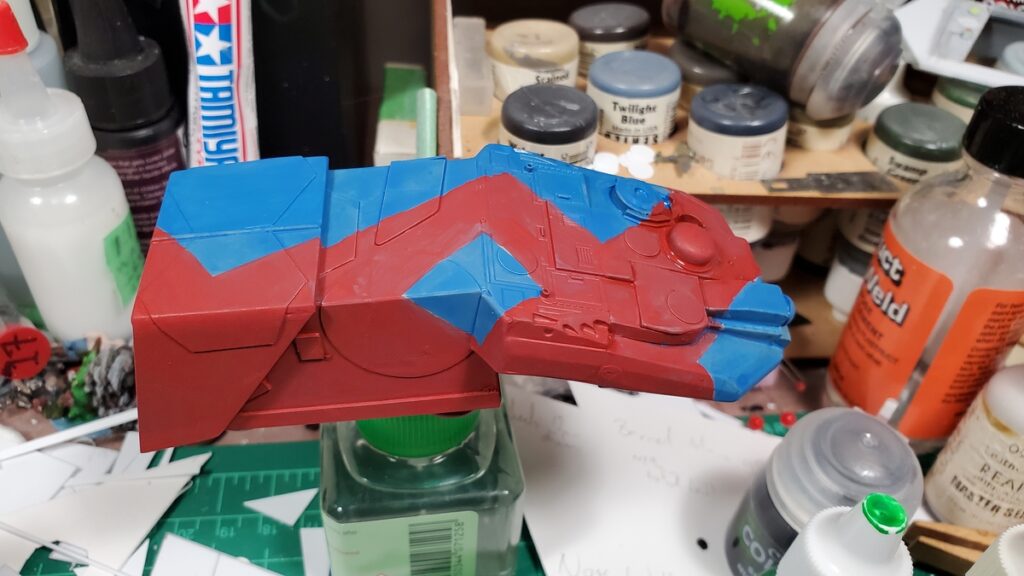
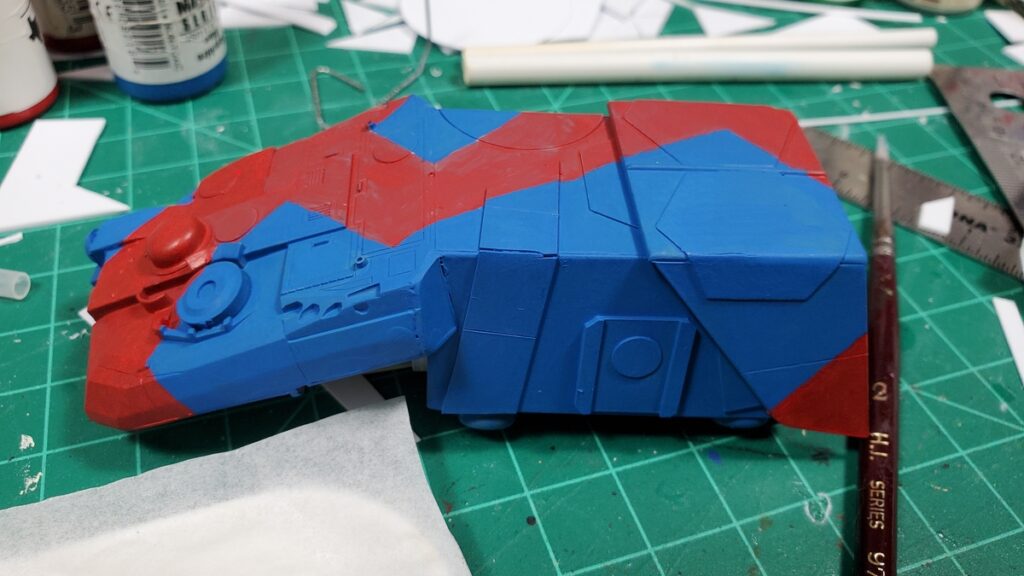
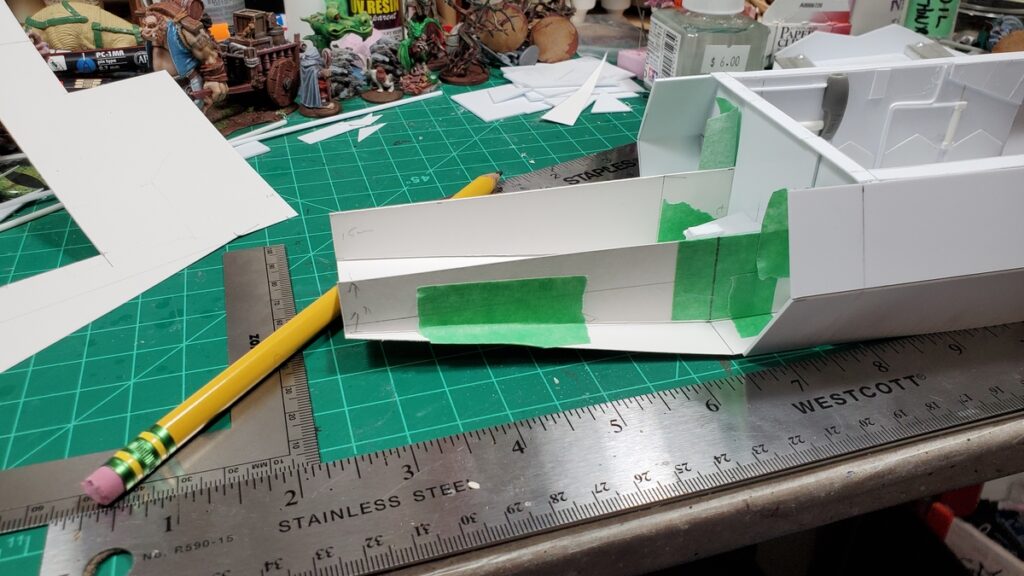
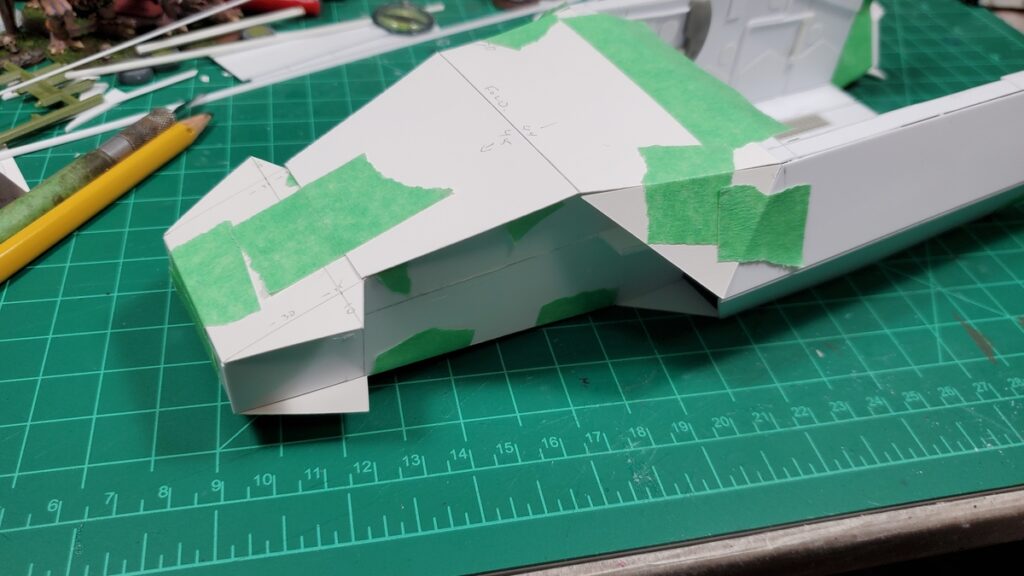
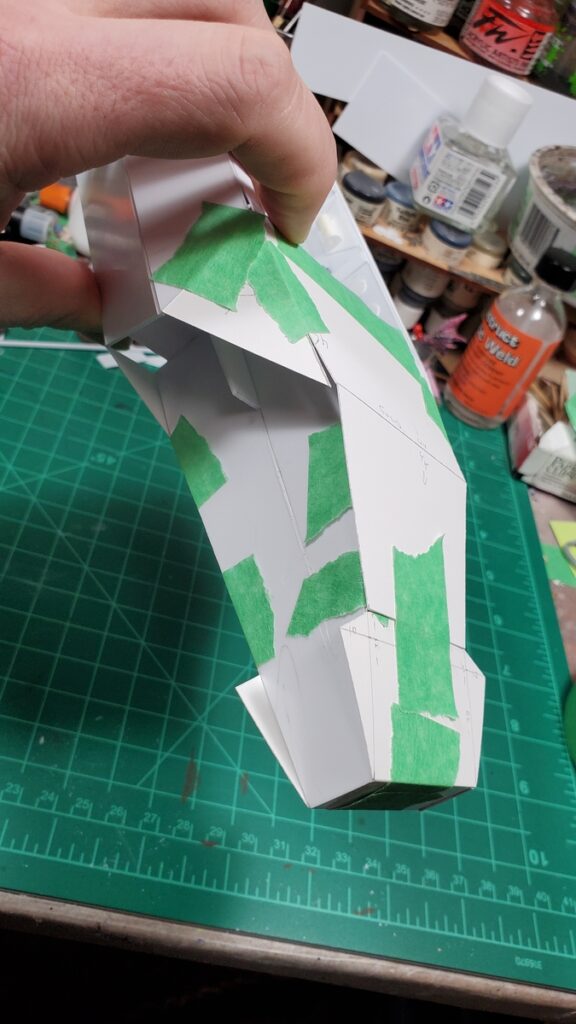
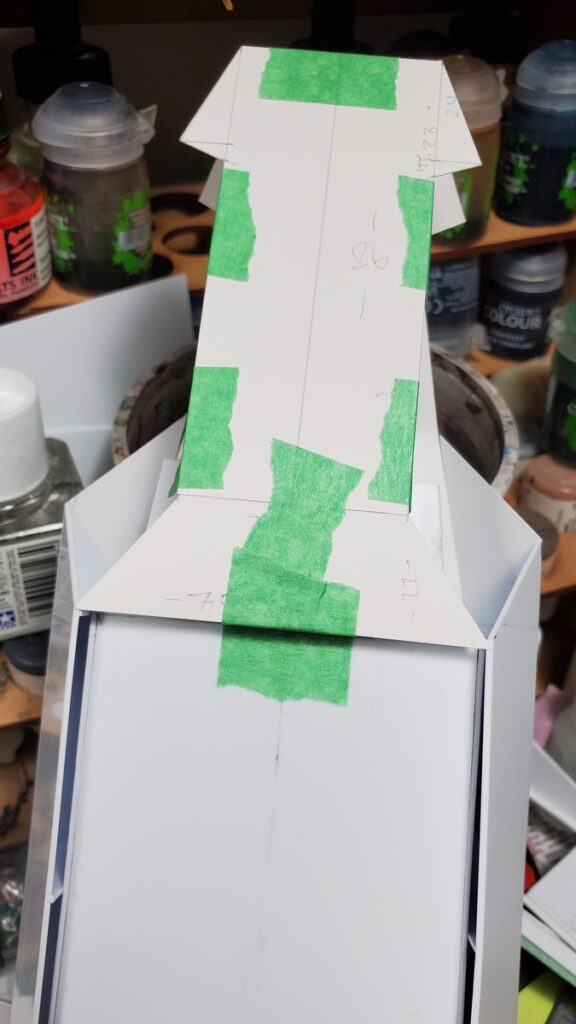
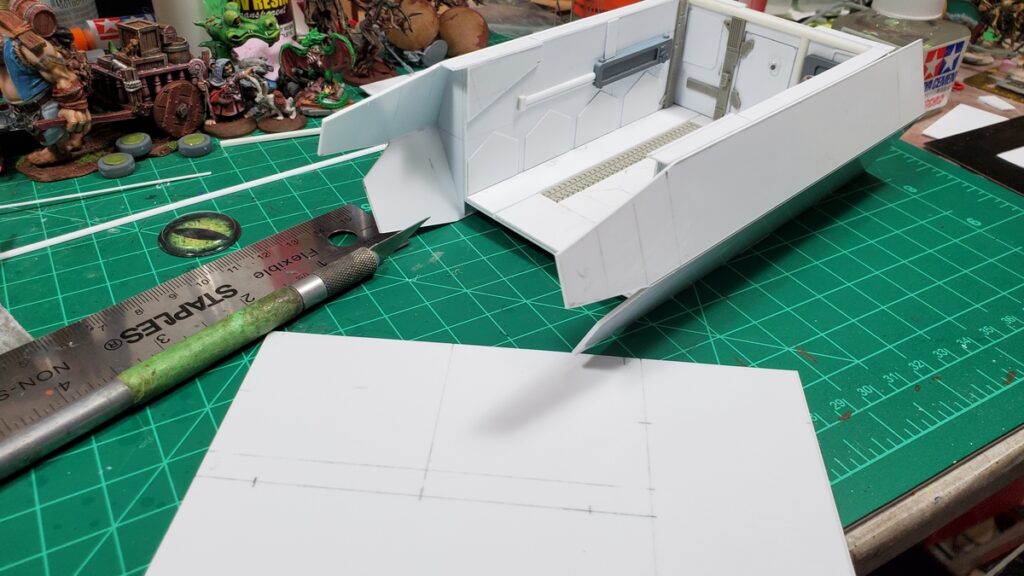
Decided to go with the nose next instead of the wings and engines, and as predicted in my last post, it required a lot of mockup work, in two stages.
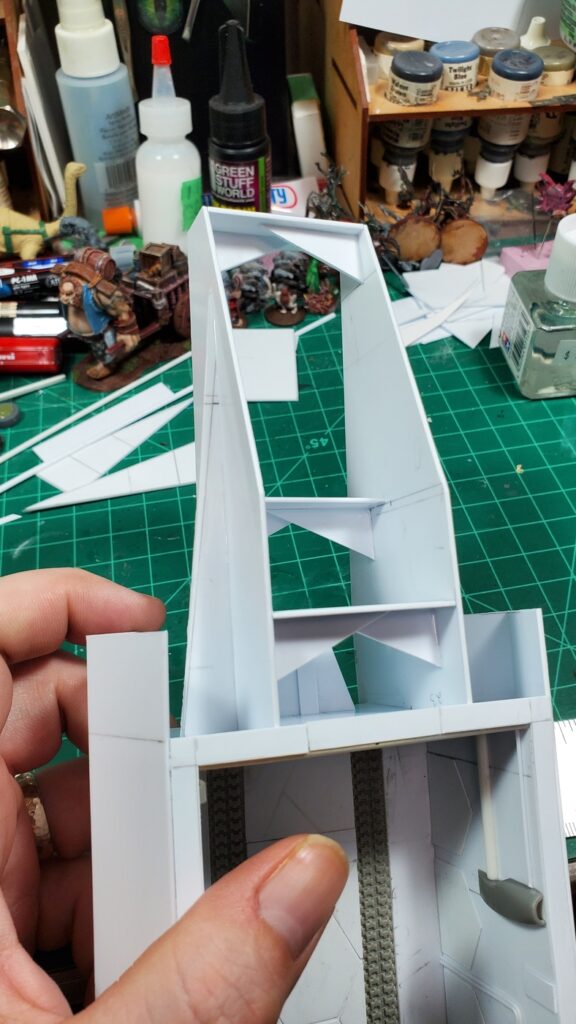
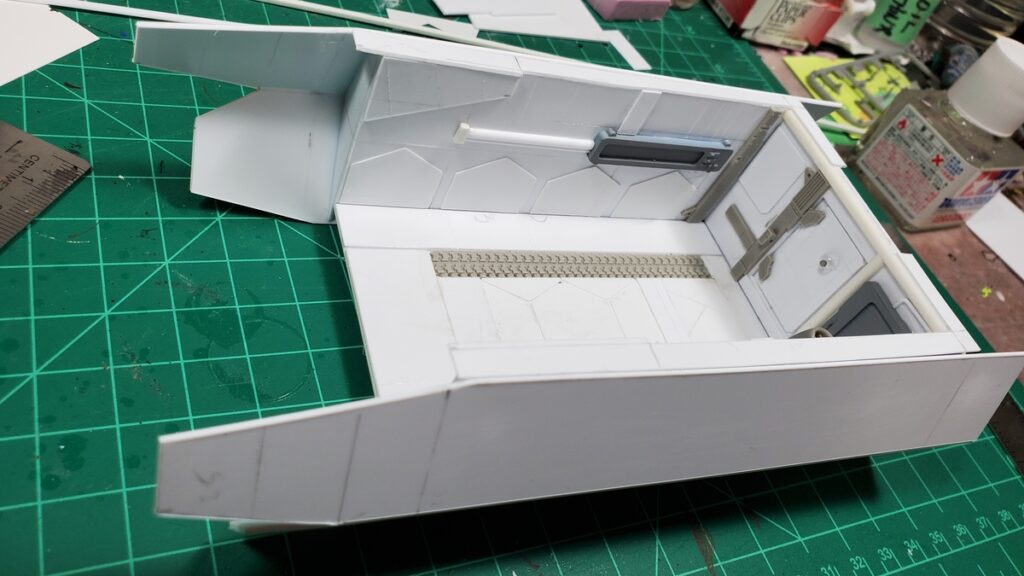
First, I did an internal frame to establish the basic proportions of the nose and give me a nice solid frame to hang the skin from.
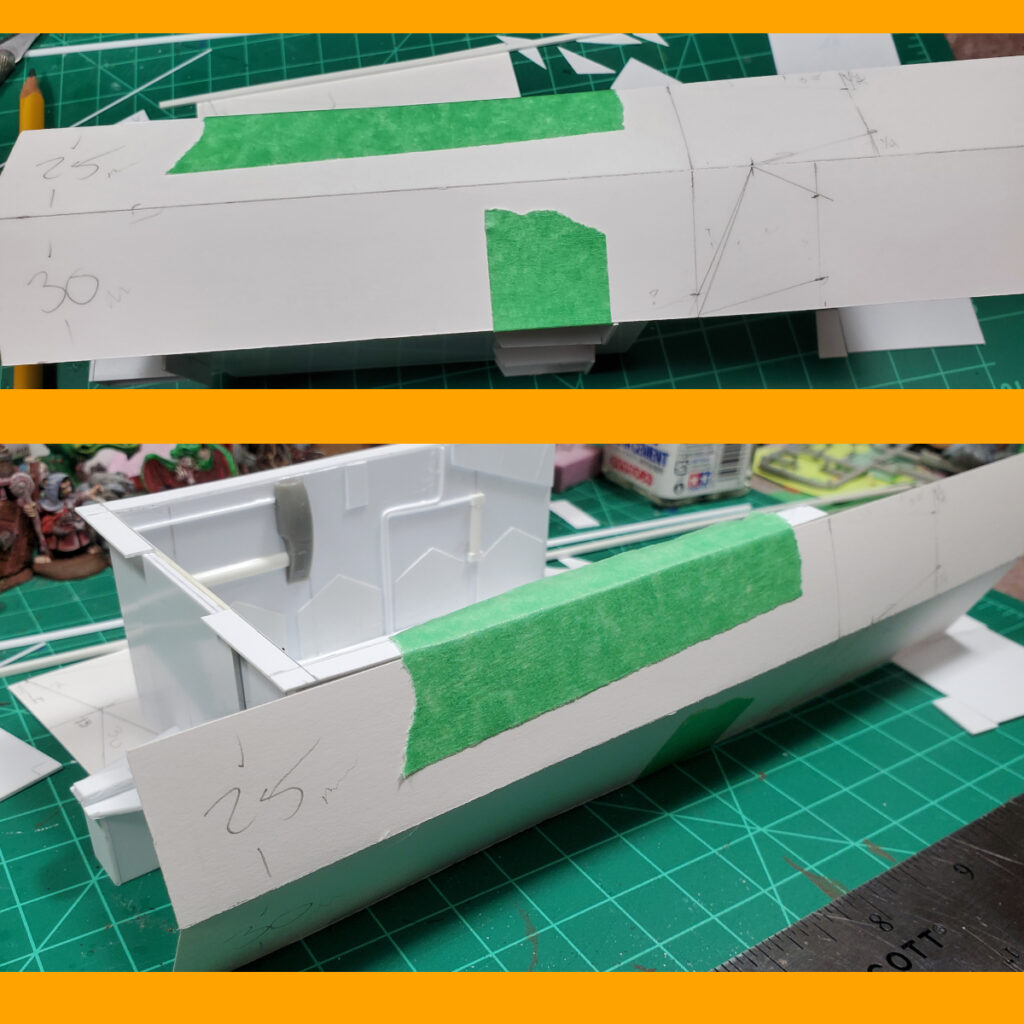
I redid parts of the skin mockup three times, including scrapping round three for part of the sides and going back to round two’s ideas. The advantage of all of the fiddling with cardstock and masking tape, of course, is that I knew what I was doing (mostly) when I switched to 1mm sheet styrene and started the real thing.
I also cut back the outer (top/bottom) corners of the sides where they extended forward, and that was the right call, it made integrating the nose and sides easier.
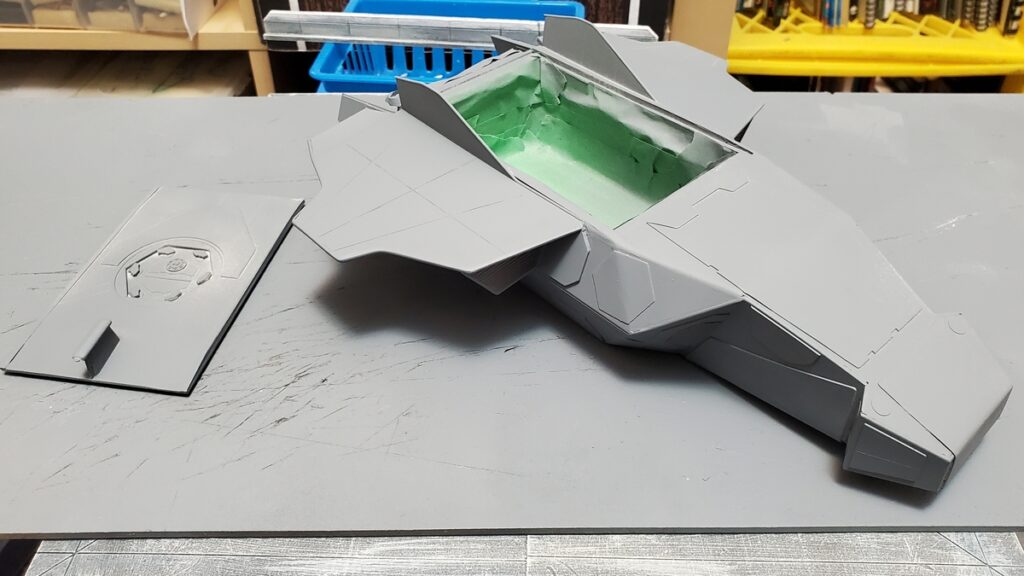
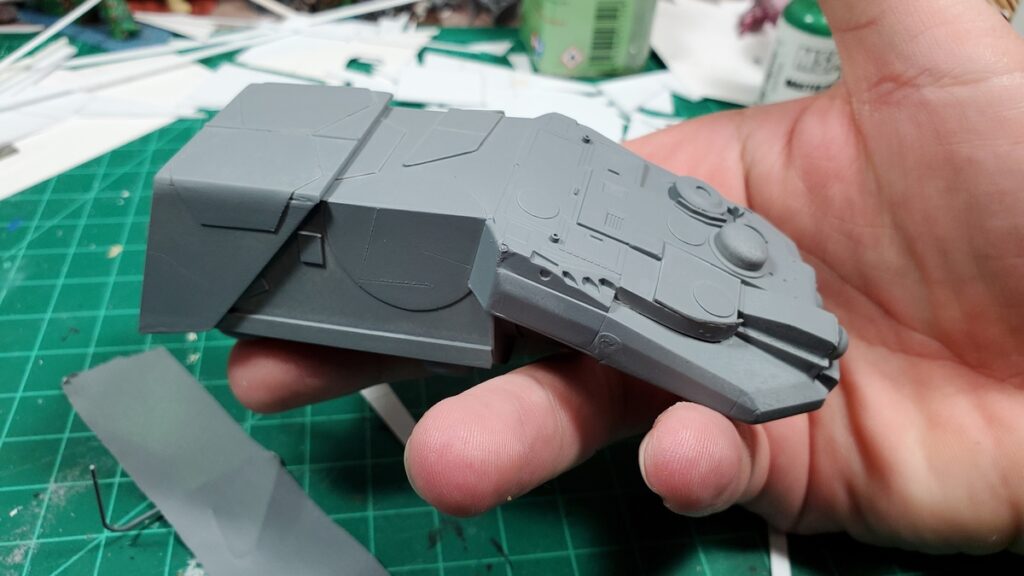
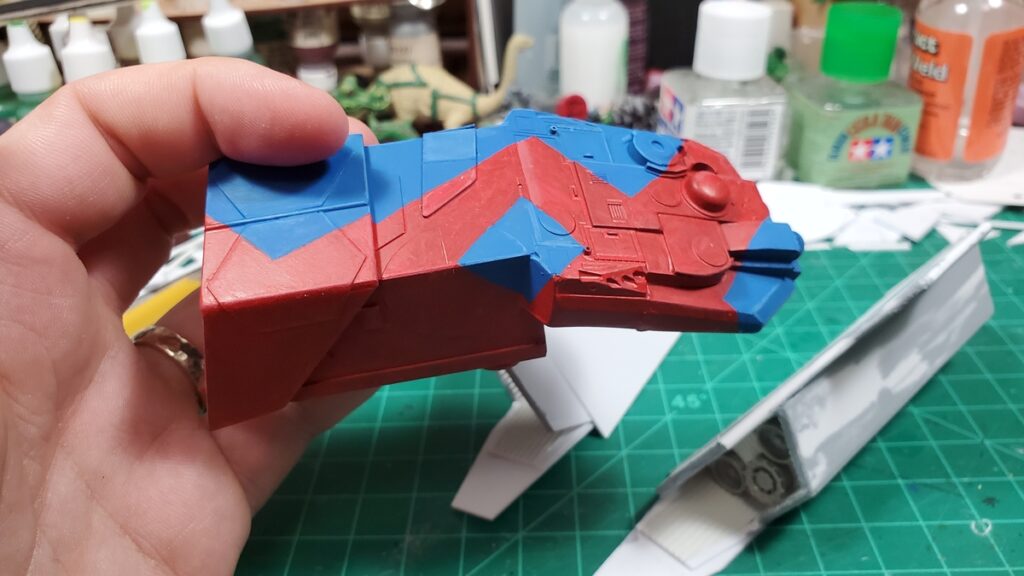
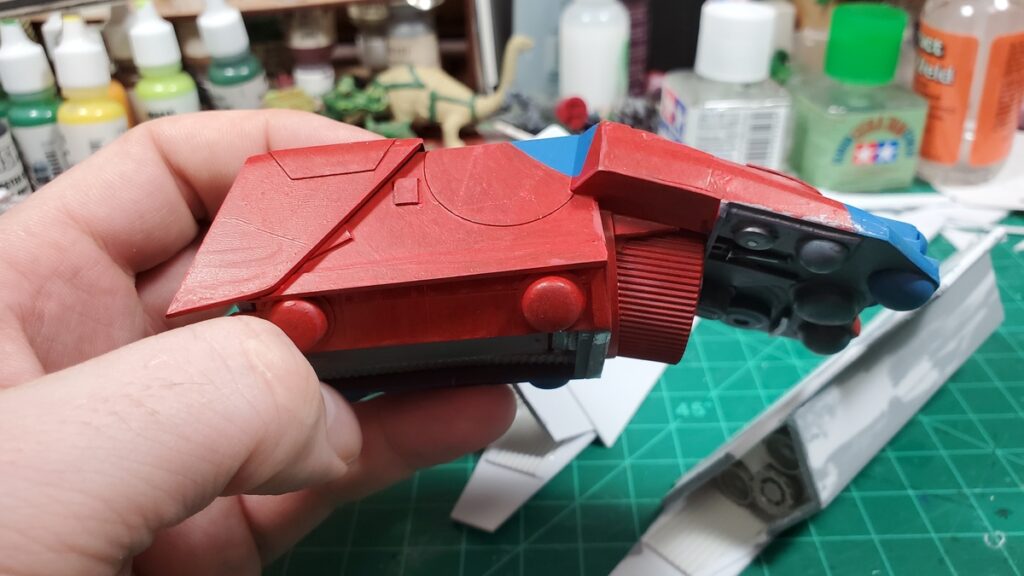
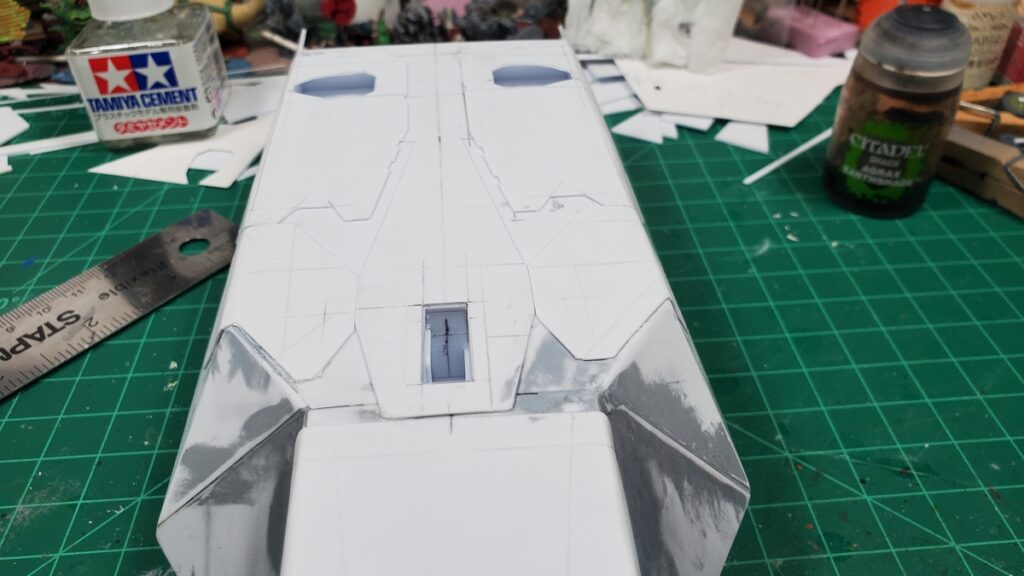
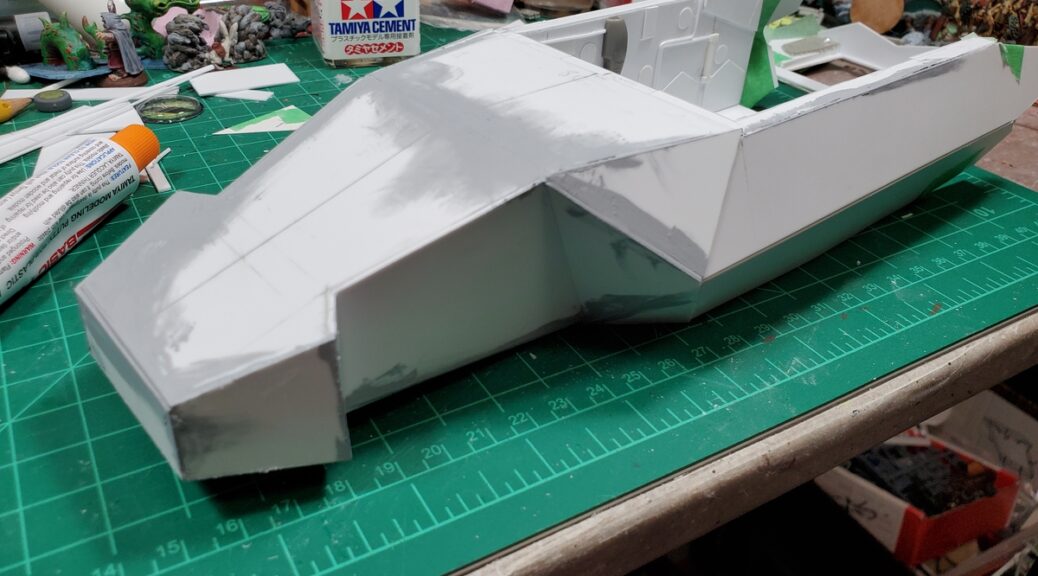
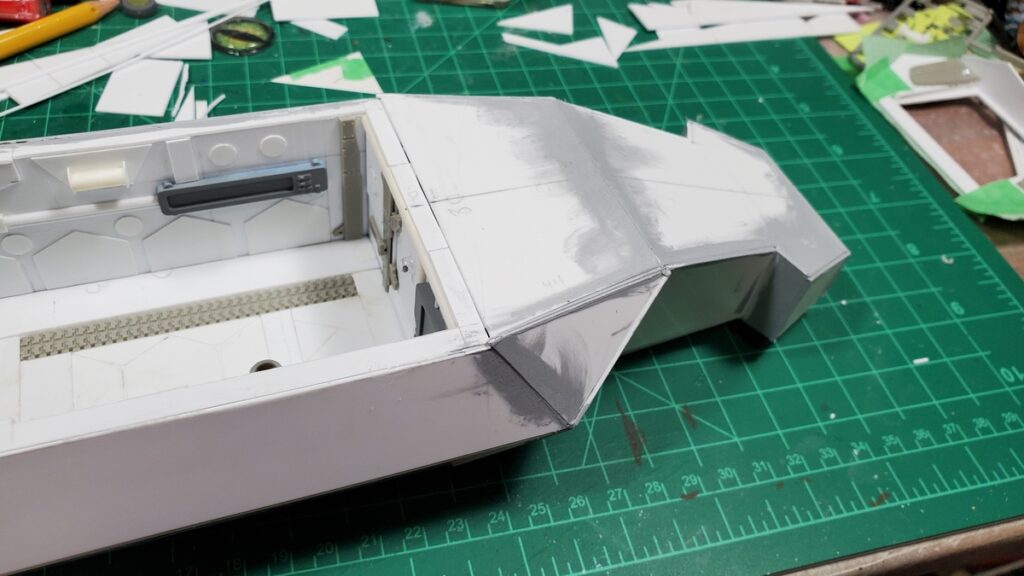
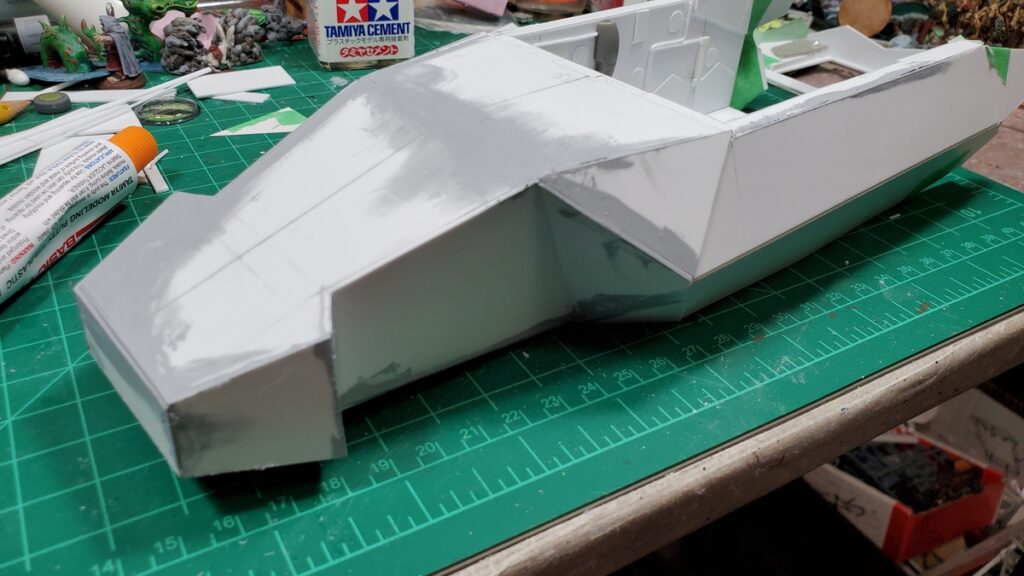
The hammerhead nose was a spur of the moment idea while planning the first mockup piece and I really like how it’s come together; the hammerhead let me play with the angles and bulk of the nose area more than a more straightforward taper would have.
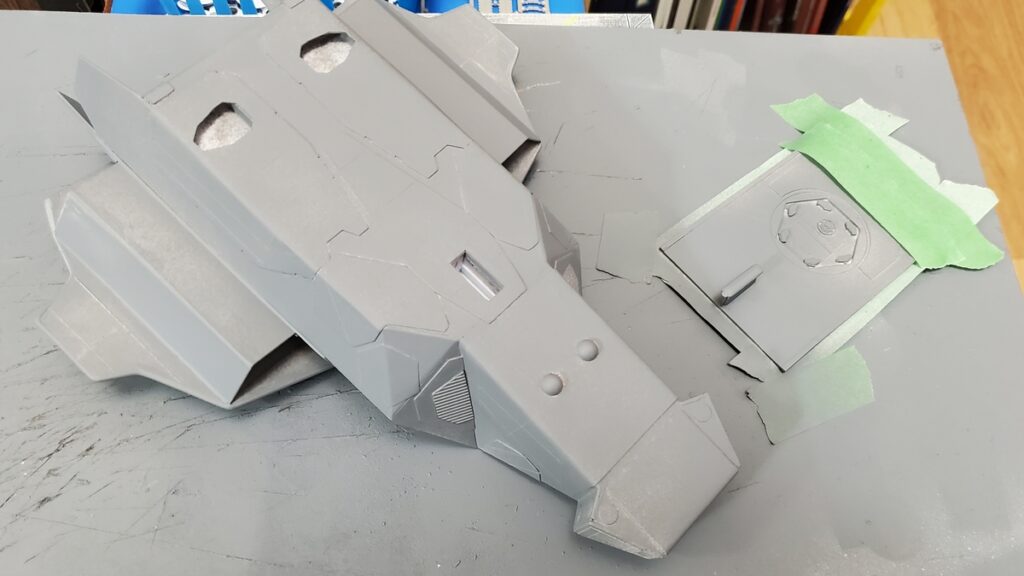
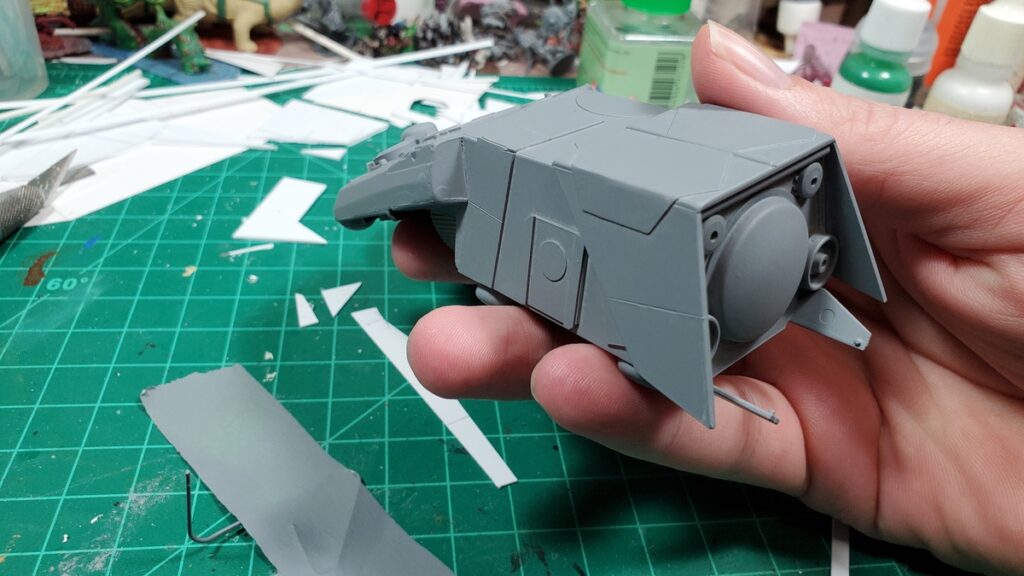
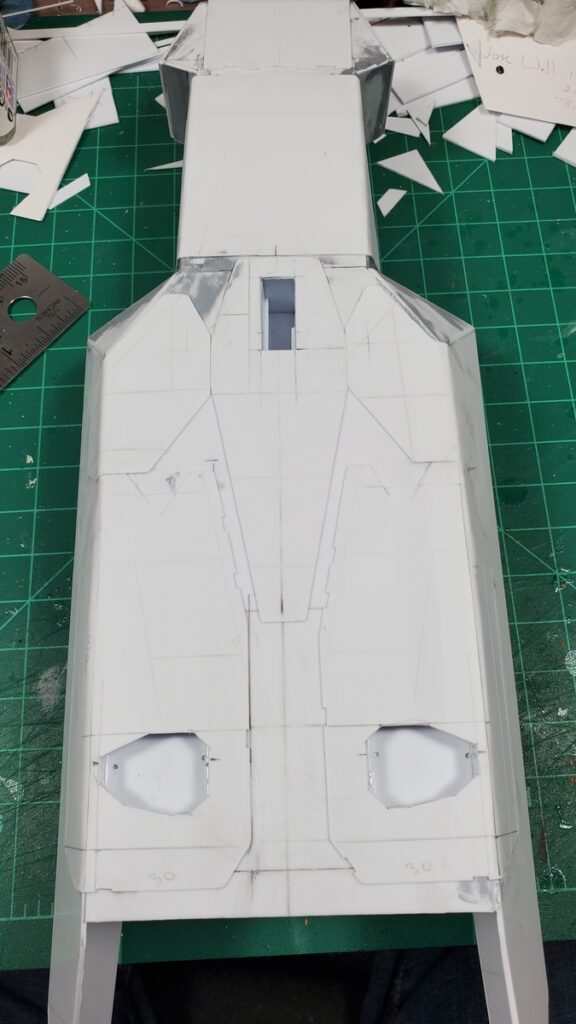
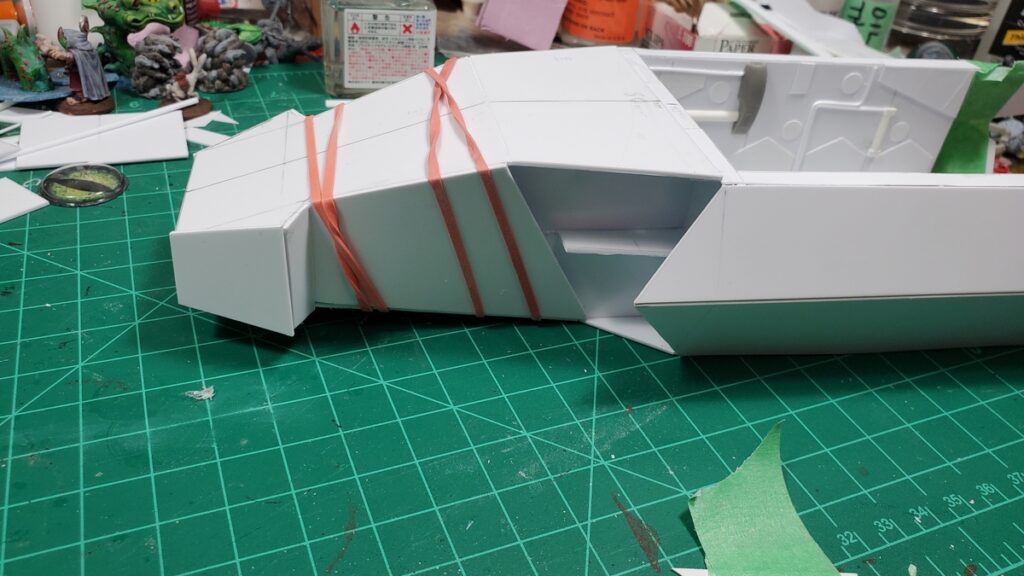
Mockup for the nose frame.Nose frame finished in 1mm styrene. I wound up cutting most of the long thin brace on the outer side off, but all the internal bracing gave me a nice solid, trouble-free start to doing the skin.Finished nose frame. The whole beast is just under 11 inches long, nose to back end, which is perfect.Closeup of the top left with skin mockups in progress.Nose skin mockup in progress, figuring out what to do between the hammerheads and the start of the body/sides.The underside of the nose, mockups in progress.Finally cutting styrene! The big panel behind the hammerheads has a twist to it, so it got anchored down with elastic bands and left for the plastic cement to cure for a bit.Styrene skin in place, sanding and puttying cleanup started. There is going to be a LOT of sanding.Current state of the nose, with putty smeared around a lot of the seams and sanding in progress.
I really like how the whole thing is shaping up, it has a good bulky angular look to it. There’s going to be a round of detail panels over this initial skin, after the endless sanding and puttying is done – some of the seams didn’t come out quite as well fitted as I’d like, so there’s going to be some remediation before detailing can start!
Still to do, in rough order of size/complexity of the subassembly: the engine pods and wings; the roof for the cargo bay; landing gear and landing gear bay doors; skin on the belly.
I’m away this coming long weekend and have some things to get organized before we go away for the long weekend, and as mentioned, the next while is likely to be mostly sanding, so it might be ten days or so before there’s another blog-worthy update to this project!
My Build Something Contest 2025 thread on LAF is here; the rest of the contest has some very cool entries – there’s another couple of shuttles or dropships, some neat magical walking constructs, and a bunch of other cool concepts among the other contestants! Entries just closed on February 8th so everyone who’s in for this year is in!
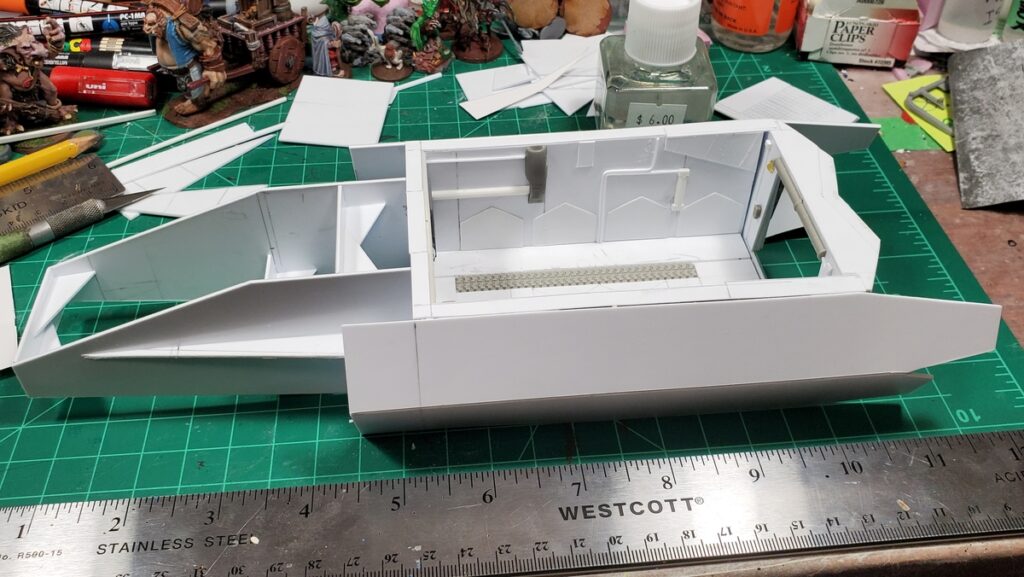
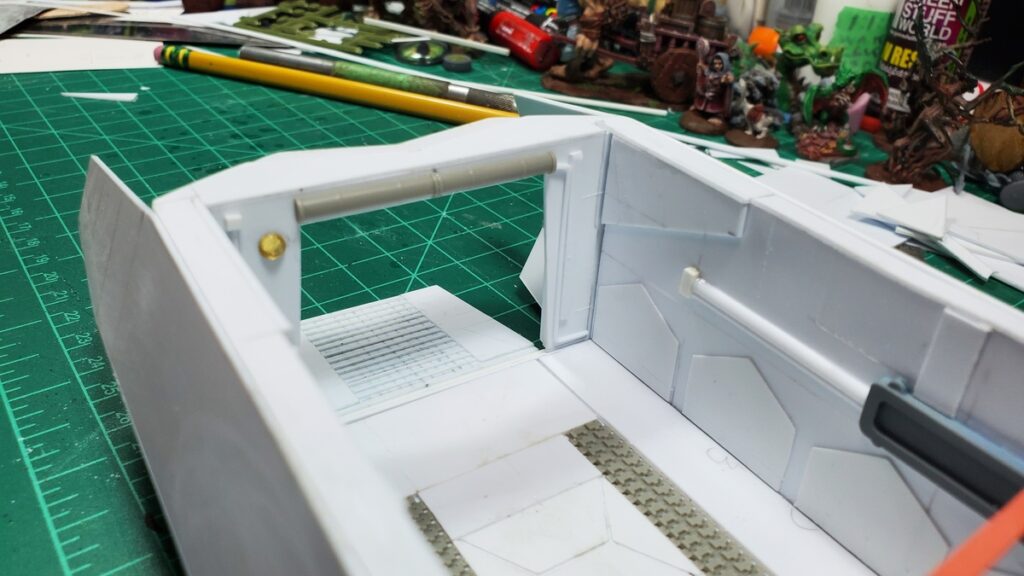
Mocking up the sides with light card. I didn’t get a photo but there’s three pieces under each of the big side panels to give strength.Mockup stage showing the in-progress underside of the shuttle.Local supervisor hard at work.Styrene sides cut and installed, with the angular extensions at the back.Designing the initial panel of the rear bulkhead.Never enough clamps. Or clothes pins in this case. Adding bulk to the underside of the extension on top of the rear bulkhead.Rear bulkhead and ramp complete and detailed, outside view.Rear bulkhead and ramp, inside view.Rear bulkhead and ramp dry fitted to the body. I won’t be gluing the subassembly in until quite late to make painting the interior easier.Rear subassembly dry fitted, outside view. There will be small panels in each lower corner to cover the groove the ramp hinge pin rides in, and detail panels on the insides of the fuselage extensions.
Very pleased with progress so far. Up next will be either the engine/wing subassemblies on either side, or the nose, depending on my mood. Both are going to require more cardstock mockups, especially figuring out how the nose is going to join up to the front of the current body assembly…
As mentioned last post, I’m in the Lead Adventure Forum’s Build Something Contest 2025. I’ve entered a few over the decades, finished my entries in even fewer, and ever gotten out of the first round of voting, so we shall see, but it’s always a great contest to watch even if you aren’t participating.
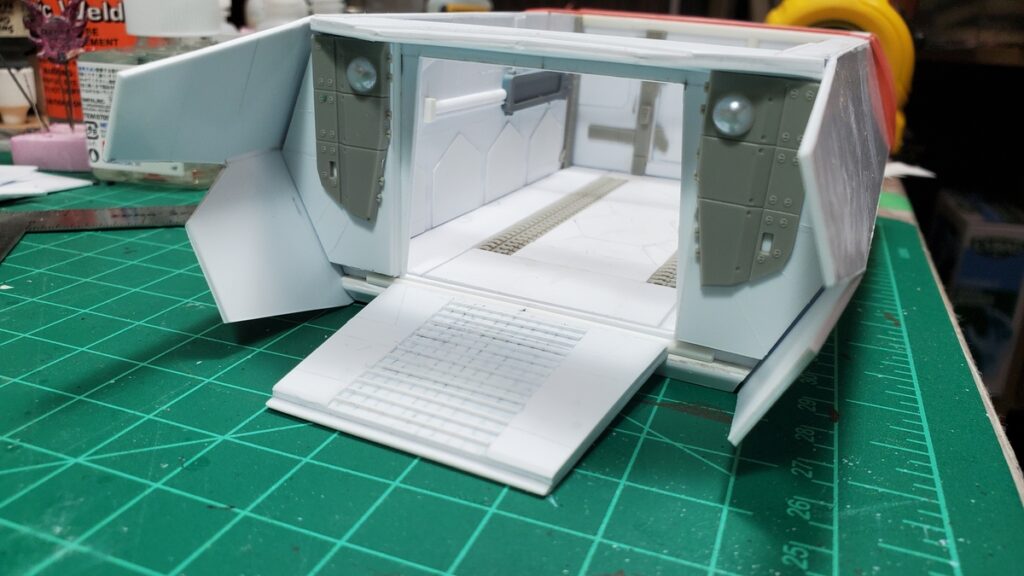
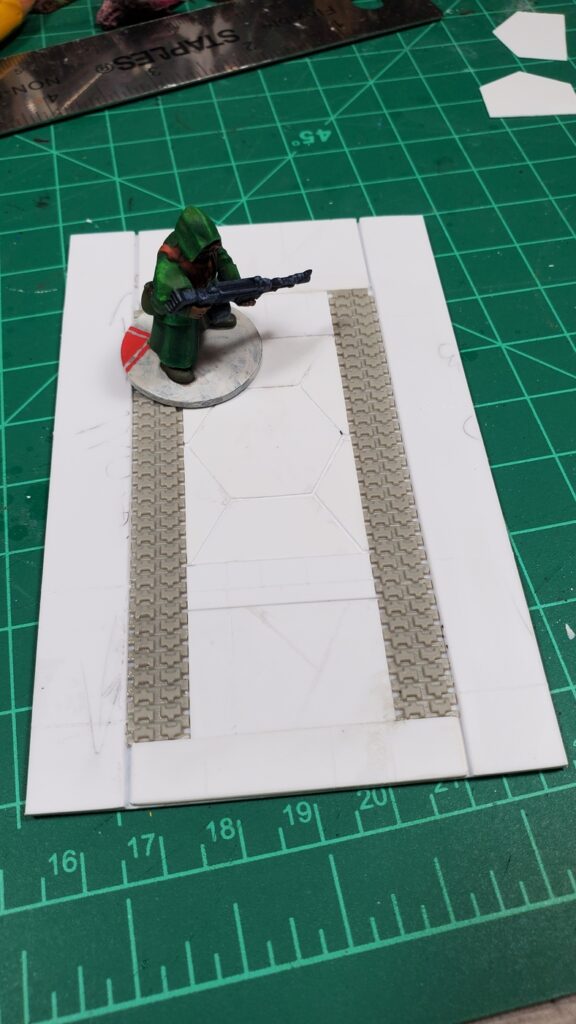
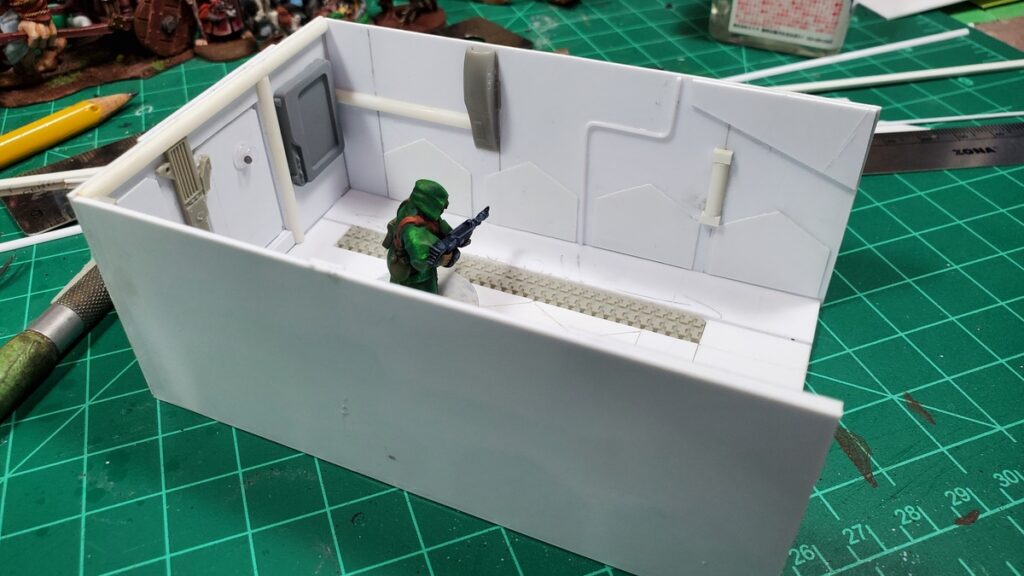
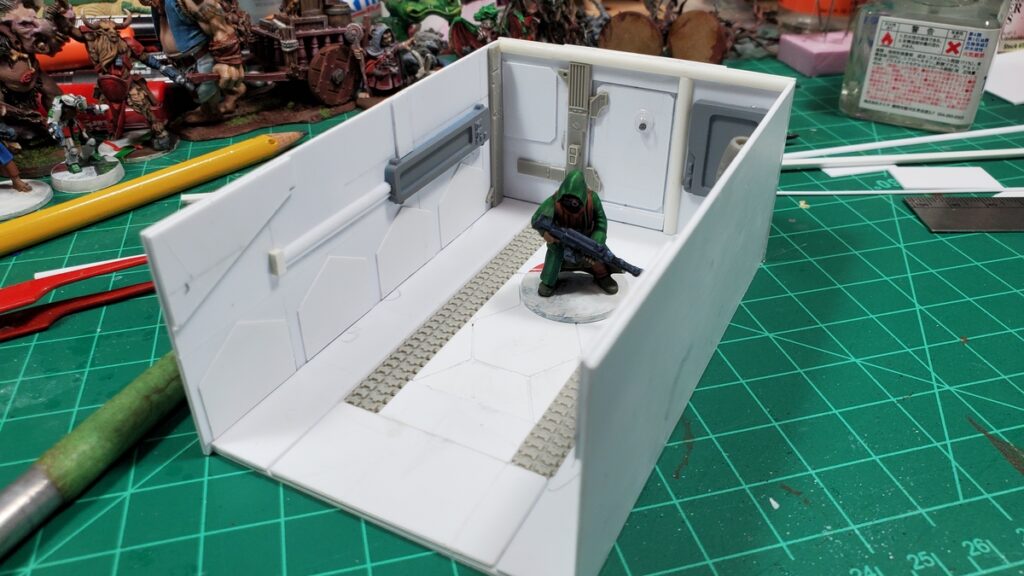
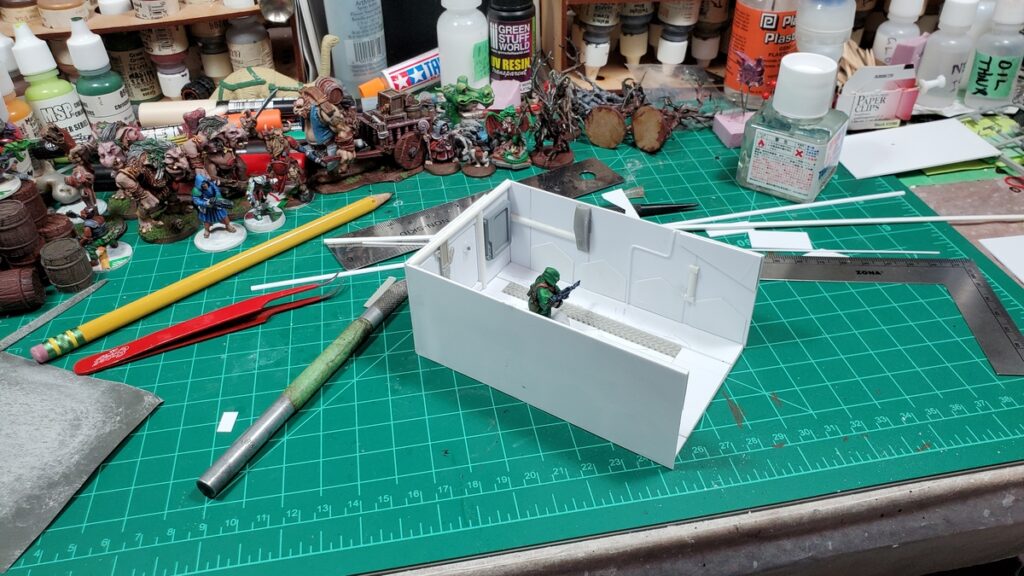
Photos to date below – today (Sat 1 Feb) I got the floor and three main walls of the cargo bay built and assembled. Engines and landing gear next, then figuring out how the actual skin of the shuttle is going to cover all this stuff!
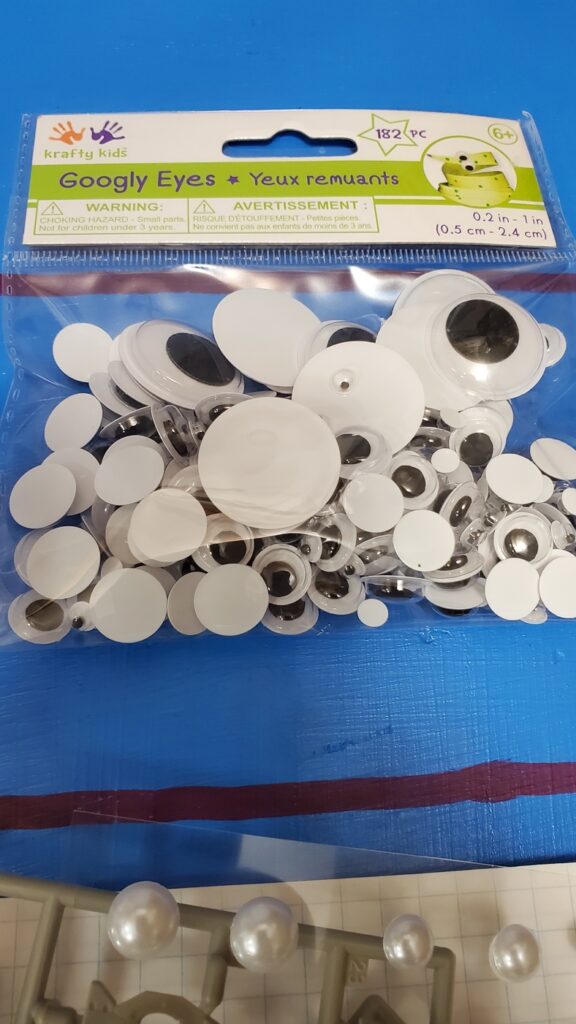
One of the classic sources of kitbashing/scratchbuilding detail parts – a 1/72 MBT, in this case a Tamiya LeClerc. Also at the top of the photo, half-round pearls from the dollar store, because you can never have enough dome shapes for sci-fi building!Also from the dollar store, an entire baggie of googly eyes. Some of these might well wind up as actual eyes in silly places, but a bunch of them are just going to be interesting shapes for kitbashing.Cargo bay floor. LeClerc track pieces for detail.The assembled cargo bay. The side walls need at least one more round of detailing!Cargo bay, showing the other side wall.Wider workbench shot.
The main thing now is going to be maintaining momentum and not getting bogged down in overthinking this damn thing. Onward!
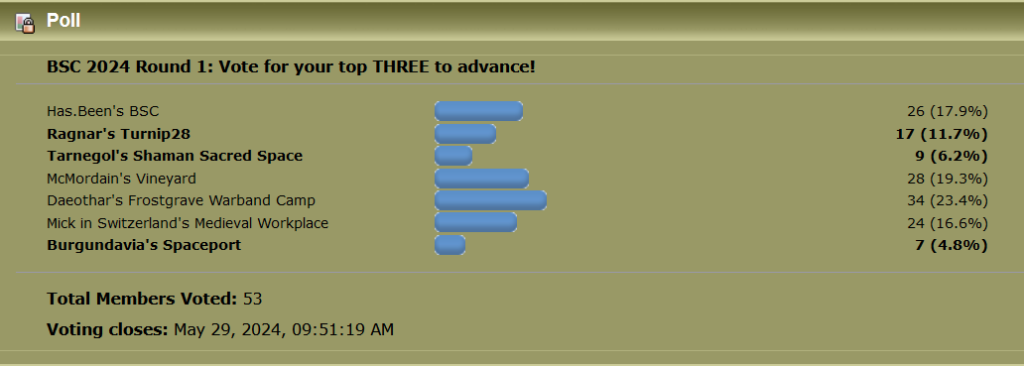
Well, round 1 of the Build Something Competition is done and I have been beat, badly. The vote wasn’t even close. Ouch. Anyway, at least I have a pretty building for my table.
With me out, means I can share some process photos and discussion here. I ended up painting and gluing the building together pieces by piece – paint some, glue some, paint some, just because of the way I needed to paint the inside.
First thing I did was assemble the upper back section (with the walkway) as a separate piece and then paint the inside of it. I also added mud/spackle to cover the 3D printing texture on the lower section and painted the concrete floor (with a few cracks added with an exacto blade).
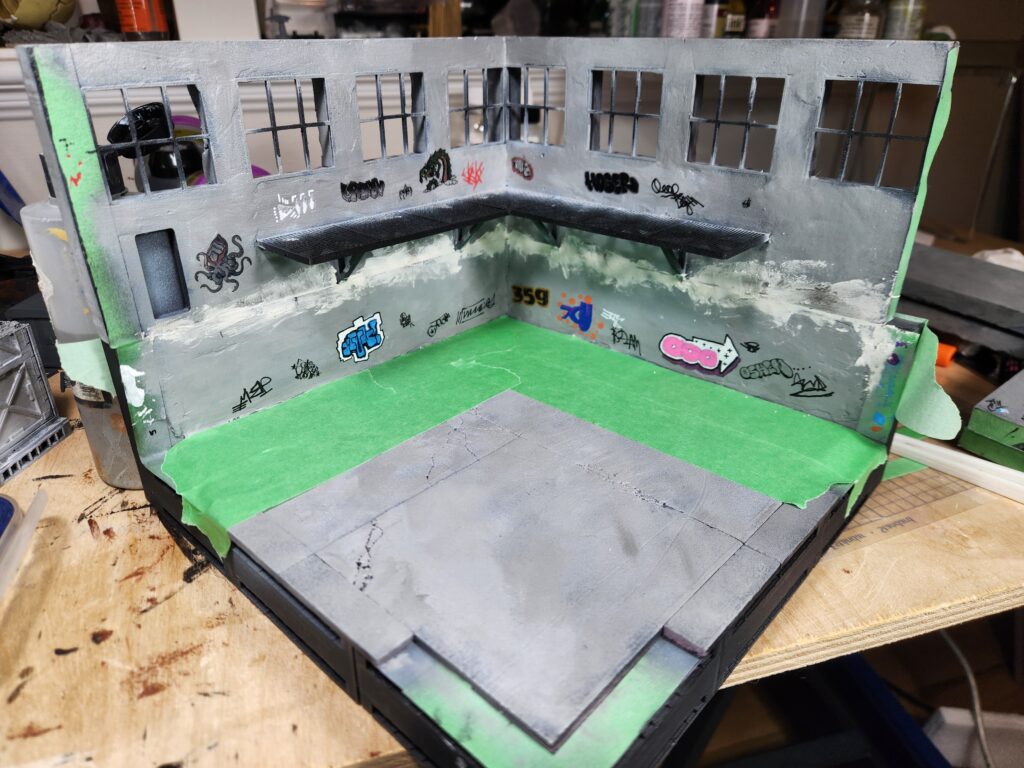
After that, I added the inside graffiti to both the lower walls and the upper section. After I had added them, I glued the two pieces together and then added some mud/spackle to cover the gaps and then roughly painted it grey. I wasn’t overly worried, as I knew that I was going to be badly painting the inside white again (to partially cover up the graffiti, as if somebody was working to renovate the building).
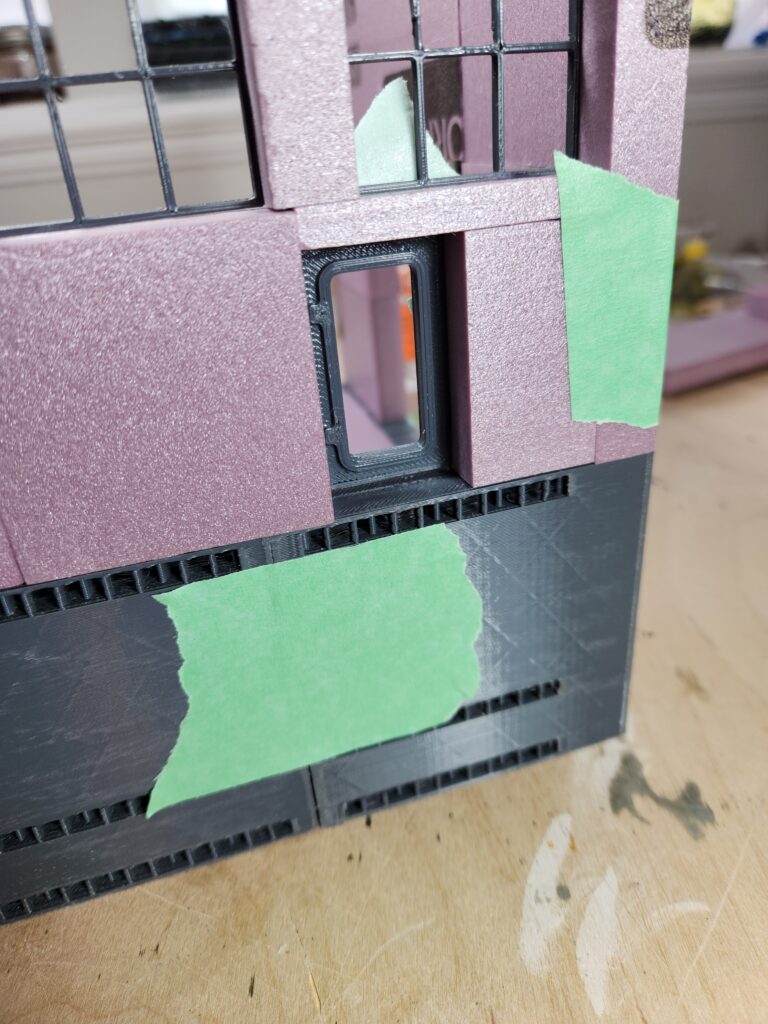
Assembled back with spackle/mud covering the gap between the foam upper parts and the 3D printed lower bits.
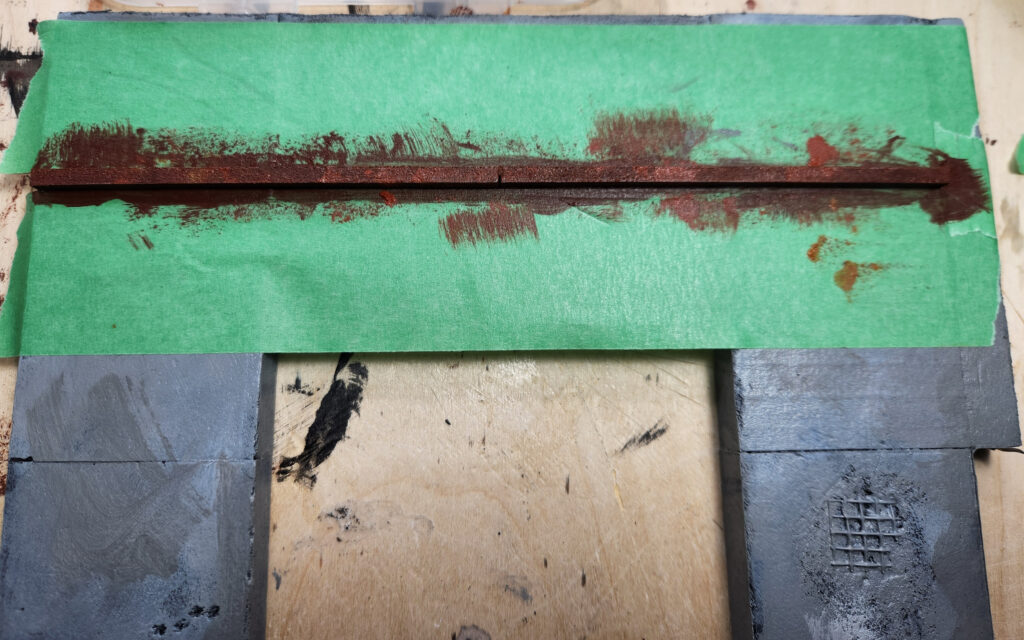
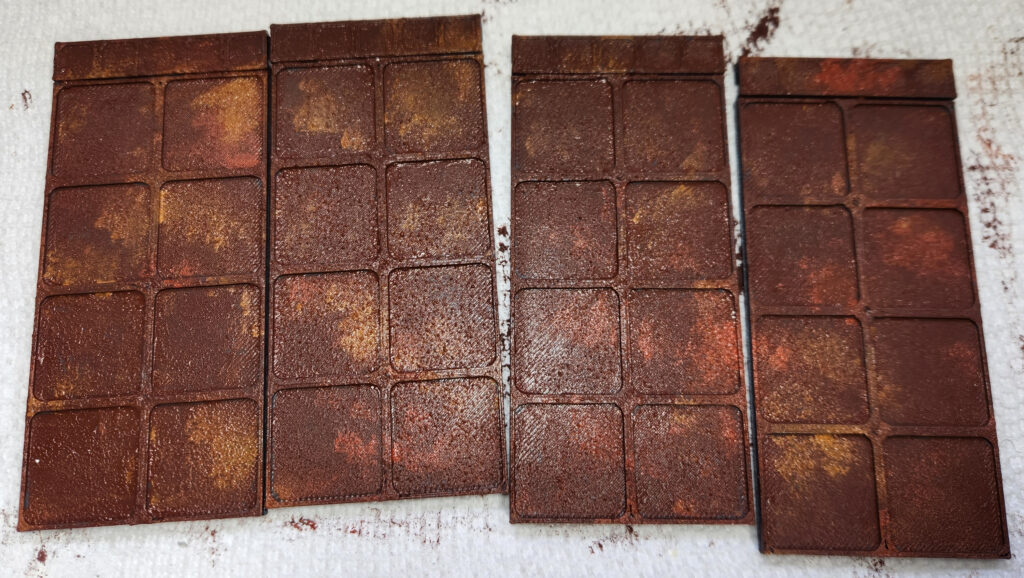
Then I rusted up the hangers and doors. For this I sponged on paint quite thickly – mostly Burnt Umber but some Burnt Sienna and Raw Sienna for accents. This is what gives these the bumpy texture. I would note that the grey paint was not fully dry under the tape here, so I ended up pulling off a fair amount and needing to repaint it. Oops.
Rusty door hangerRusty doors
After that, I glued the front panels on and then the lower walkway (which touched both the back walls and the front walls). You can see the interior has been painted white at this point.
Gluing in the lower walkway, with the inside now painted white.
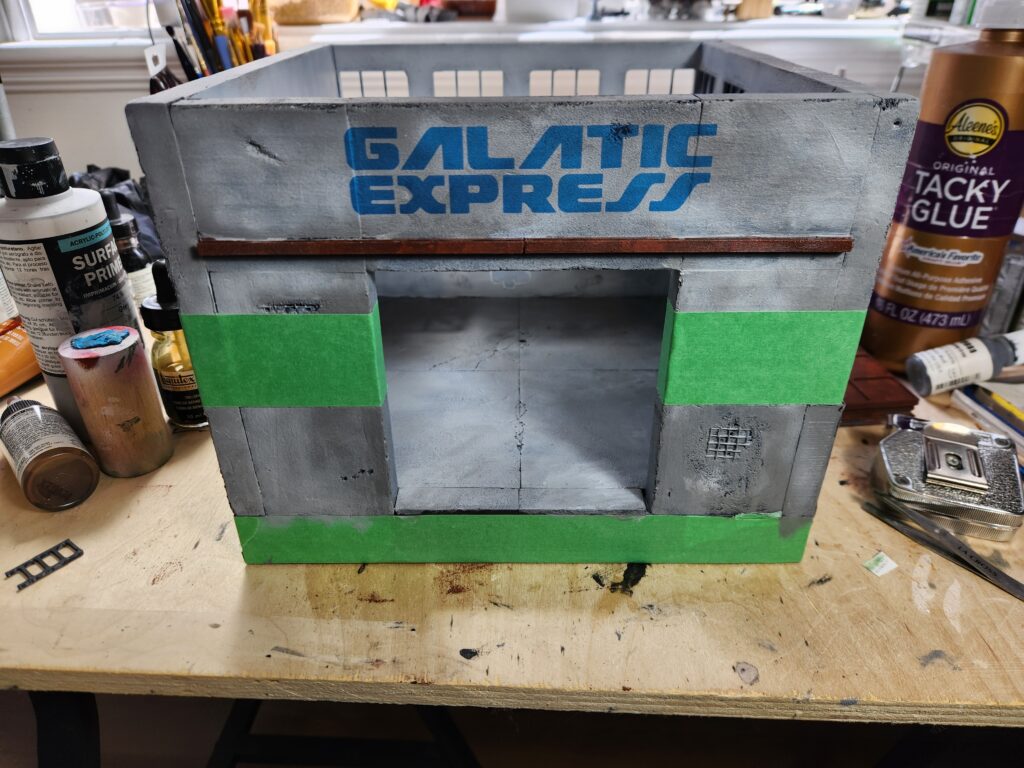
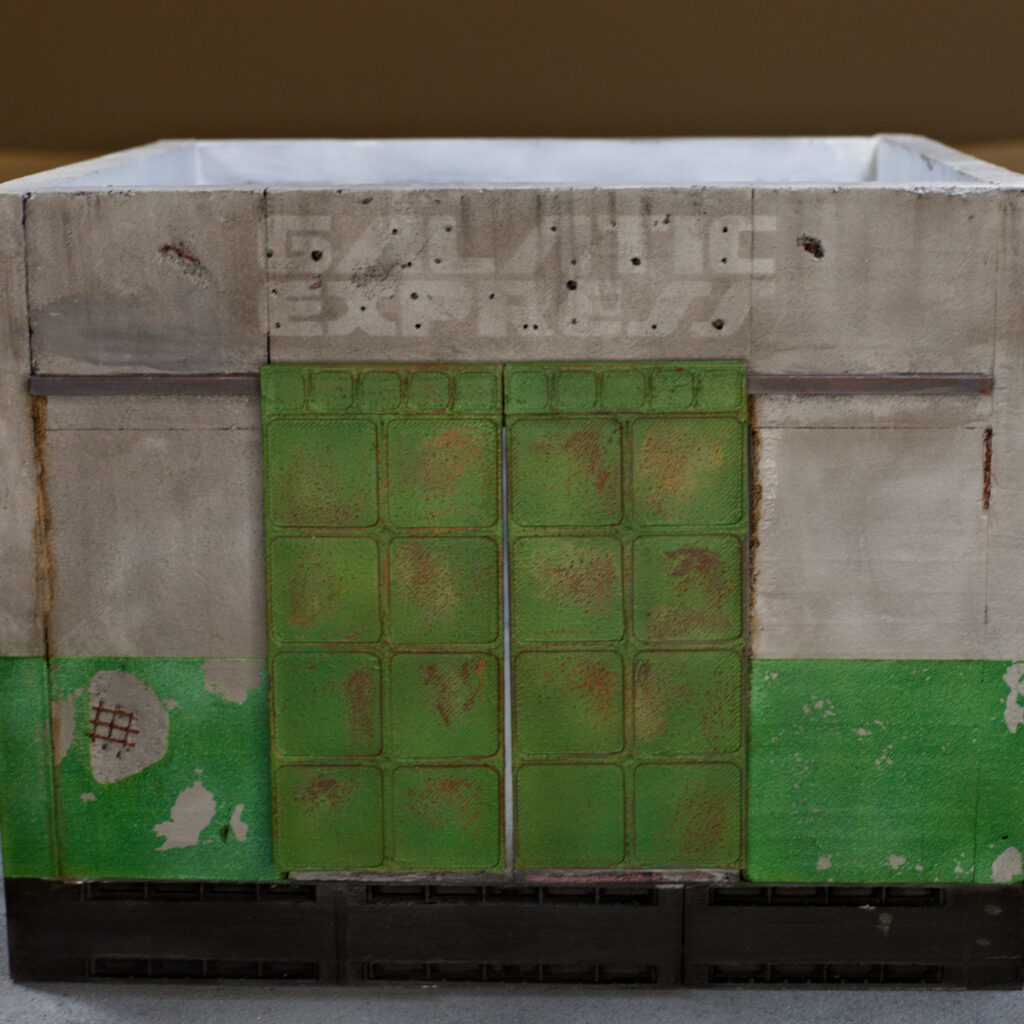
Once those were done, I cleaned up the front where the joins were to make the grey tones more consistent. I then masked off the green sections and the upper ghost lettering.
The lettering was over-sprayed with Golden’s Shading Grey, a semi-transparent grey that was amazing for darkening things subtly. I pulled off the letters, which were cut out of Oracal mask on my Silhouette, in a random order, spraying a bit more of the shading grey over the whole area each time.
The last bits I didn’t get any photos of, but this is the “draw the rest of the owl” directions:
The green lower sections I added blue stuff to mask off the damaged sections where the exposed rebar was and then sprayed the lower area, hangers and the doors with chipping medium, and then all three with a random mixture of greens roughly mixed in the airbrush. To chip it I used three methods – light sanding, using tape to pull off random sections and water with a brush. If you use water with a brush, you get lighter sections. I ended up putting an undercoat of white on the doors after I tried just straight green, but that wasn’t covering the rust well.
Lastly, I glued in the windows after painting them separately, painted the exposed rebar and then weathered with oil paints. Overall, the painting felt a bit rushed and I should have taken more time. I also missed a bunch of small details that I’d like to get back to.
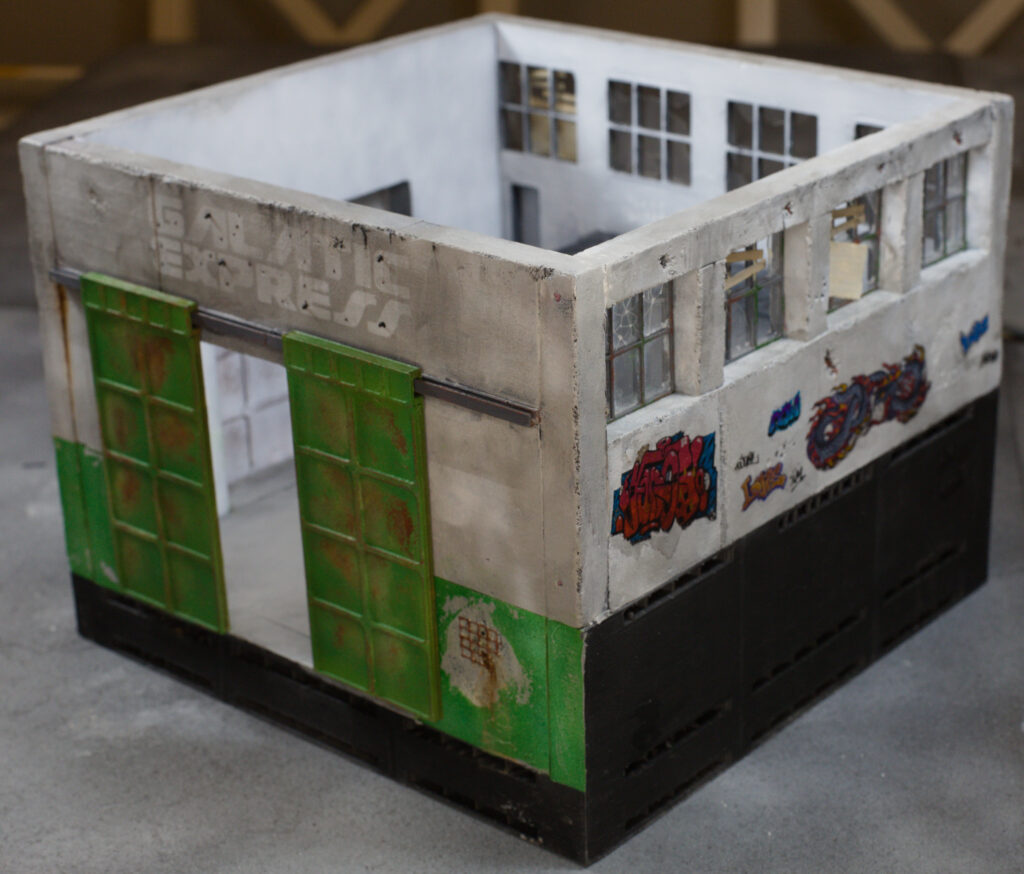
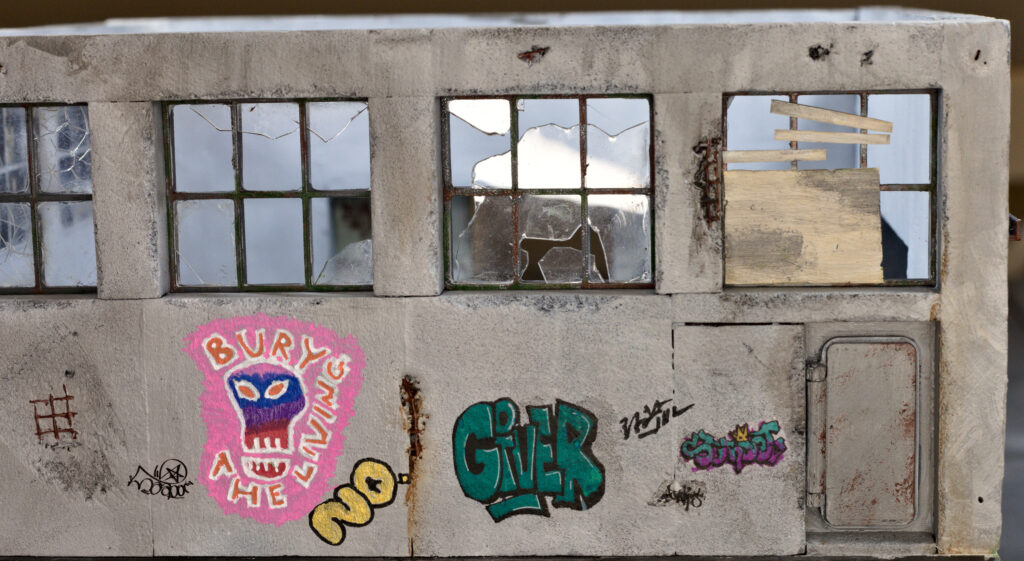
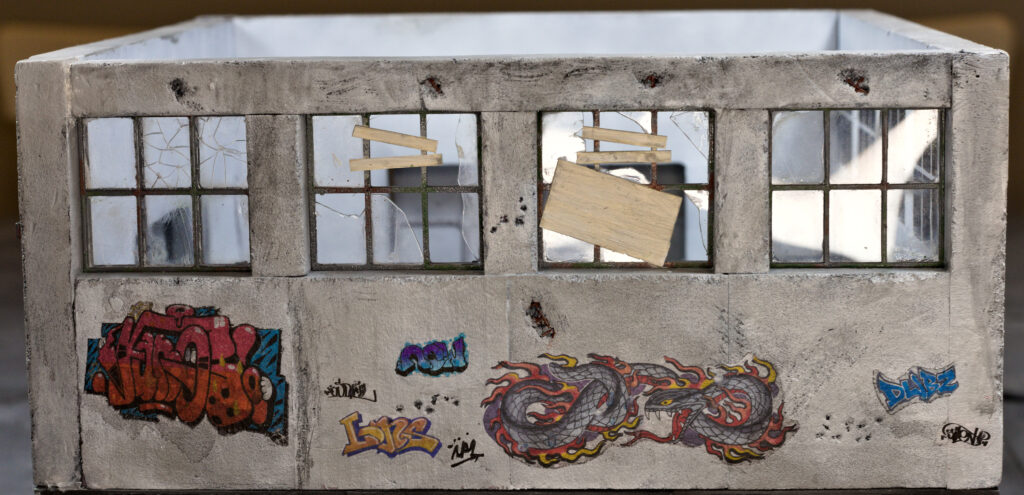
And voila! The final product:
Oblique angle shotGraffiti detail 1Graffiti detail 2Inside looking at doorsInside looking at walkwayOther main door
Another year keeps marching on and Build Something 2024 has come to an end and unlike nearly every prior year, I actually finished this year! No pictures of the painted model yet due to the rules, but here are some updates on the construction.
Overall, I managed to only get the warehouse done of the whole set I planned – will have to do the actual landing pad later. But I was happy with where I ended up with the warehouse.
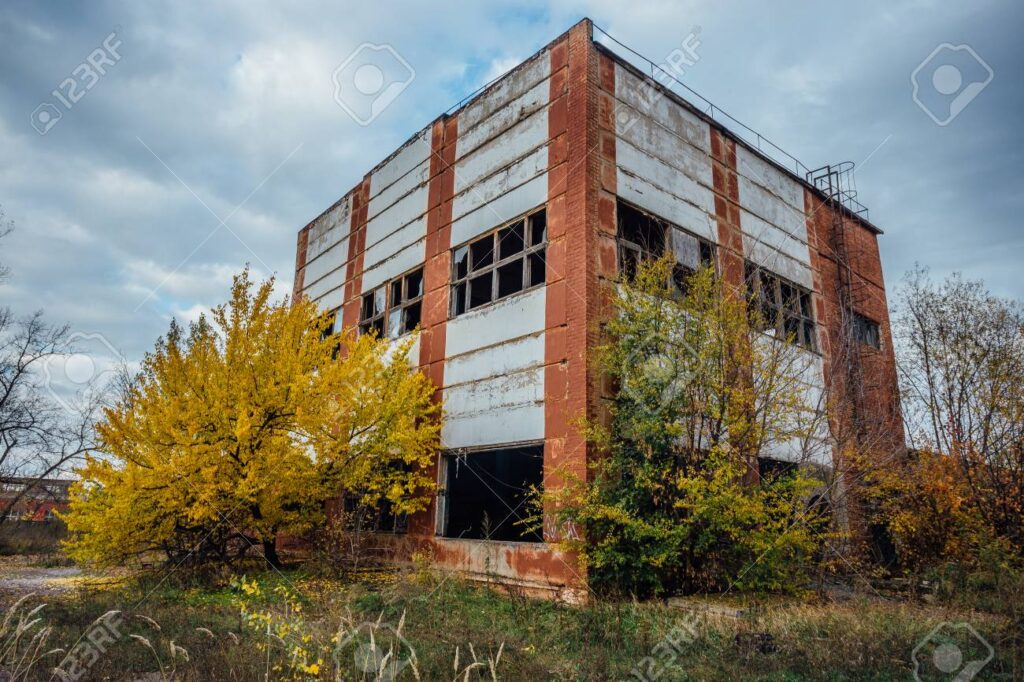
For the warehouse, I ended up with a more “ruined 20th century concrete” vibe than I initially planned, largely because of the design of the windows – rectangular with thin frame pieces.
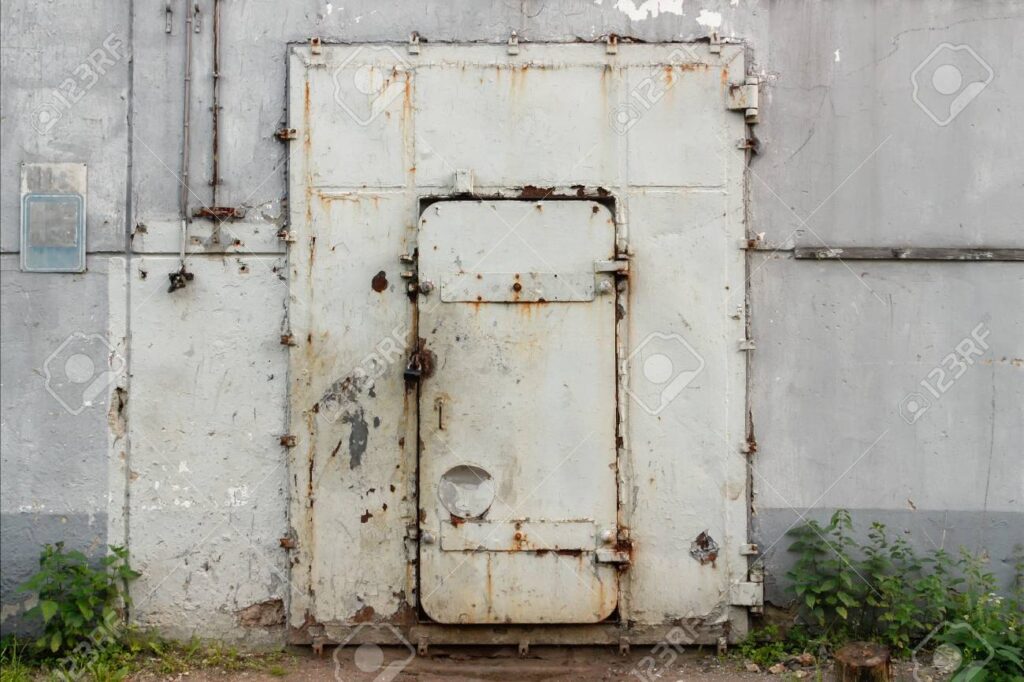
With that, I switched out a lot of my concept and leaned more heavily into that look. Here’s a few pieces of inspiration I pulled from the internet:
Closed old white metal door in an industrial building
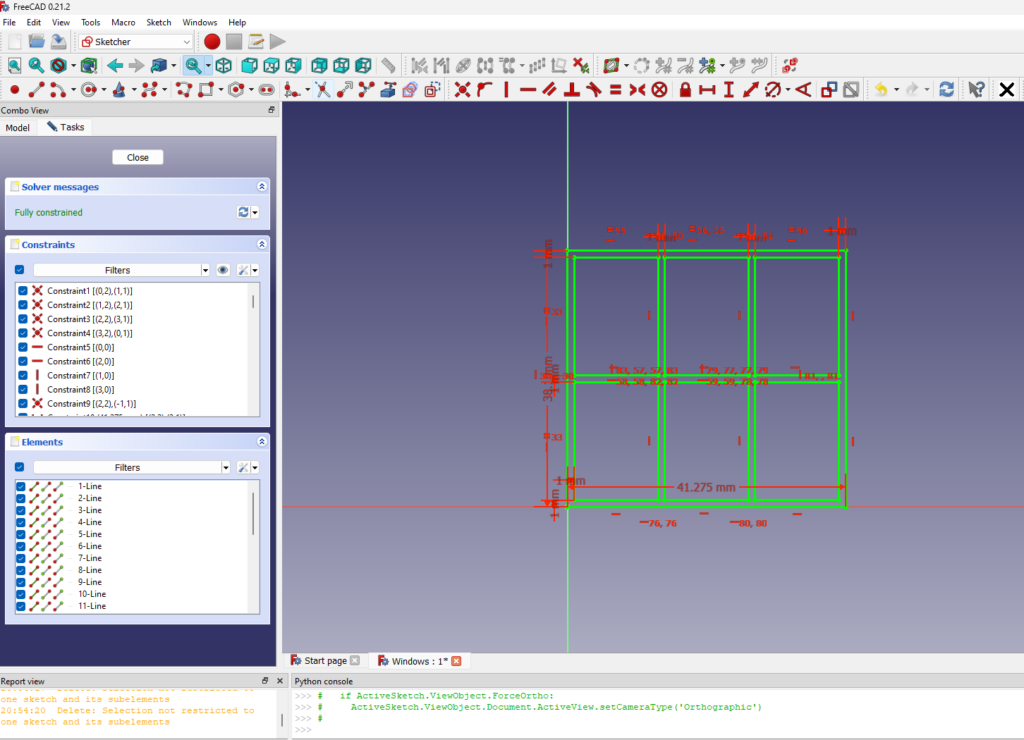
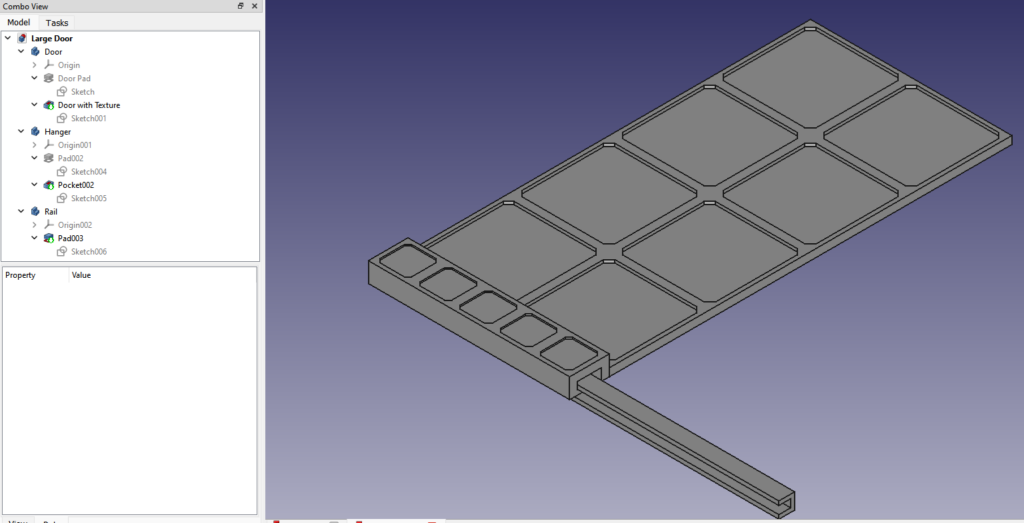
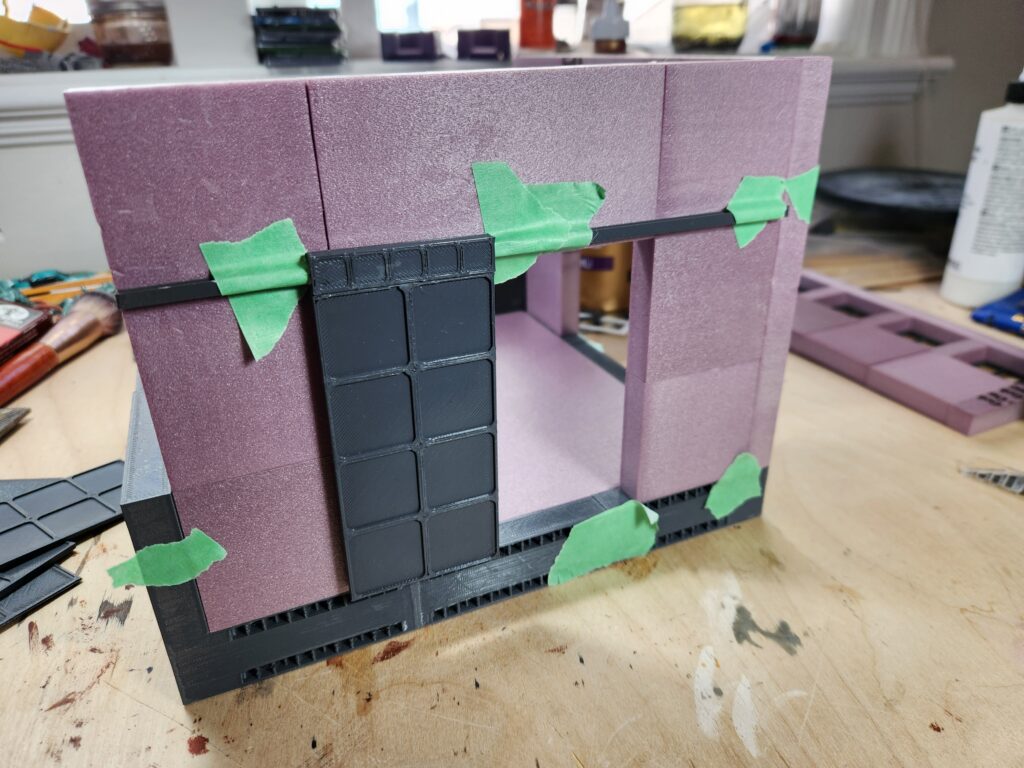
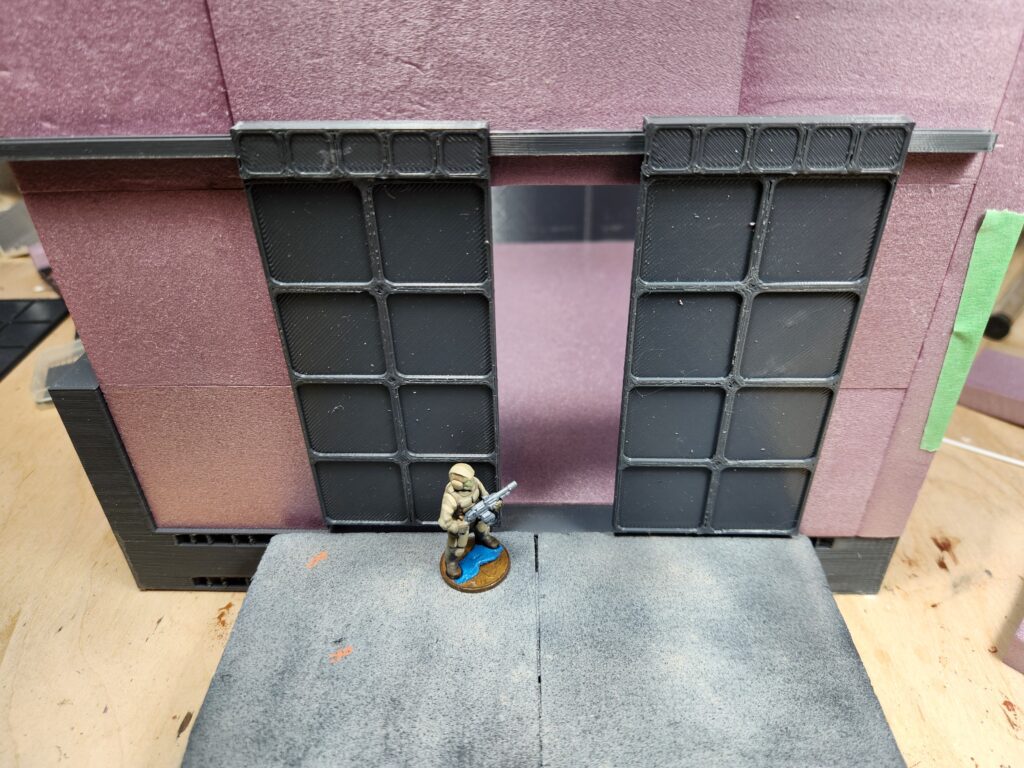
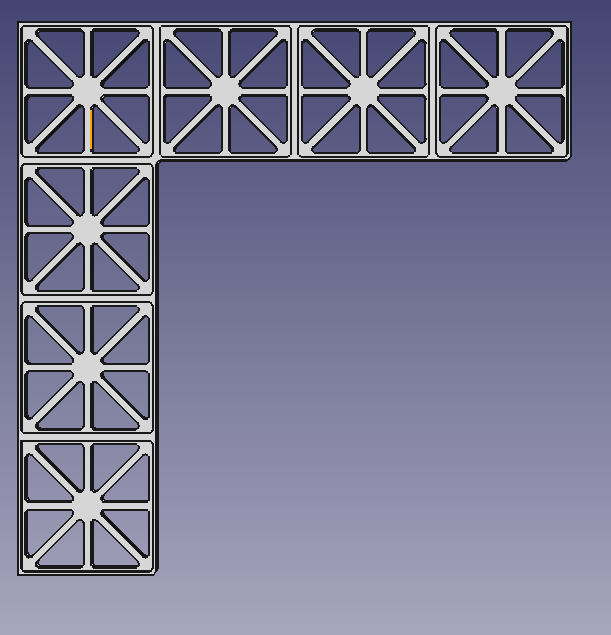
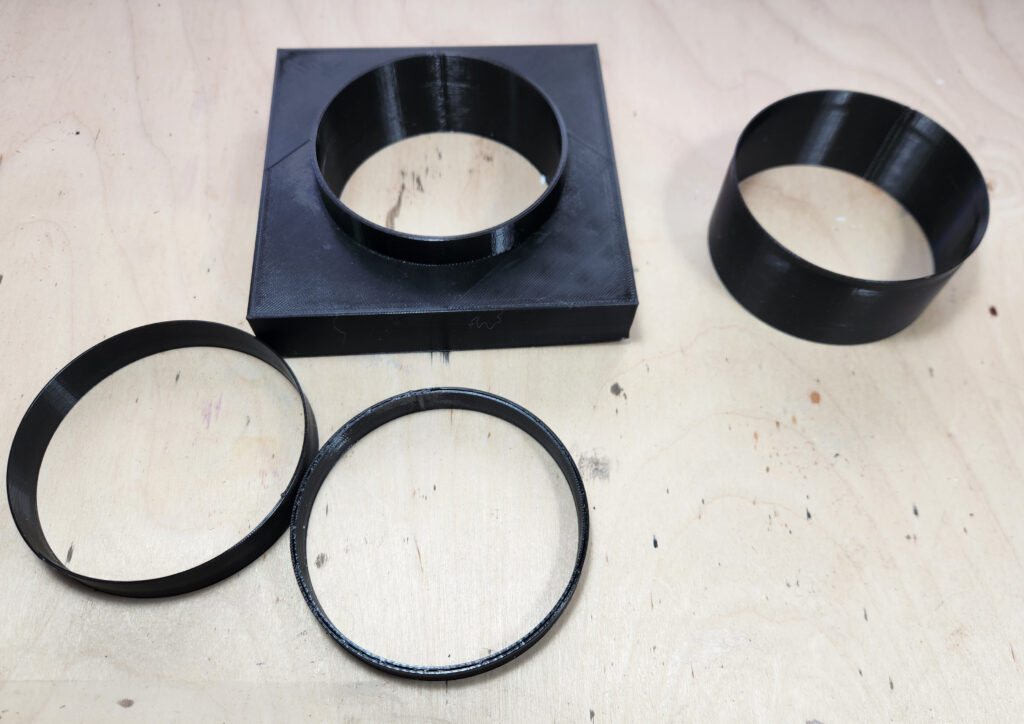
I then decided on a heavy, old-style large doors, with a small door that roughly followed the inspiration above. Both were modelled in FreeCAD and then printed on my Ender 5. The large doors…
FreeCAD design for the large door and hangerLarge door testLarge door hangers glued in place
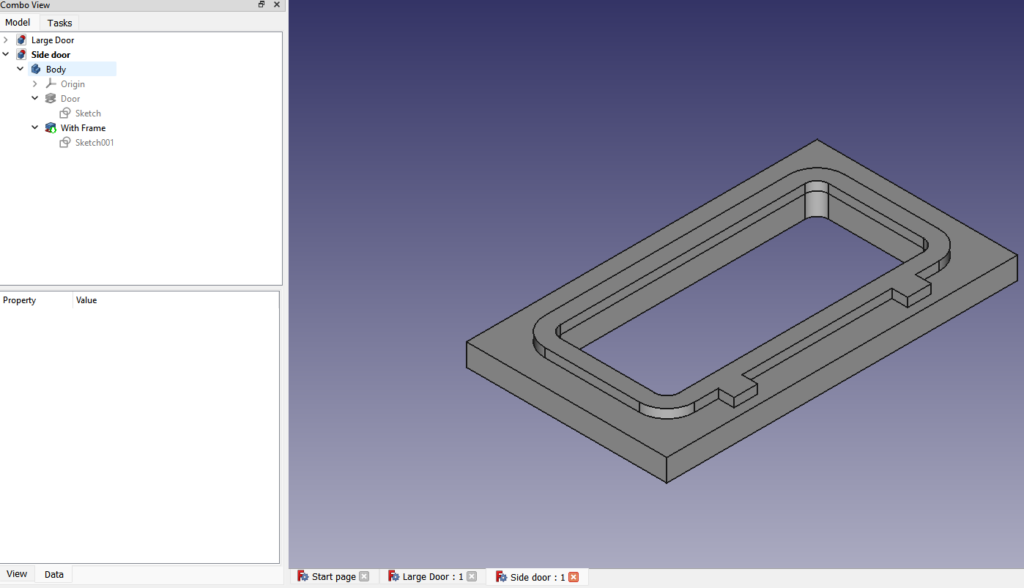
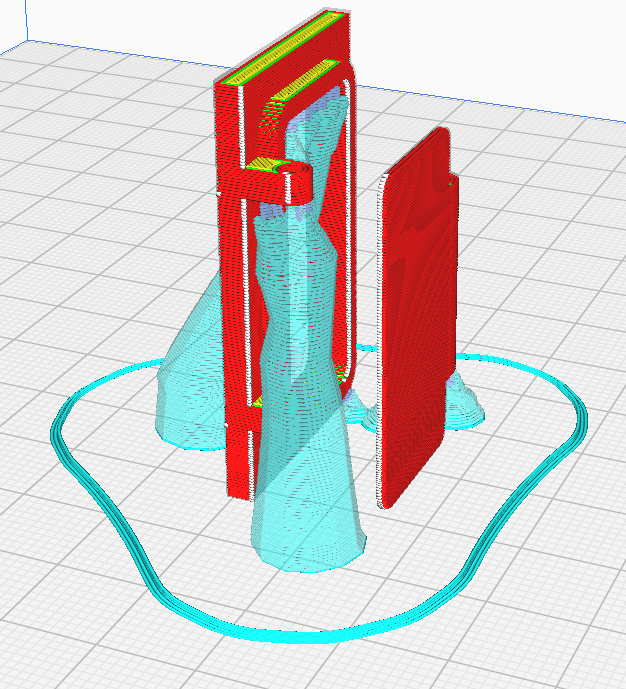
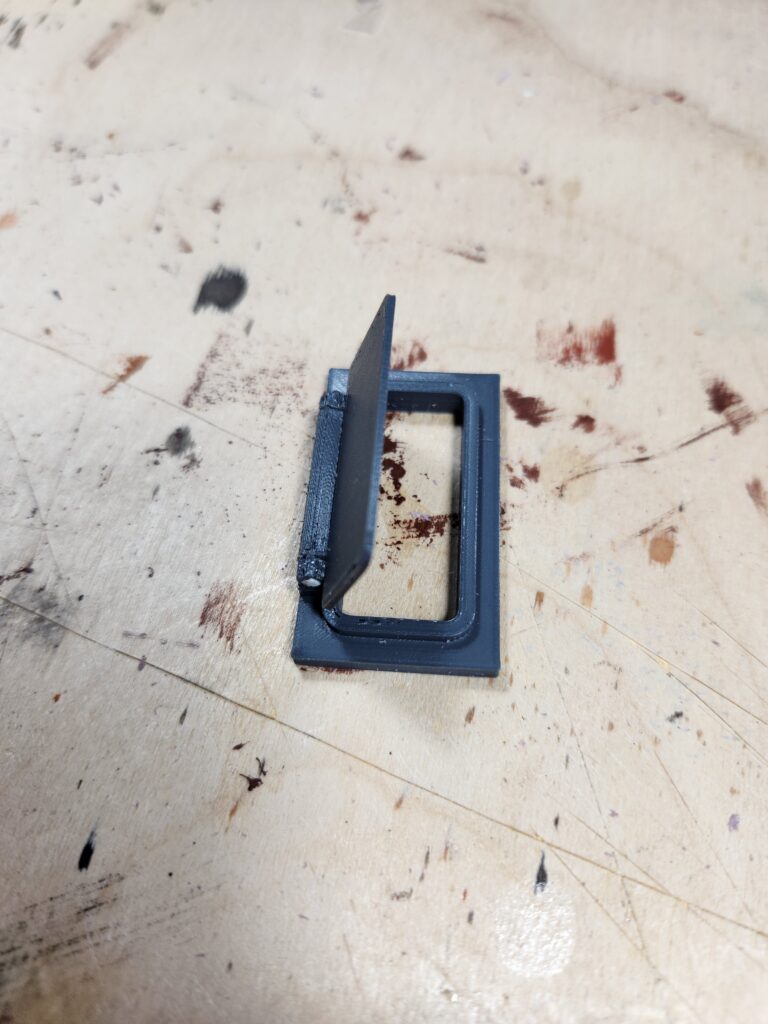
…and the small door. I first did a test with it printed flat to the bed, which worked. Once I designed the door itself, I tried it vertical. That failed, so I switched back to horizontal and printed it at 0.12 layer height. The white you see on the final image a piece of styrene rod which acts as the hinge.
Small door early testLater test that failedFinal print
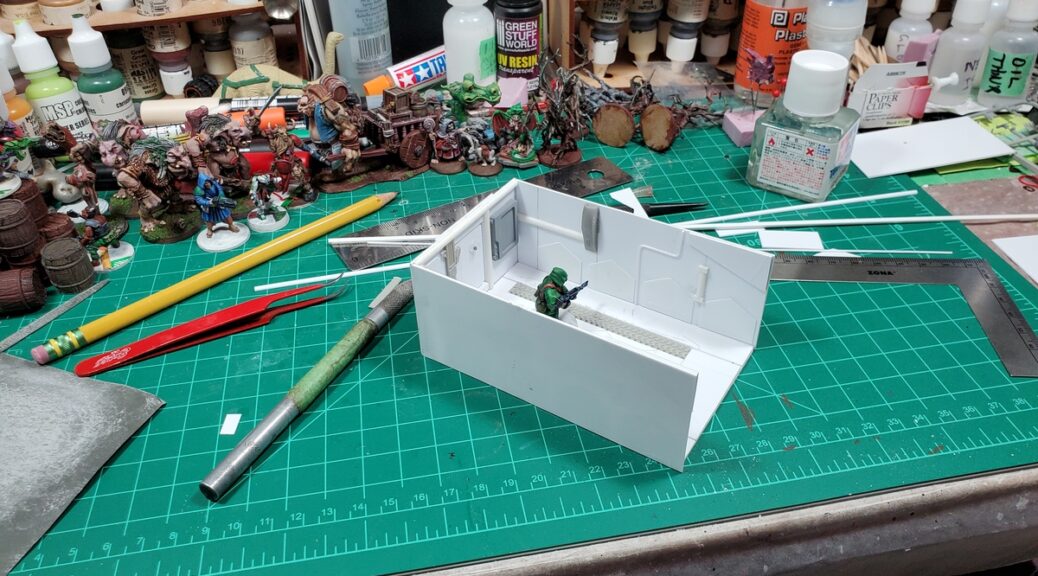
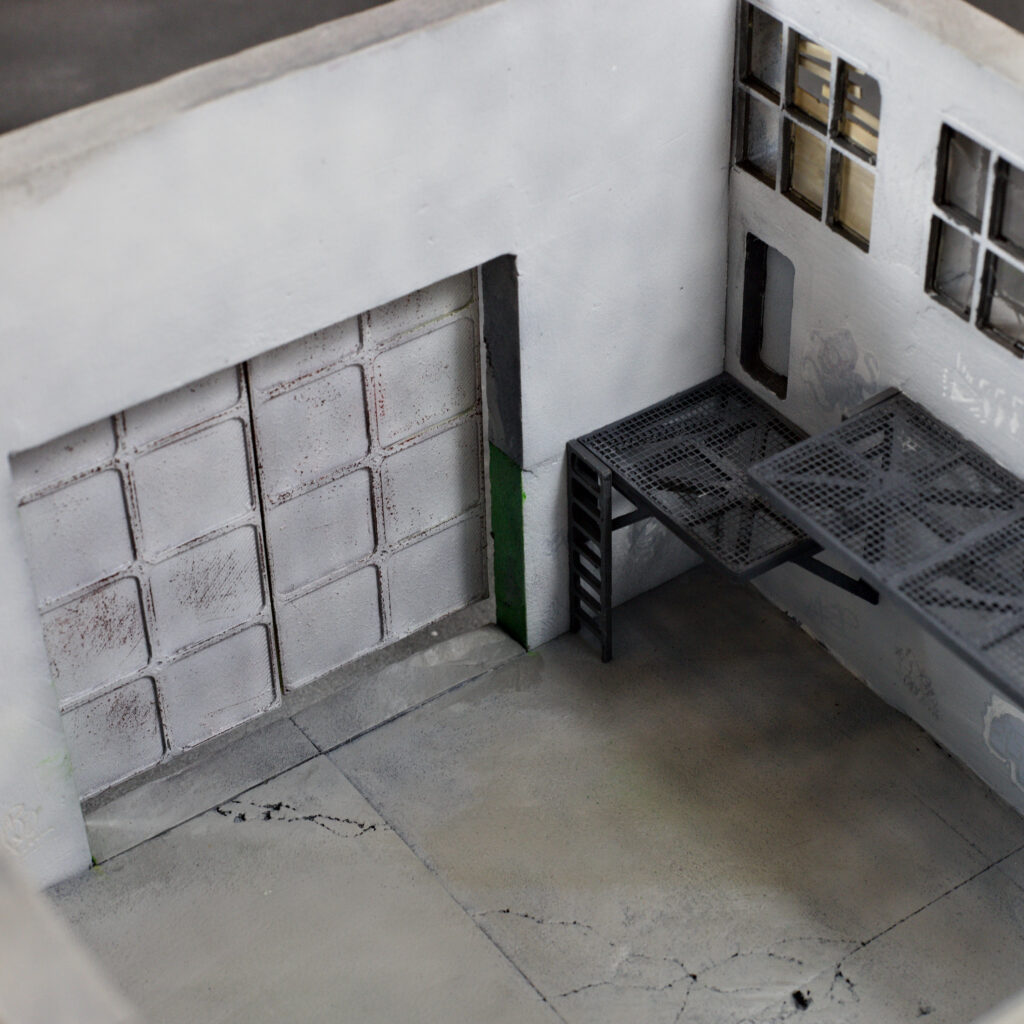
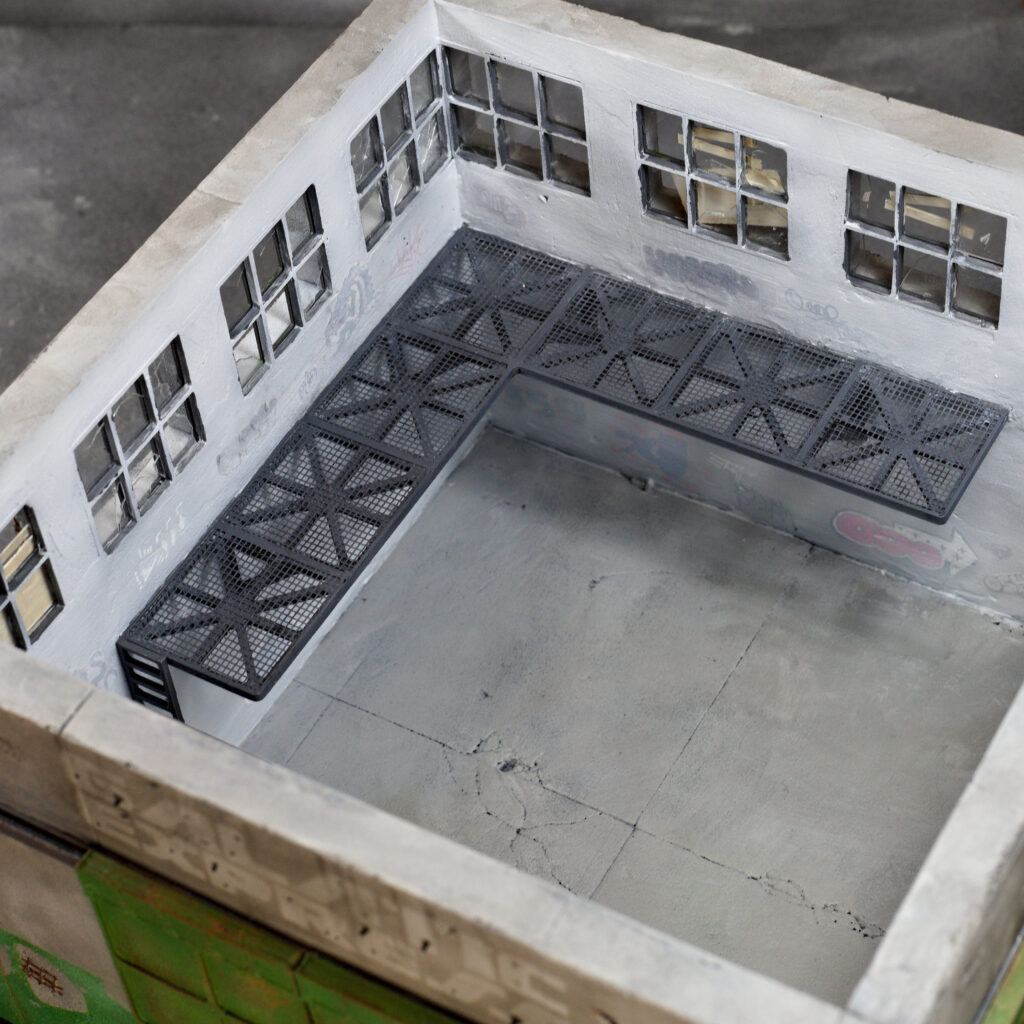
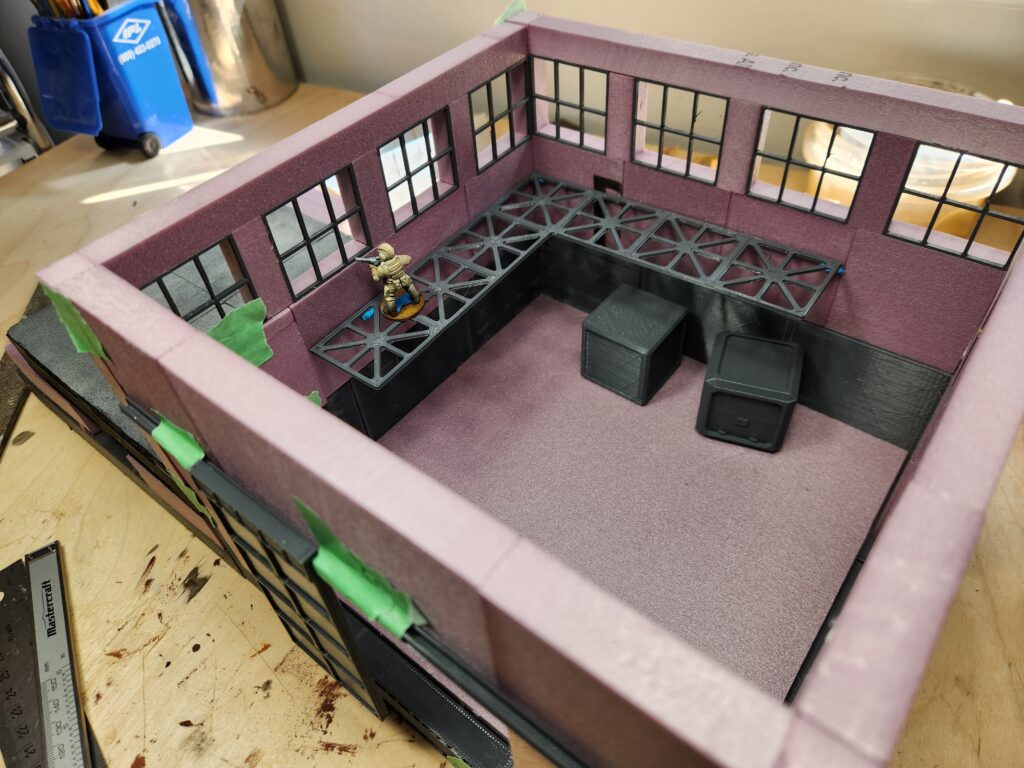
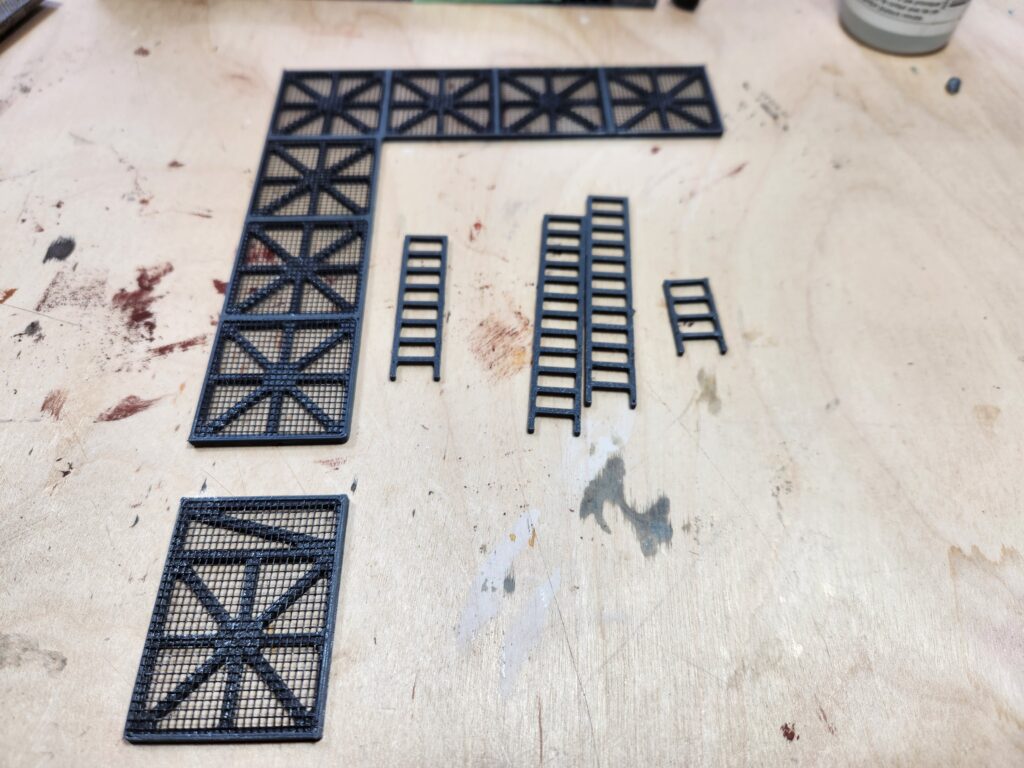
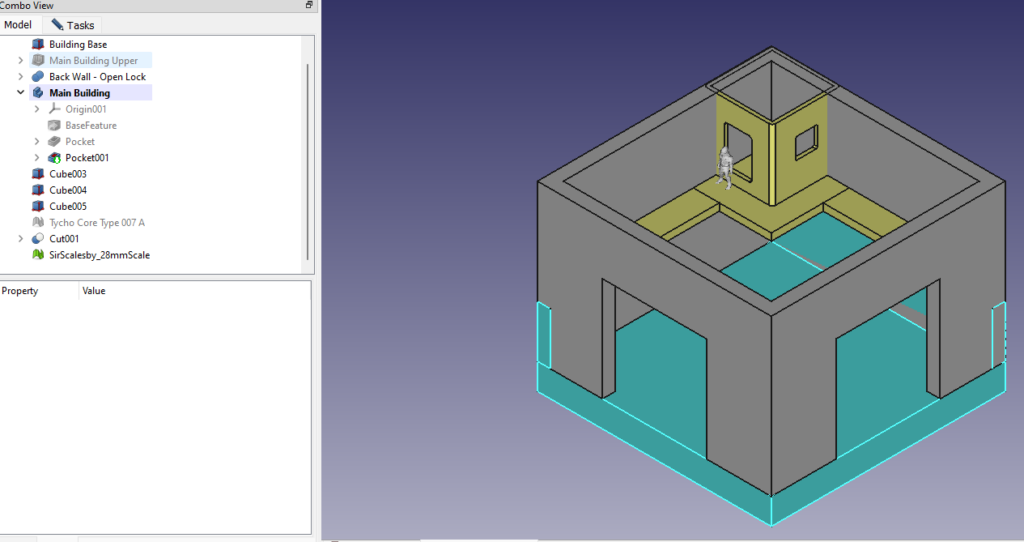
After the doors were printed, I moved onto the interior walkway, which by pure accident ended up being perfect height for a figure to shoot out of. I really didn’t plan that at all, but it was awesome. There are two levels of walkway – one at 3″ where the small door opens and the main walkway at 4″.
FreeCAD designFirst test of the walkwayFinal piece, with mesh glued on
And then onto the windows. I ended up printing them twice – the first round I didn’t think were thick enough, so I ended up printing them a second time at double the thickness. I decided to keep the first round windows and used them as external frames, to which I glued clear PETG and styrene too to make broken and boarded up windows.
FreeCAD window designFinished windows
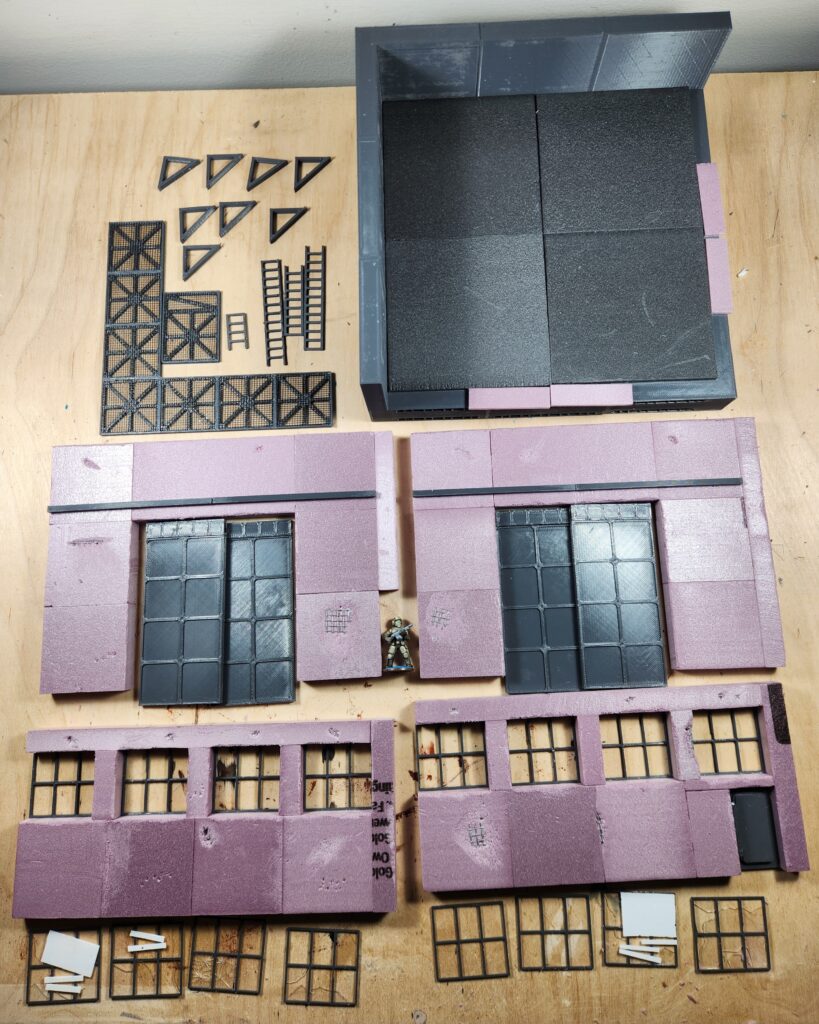
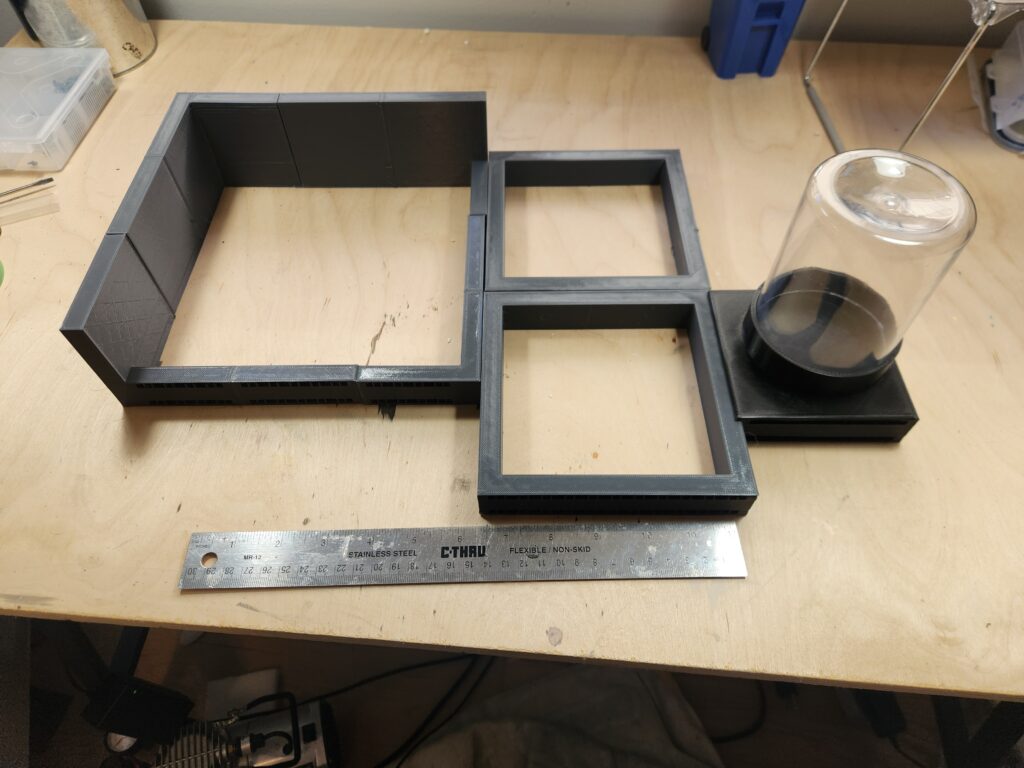
And with all those pieces, the design was basically done! I decided to assemble as a I painted, so this is the final shot before painting:
All the final pieces of the building, not yet assembled.
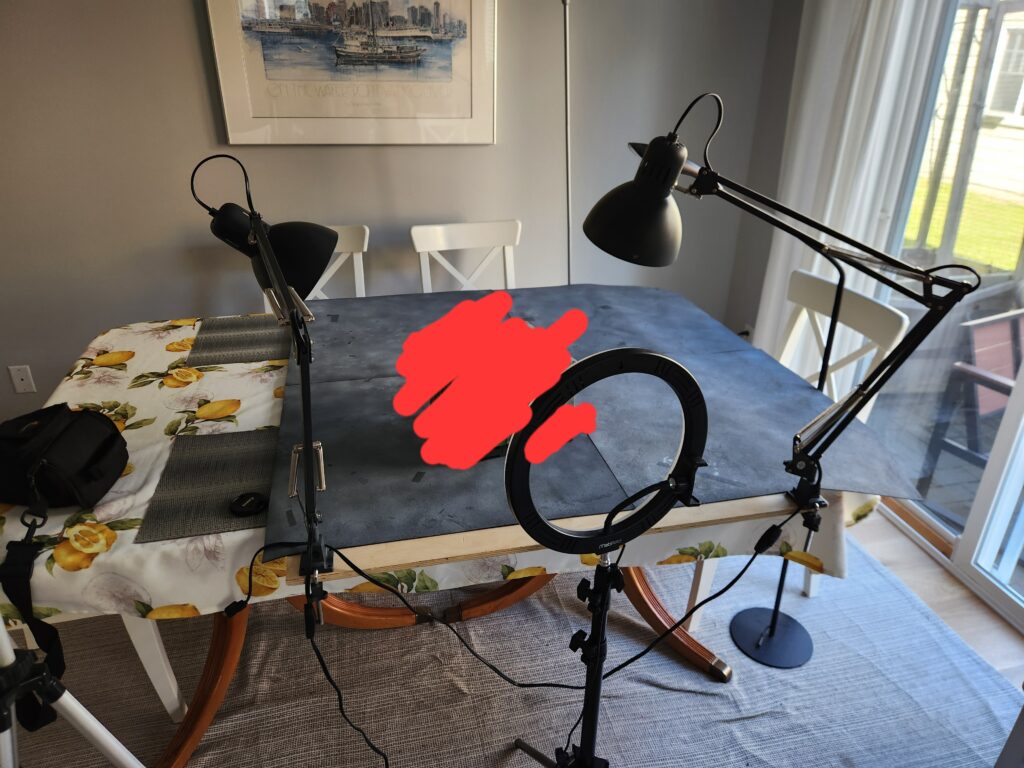
Onwards to painting, which I can’t show you yet, but here’s a photo of my photo setup. Good photos needs lots of light, so I did just that.
I’ve had various (ed: poor) success with building things competitions in the past. I’ve singularly failed to finish a single one I’ve entered, even the Build Something Small and Encounter Terrain 10×10, both of which were small things. So the natural thing to do was to organize the next round of Building Something Competition (BSC) on Lead Adventure!
If you’re not familiar with BSC, it is a friendly competition on the Lead Adventure Forum, running for more than a decade. Both Brian and I have entered at various times, he’s even finished something:
I wasn’t sure what I wanted to build this year – either a spaceport or a vertical mill thing for my hellscape terrain. As you can probably gather from the title, I decided on a spaceport. I’ve been doodling a few different options for a little bit, starting with one giant 12″x18″ piece, but nothing was really gelling for me.
First concepts 1First concepts 2First concepts 3
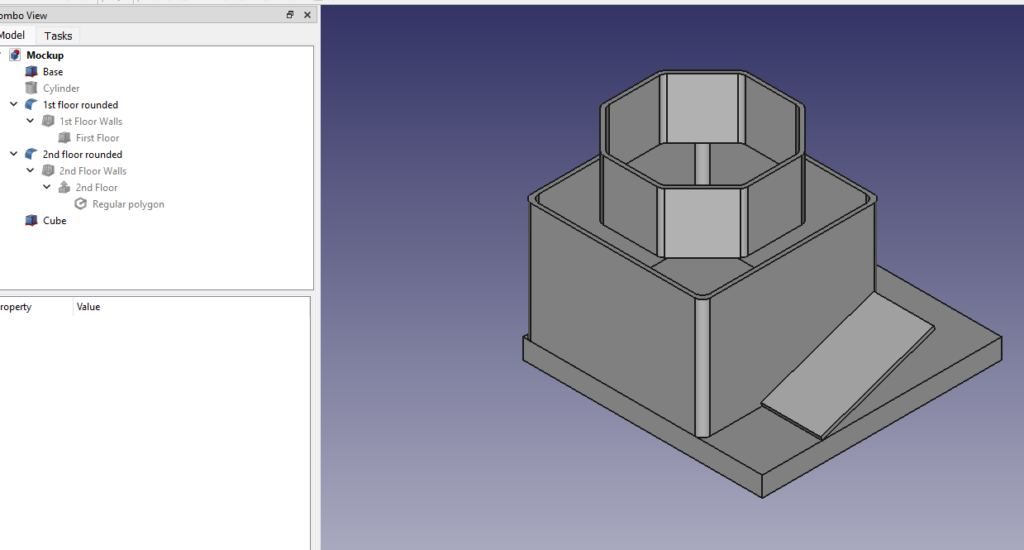
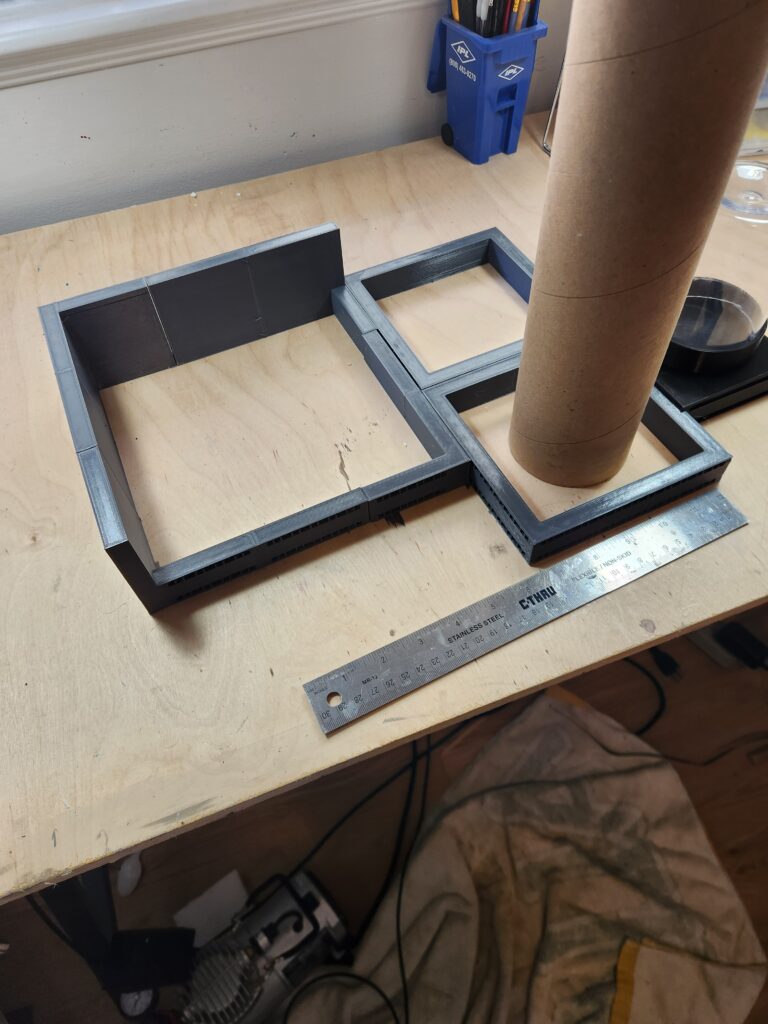
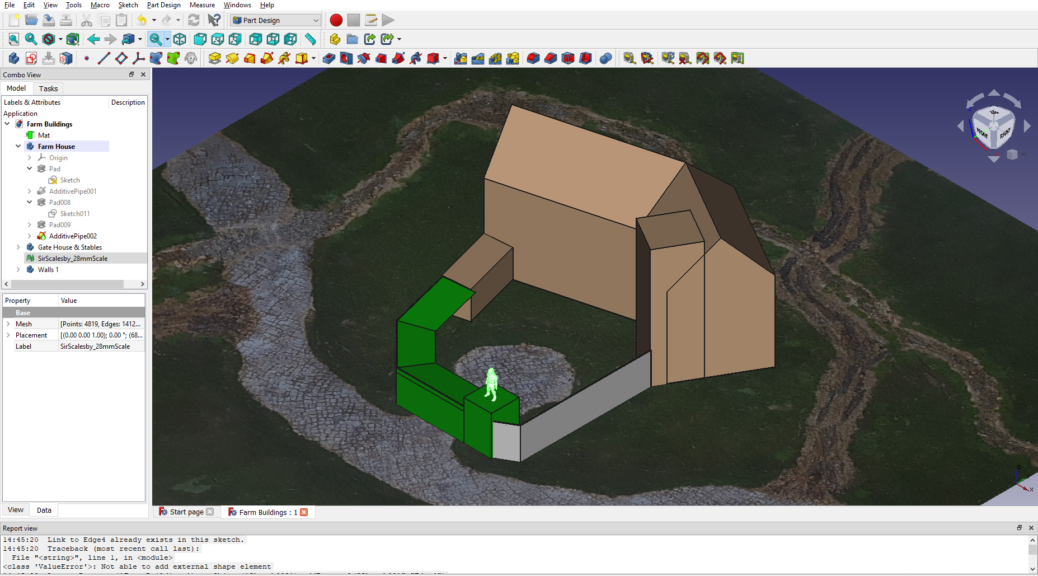
So I decided to try a few different layouts in FreeCAD, see what I liked. I found this cardboard tube from something paper that I wanted to use as the main upright. And I knew I wanted a 9″x9″ building for the main warehouse building. I initially tried a single larger building on a 12″x12″ base, but that didn’t work either. I also tried the landing pad on a big 12″x12″ base. I also didn’t like that
Concept 1Concept 1 with pillarConcept for landing pad
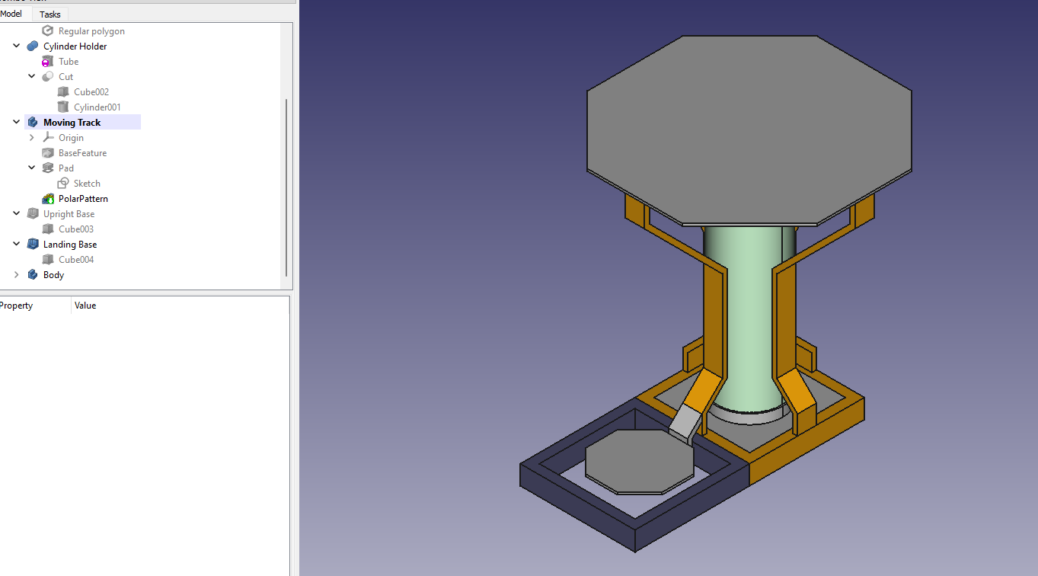
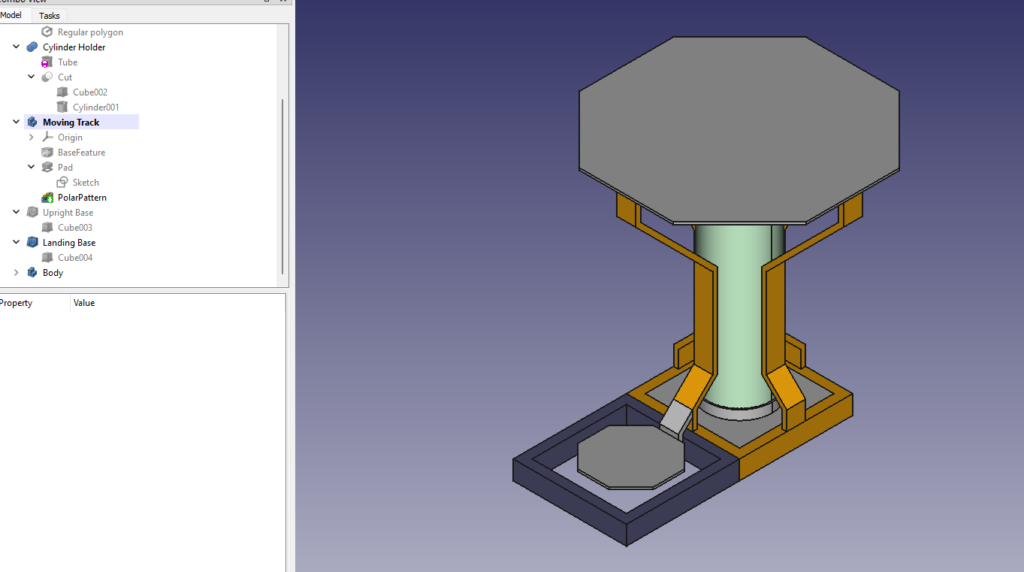
So I decided to split it into multiple bases, the building and starport each on one. And I knew I needed a way to have pads lift up into the sky, so I decided on magnets and printed pads. That is what the orange vertical pieces are – holders for either magnets or metal strips. Those pads will land on a yet another 6″x”6 base.
Main warehouse buildingStarport plus landing pad
Printing things!
I’ve been fighting off some sort of stomach issue for the past few weeks, so progress has been slow, but I finally have printed pieces ready to show at least. But first, a whole lot of failures. I needed to find out if I’d measured the tube correctly (which I hadn’t) and then I decided to use an empty pill bottle as a fuel tank to add on. So several failed prints for those look like this:
Test pieces for main tube holderTest and successful pieces for fuel tank
And finally, the printed pieces (mostly). I haven’t been able to print the holder fully successfully yet, but that is next to go on the printer again tonight. But I have the borders at least done – base, starport base, landing pad base and fuel tank.
Each year Lead Adventure forum runs a Build Something Competition, each with a theme. Brian and I have participated 5 times at various points in the past years. So with 2022 here, I figured it was my time again.