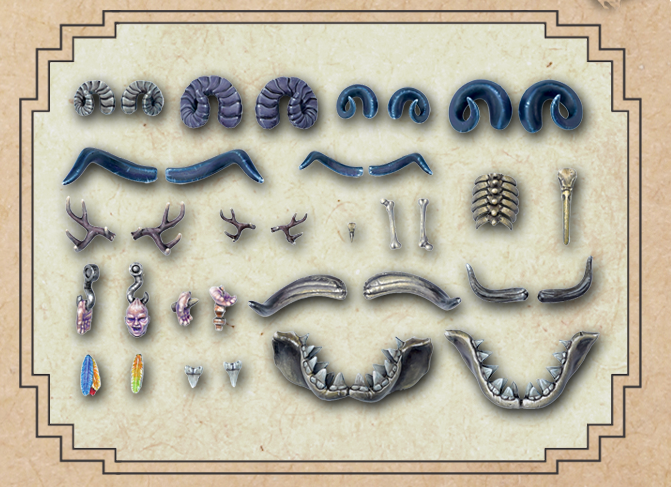
Conversion bits for strange projects can be hard to come by, even these days when high quality plastic figures make kitbashing and bits-finding easier. One of the staples of a certain flavour of folk horror, though, is folks with antlers, either on their helms or straight up growing out of their heads, and nobody has done horns, antlers, and such… yet.
Some of the planned bits. Image ganked from the Kickstarter page and cropped.
His campaign video is also over on YouTube and is nicely done, and one sprue will give you enough related bits to do whole units up similarly, which is always nice.
The Dead Animal Bits intro video
I’ve backed for a pouch of bits, 3 full sprues, and I’m really hoping to see this funded and produced so I can get inspired to get back to my weird folk horror 17th C stuff sometime in the new year!
So, if antlers and horns and bones and teeth and feathers and other gribbly conversion bits are an interest, have a look before December 18 2023 and consider backing Dead Animal Bits.
Not a paid endorsement or anything, just one of those chance finds via social media that slots very, very neatly into some of my specialized wargaming interests!
Brian and I (plus friends) attended Trumpeter Salute 2023 last weekend. No, not the UK one, the smaller one in Vancouver, Canada. We all had a great deal of fun, our first major miniatures convention since 2019 – after Bottos Con, which is primarily a board game convention, in Nov of last year.
Under Alien Suns (working title) – Coop scifi rules under heavy development
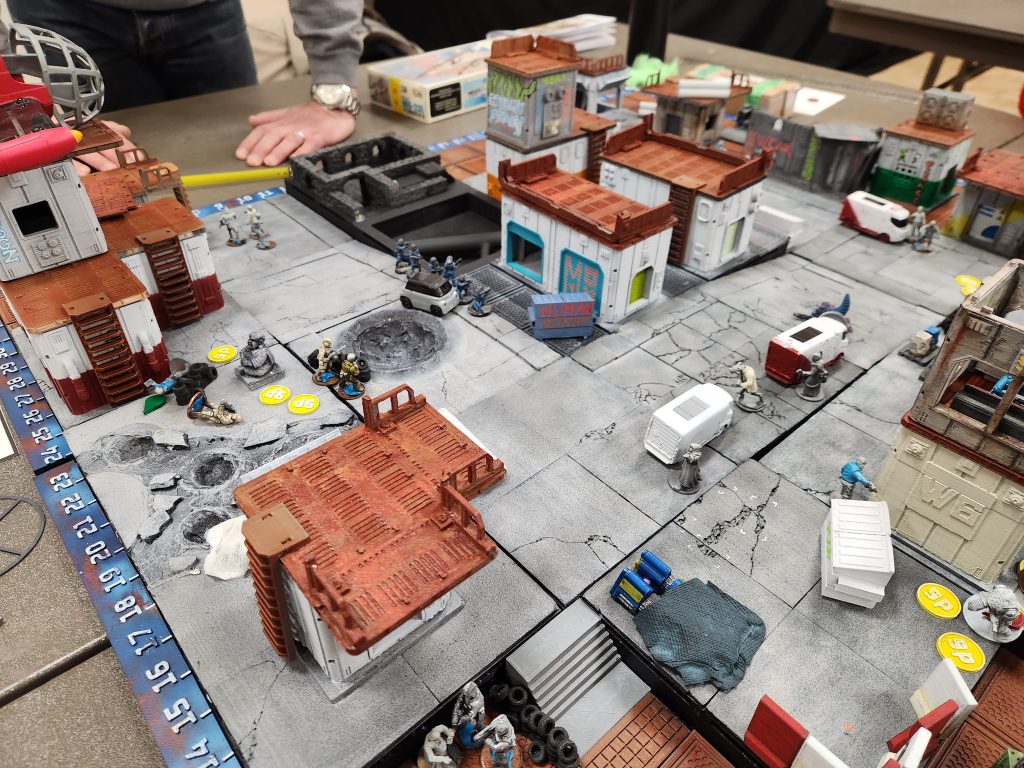
Friday afternoon in the first slot I ran another public beta test of my under development coop scifi skirmish ruleset, Under Alien Suns (the working title). It was a great deal of fun, autonomous vehicles got used as weapons, and there were many laughs. Also lots of great feedback.
Players were fighting in New Antares – against a mixed enemy – zombies from the former townsfolk & Halite Confederation soldiers
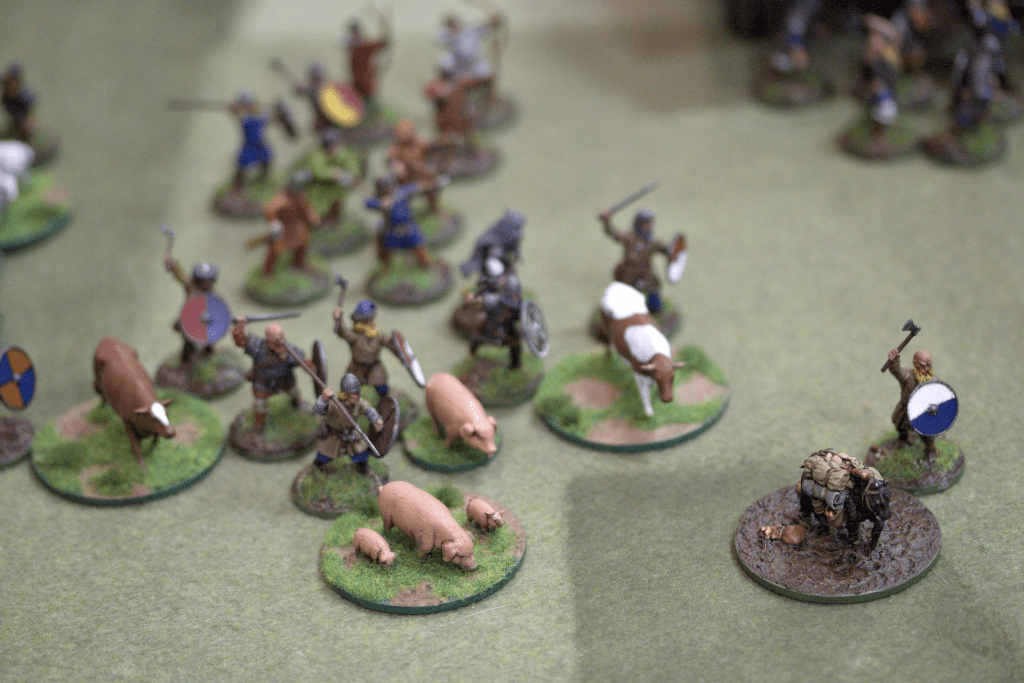
Vikings vs Saxons – Aftermath of the Raid
There were a pair of linked games both using Ravensfeast (a free online ruleset)- one of a Viking raid and then a 2nd of the Vikings attempted to get their stolen booty home. I missed the first game, but caught the second one. Also a chance to try out my new camera – a Canon RP with my older 60mm macro lens!
It ended up being a minor Viking victory, as they got the major loot (the laden donkey) off the table, and took down both my lord and the local bishop with his
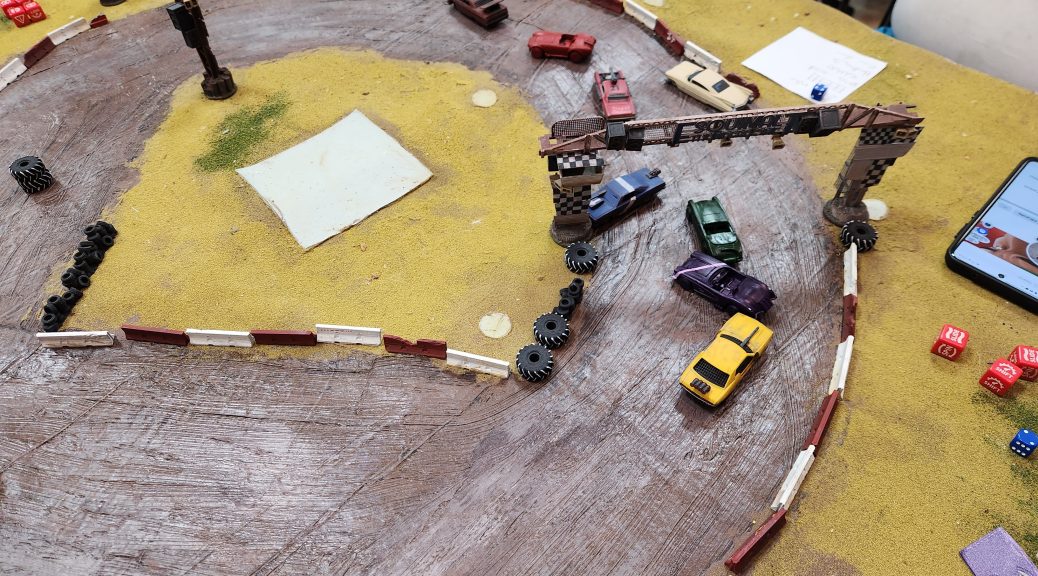
Gaslands pickup game – Death Race!
As we were late getting back to the main hall after dinner on Saturday, we ended up running the first of a pair of pickup Gaslands games. This death race ended up with the leaders taking each other out and the person in last place at the start claiming victory.
But the most glorious moment was the double jump – jump, slide, spin, jump again. Amazing to watch
Operation Sea Lion – Bolt Action
Sunday is one big slot, but we ended up having time to play a pair of games. First up, a four-table Operation Sea Lion, the start of a larger Bolt Action Campaign. On our table, it is a very minor German victory, as we cheeseweasled some troops off at the end.
It all started badly, however, as the Brits took out 1/3 of our force on turn 1 and we failed our prepatory bombardment roll. But our crowning glory was storming the ruined house held only by Dad’s Army types, who inflicted huge casualties, but we did more.
One last Gaslands game – Flag Tag
We had one last Gaslands game – Flag Tag. Team red vs the other colours, which also happened to be the younger players, including a friend’s son, against the older players (Brian, Martin and Tony).
All in all, twas fun but you never get enough photos. I did also have a participatory art project this year – I asked players to graffiti my buildings for my scifi terrain. Photos of those shortly and thanks to all that participated, I got some great stuff.
Til next year!
Update! Martin has uploaded his photos to flickr – he played many of the same games as Brian and I and even has shots of Brian’s boat game – something apparently Brian himself failed to get
I swear Bloody Miniatures chose their company name just so wargamer’s spouses could say that when the lovely figures show up! Thankfully they really are lovely figures, and if they amuse my wife too, then that’s a bonus.
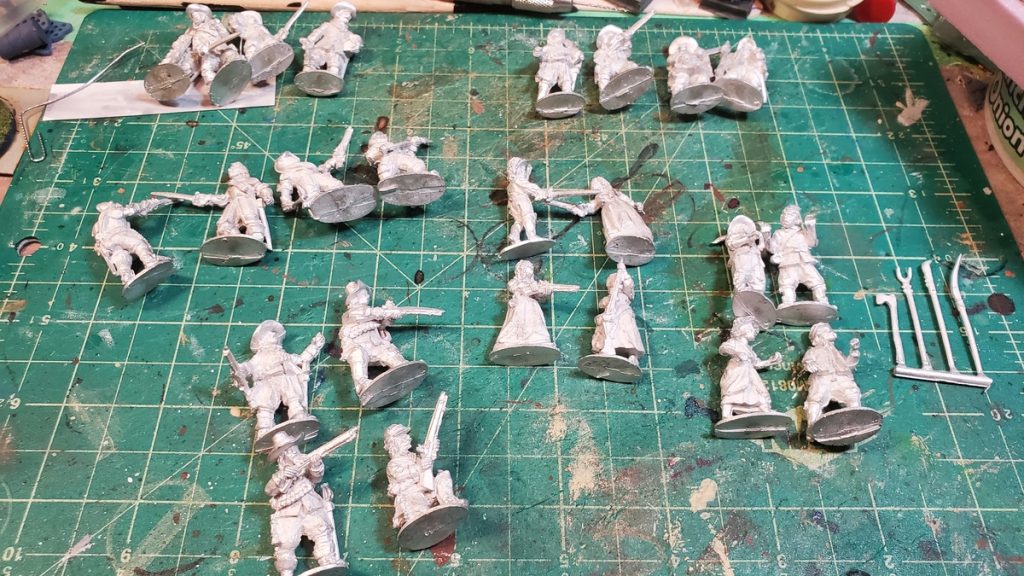
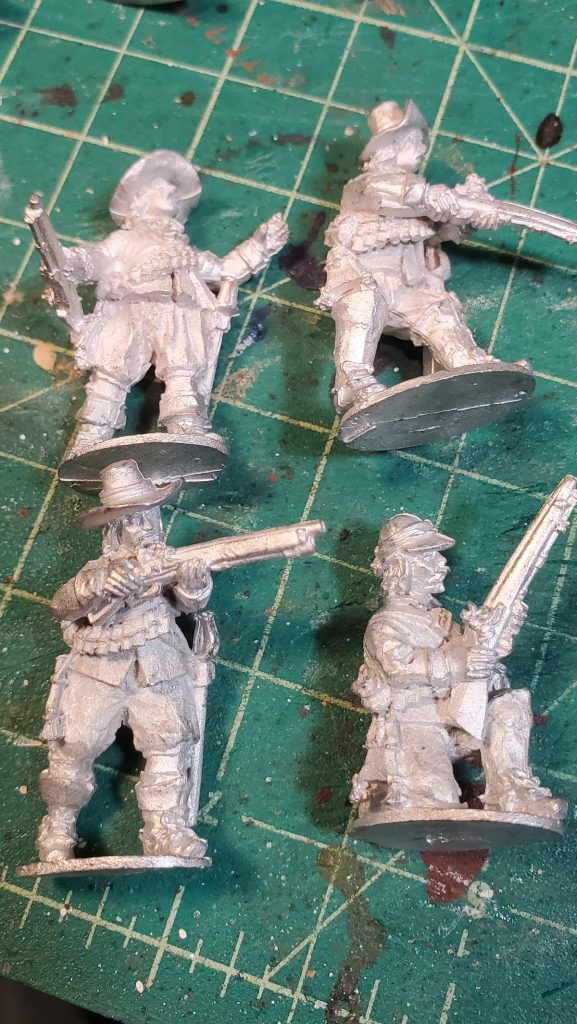
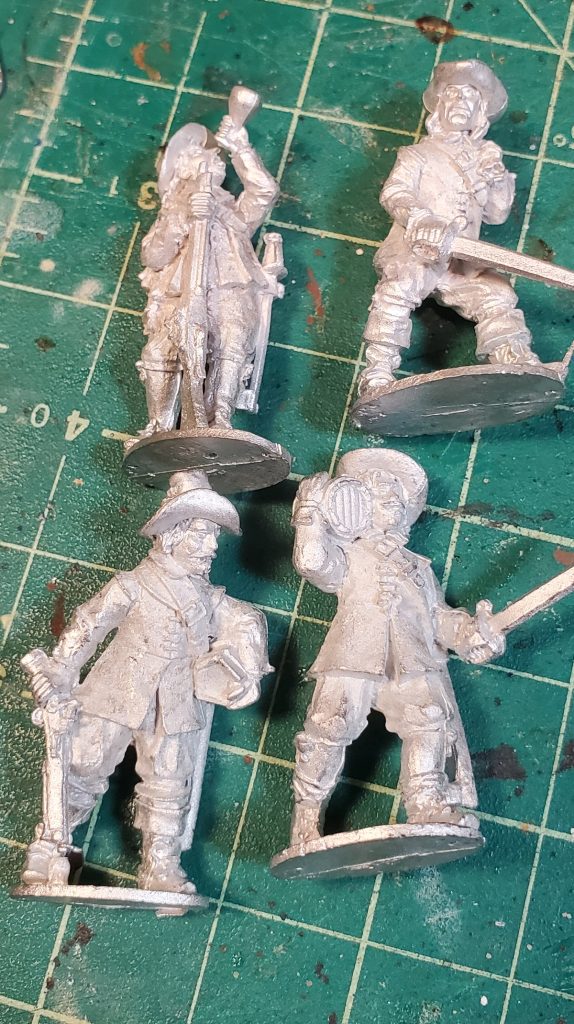
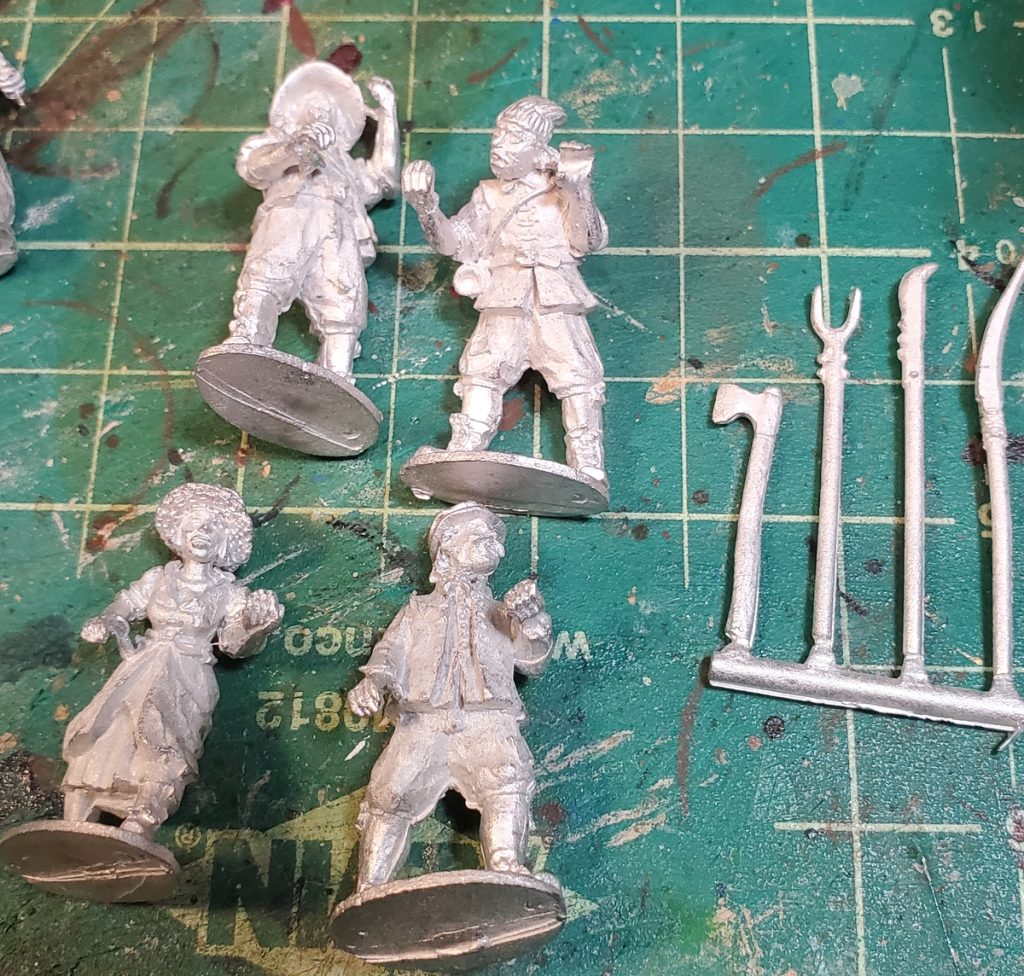
Six packs of Bloody Miniatures – all of their Wave 4 Chorus of Disapproval and two packs from earlier releases.
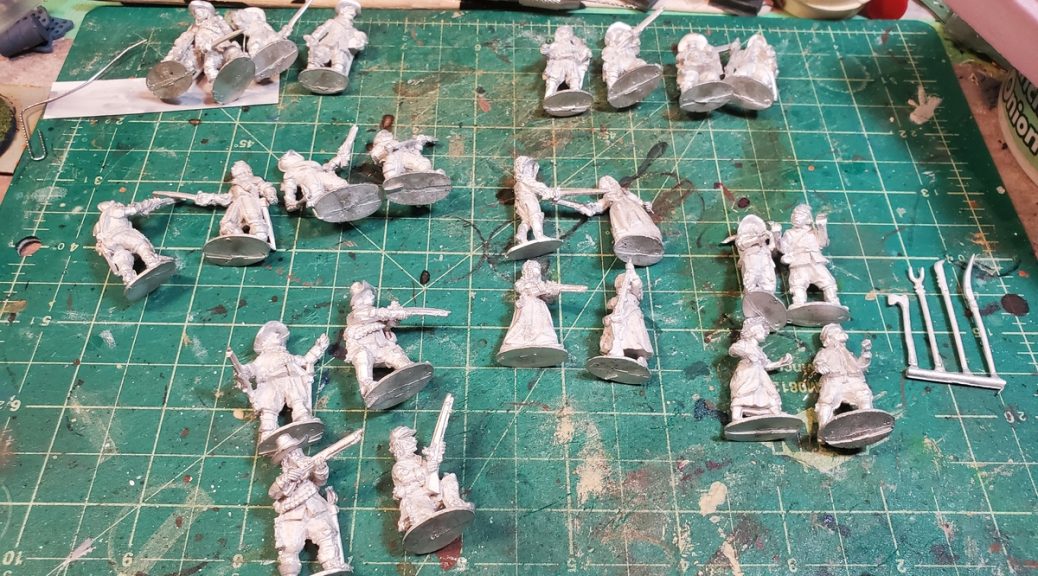
A few weeks ago I ordered the whole of BM’s Wave 4, A Chorus of Disapproval, plus a couple of individual packs from Waves 2 and 3. They showed up this afternoon and I had to snap a few quick photos to show them off.
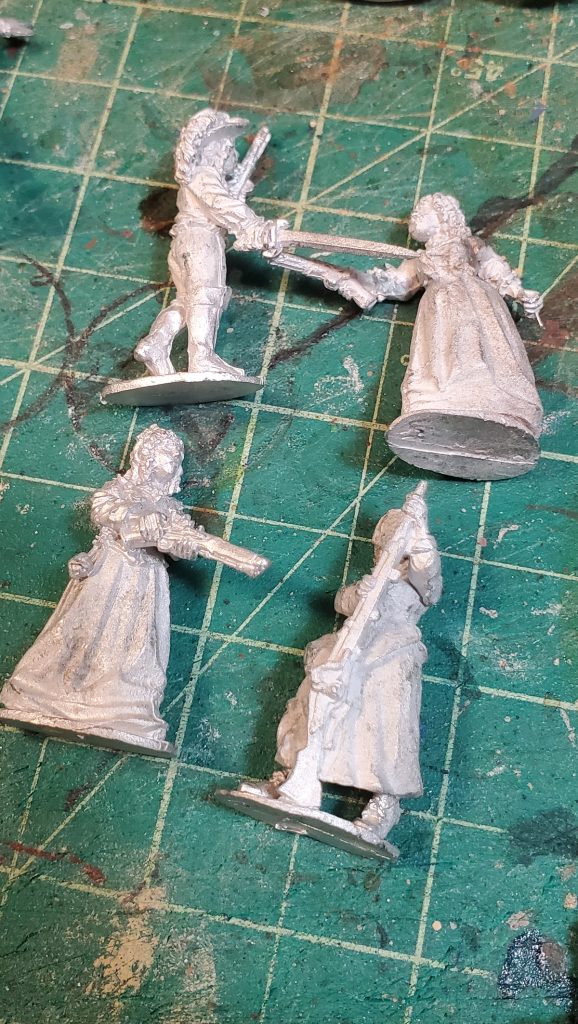
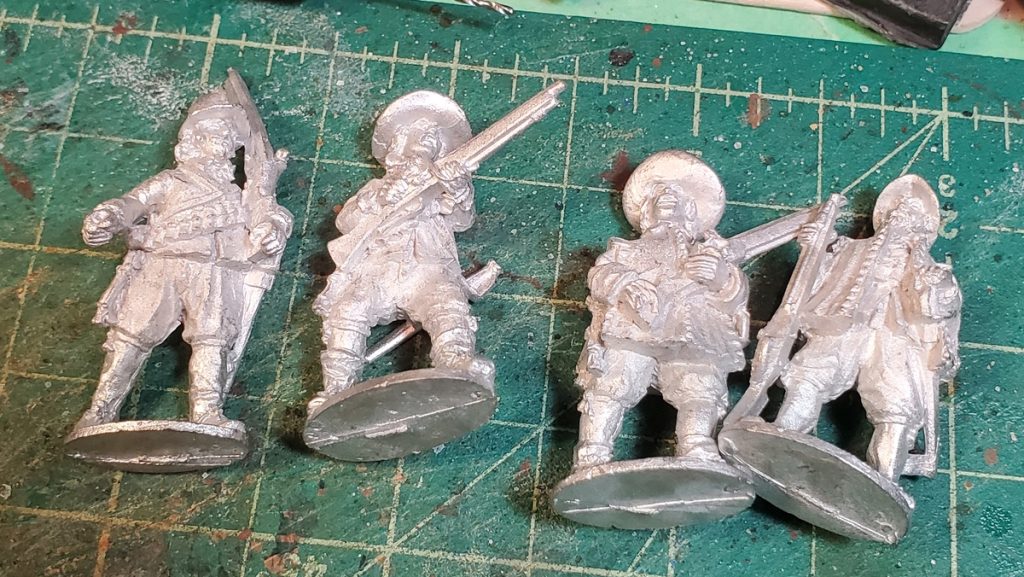
Wave 4 included the only armed female figures for the 17th Century that I’m aware of, which is awesome. There’s also a quartet of scouting dragoons skulking along, four armoured currassier on foot from the other end of the mounted troop spectrum, and finally four ordinary villagers with improvised weapons – axes and agricultural implements.
I also picked up a pack of sentries, and four looters hauling off their ill-gotten gains. Excellent character packs that I’m sure will show up in scenarios eventually! See the gallery below for some quick closeups of all six packs, straight from the box with zero cleanup.
Bloody Miniatures Gallant LadiesBloody Miniatures Night Watch sentriesBM Flying Piquets skulking dragoonsBM Unhorsed CurrassierBM LootersBM Village People armed civilians
Plague and megalomaniac idiot dictators waging unprovoked war on democracies and idiots honking in stupid pickup trucks… let us distract ourselves with some modelling instead, shall we?
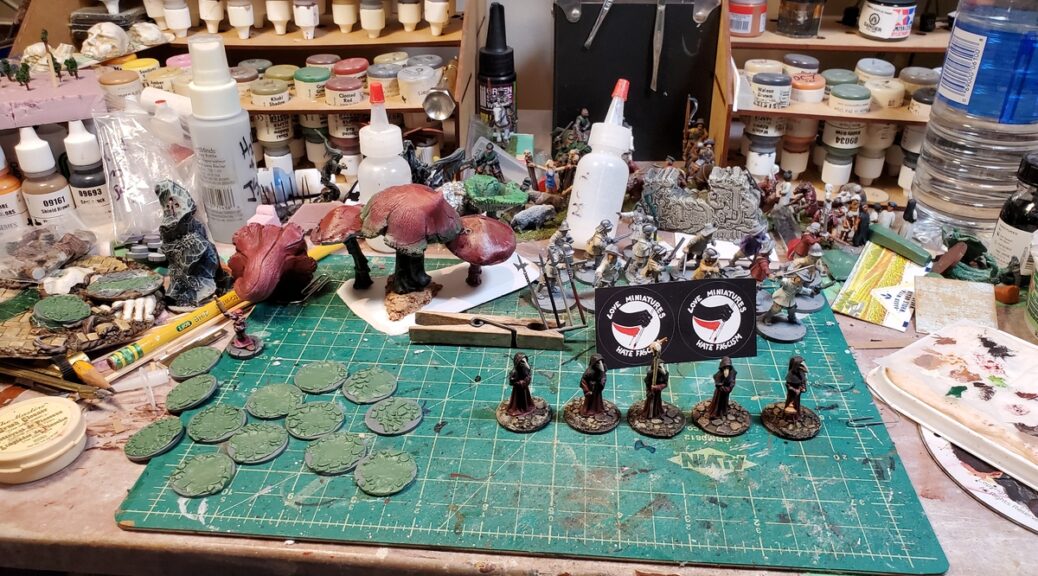
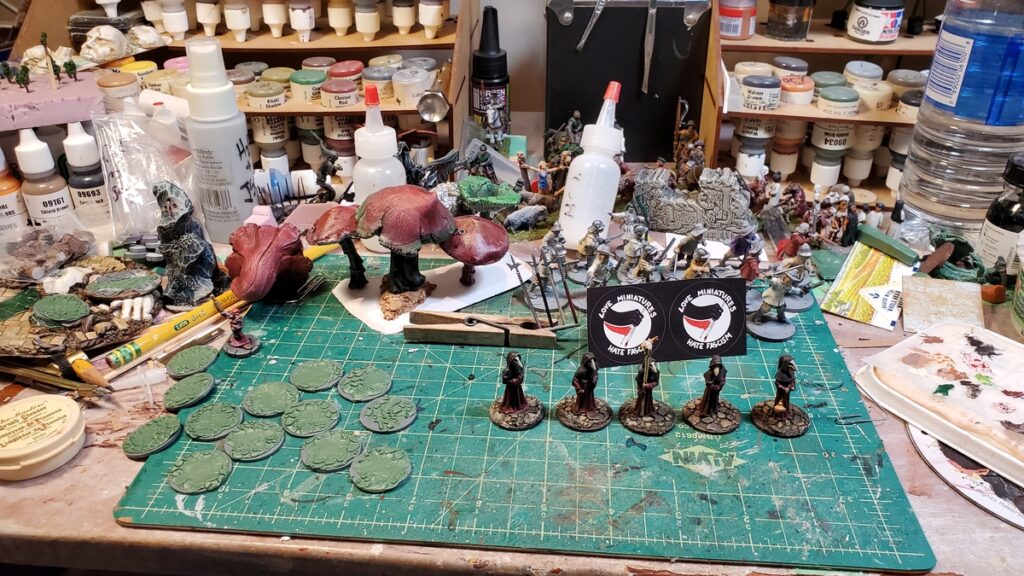
The workbench this weekend. Based and mushrooms and plague monks and ECW and much else!
So what was, in fact, on the workbench this weekend? Starting on the lower left of the cutting mat, we have a batch of 25mm/1″ plastic bases with greenstuff cobbles added to the top, these eventually to have some “town watch” kitbashed figures on them – probably Warlord ECW pikemen bodies with Frostgrave parts for some arms.
Heading clockwise, we have some awesome Fenris Games mushrooms, the first I’ve finished from their massive Sporewood set from the 2021 Toadstool Brownie kickstarter. I’ve based four of them onto a chunk of scrap 1/8th plastic and will get that finished up soonish; the fifth mushroom painted is lying on the left there.
At the back of the cutting mat behind the Fenris-supplied “Love Miniatures Hate Fascism” stickers are sixteen Bloody Miniatures English Civil War chaps, their Company of Wolves bundle of their Wave One releases, also from early 2021. Really lovely figures, full of character. Bloody Miniatures has produced two more batches of sixteen since then and Wave Four is on the way; I’ve held off on buying Waves Two and Three because up until a few weeks ago Wave One was still all boxed up…
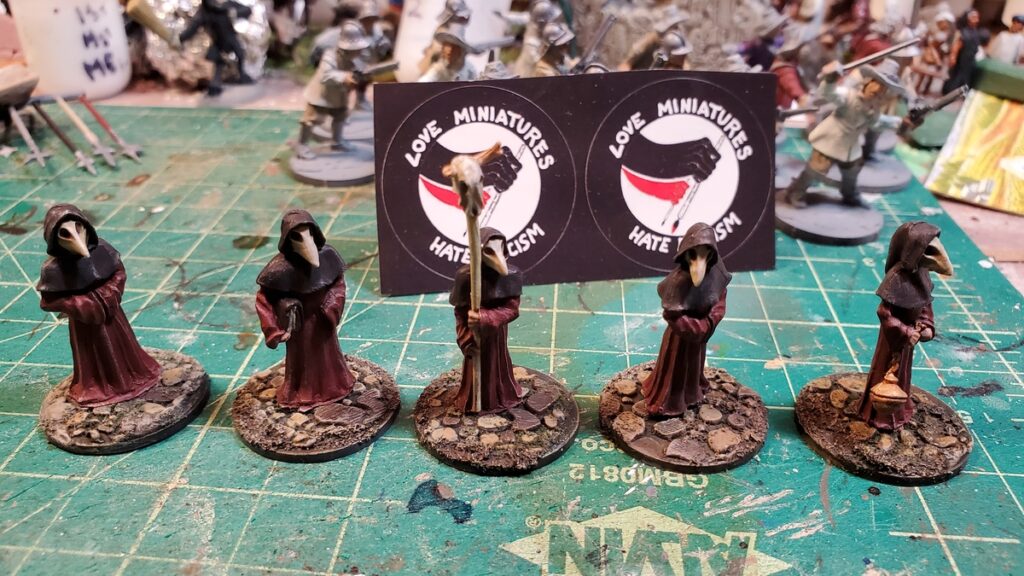
The five Fenris plague cultists, all set to lead ominous processions through a fantasy city.
Finally in the foreground we have five Fenris Games Plague Cultists all finished and ready to terrorize a table soon. Their bases were the test run for the urban bases off to the left there. I wanted grubby urban cobblestones and I think it worked. Nice simple figures full of character, too, and beautifully easy to paint up.
Hobby progress despite the state of the wider world, and that is never a bad thing. Stay safe, stay sane, and hobby onward!
A few days into January I had a fall that destroyed my glasses and injured my shoulder, both of which combined to cut down the amount of time I was able to spend on the computer. The upside of this, as I still needed something to do, was that I started a random construction project and completed it in about three weeks. (glasses have been replaced and shoulder is nicely on the mend, too)
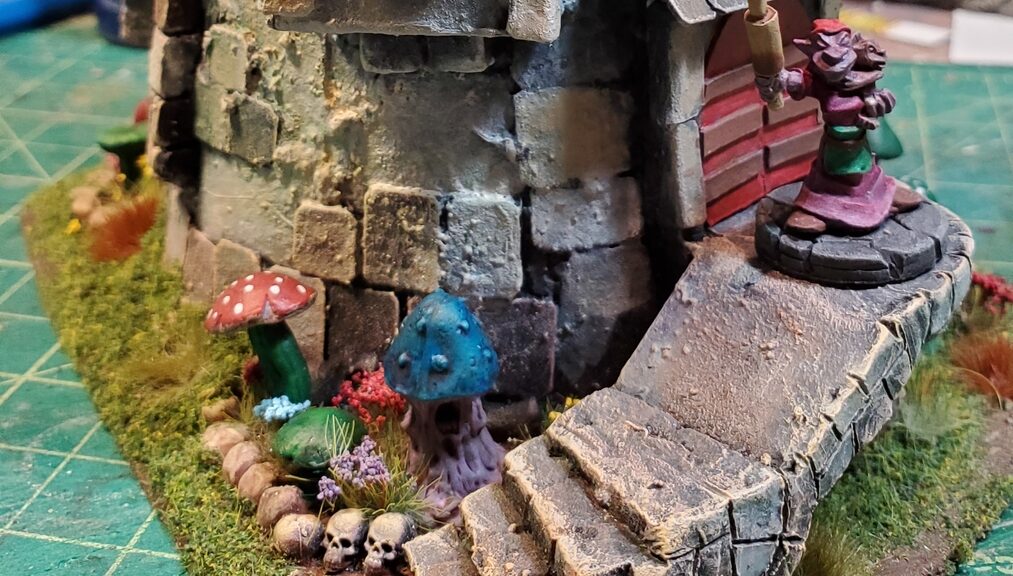
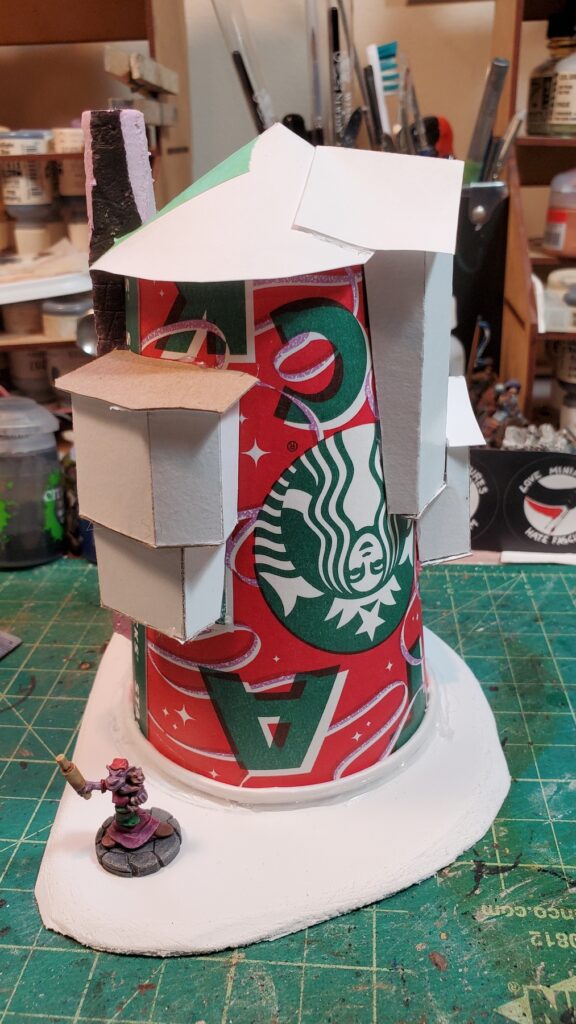
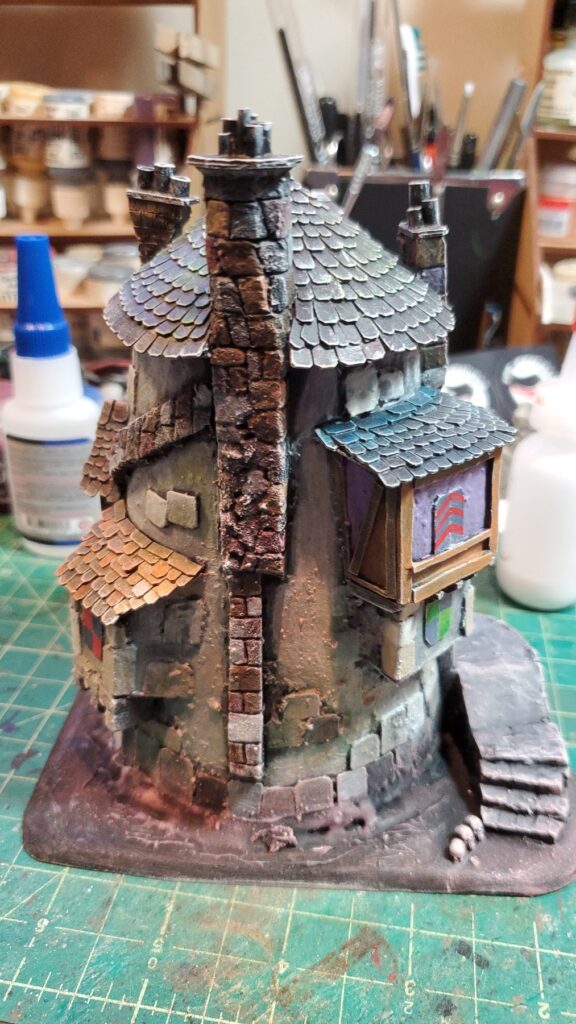
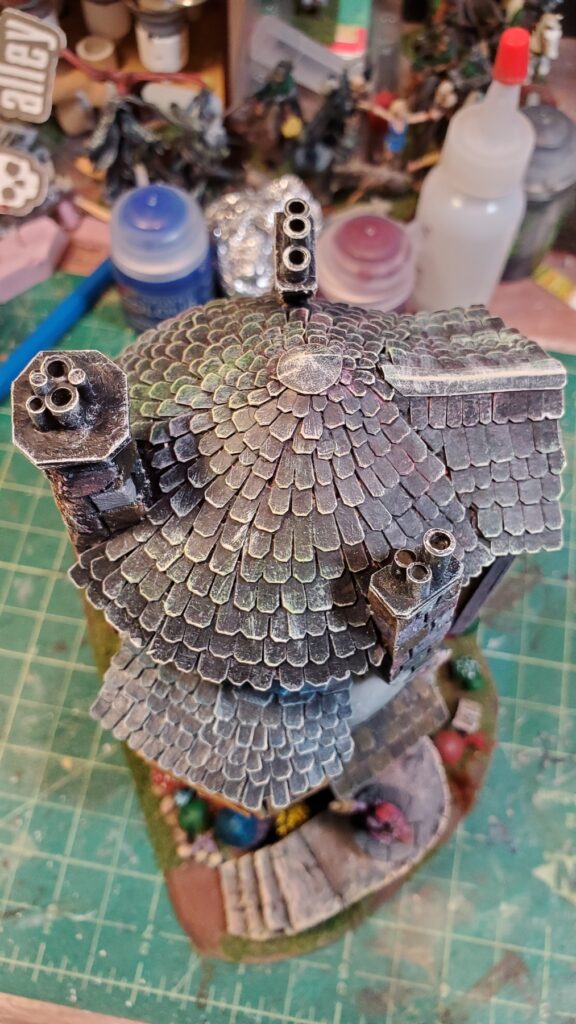
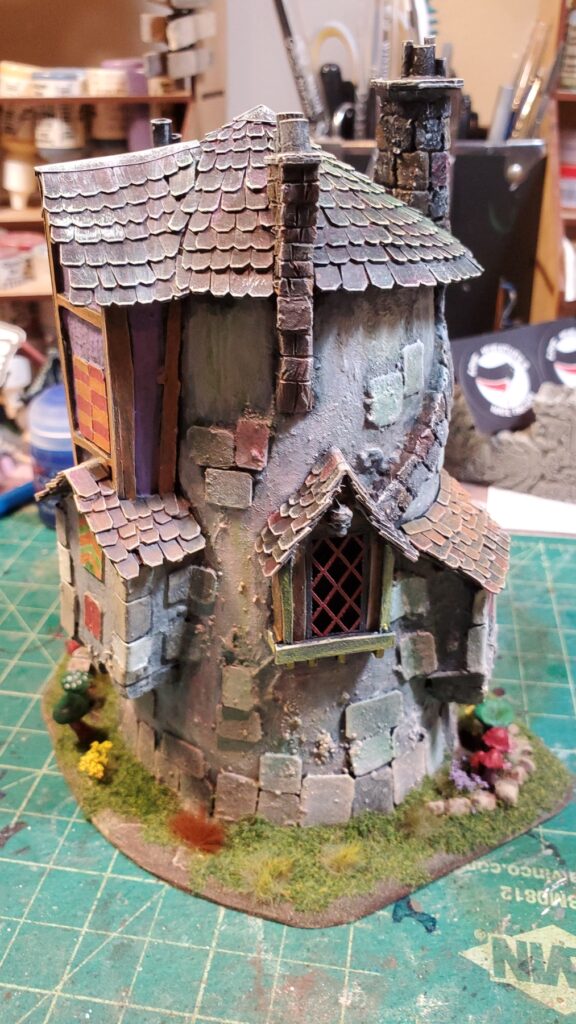
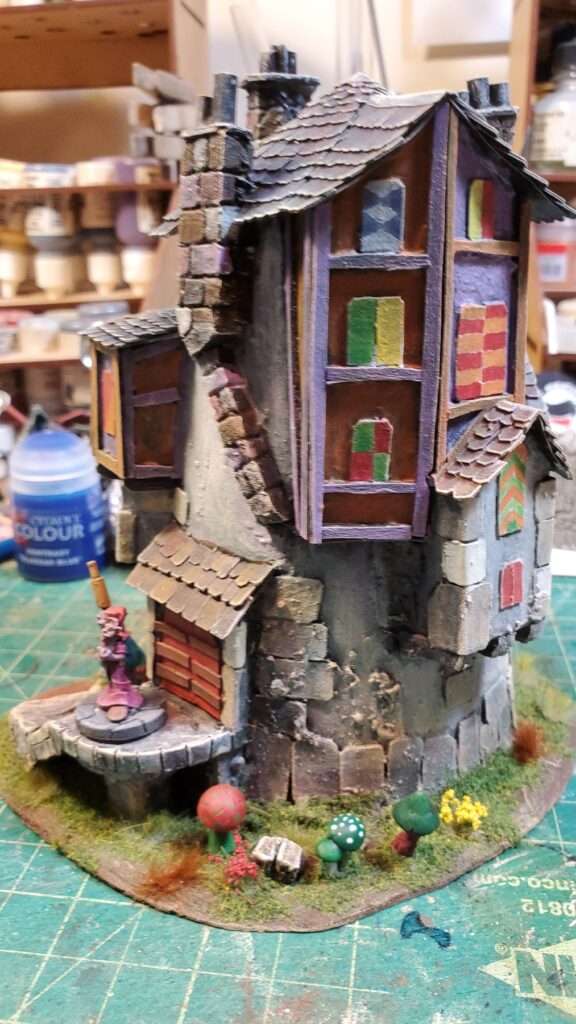
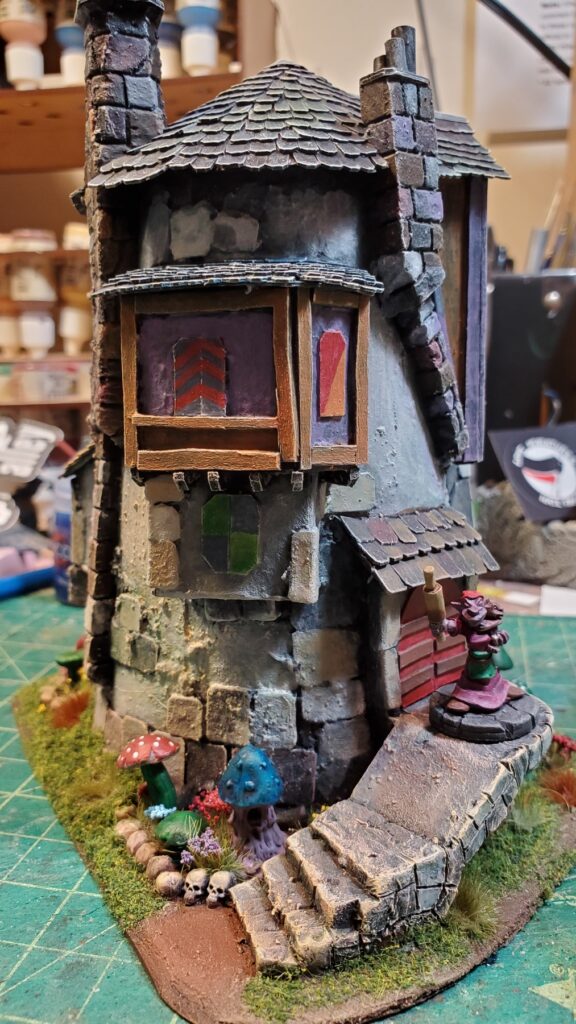
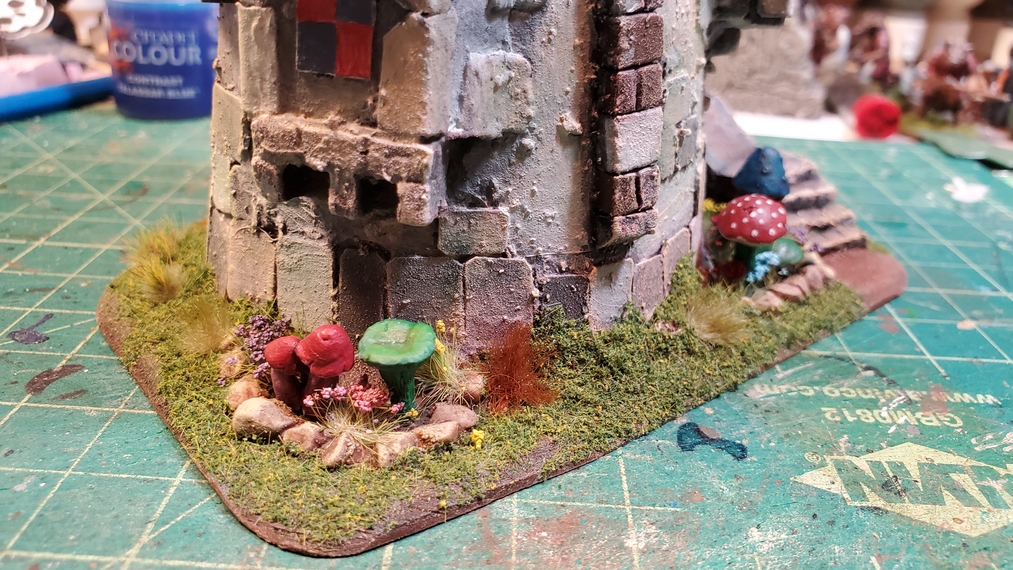
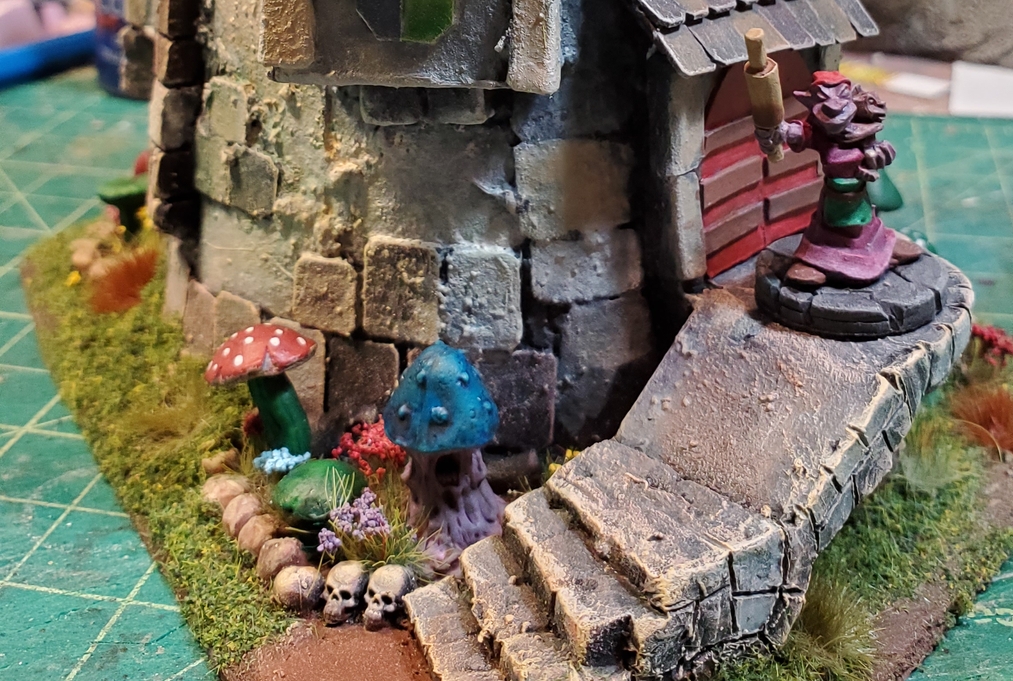
Over the Christmas holidays I had painted up an entire village of really cool Toadstool Brownies from Fenris Games (they’ll get their own post soon) so I decided to trash bash a multi-story tower for them to cause trouble from, a sort of weird fantasy cross between a fortified tower house and a tenement apartment building.
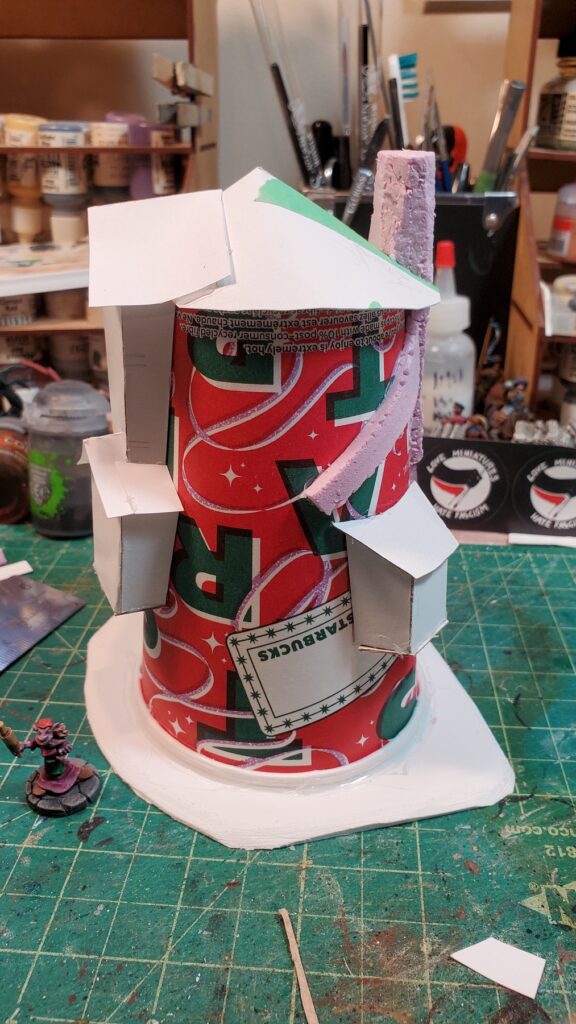
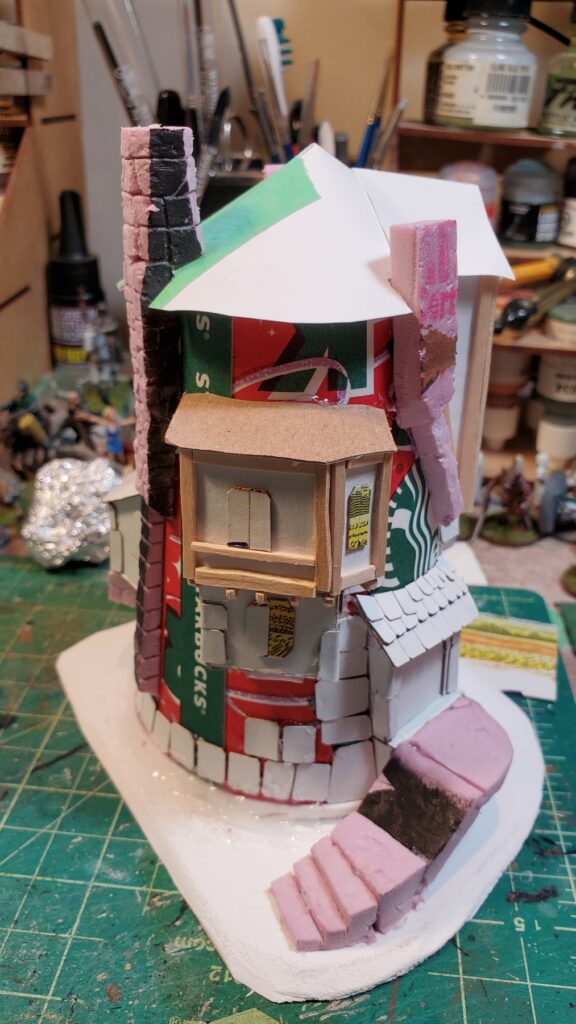
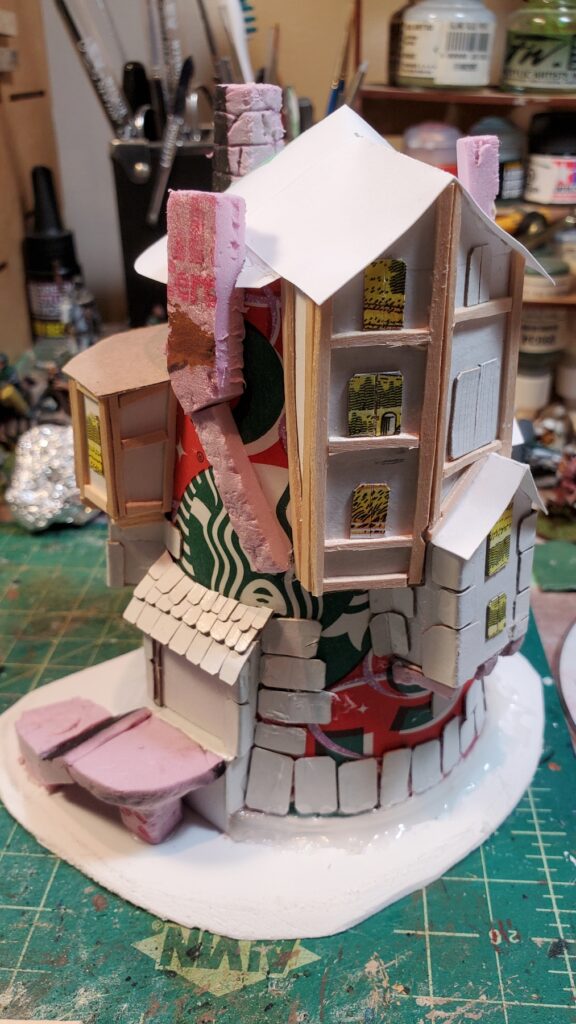
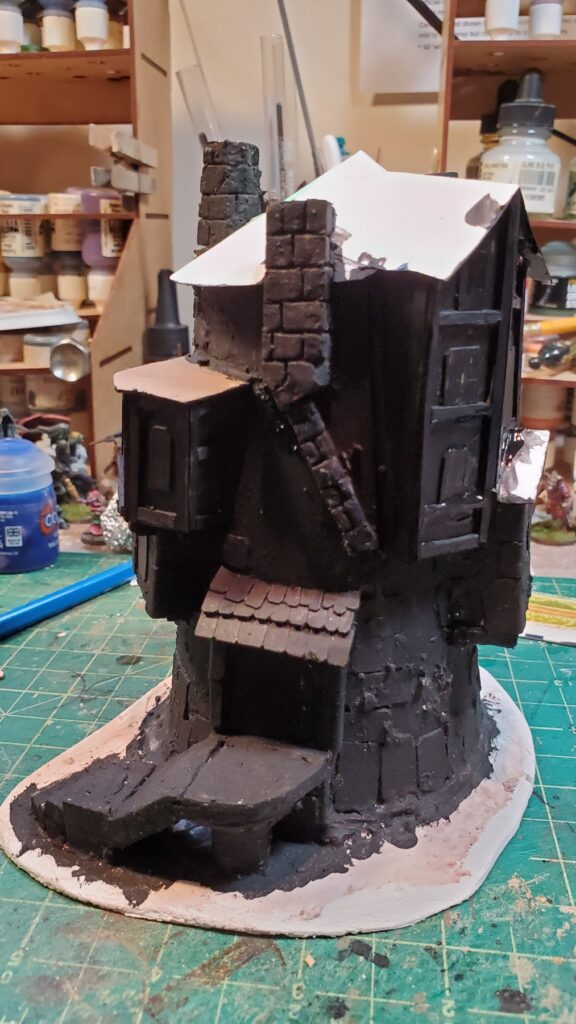
I started with a medium size paper coffee cup from a widely available but deeply mediocre coffee chain, glued that to a scrap of 1/8th PVC sheet a bit bigger than my hand, then started adding details with scrap cardstock, wood coffee stir sticks, bits of styrofoam, paper, and Milliput.
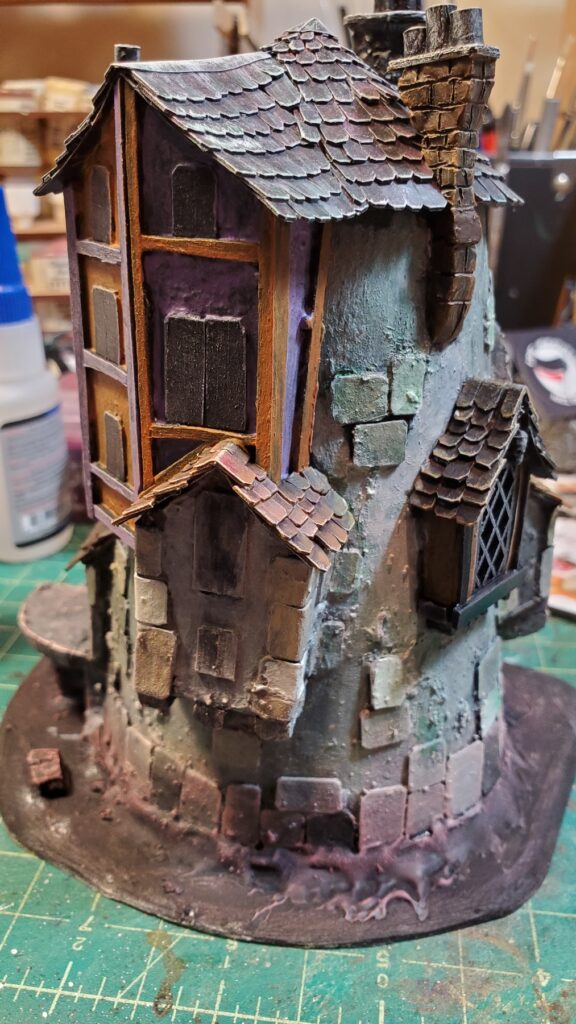
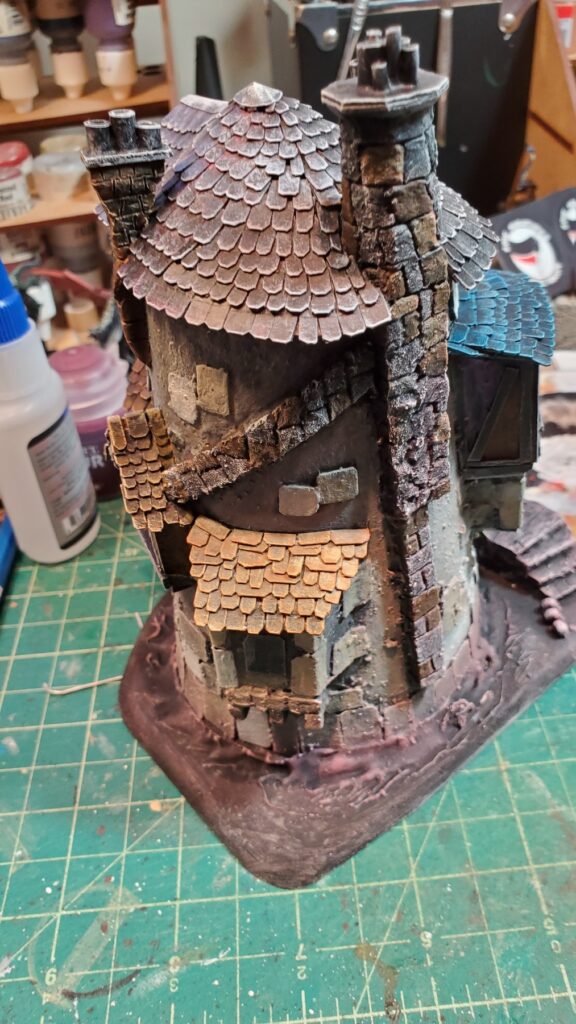
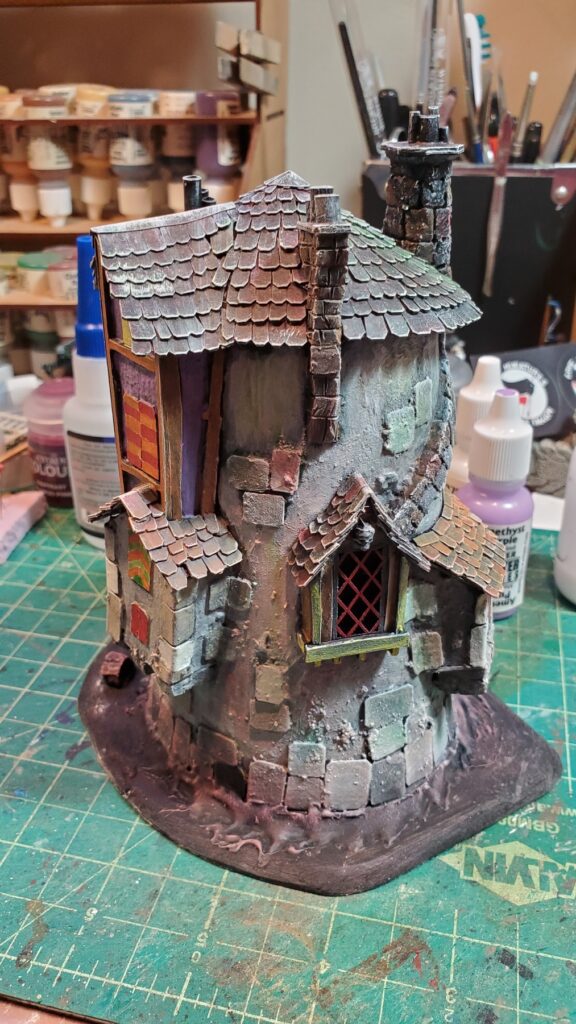
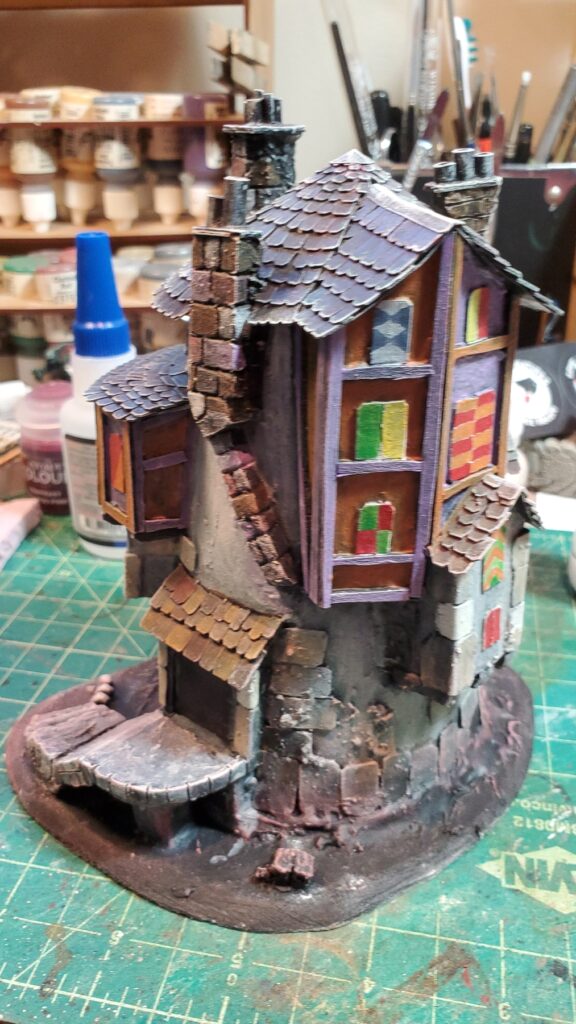
Very early in construction.Very early construction, with Toadstool Brownie on 20mm wide base for scale.Details going on.Shutters in place.Textured with thin plaster and priming started.Paint started, roofs and chimney details done.The skinny chimney on the left is Milliput around a toothpick core, for strength. Nicely gamer-proof, I hope!More paint. I used all sorts of random washes and drybrushing to add texture and character.More paint. Lasercut window and plastic skull above it.Paint on the shutters.The big chimney.Finished tower, view of the main roof.Finished tower, skull window side/back.Finished tower to the right of the door and ramp.Finished tower, door, ramp, and garden.The “back garden”.The front garden, and yes those are skulls…The Toadstool Brownie Tower, construction and finished photos!
This hasn’t actually graced a table yet, but I’m sure it will soon, and I want to write up stats for the Toadstool Brownies as either playable characters or random on-table nuisances for the games we play!
I haven’t done a pure stratchbuild like this in a while, but really want to do more, and weird fantasy builds are SO much fun!
Each year Lead Adventure forum runs a Build Something Competition, each with a theme. Brian and I have participated 5 times at various points in the past years. So with 2022 here, I figured it was my time again.
These dead might be able to take themselves out, actually.
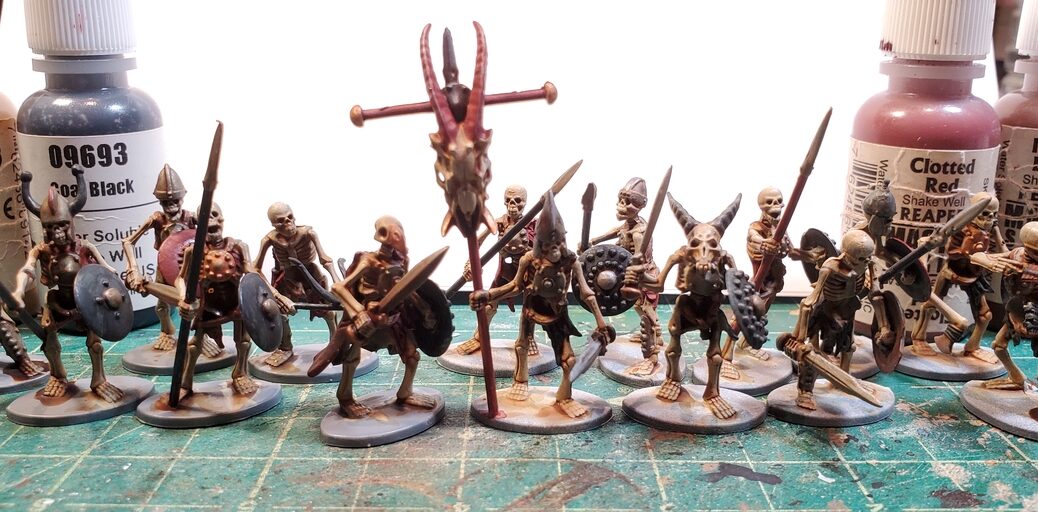
Basing still to be determined but painting finished on my first fifteen figures of 2022. These are North Star’s Oathmark skeletons; the other half of the pack is in Corey’s hands for painting and part of the reason the basing is unfinished is I’m waiting to see if we’re going to coordinate basing or just do our own thing individually.
Fifteen Oathmark skeletons, with some additions from other companies. Click for larger.
The big skull on their unit banner, and the bird and goat-ish skulls on two of the skeletons, are from GW’s Skulls pack, which is probably the most purely GW product GW has ever, it its long and illustrious history, produced. It’s also damn useful for kitbashing and scenery building and to date, the only GW product I’ve ever bought retail that wasn’t paint!
The painting was deliberately quick and simple. Grey primer with a white zenithal overspray, Reaper Stained Ivory mixed 1:1 with glaze medium for the base coat, Coal Black and Clotted Red for all the cloth and equipment, Intense Brown for leather strapping, Tarnished Steel or GW Dwarf Bronze for metal bits. After that was all dry, a fairly heavy coat of GW Seraphim Sepia over the whole figure, and then a quick highlight of the bone bits with Stained Ivory again.
This gave me a good looking hoard of dead folk to throw onto the table when we next face a necromancer in Sellswords or other games, and I have some good skeleton bits to throw into the kitbashing bits bin!
I’ve been on a kick of assembling and basing figures in batches the last little while, and also (as you can tell) not been doing much of the ol’ blogging this year… Anyway, right in the middle of assembling a couple of dozen Toadstool Brownies from the big Fenris Miniatures Toadstool Kickstarter earlier this year, the loot from the Fenris KS after that, the Wyrdworld one with all sorts of cool anthropomorphized animal figures showed up!
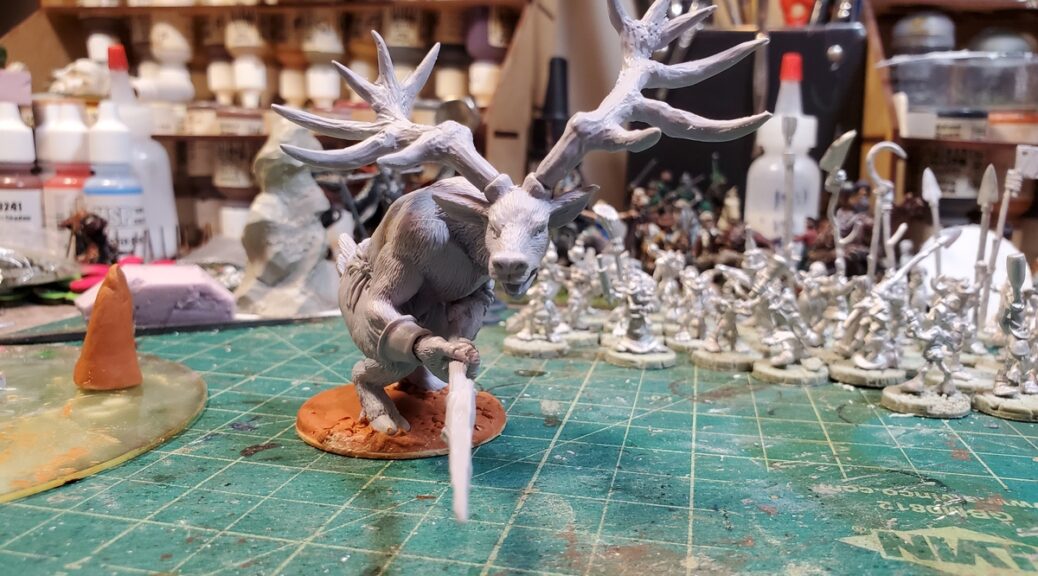
I decided that I needed to base and assemble Brutolph, the Giant Elk right away, because it is a truly spectacular figure.
Brutolph’s business end. Click for larger.
That’s a 40mm circular base our big deer is on, with his arms, spear and antlers just dry fitted for now until all the Milliput on his base is properly cured.
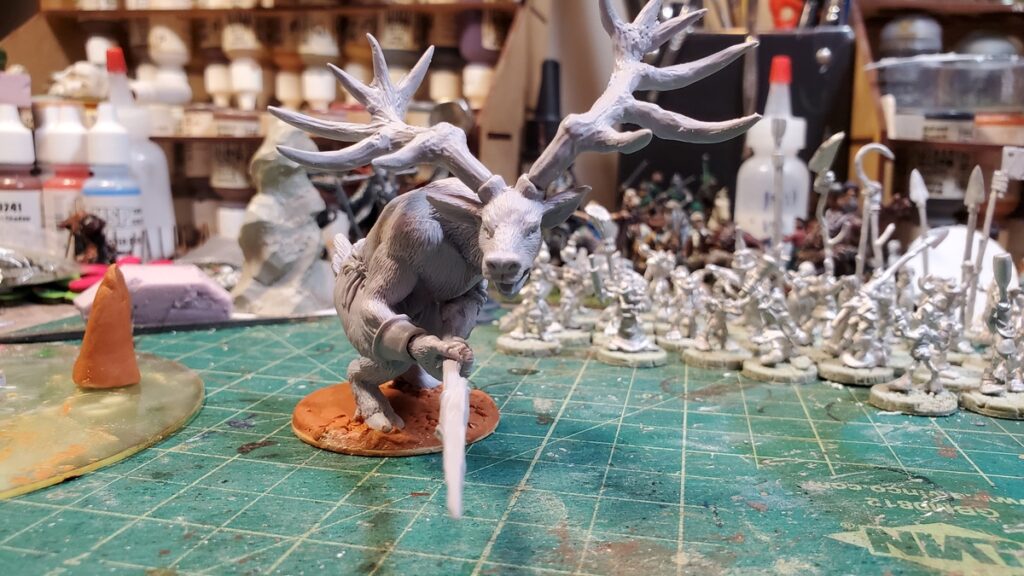
Brutolph alongside a 28mm Warlord ECW figure on a 25mm base. Click for larger.
To the top of his antlers he’s just shy of 3″ tall, and that spear is longer than that!
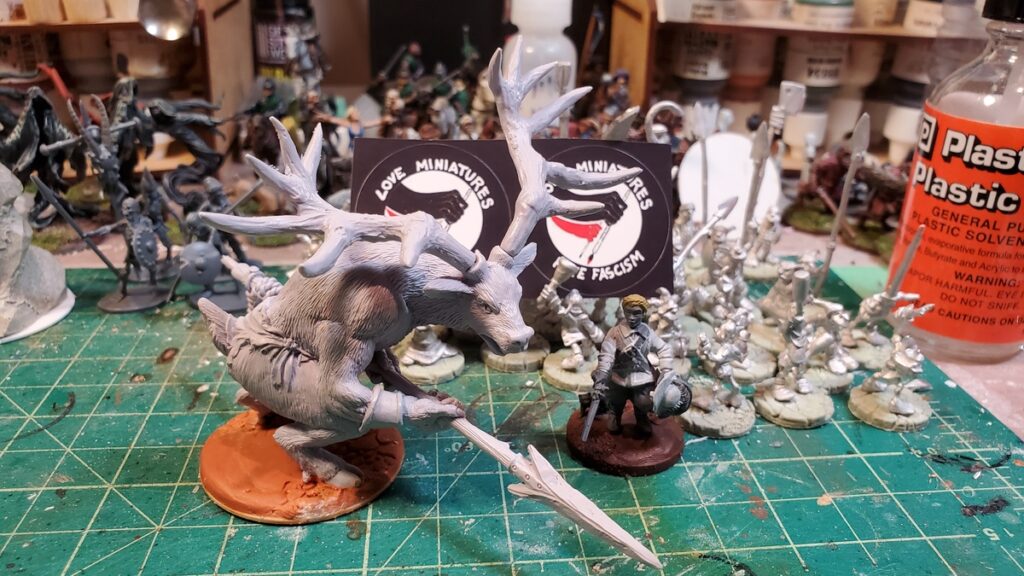
Brutolph from overhead, with Fenris Toadstool Brownies in the background holding up the awesome “Love Miniatures, Hate Fascism” stickers, also from Fenris. Click, as usual, for larger.
I’ll get Brutolph’s arms and antlers properly installed over the next few days and then he and the whole village of Toadstool Brownies will be off for priming. I’m not actually sure how I’ll be painting him up, but might go slightly weird as I intend to use the figure as a forest god/spirit of the deep forest type!
I’ve talked up Rain City Hobbies on this blog before, but only for their very nice grass and flower tufts. They also do a huge range of resin bases, but because I rarely use elaborate complex bases they’ve not interested me much.
I do own a few of their resin bases, however, picked up from the “production seconds by weight” bin sold by Rain City at gaming conventions. (remember gaming conventions from the Before Times? I miss them…)
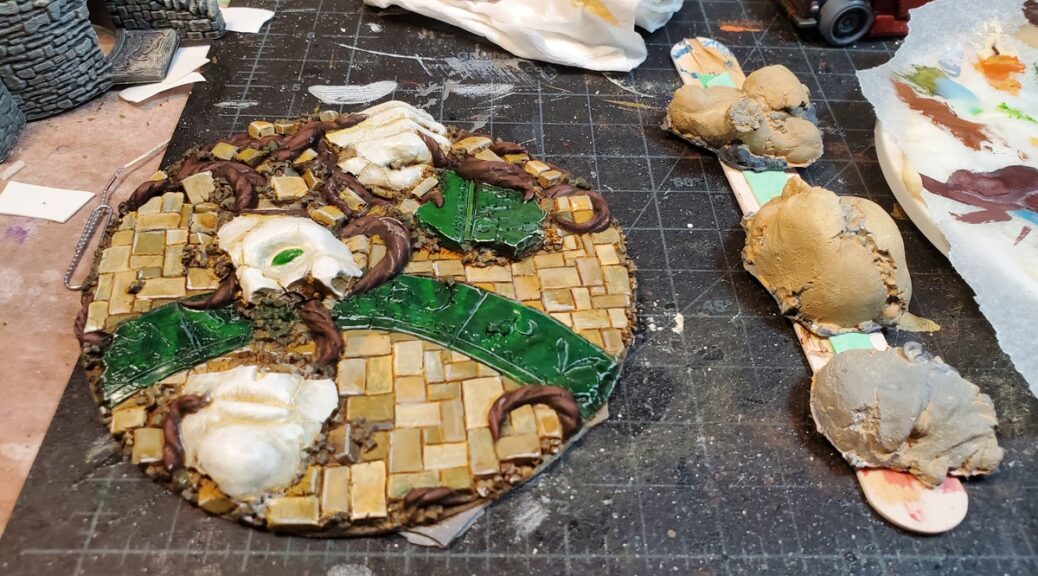
Needing a distraction from current events I decided to paint up the biggest of these, an elaborate ruined temple base nearly the size of a CD, their Huge Ruined Sanctuary insert. 120mm (~4 and a quarter inches, roughly) across, the production second one I have has nearly perfect molding of all the details, but it warped before the resin had fully cured so won’t lie flat.
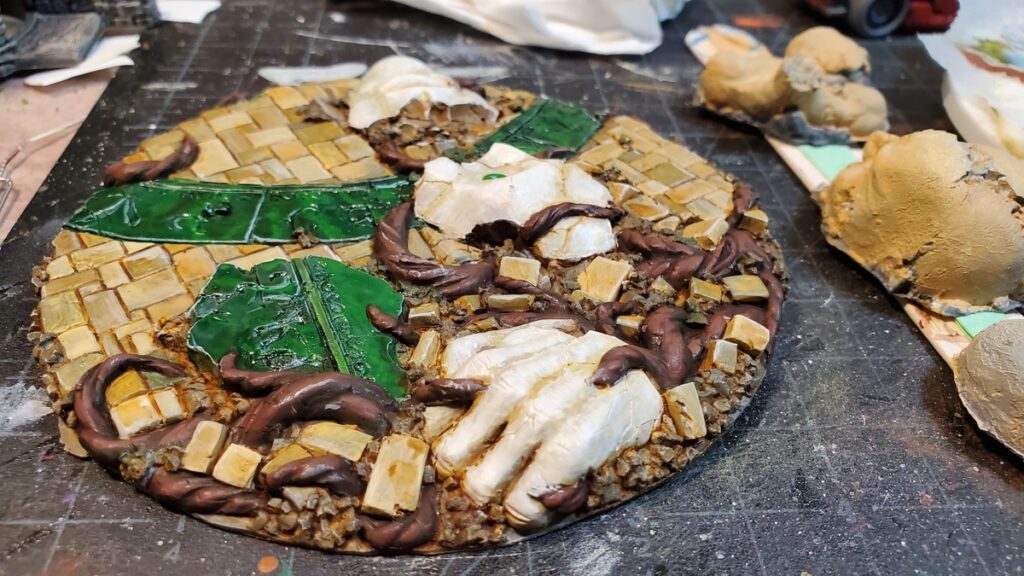
The ruined sanctuary base all painted up. Click for larger.
I tried out a bunch of different stone painting techniques on this base and I’m really pleased with how it turned out. The three big chunks of shattered statue were based in light tan, then progressively highlighted with whiter and whiter paints well diluted with glaze medium, which really got a translucent polished stone effect going.
The green arc and big green fragment were basecoated fairly dark green, then given marble-like veins with brighter greens, again well mixed with glaze medium. They got a good coat of gloss varnish, and then some highlighting with almost pure white.
The flagstones got basecoated with four or five off-white/tan shades, washed with GW Sepia and Earthshade washes, then highlighted with light tan and off-white. The tree roots are various shades of reddish brown.
The big base from the other side. Click for larger.
Because of the warp across the width, I’ll probably base this onto a larger piece of thin plastic, then use putty and then foliage to merge the lifted corners back into the base, making this look like a fragment that has been largely swallowed by forest or jungle.
I’ve also got a few more random bases I might finish up, and those three tan pieces to the right in both photos above are the Large Broken Statuary Base Accessories that I will be using either together with the big base or on their own as scenery elements. More on them in some future post when I get them finished.
Stay safe, stay home, try to get something creative done, mask up when required out in public, and better days (actual gaming conventions!) shall come again.
From the excellent people running Dark Fantastic Mills I purchased this Doomcap Shrooms Bundle earlier in the year. If you want to run fantasy games, you should, I think, have fantasy scenery. If you want to fight amongst perfectly ordinary trees, run a historical game, those are fun too.
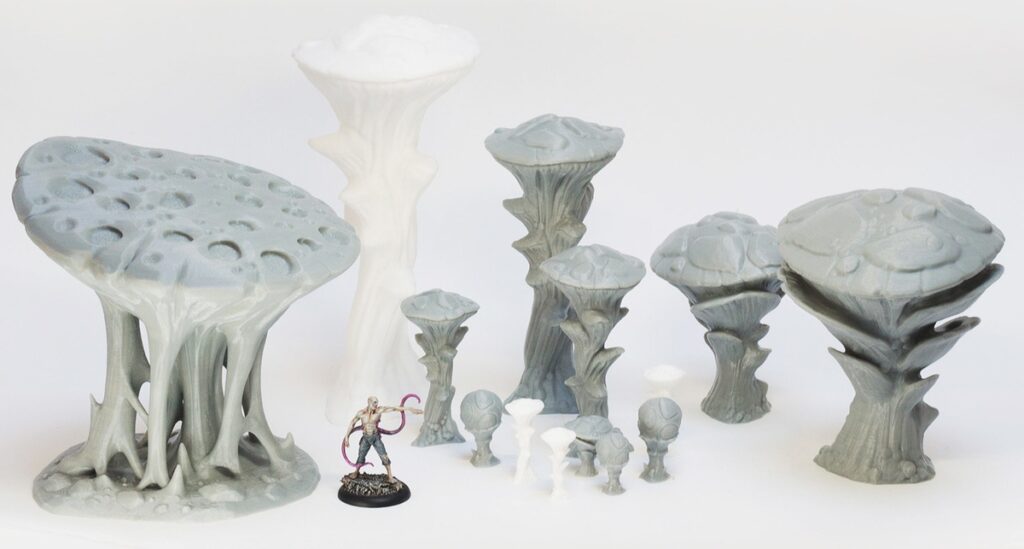
Unpainted Doomcap Shroom bundle, photo from the Dark Fantastic Mills website. I believe that figure is on a 32mm base. Big fungus!
These mushrooms are all 3d printed in FMD; you can see some layering here and there, especially across the broad flat tops of some of the bigger mushrooms, but other than that they’re wonderfully sculpted and beautifully detailed pieces of scenery. And BIG – check out that roughly human sized figure in the Dark Fantastic Mills shop photo above!
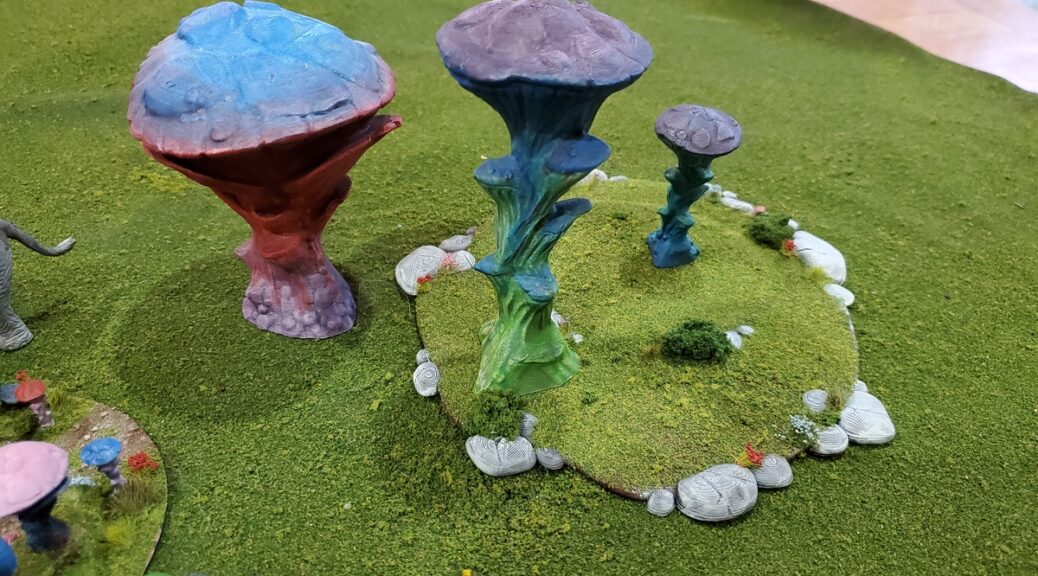
With “fantasy scenery should look fantastic” in mind, I cut loose and did up this lovely batch of 3d-printed giant ‘shrooms (and their smaller brethern) in gloriously weird colours. Reds and purples and vivid blues and greens, all the colours I usually use sparingly here and there came out in force.
I started with a dark grey spray primer coat, then did a rough drybrush of pure white. All of the colours after that got cut at least 1:1 if not more with glaze medium, so the original drybrushing mostly showed through and the various colours layered and blended fairly smoothly. I’ve posted this link before, but go watch Dana Howl’s 24 minute intro to glaze medium on YouTube, it really has changed the way I paint and these giant mushrooms would have looked much less interesting without her influence.
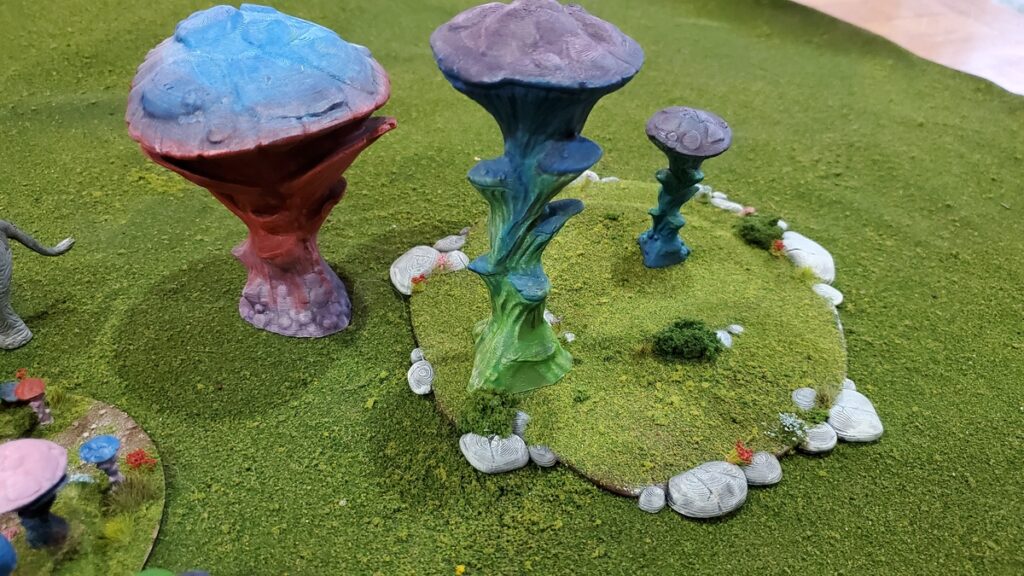
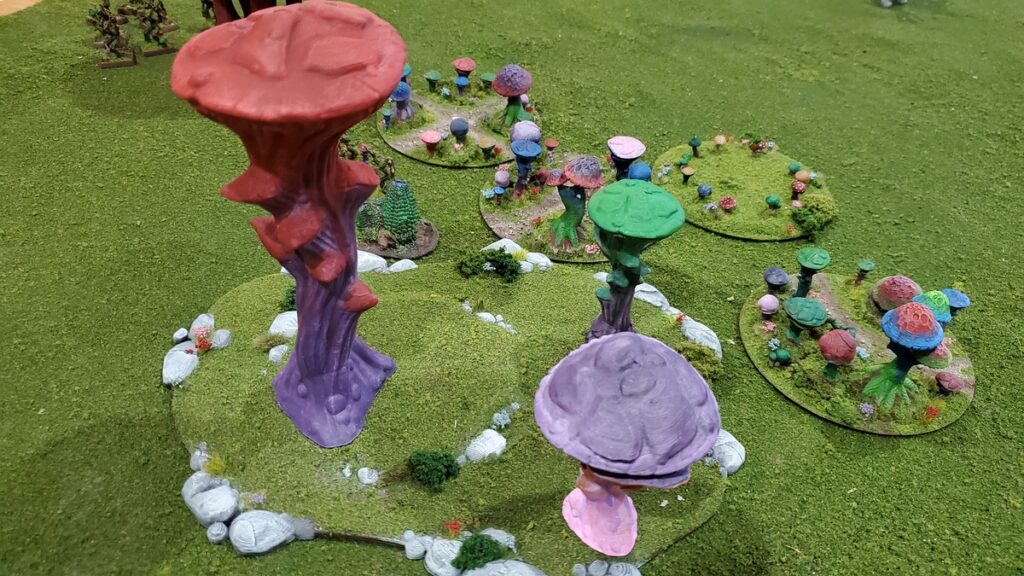
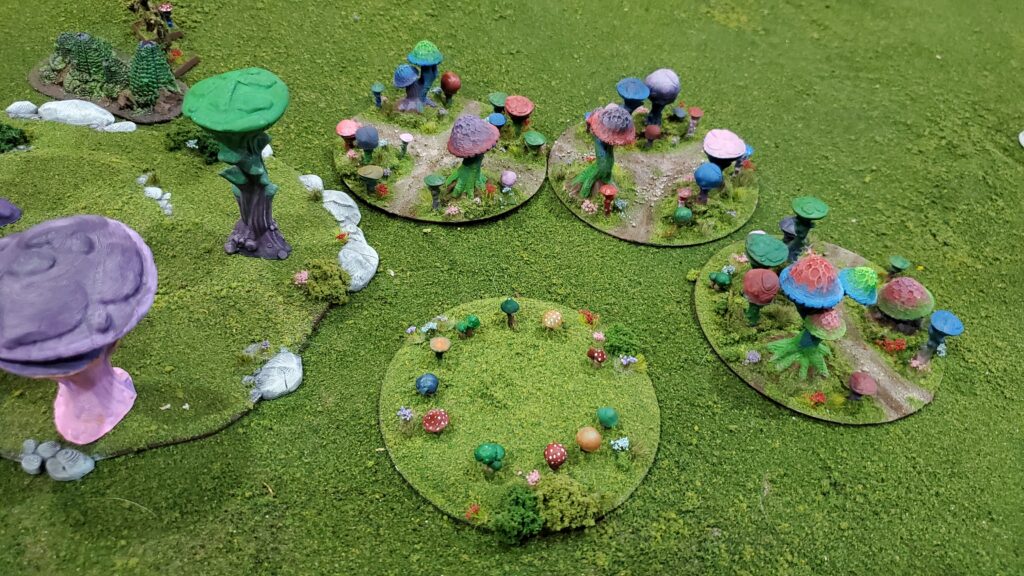
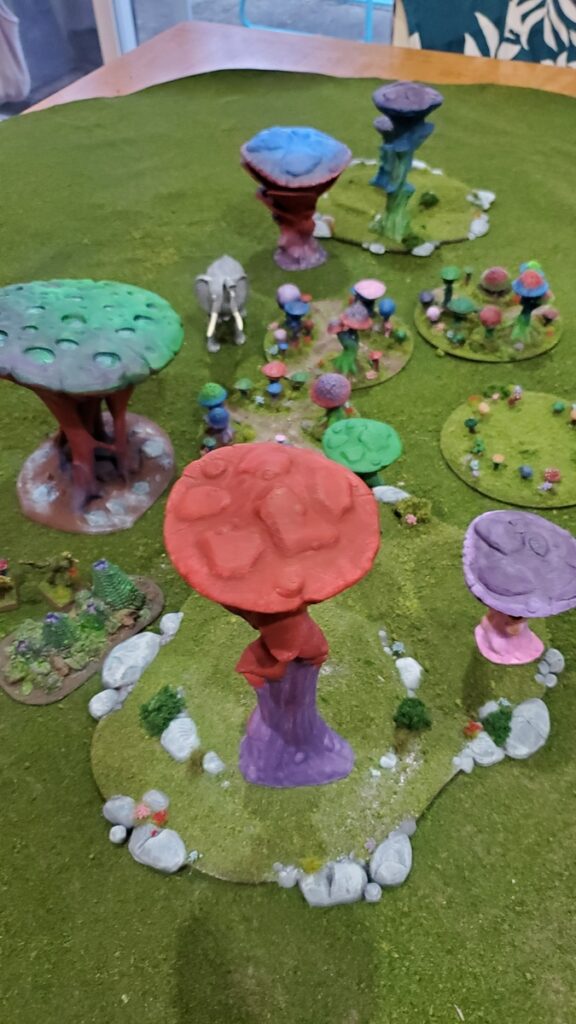
Three of the DFM ‘shrooms and the smaller of the two scenic bases that come as part of the bundle. Click for larger.The larger of the two scenic bases, and three more of the big DFM shrooms. Click for larger.DFM shrooms on the left, as well as their mini-shrooms on the three mushroom thickets in the background. The foreground fairy ring features mushrooms from Bad Squiddo. Click for larger.The largest single piece in the DFM bundle is that huge multi-trunked shroom off to the left, which I still need to finish the base of. Largest scenic base in the foreground. Click for larger.
Some of the DFM shrooms still need another round of highlighting or glazing to finish them off, and the biggest one, the massive slope-topped multi-trunked one in the last photo, still needs it’s base finished, flocked and detailed.
I’m really pleased with these Dark Fantastic Mills ‘shrooms. The bundle isn’t cheap, but you get huge dramatic pieces of scenery for your money that really stand out on the table! Go check Dark Fantastic Mills out, they’ve really harnessed 3d printing to make scenery that couldn’t easily be made in other materials and their designs really are fantastic.