In the local Bloodbowl league I’m currently involved in, there’s a pair of Lizardman teams, one using the regular GW figures for the team and my crocodile dudes from Impact Miniatures. Our League Commissioner is also playing with an Orc team, and will occasionally write a game report in the persona of his Orcish coaching counterpart. After thumping on the league’s other Lizard team 2-0, the Orcish coach was heard to say, “Herd der is some dat look like those Crocodiles on dem Golf shirts everyone is wearing dees days; CHOMP!!! CHOMP!!!!”
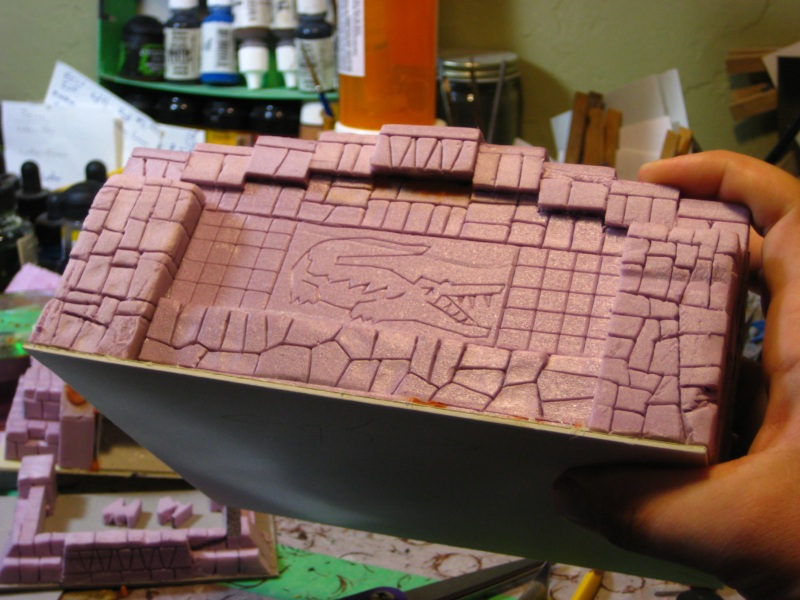
I was, at about the same time, wondering what to do for decoration on the dugout temple. A little bit of Google Image Searching and a little bit of Inkscape fiddling later to produce a basic image to guide my carving, I sat down with the completed temple, a very sharp Xacto blade, and this resulted.
Shirt pocket crocs? Sure! Still needs a fair bit of cleaning up and then of course paint! Click for larger.
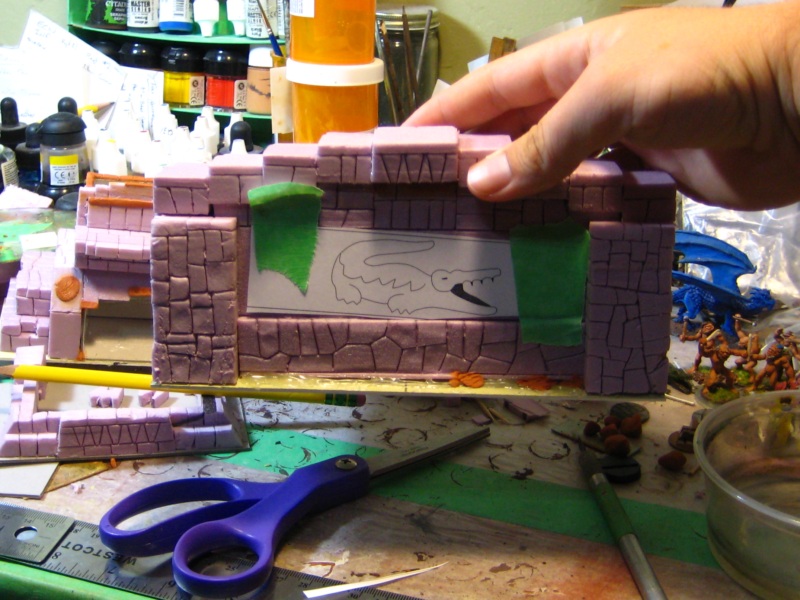
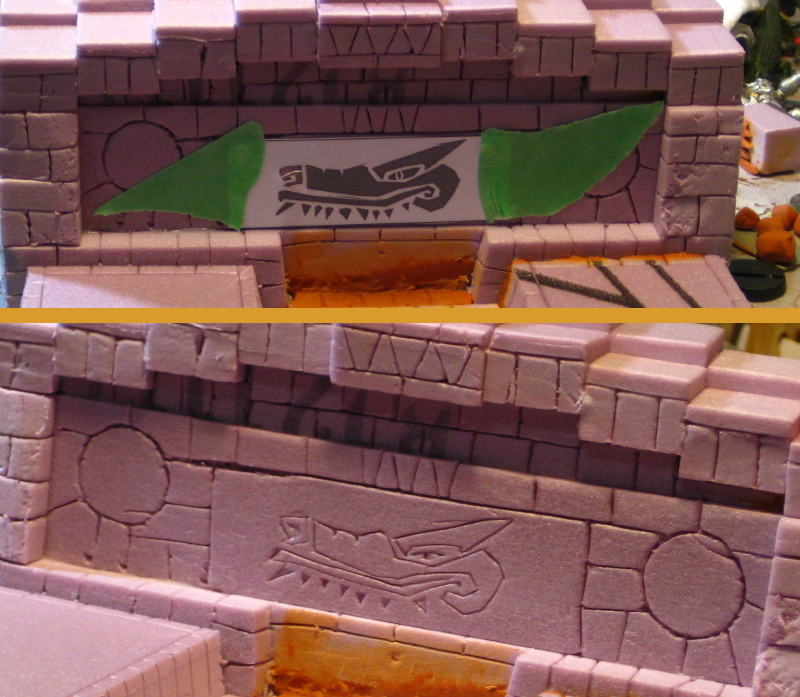
I printed out a simple line-art version of the relevant logo, taped it down across the foam, and went at it carefully with the brand-new very sharp Xacto blade.
The logo in place waiting for carving. Click for larger.
On the front of the dugout above the three actual dugout areas, I put the logo of my lizardman team, as seen in earlier in the year. Same procedure, taped the printout down and carefully went at it with an Xacto.
Saltwater Slaughter team logo on the front face of the dugout. Or a generic crocodile head, as you will. Click for larger, as usual.
When I finished the new BB scoreboard temple back in May I mentioned that when I got back from Europe I was going to be building a new set of Bloodbowl sideline terrain to match the new scoreboard.
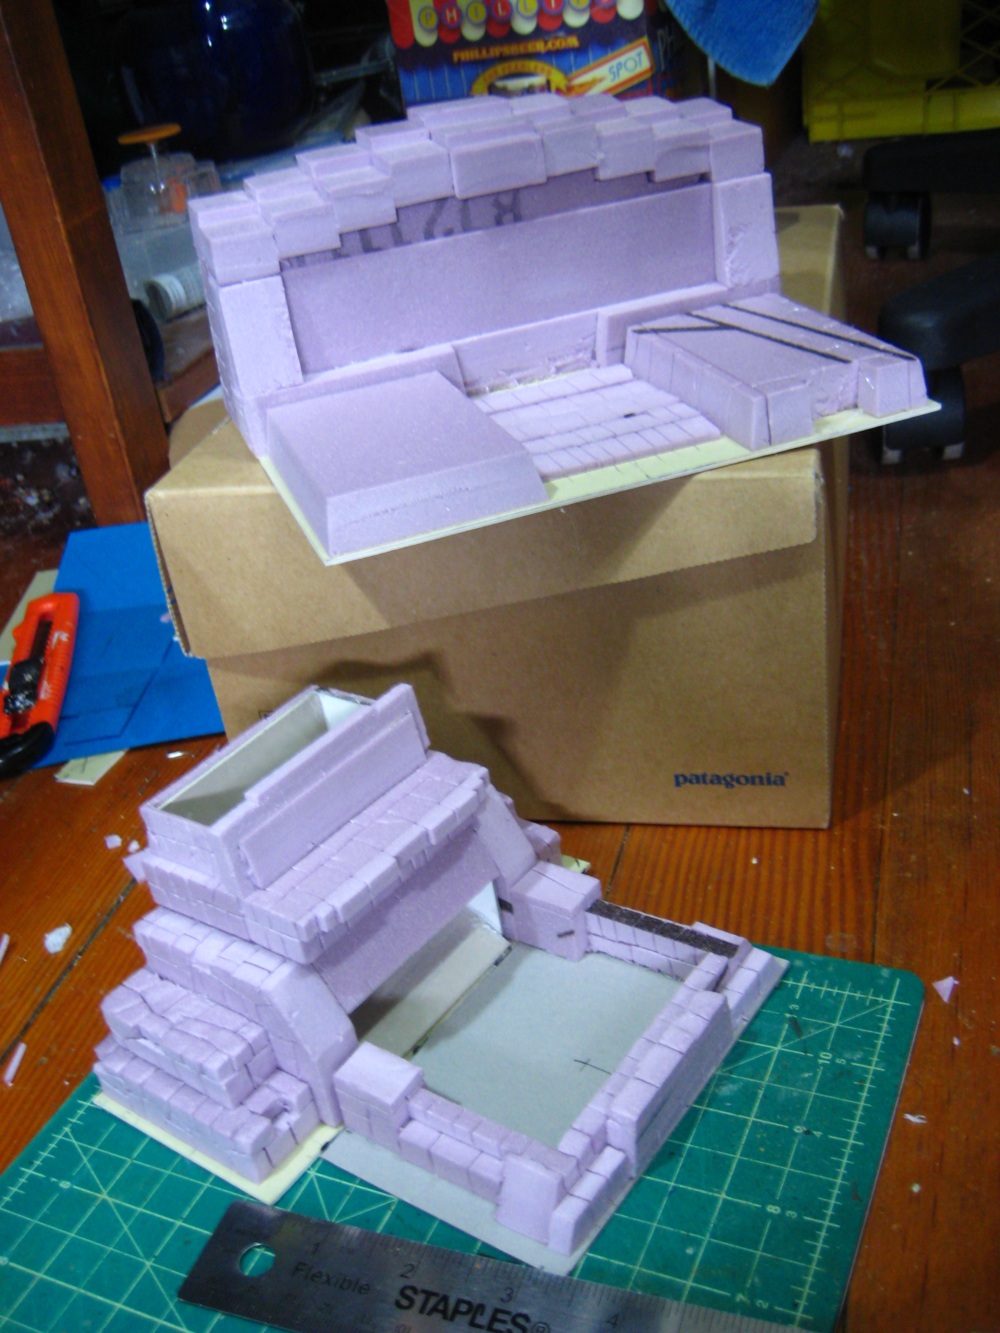
I’ve got one of the two dugouts (with turn & reroll trackers) built and ready for detailing, and using leftover bits and pieces I’ve put together a small dice tower as well.
Top, dugout & trackers. Bottom, dice tower. Click for much larger image, and see text for details.
The dugout/tracker temple piece has the three dugouts (Reserve/KO/Casualty) across the front, and the roof will be marked up for tracking turns (the eight tiles down one side), first half/second half (the two larger tiles at the peak of the roof) and re-rolls (the eight tiles down the other side). Overall size is 7.5″ wide, 6″ deep and about 3.5″ tall. The whole thing is styrofoam insulation board.
I haven’t yet started the second dugout/tracker temple because I’m out of full-size sheets of mattboard (picture framing card) to use as the base, but it will have the same footprint. The whole set is designed to fit into the large Patagonia shoebox the dugout is resting on, because I do almost all my gaming away from home and I want to keep the whole BB setup small enough for easy transport, including in my bike panniers!
The second, smaller piece is a dice tower that is just big enough to roll full-size dice. It’s 6″ wide, 2.75″ deep and just under 3.5″ tall, those being the dimensions of the leftover space in the shoebox when two dugouts and the scoreboard temple are tucked into place, and allowing for a couple of inches on top for the fabric pitch to tuck in — which also serves as padding for the buildings.
The internal structure of the dice temple is mattboard; the outer detailing is offcuts of styrofoam.
The catch tray for the dice is a separate piece about 5″ wide and 3″ deep. It’s going to be painted up as a sacred pool eventually, with gloss varnish as seen on the scoreboard temple. I might try to do something clever with magnets to keep the tower and pool attached while they’re in use, or just glue a tab of paper onto the bottom of the pool that sticks under the tower and helps keep them together.
Lots of putty detailing and styrofoam carving left to do on these two, and I need to hit the local art supply store this weekend to restock on mattboard so I can start the second dugout to finish the set.
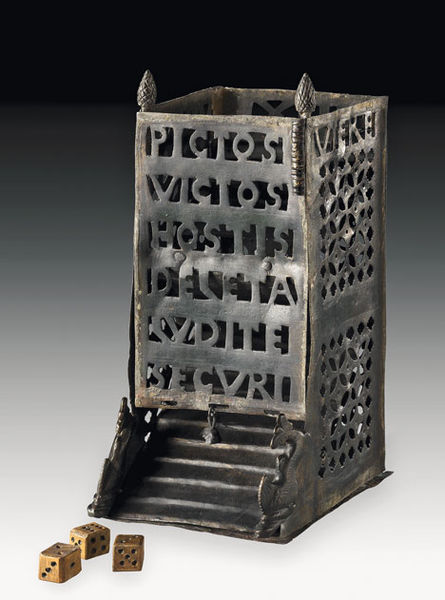
Rummaging around on the internet for information and pictures of dice towers, I tripped over this awesome piece of work, the Vettweiss-Froitzheim Dice Tower:
The Vettweiss-Froitzheim Dice Tower. Photo via Wikipedia/Wikimedia Commons.
It’s a genuine Roman artifact found in Germany, and proof that even the odder bits of gaming equipment out there are much, much older than we sometimes think.
It’s also a really cool design, actually. Any of the laser cutting wizards out there want to do up a version of this in lasercut MDF or plywood?
Posting this mostly for the other folks in the local V-Nuffle Blood Bowl League that has just started it’s fourth season; I’ve got a Lizardman team involved, the Saltwater Slaughter. The figures have been seen here before, although I am going to try to get new and better photos sometime soon!
Fairly standard Lizard team, at least to start: 1 Kroxigor, 6 Sauri, 4 Skinks, 2 re-rolls, 20,000 gold in the bank. No team doc, but I’ll probably add one after the first or second game, as well as a fifth Skink as soon as possible.
I’m back from seven weeks of holiday in Europe, catching up on email and such, and looking to get back into gaming and terrain making.
First up is going to be new Blood Bowl sideline terrain to go along with the scoreboard/temple I built before I left; I want to build new dugouts to go along with the new scoreboard.
After that, who knows? I’ve got a lot of partially painted figures and incomplete small terrain projects floating around that I really should dust off and finish, but there’s always distractions…
It was an amazing biking holiday across Austria, Germany, Switzerland and France, but it’s nice to be home and back!
I’m off to Europe first thing tomorrow (Tuesday) morning, heading to Vienna to join a group riding all the way to Nantes, France. That’s roughly 2200-2300km over 44 days on the road; we leave Vienna on May 30th and arrive in Nantes on July 14th, Bastille Day! I’ve got a few days in France and then I fly out of Paris on July 20th back to Canada.
I might make a couple of short posts here from Europe, but please don’t count on it! On the other hand, I am going to be trying to update my personal blog semi-regularly from the road, as wi-fi and spare time allows.
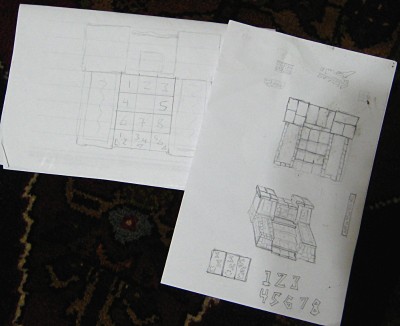
Someone elsewhere on the web asked me how much planning and design work I do for projects like the just-completed Bloodbowl Temple/Scoreboard; the answer is “really, not a lot“, but I will visualize things in head and try to work project details out mentally long before committing pencil to paper or knife to foam.
For the BB temple, aside from wanting to keep the footprint about the same as the previous one, the major critical dimensions are the main staircase which also displays the two BB scatter diagrams the game needs. I knew that if I got that main component set up properly the rest was much less exact and could be done largely on the fly.
Slightly smudged temple plans. Click for larger, as usual.
Above are the two scrap sheets of paper I used for sketching and planning. The right-hand one was first and has a top-down view and a rough perspective sketch. The left-hand one I actually used a ruler to lay out the main steps/scatter diagrams full size (the tiles are 15mm x 15mm), then roughed in the rest of the temple structure around it.
The build was more or less a matter of going through my bits of scrap styrofoam insulation board and fitting pieces to the left-hand plan, then eyeballing the dimensions of the three parts of the upper level once the base layer of 25mm thick styrofoam was in place. I measured the three indicator alcoves, but eyeballed just about everything else.
More precise architecture would be less forgiving, but this style of temple can withstand quite a lot of sloppy building and still look just fine in the end! Confession time: there are a number of places on this build where I shaved pieces of foam off after it was all glued together, disguised things with putty, or even added extra foam back after realizing I’d misjudged something.
After I’m home from Europe in July I’m going to start in on new BB dugouts and tracking scenery (Turns & Rerolls per team) to match the new temple scoreboard.
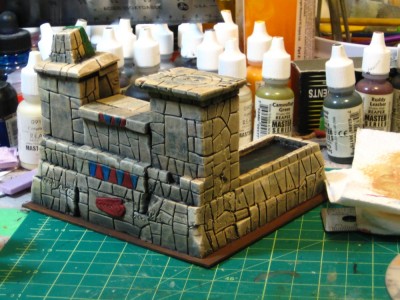
Three coats of gloss varnish on the water, flock around the edges of the base, and the two score indicators and weather indicator all finished – the temple is done!
Currently it’s 2-1 in the Very Sunny weather for whoever is on the blue side today! A Baby Croc, Saltwater Croc and Leviathan Croc observe from on and around the sacred structure.
Temple all finished, with all three indicators in place. Click for larger, as usual.
I’m not entirely happy with the three markers, but they’ll do just fine for now and they’re easy to replace at some future date if I get inspired!
Off to the left of the temple in the photo above are a quartet of small temple platforms and ruined wall pieces from foam offcuts from the temple; they’ll probably get used in some future pulp jungle lost temple but might also appear in a future Bloodbowl-related project.
The Blood Bowl scoreboard temple now has paint on it and is largely finished except for some gloss varnish over the two pools for a water look and some flock on the base and around the temple here and there.
Temple front view. Click for larger.
Temple rear quarter view. Click for larger.
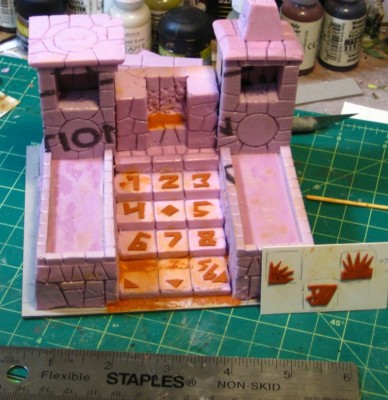
The three indicator cubes are basecoated and will get drybrushing and colour paint tomorrow.
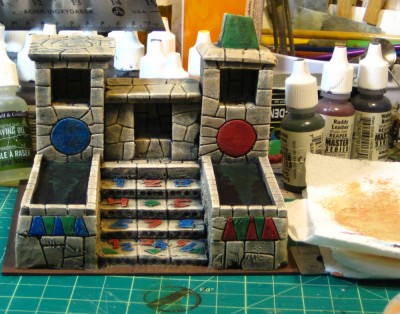
Bits and pieces of detailed putty-pushing this evening, mostly. I finished the last three icons for the weather indicator – Blazing Heat (fire), Snow (snowflake) and another Nice Weather (quarter sun). The three indicator cubes got the last of their putty, and I got all the numbers needed to to null to five on both cubes – they’re laid out on the scrap styrene in front of the temple in the pic below.
The temple/scoreboard progresses. Major puttying operations should be finished. Click for larger, as usual.
I also got the roof glued down over the central portion, after patching the back wall of the alcove with a new piece of styrofoam to make it the same depth as the other two alcoves. The indicator cubes should stick out enough to be easy to grab and move in and out without picking the entire structure up.
I also slapped a coat of white glue across most of the temple to strengthen the styrofoam. When I do the primer coat on it tomorrow I’ll include a generous portion of white glue in the paint mix as well, to really help toughen the whole thing up. Wargaming scenery should, ideally, be as wargamer-proof as possible, after all!
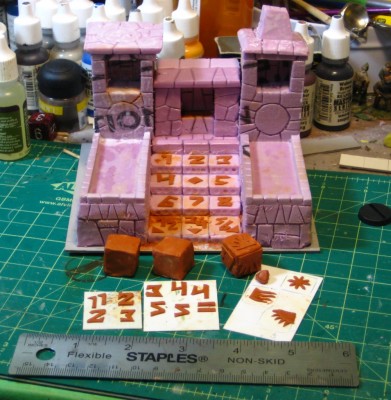
As well as patching a couple of seams between blocks of styrofoam and rebuilding one stone I’d accidentally sliced too much off, I laid out the numbers of the main scatter diagram down the top three steps and got started on the throw-in scatter diagram that will be on the lowest step. The first and second tile of that are incomplete because there’s Milliput filling in some tears in the styrofoam at the rear of those two slabs; it’s much easier to wait until that batch of Milliput is cured before I try to add the numbers.
Main steps and other putty work. Click for larger.
To the right of the temple are the first three weather icons. Left to right, I intend to use them as Fair Weather, Torrential Rain (with a lightning bolt too, just for interest) and Bright Sun. I still need to do a snowflake for Blizzard, another partial sun for the second Fair Weather icon, and do something for Sweltering Heat – flames, probably, as I’ve already got three sun-based icons.
The weather icons will be added to one of the three styrofoam cubes I also partially coated in Milliput but didn’t include in the photo. They need Milliput on the other couple of sides and some cleanup with sanding paper, then I’ll probably sculpt the additional weather icons and the numbers for score right onto the cubes after this.
I’ll probably also use Milliput to add a few decorative bits around the numbers on the temple steps after they’re cured and safe to work around. The round stones on the front face of each tower are crying out for some sort of decorative bit, but I’m not quite sure what to put there at this point…
People more experienced in putty-pushing than me almost certainly already know this, but a bit of olive oil on your tools (Xacto knife blade, mostly) works perfectly to keep Milliput from sticking. I understand it works on greenstuff and most other hobby putties, too. Can’t recall where I read that tip not long ago, but I finally tried it last night and it does indeed work!