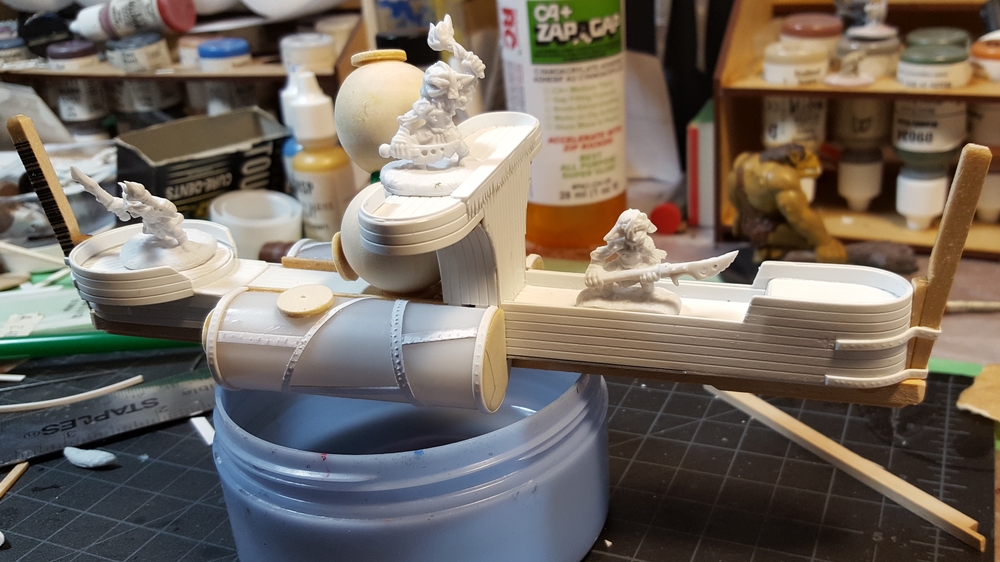
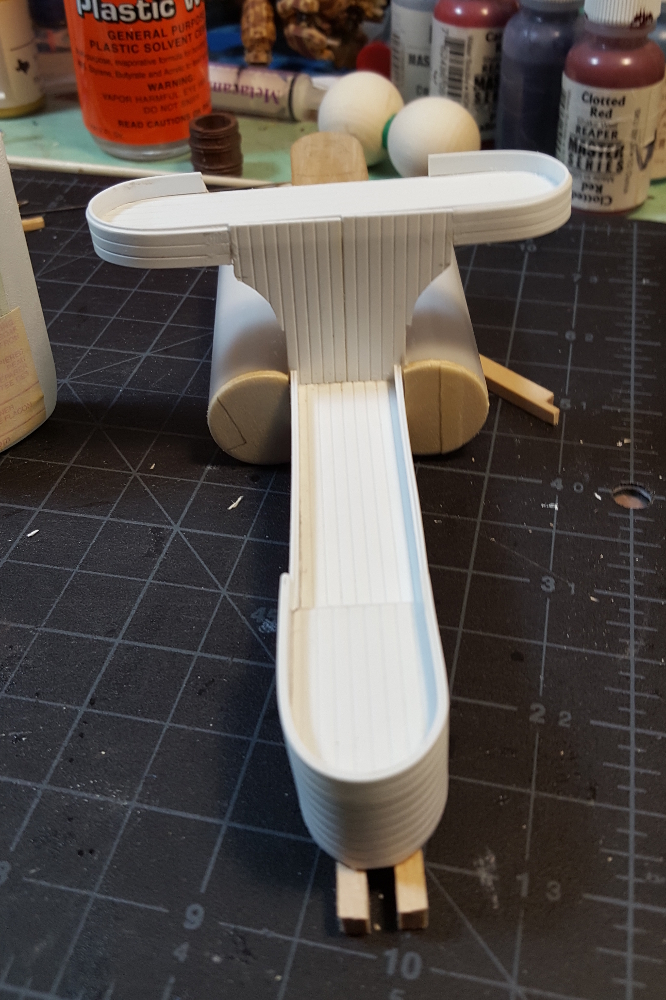
Good progress on the Blomp gondola this weekend, with all the major structural assembly finished, skinning done in styrene sheet, and the start of the lifting-gas engine and associated pipework.
The bow and stern have “masts” (not sure what else to call them, really…) that will eventually have lines connecting to the envelope overhead, with metal strapping reinforcing them both. The flying bridge has more detail now, too.
Just a couple of quick photos!
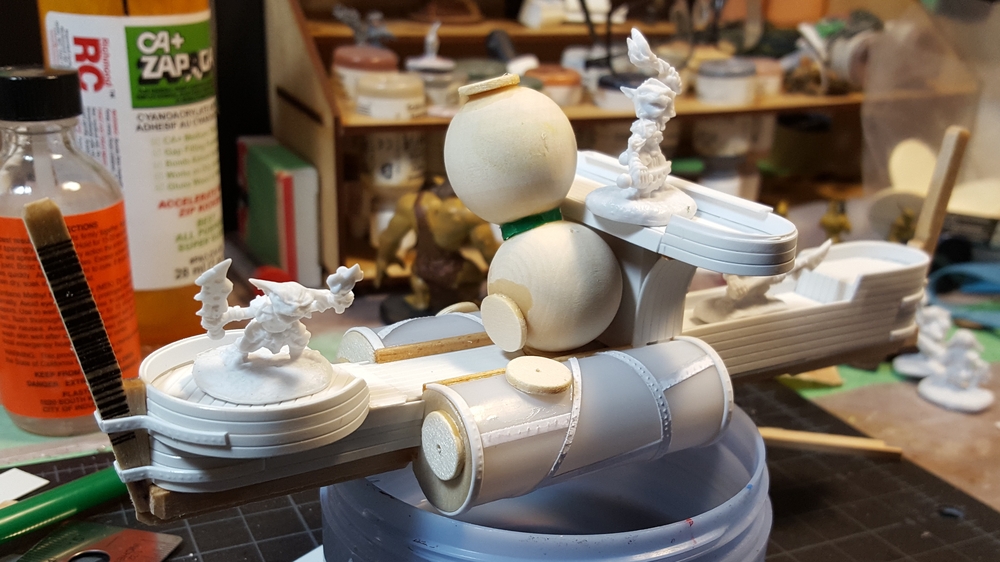
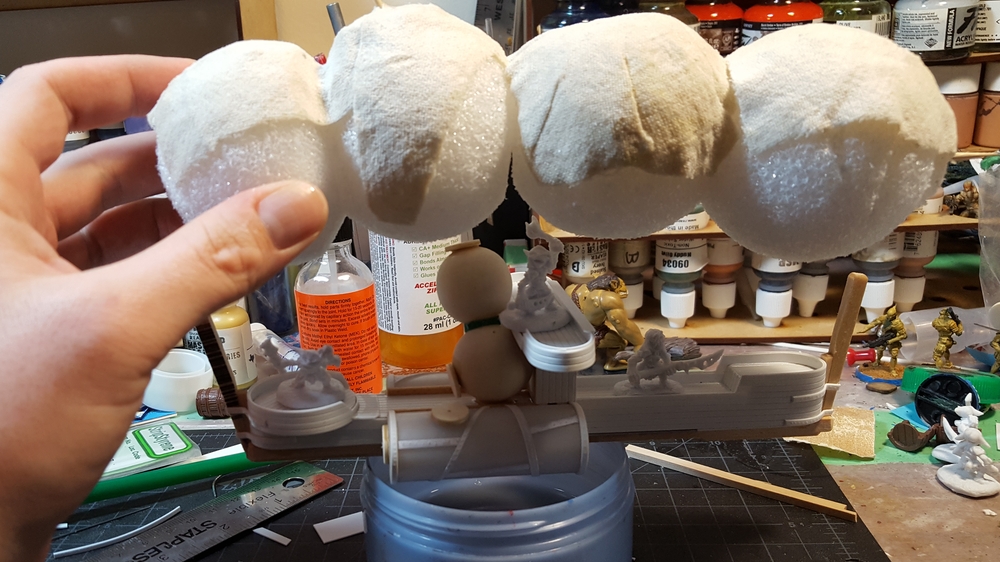
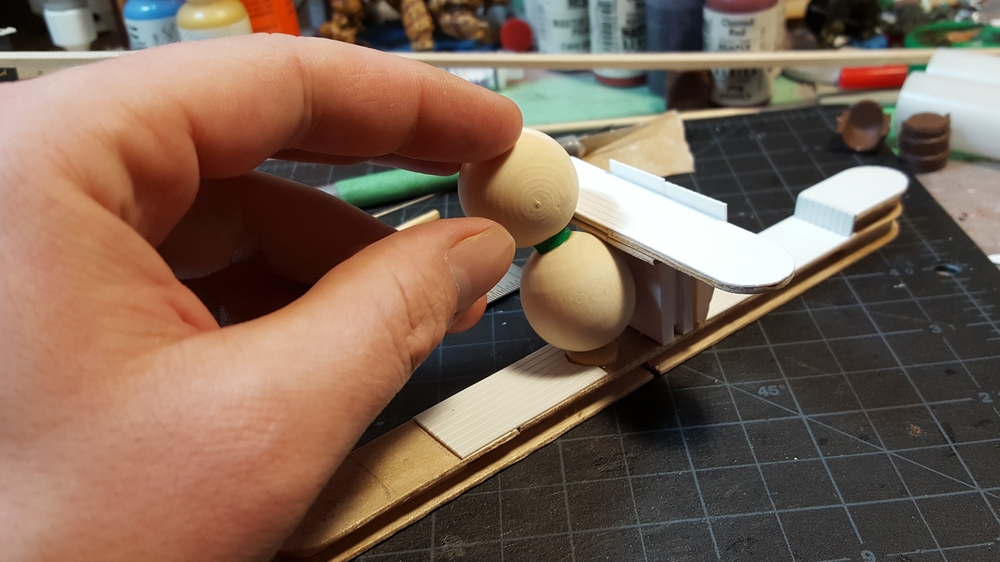
Der Blomp, front-quarter view. Rivet lines on the hull tanks, rear camera station finished, and bow- and stern-supports in place. Click for larger.Der Blomp, stern-quarter view showing the start of the Improved Non-Explosive Flautulator Engine midships and the circular rear camera station. Click for larger.Holding the partially-complete envelope over the gondola to give some idea of the size and proportions of the finished article. Click for larger.
On to greenstuff next to clean up some parts and strengthen others, especially around the Improved Non-Explosive Flautulator Engine, which will connect all the wire pipework that will actually connect the envelope balloons to the gondola!
Blomping onward, in a classic goblin-engineering “make sh*t up as you go” fashion!
The front half of the gondola has been skinned with styrene sheet, cut in one continuous strip for strength. I also glued in more styrene strip on the inner edges of the gunwale. The edges of the flying bridge received similar treatment; both areas will be getting more detailing/decoration to finish them off.
Styrene skin on the front of the gondola and the flying bridge. Click for larger.
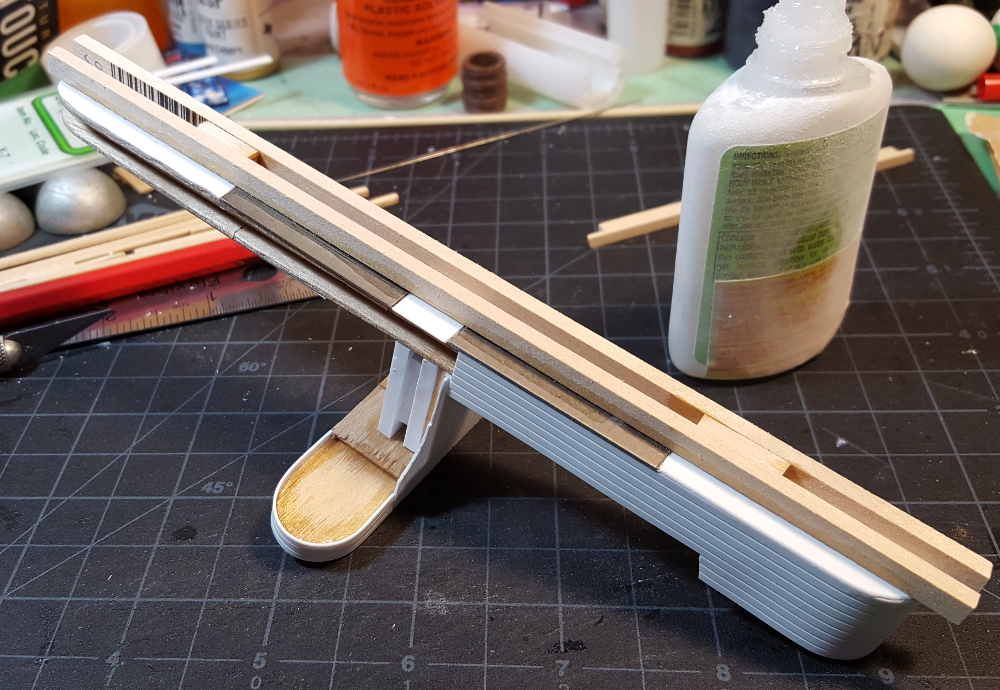
On the underside of the gondola I superglued a pair of 40mm X 20mm galvanized steel bases, and some scrap styrene to keep everything level. The keel went on next, long strips of 1/8th x 1/4th inch basswood. The metal bases and the slot in the keel will hold another piece of the same basswood with two or three rare earth magnets embedded in it to hold it into place, and a long steel wire (possibly two) leading down to the ground as the “flying” part of the Blomp’s flying base.
Keel installation, with steel bases. The piece of basswood behind the superglue bottle is already notched for rare earth magnets. Click for larger.
Finally I cut sections out of two plastic tubes (till receipt paper rolls salvaged from the recycling bin at a previous job!) and glued them just behind the flying bridge as part of the lift/propulsion machinery – tanks of whatever mysterious, hazardous lifting gas the goblin alchemists have invented, probably! The end caps are wood craft circles trimmed slightly to fit, and the tanks will get detailed with rivets, weld lines, pipes, and such in due course.
Midships tanks added. Click for larger.
More soon as we progress! The February 18th end date looms like a looming thing!
Progress on my Lead Adventure Forum Build Something 2017 entry, the goblin-crewed Bloodyear Blomp!
I’d said previously I was going to finish covering the blimp envelope in fabric before moving on to the gondola, but in standard wargamer fashion I’ve been distracted into working on the gondola first.
The basic skeleton of the gondola is a couple of big hardwood craft sticks, cut and butted together with more scrap wood between them. The flying bridge is more craft sticks cut and jointed together, and the support structure under it is random scrap foamed PVC board.
Blomp hull basic assembly, with Reaper Bones goblin crew for scale. Click for larger.
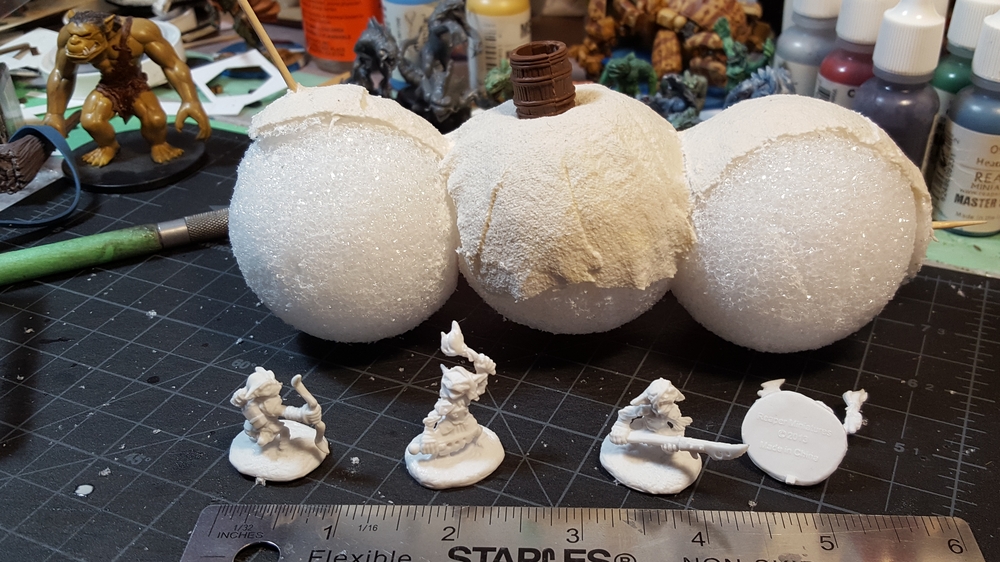
The crew are going to be converted from Reaper Bones goblins; I’ve got a whole bunch leftover from my BB Goblin team conversion project and they’ll fit right in!
First part of the Improved Non-Exploding Flautulating Engine. Finest goblin engineering! Click for larger.
The midships portion of the gondola, behind the flying bridge, is going to be filled with the lift and propulsion machinery. Pipes will lead from here up into the balloons of the envelope, with solid wire cores to provide the structural connection between the gondola and the envelope.
Every year or so over on Lead Adventure Forum they hold a friendly Build Something competition. There’s a theme that imposes some restrictions; one year it was “your scenery must be based on a CD”; we had “marine/watercraft” once, and this year the theme is “flight”.
I’ve been a LAF member for years and it’s an awesome forum, but I’ve been fairly inactive over there for the last year or so. Joining the Build Something 2017 Contest was a good way to nudge me back into being an active member of this awesome online community.
The theme being “flight” I thought of doing a cargo shuttle of some sort for Infinity, but with only a six week timespan to complete the entire contest entry in, from start to finish, I shelved that tempting idea in favour of an entertainingly silly piece of Blood Bowl sideline terrain: the goblin-crewed Bloodyear Blomp, which carries magical cameras and announcers over Blood Bowl fields all over the known world!
To give it some actual in-game purpose, I’ll put a pair of Reroll counters on the base of the thing, to go along with the goblin scoreboard I made a while back.
Being goblin-engineered (to push the term “engineered” very near it’s breaking point!) the Blomp can be a bit ramshackle, so I just started building! I picked up a pack of craft foam spheres as the balloon/envelope structure of the Blomp and started jamming them together and then covering them with bits of scrap fabric.
Here’s the first building session’s progress.
Blomp! First construction of the blimp envelope, and a few of the goblins who will eventually crew the thing! Click for larger.
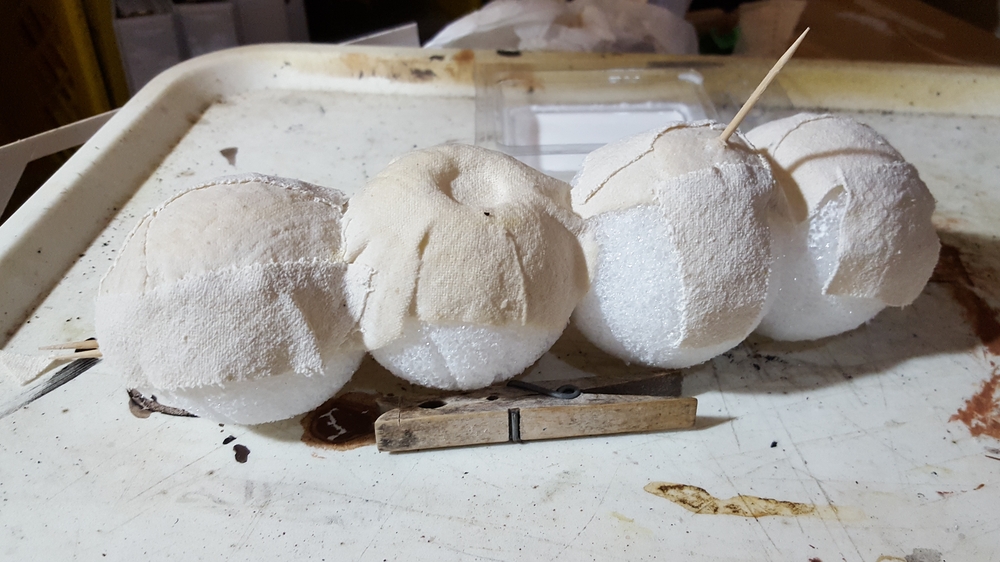
Since then I’ve added a fourth sphere to the tail end and done some more fabric.
More Blomp! Fourth envelope sphere in place and more fabric. Click for larger.
I’ve got a build thread over on LAF that will generally be updated faster and more frequently than I’ll do blog posts on the Blomp, in keeping with the spirit of the contest. I still need to figure out the gondola design and a bunch of other details, but it’s been a fun build so far!
First of all, Happy New Year, everyone! Hope your 2017 is full of excellent gaming, good friends, and completed projects!
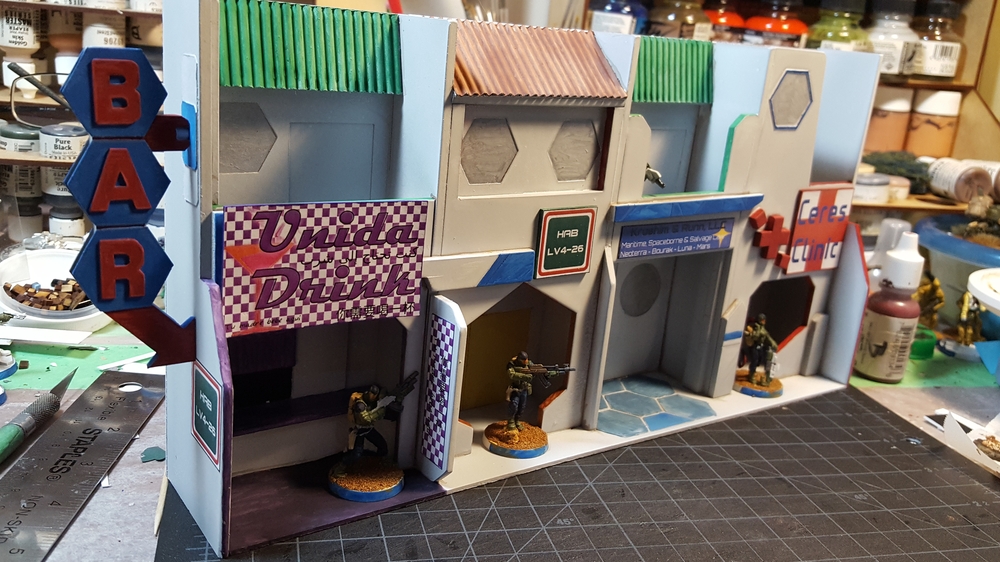
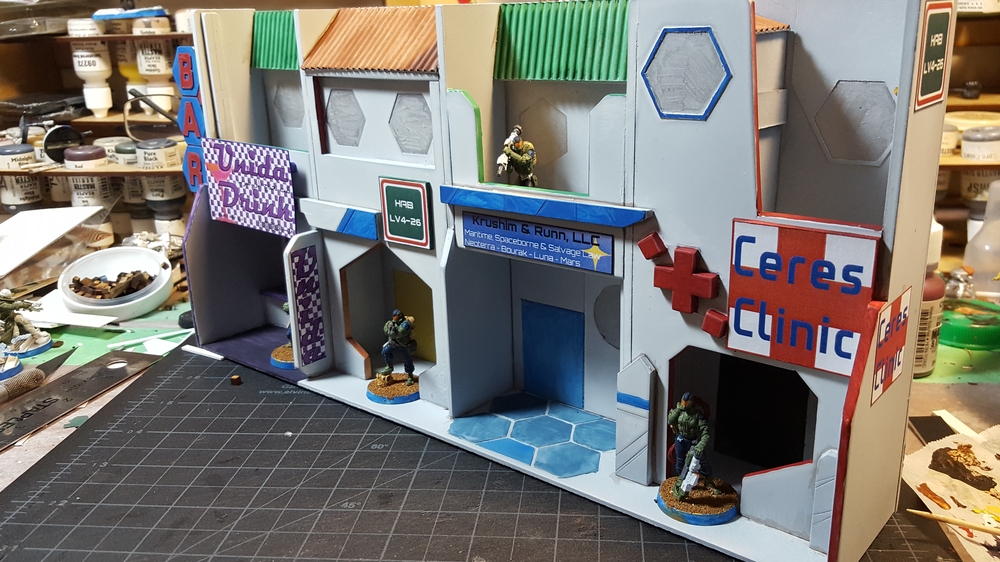
On the “completed projects” note, I get to move my first completed project of 2017 off my bench and into my scenery boxes. I’ve finished painting and adding signs to the habitat module facade I started in November.
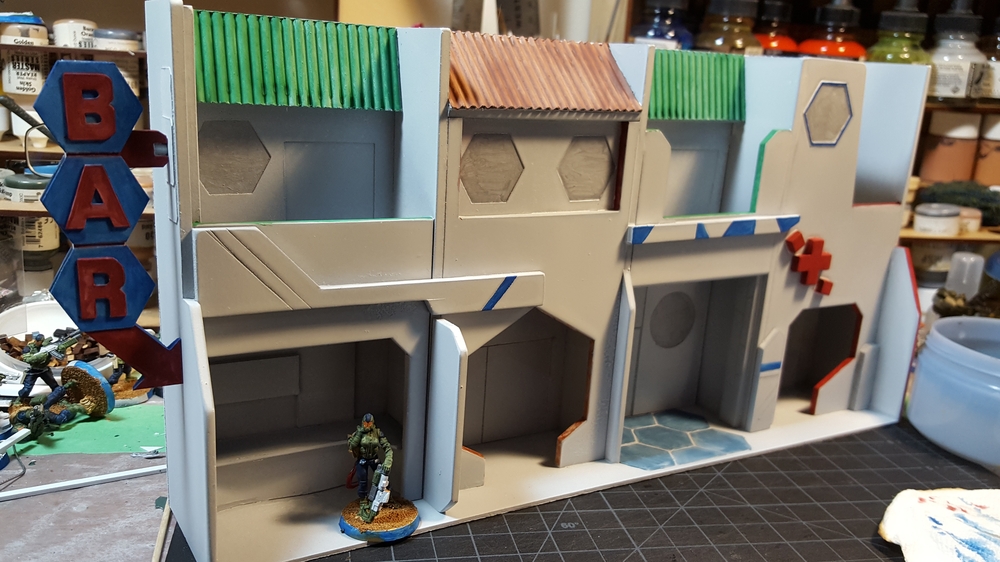
Painting in progress on the hab module, 27 December. Click for larger.
I added various spot colours of paint here and there, some hex floor tiles in front of one of the doors and a small auto-bar setup to one module, and a few window frames and other small details. Almost all of this detail was done with scrap card or plastic offcuts.
The “BAR” sign on the left is held on by a rare earth magnet embedded in the wall and another built into the frame. I printed the letters off on my computer, glued them to thin plastic card, and cut them out carefully by hand, using sandpaper and files for cleanup. The hexes are from a 1″ hex punch I bought at a craft store; the frame behind them is an offcut of 1/8″ foamed PVC plastic board. It’s double sided; the other side is identical.
After painting it was off to the computer and Inkscape to create a set of signs for the three commercial modules on the ground floor of the unit. The bar is “Unida Drink”; there’s a legal firm, and then the Ceres Clinic on the far right. Signs identifying this as Hab LV4-26 are on either end and above the main entrance with the hexagonal outer wall.
Hab Module LV4-26, left end. Click for larger.Hab Module LV4-26, right hand end. Click for larger.
I’ve included (Google Translated!) Arabic and Simplified Chinese text on quite a lot of the signage I’ve created for Infinity; the Arabic and Chinese text on the Unida Drink sign reads, “You require a drink”, ie a literal translation of the English-language pun in the bar name. There’s some Spanish on there too, for fun, which reads, “Your mom drinks here”.
I might yet create a second hab module (LV4-28, perhaps?) as this one was fun to do, should be tactically interesting on the Infinity table with the balconies and doorways, and they’re an awesome source of colour and a lived-in look for a table. Need to come up with some more weird/interesting/cyberpunk-ish names for businesses!
In the next couple of days I’ll be publishing a PDF so anyone can build a small craft airlock for their science fiction gaming, and then it’s off to other projects, including getting back into some pulp scenery building in advance of 2017’s local wargaming convention season!
Between the Christmas season and what appears to be the worst cold I’ve had in many, many years there’s not been a lot of wargaming activity here at Chez Wirelizard. I did manage to spend one sickie evening messing about with Inkscape and created a nice floor airlock piece to add some colour to the space station.
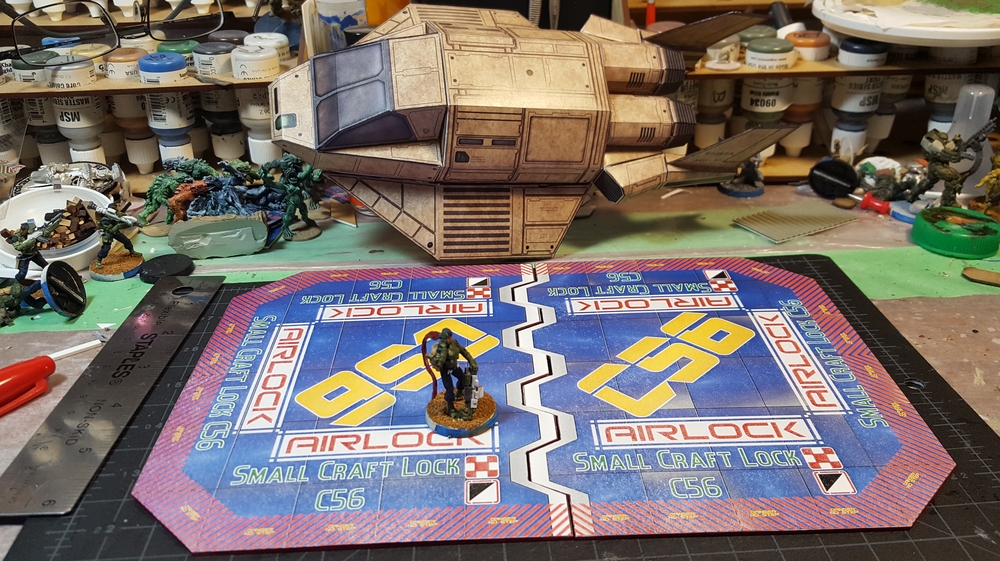
The inspiration is one part from aircraft carrier’s giant elevators and one part from science fiction (so far, least) giant cargo airlocks. The size is fairly arbitrary, 10″ long by 7″ wide, big enough to hold either of the papercraft spacecraft I’ve built recently. I started the graphic as one big piece in Inkscape then split it into two doors, printing each on a single letter-sized sheet of paper. I did a sort of blue/grey/black background with lots of hazard stripes, labels, and ID tags all over. The two door graphics got printed on full-sheet sticker paper, stuck to mattboard, then cut out. I coloured the cut edges of the paper & card with a red Sharpie pen.
Airlock doors with Muyib ignoring all the warning signs and walking across them anyway… Click for larger.Percheron shuttle on the doors – just long and wide enough! Click for larger.
These pieces are usable as-is on the Infinity table, but the next plan is to do some edge or frame pieces to go around the doors, provide some actual cover to Infinity troopers, and add some more interest to my space station. I also have an entertaining plan for showing the open airlock when the doors aren’t closed, but stay tuned for that! I’ll also get the airlock door graphics cleaned up a bit and save them as a PDF if you want to print your own.
Back on a holiday note, I hope you had a satisfactory Christmas or whatever mid-winter holiday you celebrate, and a good New Years too!
I’ve been calling my Infinity space station table project a space station since I started planning it, but really it’s been a collection of big walls and random bits until recently. What does a space station really need to make it feel like a space station? How about some actual space craft?
To that end I hit the excellent Genet Models site and grabbed a bunch of the free papercraft scenery PDFs there. Genet is Christopher Roe’s site; he used to sell his PDFs under the Ebbles Miniatures and then Genet names but these days he gives them away for free!
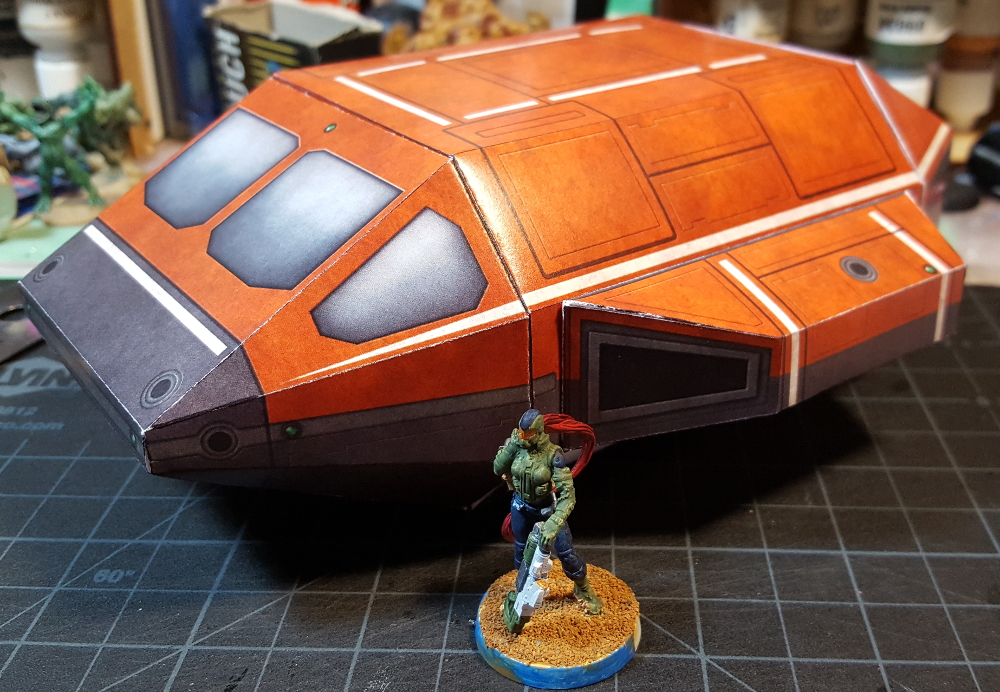
First I printed and built the basic Utility Shuttle in red. There’s a lot of grey and white on my space station table, I wanted something solidly colourful! The Utility Shuttle is only five parts – nose, body, tail, two wings – and quite straightforward to put together. The only issue I had with it was the central body piece was kind of loose and floppy to put together. I’d printed everything on 65lbs light card; it might have been easier to put together with heavier 90 or 100lbs card. Once it’s assembled it’s all solid, though. I left off the landing skids that are supposed to elevate the shuttle off the ground, to make it more obviously a Line of Sight blocker during Infinity games.
All five subassemblies for the red Utility Shuttle. Click for larger.
To cover the white strip that the landing skids are supposed to be glued to, I cut part of each landing skid up and glued it straight over the strip.
Completed red Utility Shuttle. Infinity Muyib infantry on 25mm base for scale. Click for larger.
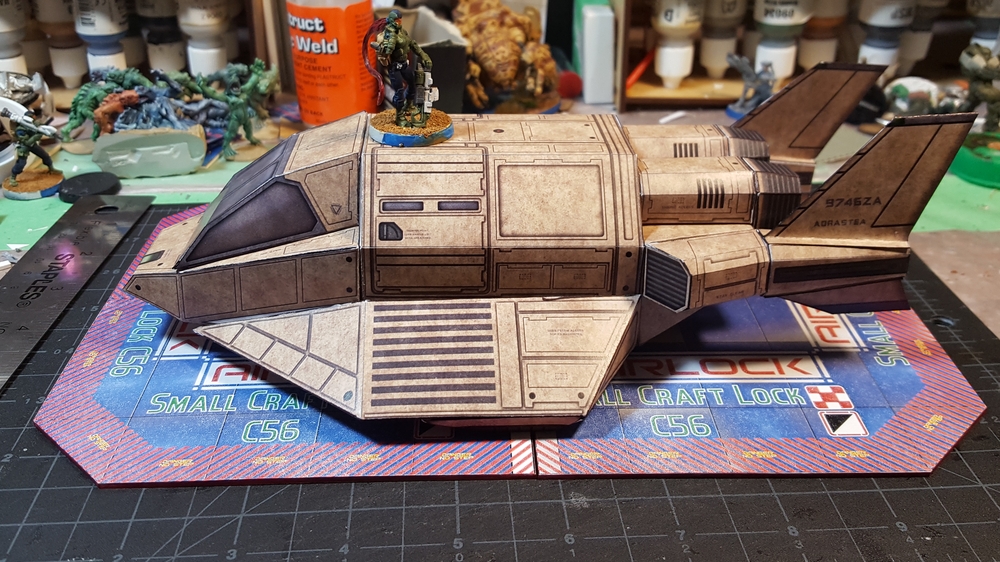
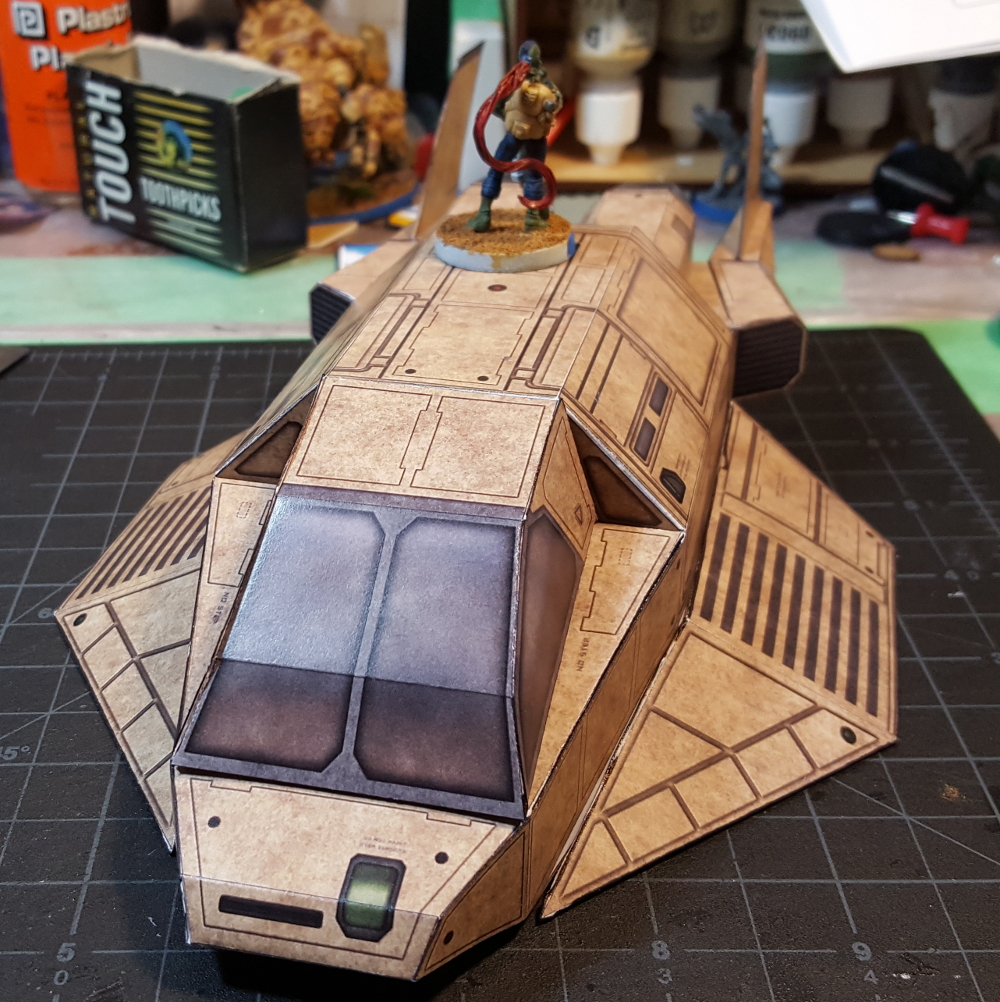
The second build is the VU-22 Percheron, a light shuttle/dropship. It’s only available in military colours, although there’s really nothing obviously military in it’s lines. I might try re-colouring the white/black prototype version to get some civvie colours going, but for now I printed off the tan/sand coloured standard version.
This is a more complex build with about 20 parts, some of them smaller and somewhat complex, but I actually found this an easier build overall than the Utility Shuttle. It’s a more recent design than the Utility and better engineered, with some internal bracing on potentially floppy and troublesome parts to assist with assembling. It’s about the same size, roughly, as the Utility Shuttle (I’ll post a group shot soon, don’t have one currently) but more complex, more interesting, and with better proportions than the chunky, simple Utility Shuttle design. I didn’t watch much of the new Battlestar Galactica TV show when it was on the air a few years ago, but a friend pointed out the Raptor inspiration for the Percheron.
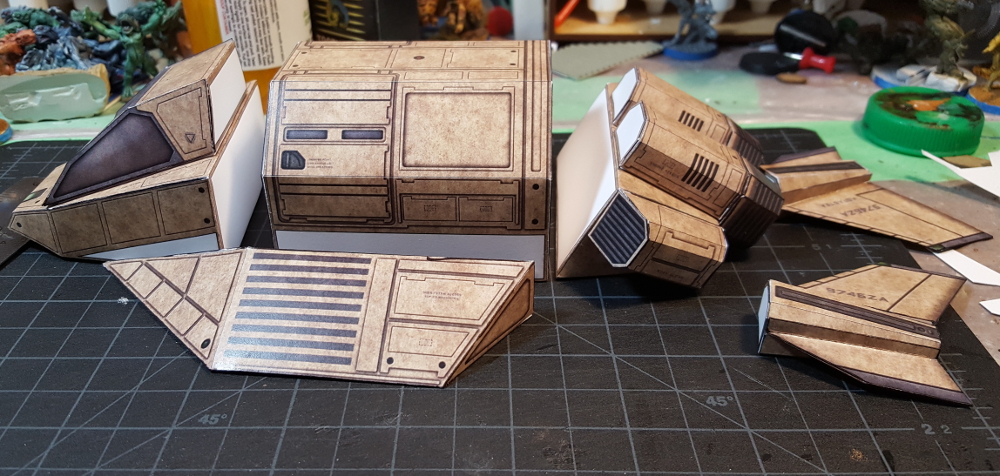
Percheron major subassemblies laid out. Click for larger.
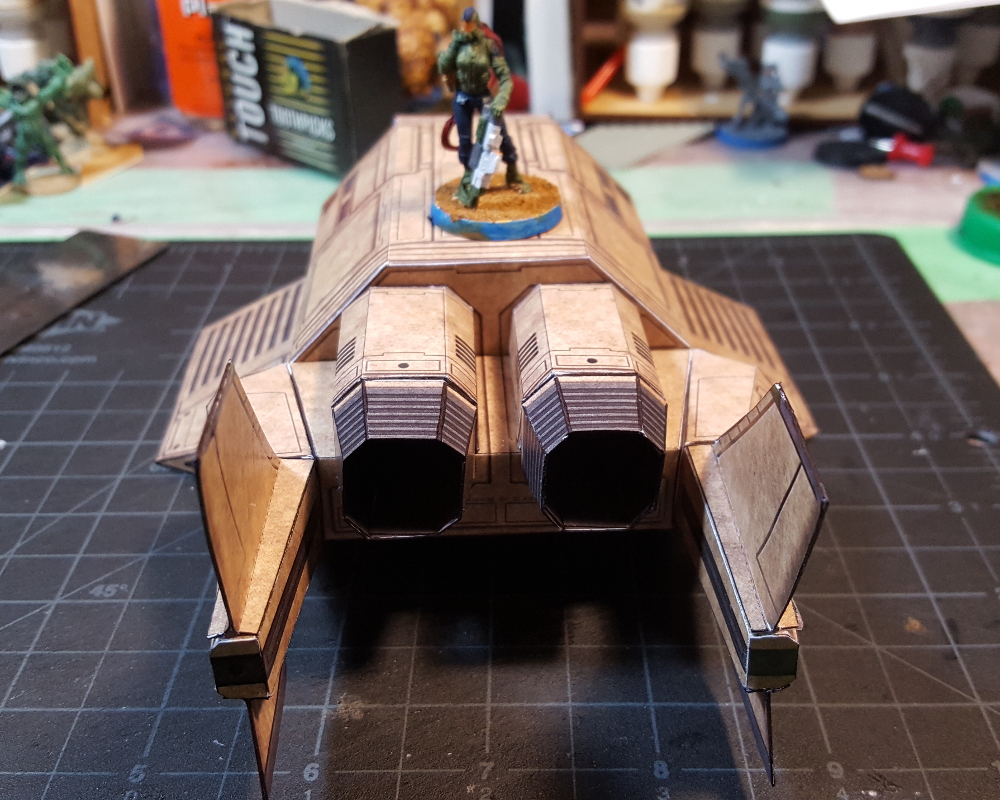
Percheron assembled, front view. Muyib for scale again. Click for larger.
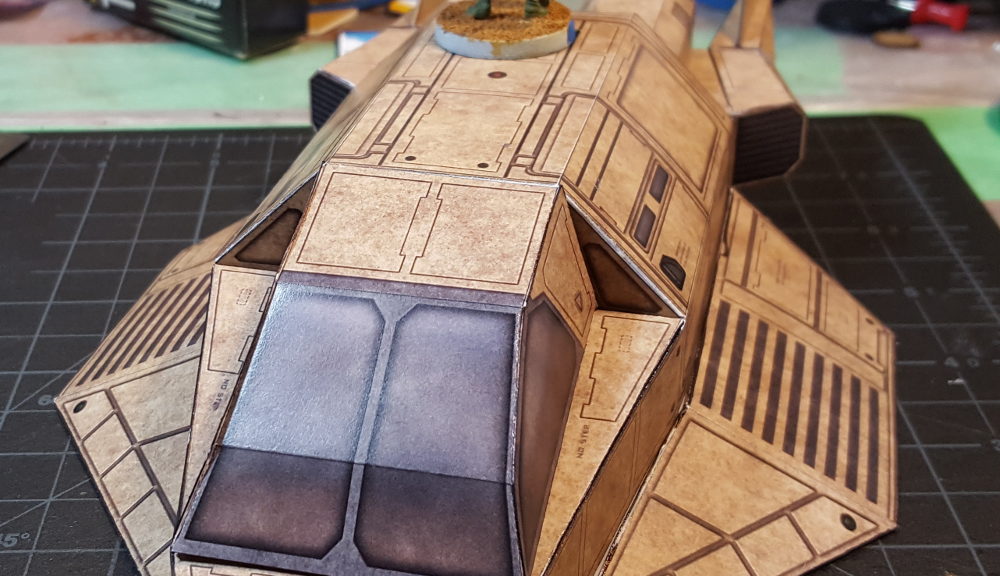
Most of the Percheron’s parts count is actually in the back end engine and tail assembly. The engine cones and tail pieces are a bit fiddly to assemble but look great when done.
Percheron tail view. Muyib for scale again. Click for larger.
There don’t seem to be that many generic papercraft shuttles, dropships, or other wargaming-scaled spaceships available, so it’s awesome that Genet is making their PDFs available for free. There’s a bunch more spacecraft available there, including the massive VT-3 Pinzgauer cargo shuttle, that I might yet build up to decorate Infinity tables with, as well as some smaller details like cargo-handling exoskeletons and such that would make great looking “dockside” clutter around the docks and hangar bays of a space station. I’ll almost certainly be building up more Genet Models cardstock kits in the future!
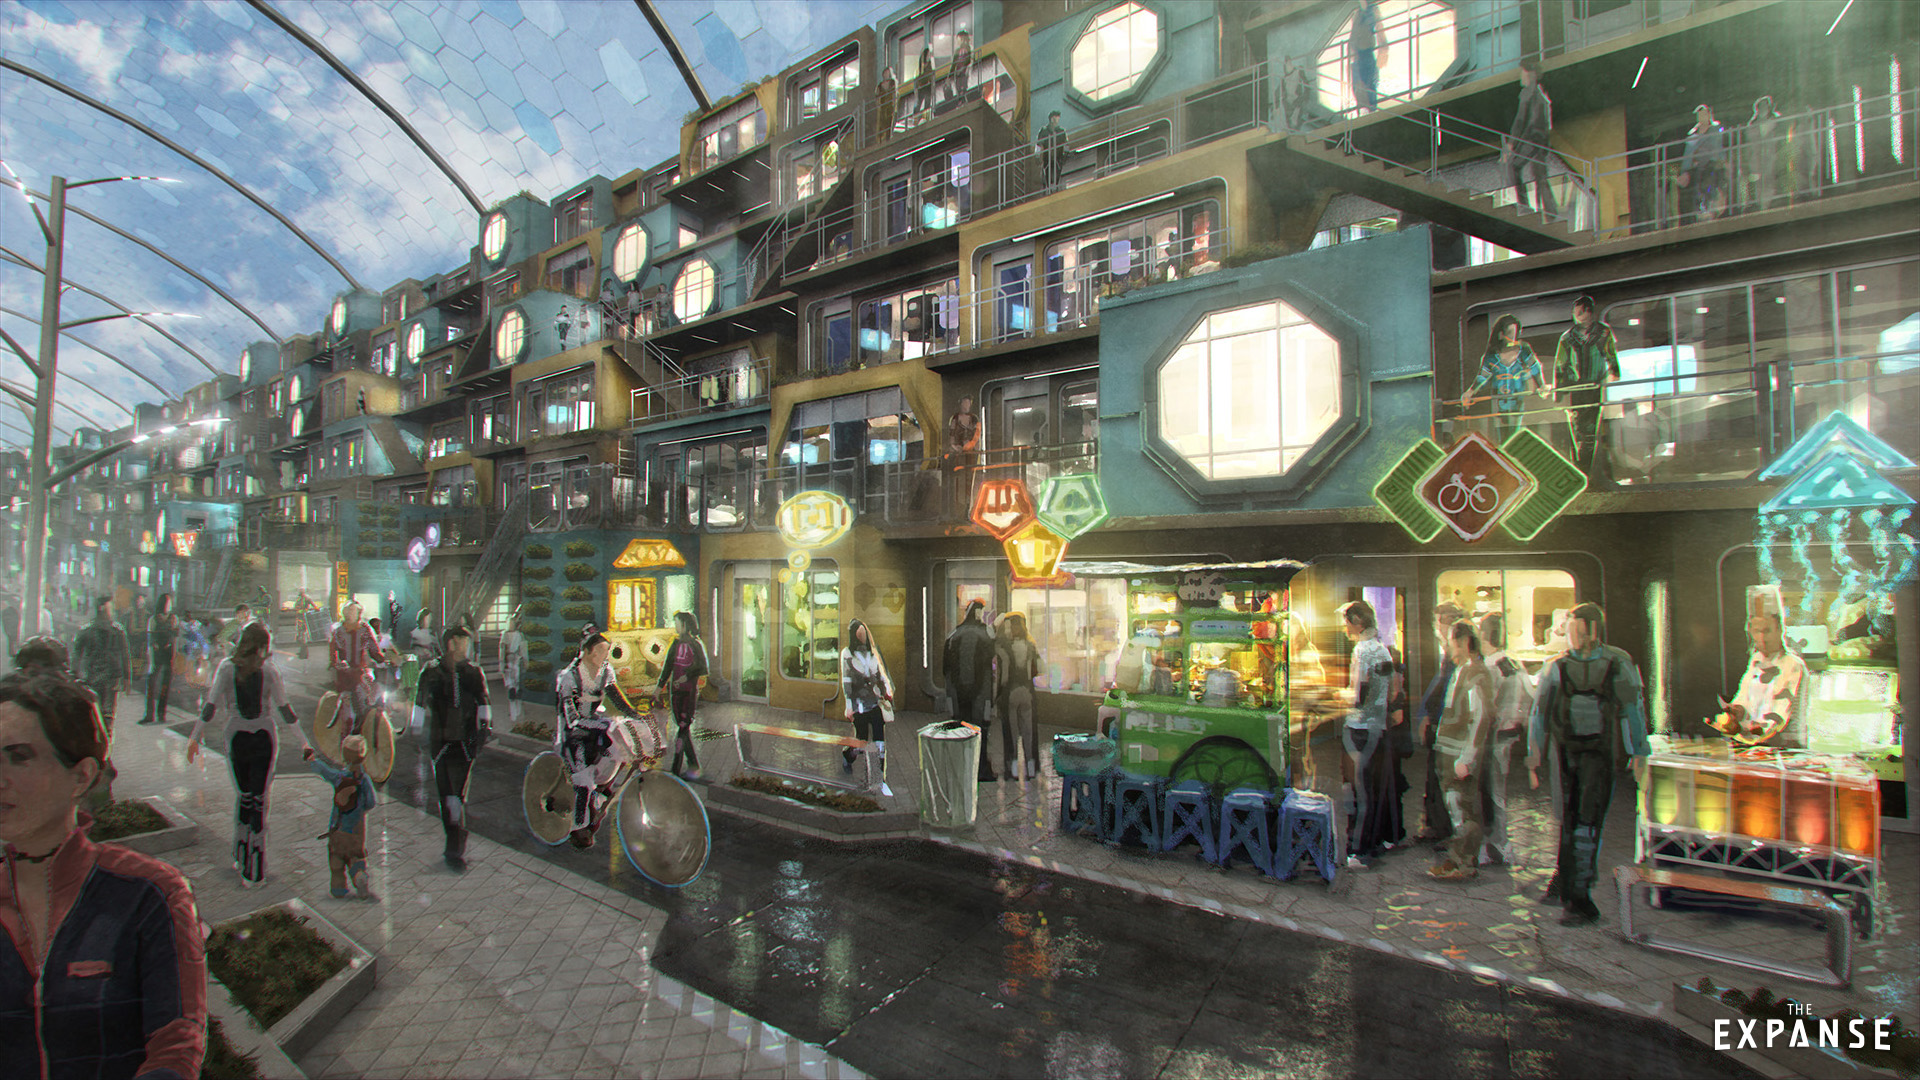
This shop front/apartment facade for my ongoing Infinity space station project has been inspired mostly by the depiction of some of the habitat levels of Ceres in the TV show The Expanse. If you haven’t watched The Expanse I highly recommend it, it’s good quality TV (not something I say regularly!) that depicts a hard science fiction fairly near future that nods to classic SF like Bladerunner while carving out it’s own niche.
There’s a great article on some of the concept art from Season One of The Expanse over on ArtStation, Behind The Scenes: The Concept Art of The Expanse. The piece that really inspired me was this painting showing the better-quality habitat levels on Ceres, with their stacked, clearly modular apartment blocks with small shops at ground level.
Hab levels, Ceres. Image via ArtStation. Click for larger.
With the limits of storage and transport of tabletop scenery (as well as the consideration of being able to play around whatever I create!) obviously the soaring multilevel terraces of Ceres will get scaled down a bit… or a lot. I decided to stick with the 12″ long, 6″ high size of my existing big wall modules and roughly the same thickness, creating a two-story facade piece intended to go on one edge of the table.
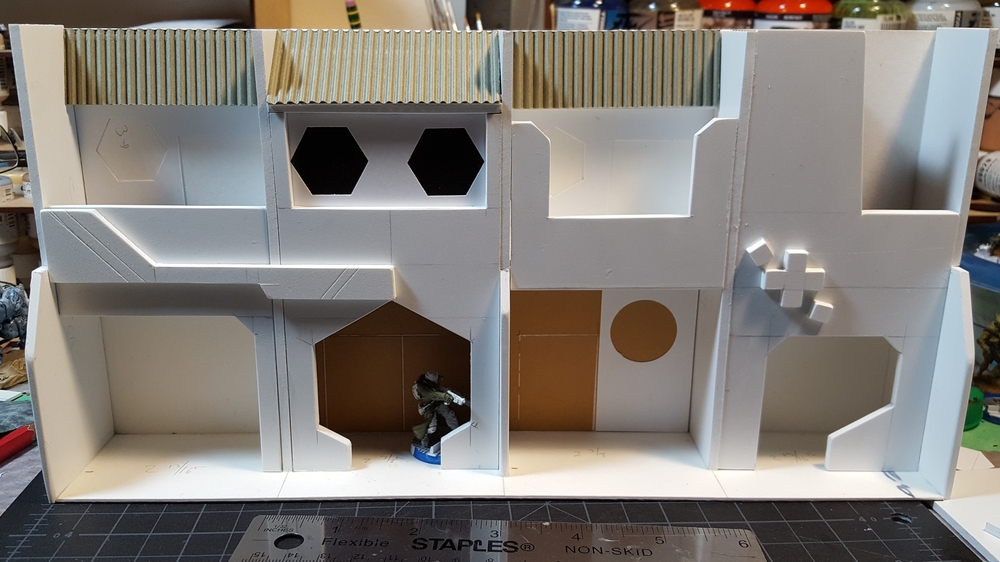
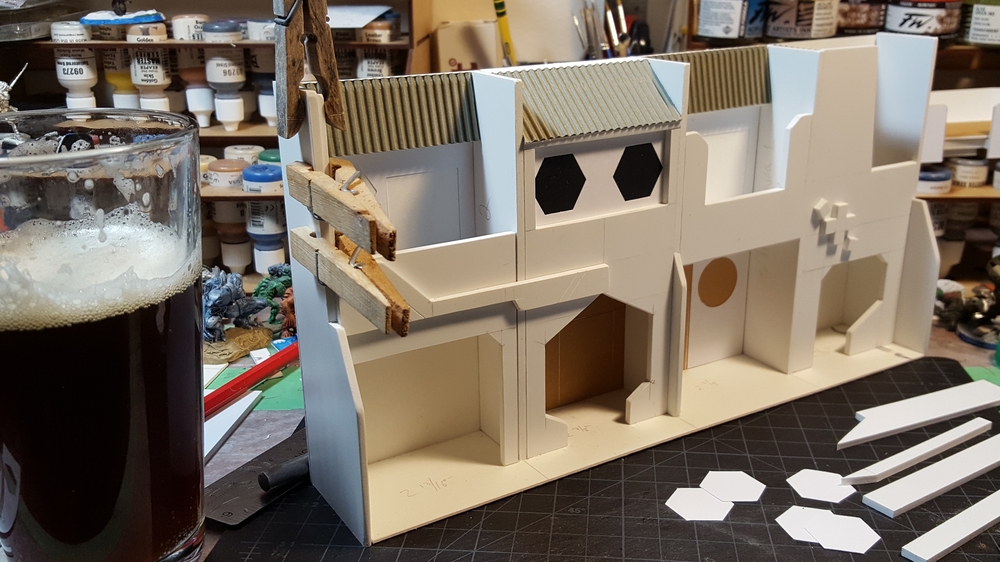
Basic construction finished. See text for details; click for larger.
The basic unit has four modules per level, each roughly 3″x3″. Left to Right on the ground floor we have a bar or fast food joint, the entry doors for the hab module itself, some sort of offices, and then a small medical clinic. The top floor is all apartments, three of which have balconies. The roofs are deliberately inaccessible to figures.
The basic construction is mostly 1/8″ foamed PVC (Sintra board) which is great stuff to work with, easy to cut cleanly, sandable, and will glue with either white glue or superglue. The rest is almost all 1/16″ mattboard, the high quality cardboard used in framing pictures. I get my PVC from the offcuts bin at our local plastics supplier, and the mattboard from a local art supply/picture framing store.
With Haqqislam Muyib infantry for scale. Some detailing and lots of paint to go! Click for larger.
Detailing is mostly scraps and offcuts of PVC and mattboard, with some lighter card for the window frames, tiles, and elsewhere. I still need to add bar stools around the outdoor bar on the left, a few more window frames, and some other details.
More soon, I hope to get this piece basecoated today and some more detail over the next few days!
One of the big wall modules I built for my Infinity space station tabletop set has a door three inches off the ground, intended to connect to catwalks or other elevated terrain. The problem with it has been that I have no catwalks or other elevated terrain, so most of the time that door just kind of hangs in space and looks weird…
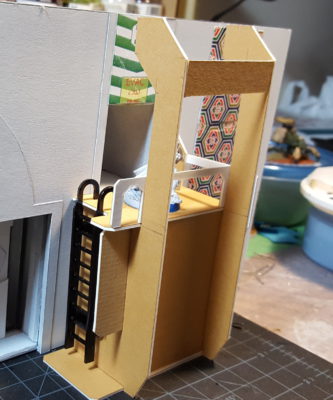
I decided to start with at least one module for one side of the elevated door. I was thinking about an open stairwell, but keeping stairs inside a small enough footprint when you have 3″ vertical to cover is challenging. Instead I went with one of the acrylic kit ladders I got from Warsenal earlier this year. The rest of the construction is 1/16th mattboard – picture-framing cardboard – which is what I make almost all of my terrain from.
Elevated access point, front view. Click for larger.
Elevated access point, left end with Warsenal ladder. Click for larger.
Elevated access point, matboard with Warsenal ladder. Click for larger.
The vertical beams are 6″ tall, same height as the big wall modules, and the whole thing is 2″ deep (1.5″ at the platform) and 3″ long overall. I had intended to install one of my big 5″ tall by 3″ wide advertising displays across the front of the piece but looking at it, I might run a series of smaller ad displays up the two vertical pillars, because part of the point of these elevated pieces is to make the space station board more three dimensional and complex to play on.
I’ve also got a new round of advertising and other graphics in progress, including new versions of the utility and emergency lockers. More on all of that soon!
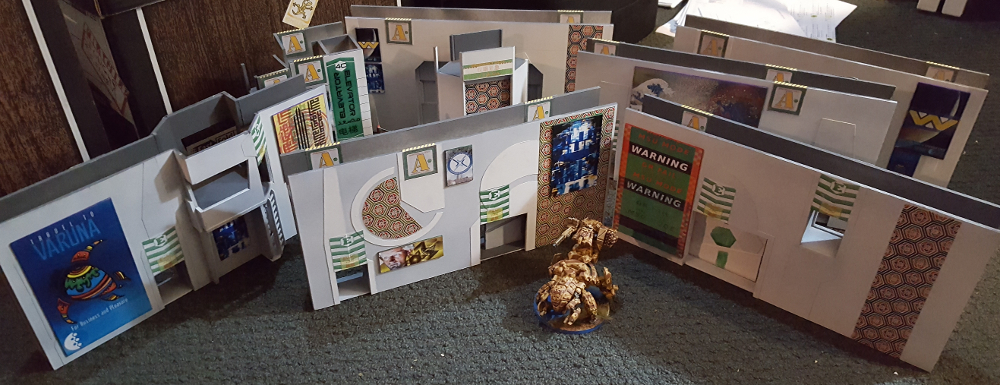
I’ve been using my big space station walls and the associated scatter terrain for over a year now, and while all the wall modules are fully painted and physically finished (doors and such) I’ve never considered that part of the project “finished” in the full sense of the word. I really wanted that full colour, cluttered feel to the walls, with lots of bright ads on the white (“civilian”) sides of the walls and warning labels, directional graphics, and some ads on the grey (“industrial bay”) side of the walls.
I’ve done some ad graphicsfor Infinity before and spent a few minutes printing more of those existing graphics, including resized versions. I also scrounged some nice stuff from other users on the Infinity forums and Topsolitario, among other sources.
All six space station wall units with ads and other graphics added. Maghariba Guard for “scale”, it’s on a 70mm wide base… Click for larger.
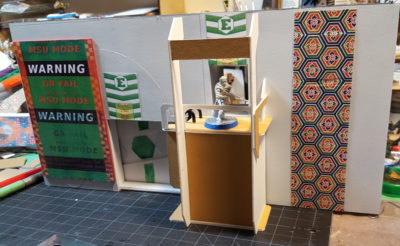
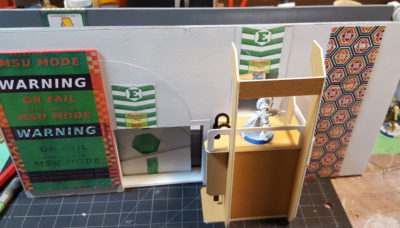
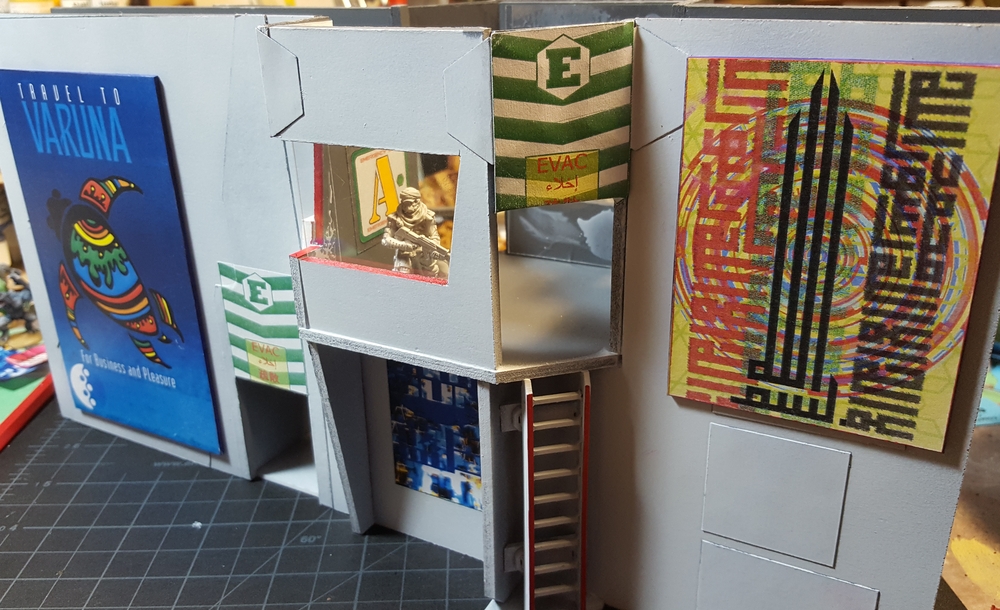
For the elevated control booth that’s the main feature of one of the wall modules, I’ve added plastic sheet as glass to both windows, and plan on doing some control panels and such inside and around the booth.
Glass added to the control booth. Haqq trooper for scale. Click for larger.
The colour on the ladders and window frame in the photo above is from my new favourite simple terrain colouring method: Sharpie permanent markers! My girlfriend has one of the big Sharpie art sets with lots and lots of bright colours, and I’ve been borrowing them for easy, quick edging and spot colours on this scenery project. All the posters and ads are edged in Sharpie as well, to avoid having the white edges of the underlying paper stand out so much.
Finally, I got a set of the Games Workshop forest trees (currently sold with their fantasy elf stuff, far as I can tell) a while ago and have finally starting doing something with them. Here’s the Maghariba Guard TAG posing among the trees… if you go into these woods today, you’re in for a TAG surprise!
Maggie playing in the woods! Click for larger.
More soon, I’ve made some more progress on detailing the control booth and elsewhere.