TerranScapes has a good video on using gloss gel for water, and I also found a video on using gloss gel medium for ship wakes, so naturally I had to pick a tub of the stuff up from my awesome local art supply store, Island Blue. (shop local, folks. Local stores are always cooler, and the staff far more likely to know their stuff!)
Anyway, I pulled out two of the shoreline/river bank modules I made over a decade ago (Part One, Part Two). For pieces started in June 2010 from matt board they’ve held up remarkably well, and they made ideal test subjects for learning how gloss gel medium works.
Gloss gel waves applied to two of my shoreline or river bank segments. Click for larger.
Gloss gel medium works beautifully for waves, and the main thing I learned is not to be afraid to put more on than you might think is wise, because it shrinks a fair bit when drying. It also doesn’t dry perfectly clear when it’s thick, which is fine for waves. That might be a function of humidity, according to the TerranScapes video. He talked about putting terrain pieces in a box with desiccating (silica) pellets to get everything perfectly cured and clear…
I’ve got another two or three of these modules around here somewhere, so they’ll get spruced up with gloss gel now too, eventually. I’ll also redo the foliage along the banks, and probably have to repaint the undersides to take some of the warp out of the cardboard again. Not bad for terrain that’s over a decade old!
At BottosCon 2019 earlier in November I got the chance to play Warlord Games’ new Cruel Seas coastal naval game, British vs German speedboats in the Second World War. It’s not a bad game, but it’s definitely got some quirks and while the models are lovely, 1/300 (6mm) is too big for naval gaming. The table got very crowded very quickly and it felt more like bumper-boats than anything else.
That said, this sort of coastal gaming with light forces has always been one of the few areas of WW2 I’d consider gaming, so a quick chat with friends and look around the web pointed me to Last Square’s 1/1200 coastal forces, the Figurehead range, and I ordered a few British motor boats, some German boats, a few merchantmen, and a couple of aircraft. I also had a look at Magister Militum’s 1/1200 Hallmark range but decided to stick with Last Square for now.
I was also already aware of Brigade Models’ Small Scenery range, which has intrigued me for several years but which I’ve had no particular use for until now. You can, of course, run a perfectly good and realistic naval game with nothing but ship models and a blue or grey mat, but did anyone really think I was going to start a new genre and scale without doing some sort of scenery?
All of that stuff is enroute to me now and I’ll update when it arrives!
In the course of looking up the North Sea and English Channel battleground, I discovered that the amazing David Rumsey Map Collection has England and Wales, Sheets 1 – 146. Ordnance Survey, Popular Edition One-Inch to the Mile digitally composited at crazy high resolution so you can zoom way in and see what the land side of England and Wales looked like between the Wars. Not much in the way of maritime details like shoals and reefs, but fantastic for getting a feel of what the shoreline might have looked like, especially when you can compare the 1923 map with modern Google Maps/Streetview images.
Also from David Rumsey is a 1922 atlas showing the southern North Sea and English Channel with a bit more maritime detail like shoals, sandbanks, and shipping routes.
If anyone knows of a set of pre-WW2 Admirality charts online that cover England and maybe further, please do point them out. The National Library of Scotland has charts but they only cover Scotland.
Finally, on a more directly related to the tabletop note, Mel the Terrain Tutor did some terrain for Cruel Seas when it first came out. Obviously the scale will be different from what I’m planning, but sandbanks and such are pretty scale-agnostic anyway… By way of an end to this long and rambling post, here’s Mel’s rather good tutorial video on sandbanks for small scale naval games.
Most of the painting is finished on the various Reaper dogs last seen a few weeks ago, and they’ve painted up so nicely I’m going to show them off before they’re entirely finished, which I do not usually do.
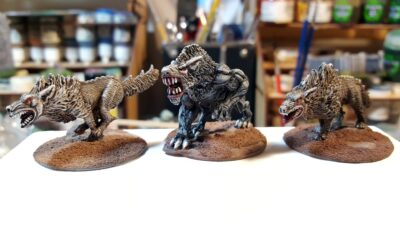
Centre is Reaper’s Moorhound; flanking him are Reaper Hellhounds. Click for larger.
The Moorhound got a black basecoat; the other four got a dark brown basecoat. No particular reason, honestly. Most of the texture was brought out by simple drybrushing in a variety of off-white shades, then some highlights all the way up to pure white, and some selective shading with washes. I pushed the contrast more than I usually do and I think it works really well for these otherwordly demon-dogs.
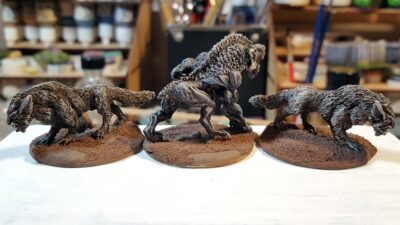
Back view of the Moorhound, flanked by two Reaper Goblin Wolves. Click for larger.
The bases all five dogs are on are 40mm rounds built up from sheet styrene and putty; I’ll get flock and tufts on them in the next couple of days. Then I need to figure out stats for these in Pulp Alley 2nd Edition and unleash them upon our tables!
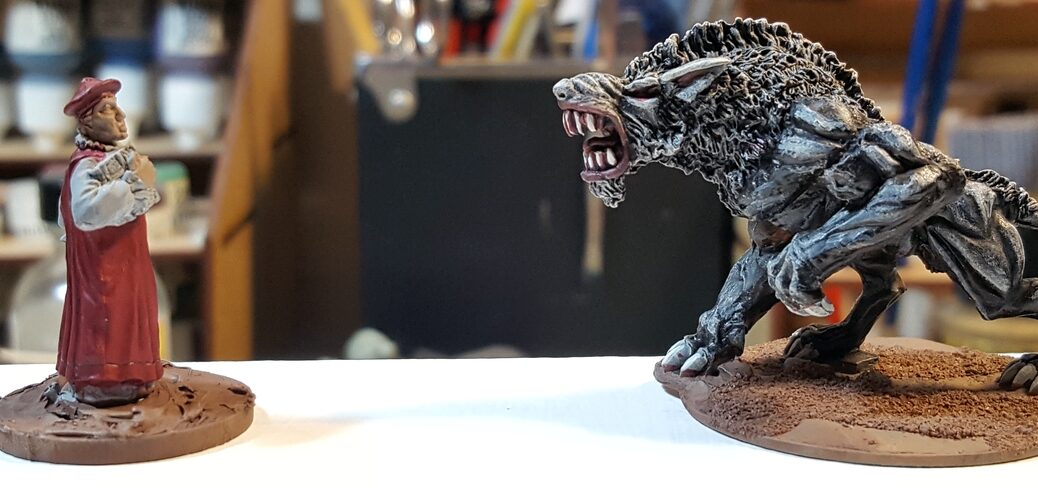
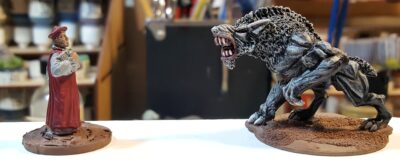
A Warlord 28mm priest faces down a Reaper Moor Hound. Click for larger.
I picked up a few things from Fenris Games back in June or July, and the first pieces are finally getting completed and onto the gaming table!
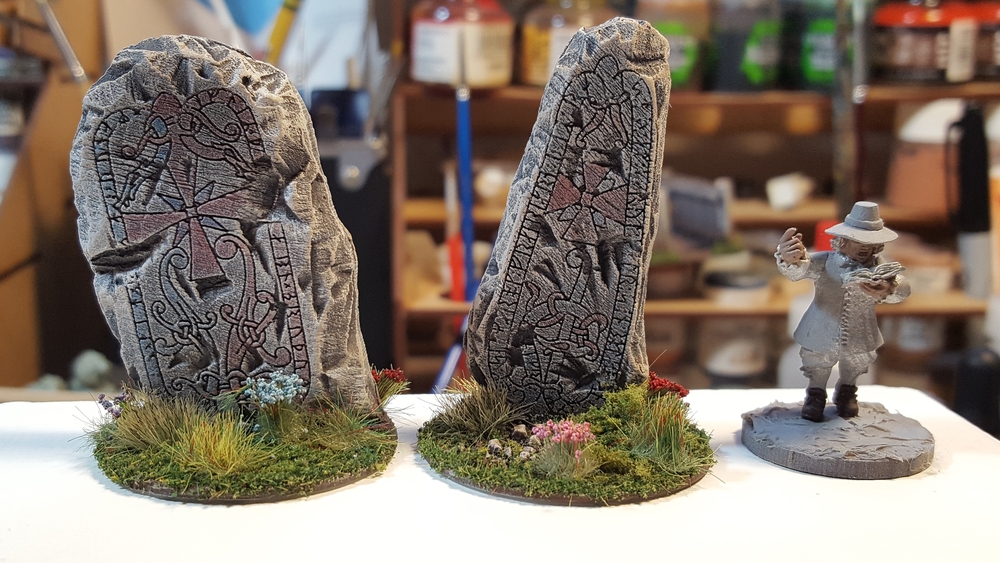
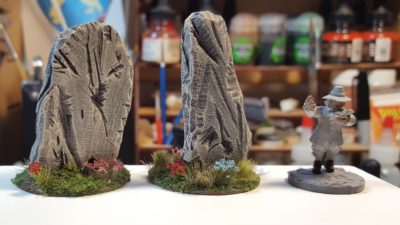
Two Viking Runestones from Fenris Games. Click for larger.
These are “Viking Runestones 2” from Fenris, cast in pale grey resin. Each is about 2″ tall. The carved runes on the front are very finely detailed; I wouldn’t be surprised if they had been laser engraved on something (thin acrylic?) and that was then embedded in putty or something to make up the rest of the stone.
Runestones, rear view. 28mm Warlord ECW figure for scale. Click for larger.
I’ve got a few other bits and pieces from Fenris in progress. All of their stuff is really high quality, their range is huge, and shipping was fast. Highly recommended!
Every culture has dog/wolf demon things in their folklore. The UK is thick with them, it seems like every county has three or four varieties, and they show up everywhere else in Europe too. Usually huge, black, red-eyed, and inclined to eat people by dark of night or just bay (they never merely bark) threateningly on dark and misty nights.
With that in mind, adding some demonic dog-creatures to my “Weird ECW” skirmish seemed like a natural thing to do. Fortunately, Reaper Miniatures has a whole selection of suitable figures, so I sent some money to those nice folks in Texas and got a good selection of things back, of which this pack of extremely bad dogs is just the first part to be seen here!
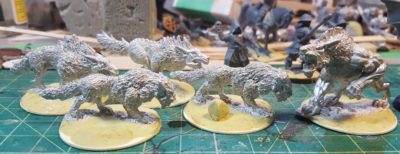
Five extremely bad dogs. See text for details, and click for larger.
The two left-hand figures are Hellhounds, the two slightly smaller beasts in the middle are Goblin Wolves, and the really, really big doggie on the far right there is Moor Hound.
They’re all on 40mm wide bases, just for scale, and the grey figure in the background is 28mm Warlord plastic.
Looking forward to getting these guys painted up and figuring out stats for them in Pulp Alley and the other rules sets we use! Somewhere in my mountain of unpainted figures I have at least one other big dog figure (a Reaper Warg, I think) that I can add to this pack when I find it.
Several of the scenarios in Pikeman’s Lament ask for a bastion or earthwork to be attacked or defended, but at a maximum area of 9″x9″ it isn’t going to be some grand fortification or anything.
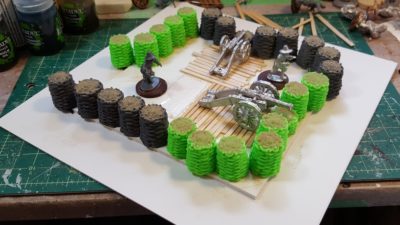
I wasn’t sure what, exactly, could be done in that area, so I cut a piece of heavy plasticard that size and started arranging my Assault Group guns and crews around the 3d printed gabions we found over on Thingiverse.
The 3d Printed Gabions
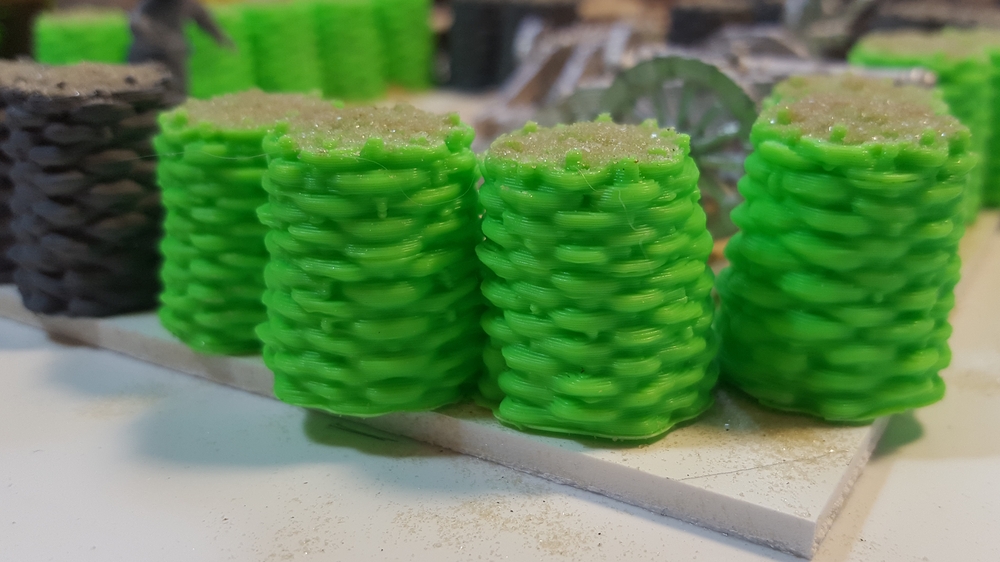
As seen previously here on The Warbard, my brother Corey owns a 3d printer. A Creality Ender 2, apparently. Gabions are big roughly-made wicker tubes filled with dirt, basically, used for temporary fortification for centuries – right up until at least the First World War, in fact. They’re iconic looking but would be really, really fiddly to scratchbuild. Finding the set of 3d modelled gabions for free over on Thingiverse was what kicked this whole project off.
3d printed gabions in closeup. The striations of the 3d print process nicely add texture. Click for larger.
If you haven’t got access to a 3d printer, Renedra will sell you a couple of sprues of quite nice-looking gabions for a very reasonable sum.
The Bastion
The 9″x9″ footprint was dictated by the Pikeman’s Lament rules, but proved to be a good size anyway for a bastion that could hold one gun with crew or a full unit of 12 infantry in the Pikeman’s system while not dominating the table. It’s still a very, very small bastion; even single-gun emplacements in the English Civil War were usually bigger than this once you included their surrounding ditches and such. Compromises are always made for tabletop usability, however!
The actual gabions and fortified part of this are raised slightly on a 6″x6″ offcut of 1/8th” EPVC plastic board, with openings for cannon to fire through on two sides and a ramp leading down and out on the third side.
Gabions in lace and planking started inside. Assault Group guns and crew and a Warlord plastic infantry figure for scale. Click for larger.
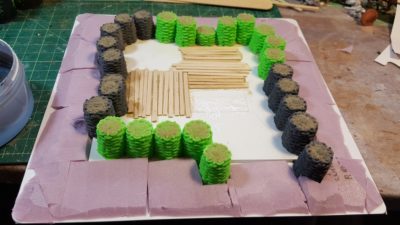
I used chunks of styrofoam to fill in the area outside the gabions, sloping up slightly from ground level, holding it in place with hot glue to speed up construction.
Styrofoam to fill in the slight slope up to the outer edge of the bastion itself. Click for larger.
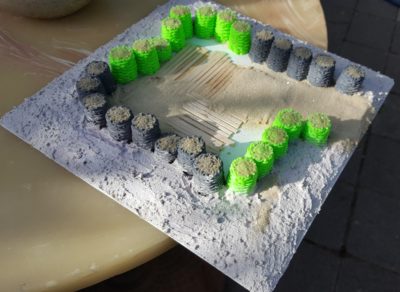
To cover the styrofoam I mixed up premixed plaster, white glue, sand, and a bit of water to make a tough textured fill, then pushed it into place with a tongue depressor. The interior has flooring/duckboards made from wooden coffee stir sticks, with sand filling the gaps between the boards.
Plaster, white glue, and fine gravel over the styrofoam. Click for larger.
Paint tomorrow after the plaster has had a chance to dry fully. I thought about putting extra obstacles in the ground outside the gabions, but have decided to leave it mostly bare earth. I do have my recently-bought Renedra chevaux-de-frise to add around the bastion once it’s on the table, after all.
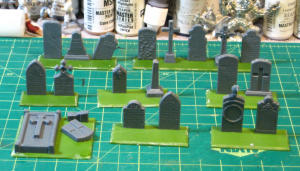
Back in 2013 half of them (one of the two identical sprues) got cleaned up, based, sand added to the bases, and grey primed, and that was it. For more than five years.
The original 2013 batch of graves, based but not yet primed. Click for slightly larger.
In early 2018 I pulled the 2013 bits out of storage and got them painted up and flocked fairly quickly for the game I ran at Trumpeter Salute 2018.
The paintjob was pretty simple. I hit all of them with a wash (GW Nuln Oil or Earthshade), then drybrushed and scrubbed various other colours across the stones. Two different shades of grey, some dark green, two shades of tan, and two shades of off-white applied in different amounts to different stones give a bit of variation to each stone.
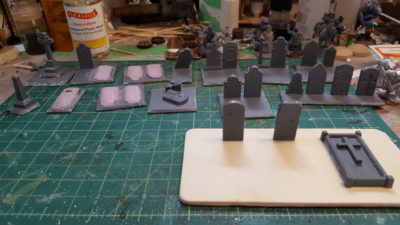
Finally, this week I’ve pulled the second sprue out and got them all based up.
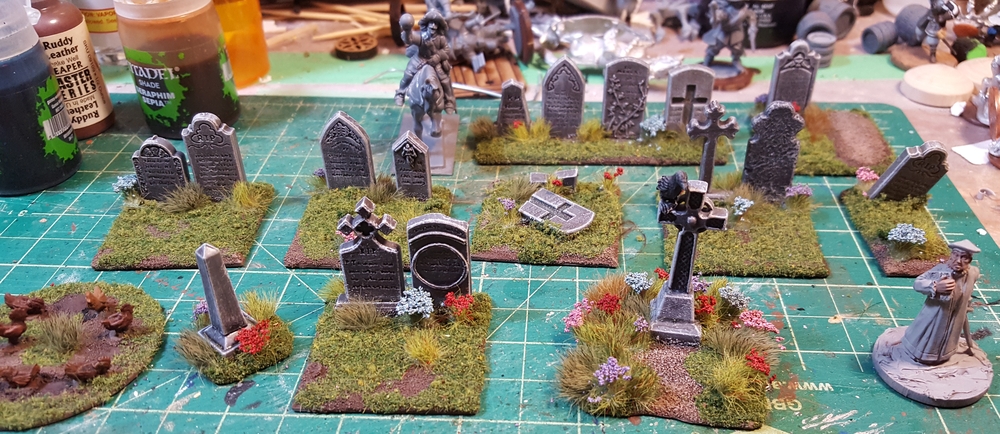
Latest graveyard stuff all based up. Click for larger.
The bases are all leftovers from various Warlord ECW plastic box sets. I think the newer stuff is from the Firelock Infantry box and the older from either the regular infantry or cavalry box. Waste not, want not, and I wasn’t ever going to use them for figures! The freshly dug graves (great potential plot points!) are just scrap styrofoam glued down and then sanded.
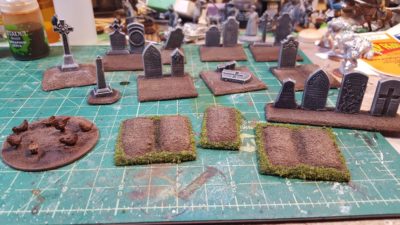
Latest graveyard bits. Fresh graves in front, regular gravestones behind. On the left is a base of chickens from Warbases, just for fun. Click for larger.
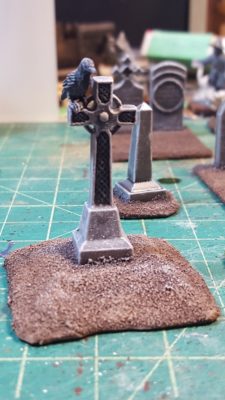
I’ve used the Celtic cross and some of the base pedestal bits to create a roadside cross or shrine. Just the thing to lurk on a dark and misty moor or something!
The roadside cross, still in progress. Complete with ominous raven! Click, as usual, for larger.
Finally, I used Rain City Hobbies tufts and flowers to add some detail and interest over my usual mix of flock. I really like the little pops of colour the flowers provide, and they’re becoming a standard feature on my scenery, especially the English Civil War items.
Finished, all these years later! I’ll get some photos of the full graveyard setup soon. Click for larger.
Should you want your own gravestones the two-sprue set is still available from Renedra which is definitely not always the case when coming back to some products after this long. Hopefully you take less than seven years to get yours ready for the tabletop!
Trumpeter Salute 2019 has come and gone. This was the first Trumpeter in many years where I didn’t run a game which felt kind of strange, but that did leave more time for other people’s games!
It was also the kick in the butt I apparently needed to devote a bit more time to gaming, after most of a year (two?) of basically doing squat except watch my gaming stuff gather dust.
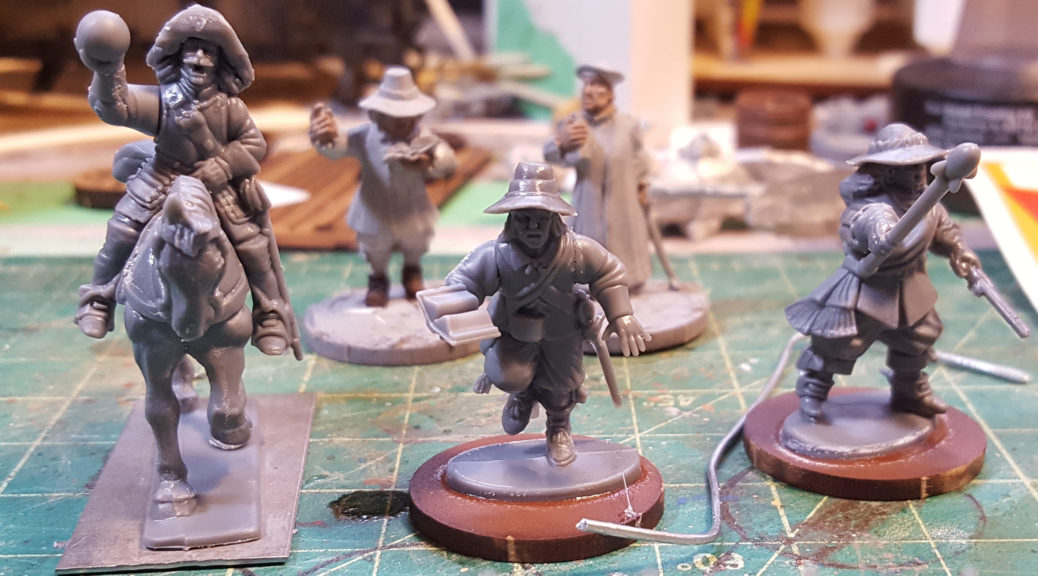
Among the things I bought at Trumpeter was a pack of Frostgrave Wizards in plastic. I’ve been musing for a while now about mixing up 17th Century English Civil War/Thirty Year’s War figures with magic and fantasy stuff of some sort, and while a lot of things like wands or wizard’s staffs would be easy enough to add to figures with wire and putty, a couple of sprues of ready-made bits seemed like a good plan.
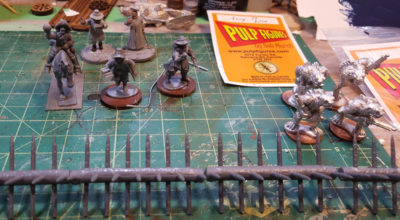
The Trumpeter Salute 2019 haul. First three Warlord/Frostgrave magic users on the left, new frogs on the right, chevaux in the foreground. Click, as usual, for larger.
It turns out the Warlord plastic ECW figures and the North Star plastic Frostgrave figures are pretty much perfectly compatible. Very similar heights and proportions, and heads and hands similarly scaled. The arms are jointed identically at the shoulders on both, too, although the heads & necks are separate on the Frostgrave figures but integral to the bodies on the Warlord stuff, so if/when I want to start doing headswaps I’ll need to do some surgery.
I also got a pack of four “Frogs with French rifles” from Pulp Figures, to give my Cthulhoid fishmen/frogmen forces some actual firepower. I’m not sure if these will be sold via Pulp Figures or Crucible Crush, but they’re awesome!
Finally, I picked up a pack of Renedra’s Chevaux de Frise for more barricades to scatter around – perfect for some of the Pikeman’s Lament scenarios that call for a line of barricades or a barricaded village. The pack contains a pair of sprue frames that will give me about 18″ or so of chevaux de frise all told.
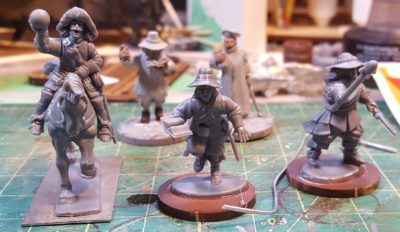
First three magic users! See text for details, click for larger.
I whipped up the first three “weird ECW” magic users already. On the left is one of the regular Warlord cavalry figures with an arm and hip pouch from the Frostgrave wizards; centre is a Warlord firelock body with both arms from Frostgrave (usable as a religiously-inspired figure in straight historical games too), and on the right is a body from the Warlord infantry command sprue with arms from the same sprue and a wizard’s staff from the Frostgrave set.
I’ve got a whole bunch of photos still on my camera from the actual Trumpeter Salute show; I’ll try and get them edited and uploaded this coming weekend.
This is diorama-level scenery building, but almost everything he does in this video is applicable to wargamer-proof terrain too and the final result looks awesome.
Paepercuts is a great channel; he was quiet for a while but has been putting out new stuff regularly now and is well worth the subscription over on YouTube. One of the comments in the Savannah video describes the host of these as “the Bob Ross of scenery videos” and I realized that’s one of the things I like about him, there’s none of the “HEYYYYYYY GUYSSSSSSSSSSS” weird loudness that is apparently standard issue in far too many other YT videos.
As for me and my house, I’m still not doing much gaming-related stuff but I can feel the new-project itch starting up. This might be something completely different, away from the various 28mm projects I’ve spent time on the last five years or so. Possibly Russian Civil War at a grand tactical small scale, 6mm or even 2mm/3mm for that “miles of open steppe” feel… we shall see!
Trumpeter Salute is next month in Vancouver and for the first time in years I’m not running a game but I’m still really looking forward to being there. Trumpeter has been great for blasting the wargaming cobwebs off in past years, we’ll see what it does this time around!
2018 has been a year of not much wargaming. I’m busy and well, just not doing a lot of gaming.
Last month was a bit of a milestone, though, that I should acknowledge: November 2018 makes twenty years straight of me having a wargaming presence online of some sort or another! Way back in November 1998 I signed up for a Geocities account (remember them?) and built the first version of this site in my college’s computer labs, because I didn’t own my own PC until 2000 or so.
While I’m at it: Merry Christmas, Happy Holidays, Happy New Year, and such. May the holidays season be what you need from it.
(also: the new post editor WordPress 5.0.1 ships with is shiny hot garbage. It’s deleted three draft versions of this post. Install the ‘Classic Editor’ plugin to restore WP to sanity if you’re a WP user!)