Posts, articles and links mostly concerning the painting of miniatures. Lead Painters League posts, links to resources and inspiration elsewhere, and such.
Awfully quiet around here for far too long, for which I apologize!
I’ve actually been doing quite a bit of painting and a little bit of terrain work. My personal goal is to get my entire current collection of Infinity miniatures painted, based, and completed before Labour Day, the first week of September. That’s about 65 miniatures total, of which maybe 25 or so are actually fully finished.
A couple of shots of recent work – see the photo captions in the gallery for more details!
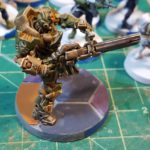
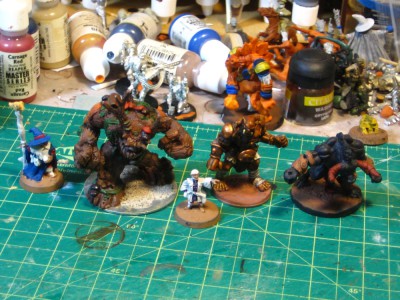
Haqqislam Azra’il, a big Heavy Infantry (superheavy, really) that I just did some edging on to make him “pop” more!
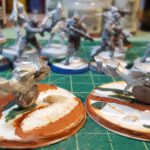
Bikes in progress. These are the old (2006 or so!) and out of production Haqq “unicycles”. I like them, a lot of people don’t. Building new bases so they fit the current standard base for motorbike units, which has changed since these were produced.
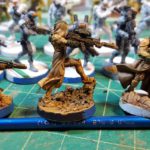
Lasiqs for Hassassin Bahram. Centre is a sniper, left and right are rifles.
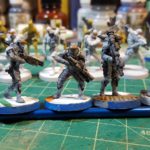
Sekban for my Qapu Khalqi Haqqislam force. A mix of rifles, boarding shotgun, and a rocket launcher.
My girlfriend is out of town with friends so I’ve had a bachelor/wargamer weekend and gotten a lot done on my Infinity figures.
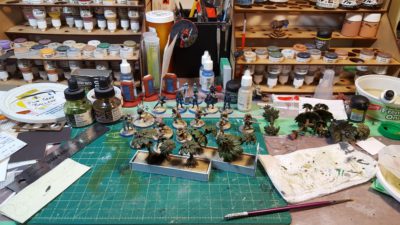
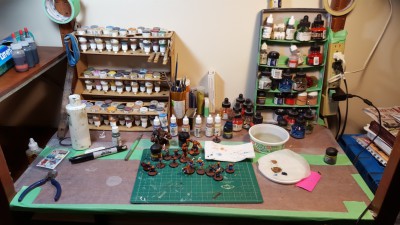
The workbench – planters in the foreground, various Haqqislam figures behind, and the usual clutter around the edges! Click for larger.
The planters are foamed PVC sheet and mat board offcuts, and the trees are from Games Workshop — at one point they produced a rather nice set of modular plastic “tropical trees” that vaguely resemble palm trees and are a lot of fun to put together. Like pretty much everything that GW ever does that’s actually interesting, these seem to have vanished from their website, which is a shame. I picked up most of a set a while ago when I bought a whole mixed batch of wargaming stuff off someone locally who was having to downsize.
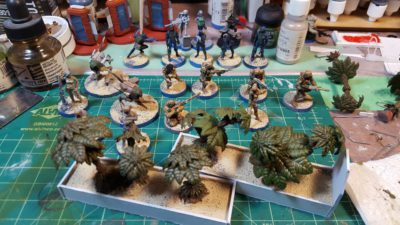
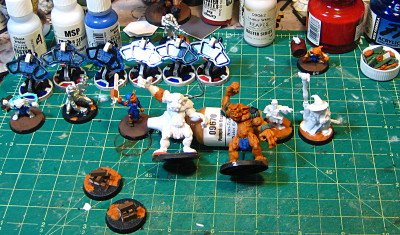
Closeup of the planters – done with the old GW palm trees – and CB Haqq figures in progress. Click for larger, as usual.
Closeup of the figures and planters. The dark blue figures in the background are various Hassassin Bahram soldiers including three of the infamous Fiday assassins. The figures closer to the camera include a pair of Remotes on the left, an al’Hawwa sniper and al’Hawwa hacker, a pair of Hafza infantry in lower left, and a quintet of Djanzaban medium infantry on the right – two rifles, a sniper, an HMG, and a hacker, all stalwarts of the Qapu Khalqi sectorial force in Haqq.
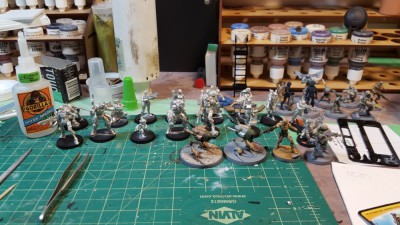
A vast pile of bare pewter Haqqislam figures for Infinity, and a few in progress… Click for larger, as usual.
It’s been a quiet month here on the Warbard, but things have been ticking along in real life. The space station scenery for Infinity is taking shape, and today I sat down and cranked through assembling every single Infinity figure I owned. There were far too many boxes and blisters hanging around, so now there’s a long line of bare pewter figures waiting for putty and then primer before actual painting can start!
I’ll try and get some space station photos up later this week; I like how it’s coming along.
We’re also getting into the convention season locally, with the new LANtasy taking place in mid-March and Trumpeter Salute 2016 over in Vancouver on the first weekend of April. All I’m doing at LANtasy is playing Blood Bowl, probably with my existing Skaven (rat) team, so prep for that is minimal. For Trumpeter I’m running a Pulp Alley game set in the jungles of British India between the wars; I have enough figures for that and enough scenery, but might try and get a few extra figures finished and one or two bits of scenery. I also need to run a game or two of Pulp Alley to remind myself how the rules work, as it’s been ages (probably over a year?) since we last played it!
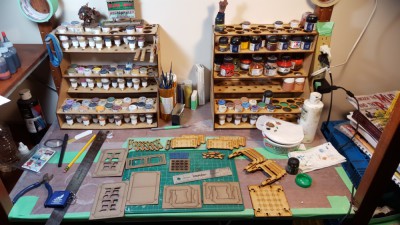
New paint rack in place, top right, and an Impudent Mortal elevator spread out across the bench.
My Impudent Mortal order arrived last week, and I’ve assembled the new paint rack already. It’s an exact duplicate of the one I bought back in 2014 and should help keep the rest of my workbench relatively uncluttered, at least of paint, figures, and small projects that can go up onto the shelves of the rack somewhere!
Spread out across the foreground is the components of Impudent Mortal’s Near Future Elevator Set, which should make for good looking scatter terrain on our Infinity tables soon! More about those in a future post as I actually start assembly of the first one.
Also in progress and needing a post soon is new dugouts for Blood Bowl, to go along with the scoreboard I made in November.
First post of the New Year! Happy New Year, hope 2015 was good and 2016 is at least as good.
I spent the week between Christmas and New Year moving, and a fair bit of the time since getting stuff sorted out and properly moving into the new apartment my girlfriend and I are sharing now. An important part of that was organizing the hobby space, of course, for which our second bedroom is going to serve nicely when we don’t have guests over.
I’ve taken advantage of the fact that everything went into boxes for moving to keep the vast majority of my gaming supplies boxed up and in the closet for now, only bringing things out one project at a time to finish and organize things.
Some further changes are coming soon; I’ve found replacements for the pair of battered, decades-old swing-arm lamps (one at each shoulder) that currently light my bench, and I’ve ordered a second Impudent Mortal paint rack to go with the first I got back in late 2014 which should help keep things a lot better organized.
Painting right now is mostly Blood Bowl guys, although I have a bunch of Infinity models I want to get paint on, especially as we have another Infinity event coming up in February!
Various Reaper Bones figures for Blood Bowl, including a really massive feral treeman! Click for slightly larger.
I’m going to be moving between Christmas & New Years so I’ve been busy packing stuff and cleaning; I’ve been in my current digs about three and a half years and the gaming stuff especially has kind of crept all over the place, so it’s a good opportunity for some sorting, de-junking, and reorganization of my work bench. The new apartment will have more space for hobby stuff, which is both great and slightly worrying as wargaming has a proven ability to fill all available space!
Anyway, after boxing up the majority of the gaming stuff and doing some initial straightening of my actual workbench I decided to do a bit of painting to relax, and to work on some figures that have been lurking, mostly ignored, around the edges of my bench for ages now.
Primarily, that mean finally getting some proper paint on the massive Reaper Bones Spirit of the Forest. I based him and added some Blood Bowl-style shoulder pads ages ago (possibly 2014?) and he’s sat around the edges of my painting mat ever since. A base coat revealed that the figure has all sorts of cool detail on him, plants, vines, fungus, and moss all over. I got some of that tonight and I’d run him on a BB pitch without being too bothered, but this really is a figure that will reward some time picking out more details. The one downside really is the sheer size of the figure – that’s a 2″ washer I’ve based him on, and his toes poke over on both sides…
The other figures are a wizard (far left) for those (rare!) times when a BB team gets to hire a Wizard as an inducement; a gnome Apothecary to patch people up and get them back on the pitch; an Ogre so I can proxy my still-unpainted Amazons as a Human team; and finally a big Minotaur that I picked up because I liked the look of the figure but who might now become the centrepiece of a Chaos team from some of the other Bones figures available.
Almost all my painting the last few months has been on the BB Goblin team, so it was nice to get paint on other figures and especially satisfying to start on the giant Treeman.
With holidays and moving I might not get one more post completed this month, so if I don’t, Merry Christmas, Happy Holidays, Season’s Greetings, and Happy New Year to everyone!
(or, you know, Bah Humbug if that’s more your thing!)
Quick and dirty late night snapshot of my workbench!
Troll surgery and various other things on the bench. Click for larger, as usual.
Front and centre is a Reaper Bones troll (in white plastic still, hence kind of blown out in the pic…) next to his orange-painted buddy. I’ve cut both arms at the elbows, repositioned them, and gotten started on puttying to cover up the damage. He’s for my goblin Blood Bowl team, eventually, so the rather rough putty work will be covered with football pads similar to the ones worn by the right hand figure, who has just had pads added to his basic pose.
Most of the rest of the clutter is also Blood Bowl related; there’s a wizard and a doctor just mounted on their bases to the right, a couple of goblins lurking, and two Bribe counters in the left foreground – the plastic sprue will eventually be painted to look like gold bars.
The background is mostly Infinity stuff, a pair of new figures for my Haqqislam forces and six consoles from Warsenal. More on the consoles sometime soon, as I’m writing up a review of them and the Supply Crates I also got from Warsenal.
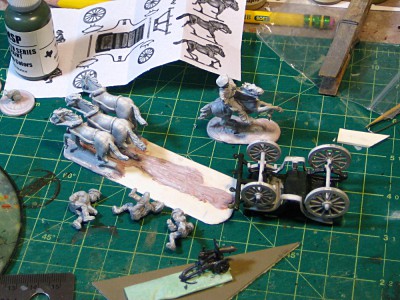
The Eureka tachanka itself (the wagon, that is) comes together fairly easily with a bit of patience and some test fitting. The main body is a single piece, which I had to bend very slightly to straighten as the back end had been pushed very slightly downward during shipping. The rear springs and axle are three simple pieces; the front piece has the bar the horses are harnessed to, then two springs, then a front axle.
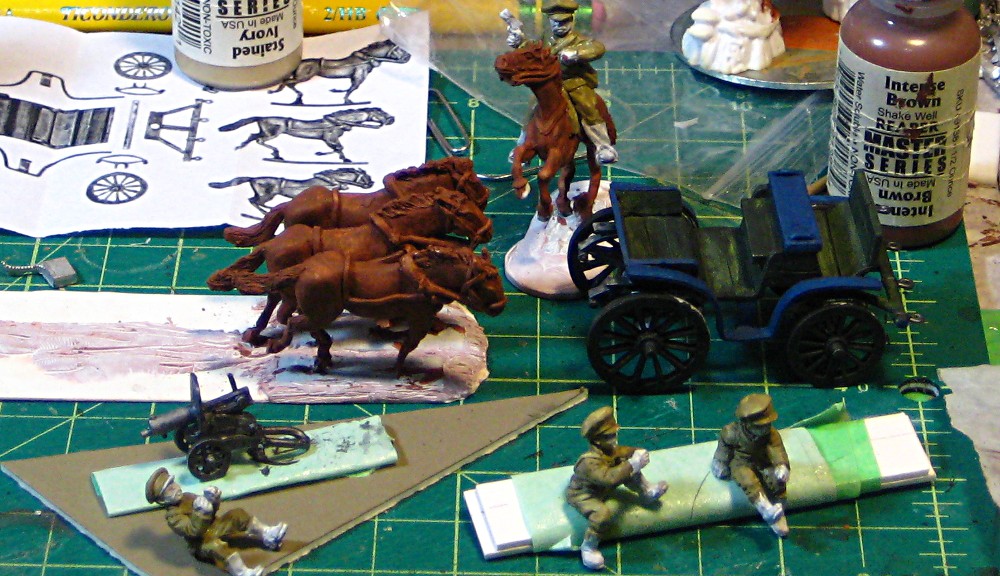
The tachanka itself upside down on the right; the horses mounted and puttied into place on the base to the left. Crew figures int he foreground, along with the Maxim MG. Click for larger, as always.
I glued the whole thing together in one shot, wheels and all, and now that I’m painting it I find myself wishing I’d left the wheels off to make the undercarriage slightly easier to paint. On the other hand, getting the fenders on either side into place and symmetrical is easier when you have the wheels already solidly in place for reference, so it’s one of those “on the one hand/other hand” sorts of things. I can always slop mud around on the underside to hide any minor painting glitches, after all…
The base the whole thing will sit on is a strip of .040″ styrene plastic card, reinforced with Milliput epoxy putty, especially around the horses’ integral bases. I also ran a ridge of putty down the centre of the card base to stiffen it, with some slivers of scrap card under that just to give the putty something to hang on to. The base is just barely big enough to hold the wheels of the tachanka and the horses, but similar minimal “shadow” bases have worked to protect the relatively delicate wheels of other pewter/resin vehicles in my collection for several years now.
The tachanka is getting a dark green basecoat, similar to the paint scheme on the earlier armoured car. I’ve gone with blue trim, either a remnant of civilian finery (a lot of tachankas were lightly converted civilian carriages) or a bit of regimental pride coming through. I’ll leave all three crew in generic Russian khaki so they can be used by either side in my RCW games; I might eventually rig a flag holder somewhere on the thing for it to show off which side it’s fighting for today!
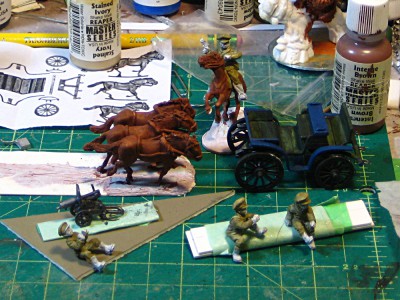
Such basecoating! Horses, tachanka and crew all basecoated, as well as heroic Russian officer dude on his horse behind – also a Eureka figure. Click for larger, as always.
I’m trying to get the tachanka ready for Trumpeter Salute in Vancouver which starts this Friday, so time is pressing and I’m speedpainting like crazy, and feeling rusty because I really haven’t painted much at all in the last eight months or so! At some point I also need to come up with some basic rules for running the silly thing in Chain of Command, but that might be left for the ferry ride over to Vancouver Friday afternoon…
I first heard of Impudent Mortal when Richard of TooFatLardies used two of their buildings to build himself a very nice brewery for WW2 gaming. Rich got his through Minibits in the UK but it turns out Impudent Mortal is over on this side of “the Pond” down in the States.
I was interested in the universal brick look of the industrial buildings, which are the sort of Victorian/early-20th C brickwork you can find almost anywhere in the world right up to the present day, so I finally ordered a pair of brick buildings, a 6″x4″ rectangular building and a larger L-shaped building.
I also ordered one of their paint racks, the 66-bottle 3-level Reverse Eyedropper Paint Rack Extra Shelf, as most of my paint collection is Reaper Master Series in the very nice dropper bottles.
Communication from Walt at Impudent Mortal is fantastically quick and shipping is similar; everything arrived while I was away in northern Alberta then had to wait until I got back to the real world before I could do anything with it! Both buildings and the paint rack arrived tightly wrapped in heavy cling-wrap, the industrial version of your standard sandwich wrap, which kept all the components together very nicely inside the box.
I’ll get the buildings covered properly when I assemble them soon, but my first impression from dry-fitting the smaller building and then properly assembling the paint rack is that everything fits together easily and solidly. All the Impudent Mortal stuff is laser-cut from 3mm MDF, which will make for very solid buildings and a very solid paint rack.
Instead of shipping their stuff with instruction sheets IM has both videos and PDFs on their website, which has the advantage of giving you an idea of how everything fits together even before you buy it. The paint rack I bought is 14 pieces: two vertical sides, six shelf pieces, and the rest bracing at the backs of the shelves. Each shelf level has two pieces, the top piece with larger holes to hold the body of the dropper bottle, and the lower piece with smaller holes intended to hold the top of the lid of each dropper bottle.
Each level also has half a dozen smaller holes in each back corner, intended to hold brushes, sculpting tools, pencils or other small tools. That’s a useful way to use up the corners too small to tuck one more bottle into, but the lower pieces have holes in them too, which is odd – it means only the lowest shelf can actually be used to hold most things, because a brush or pencil put in one of the top shelf’s holes will just fall through. Leaving those corners of the lower pieces of each shelf pair solid would make them more usable.
Assembly was easy and quick and the fit was good. Lay one vertical side piece out, add all six shelf pieces with a bit of white glue, then drop the other side piece in and click everything together one shelf piece at a time. The various braces go on and keep everything square, and you’re done. Maybe ten minutes after I started I had the paint rack on my crowded painting bench and was loading paint into it!
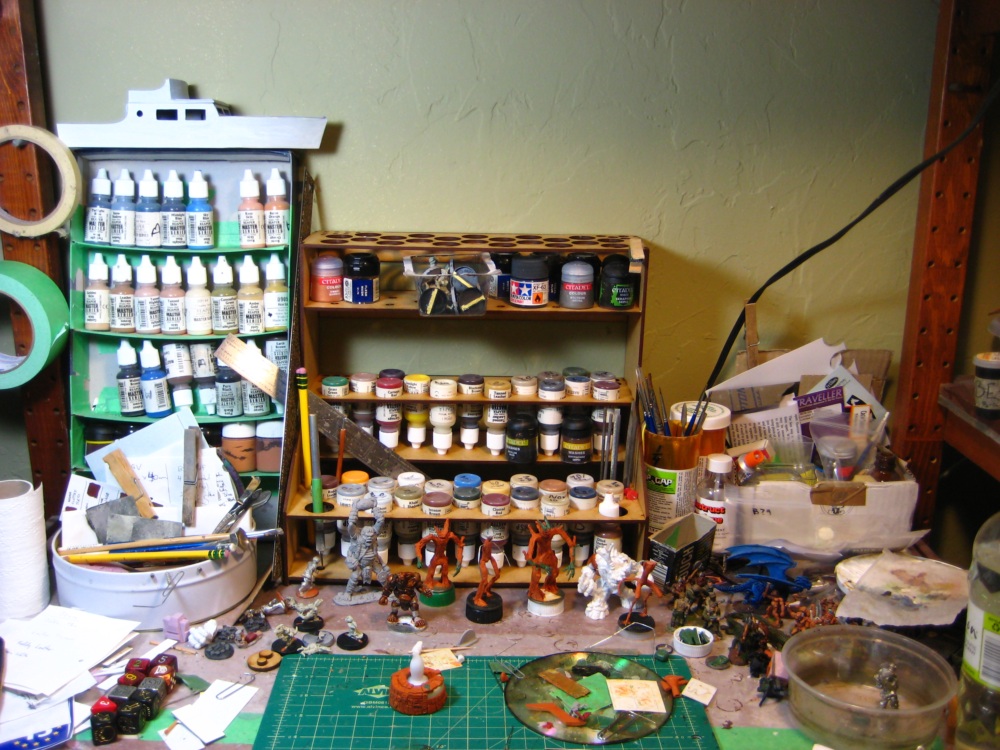
Workbench with new Impudent Mortal paint rack, 12 October 2014. Click for larger, as usual.
Making space for the new rack forced a badly-needed reorganization of my fairly small and very crowded painting bench. The small holes for paint brushes and tools will allow me to downsize the round white tin on the left to some sort of smaller container soon, now that files, pencils and such are tucked into the new rack, and the space-consuming clutter of overflow paint bottles from the homemade rack on the left is now nicely contained in the new rack. The shelves on this particular rack are far enough apart that you can fit GW or Tamiya paint pots between the top and bottom pairs of each shelf level, which is a nice bonus. You even have space to do that with a few pots per level when all the holes have dropper bottles in them – see the right-hand side of the middle shelf in the photo above!
The top shelf of the new rack will eventually hold my collection of acrylic artists inks that I use regularly on figures, but give the weight of those bottles I have had to leave them off until the glue had properly dried on the rack!
The IM racks are available in several different styles to fit different types of bottles; this one is about 12″ wide, 8″ deep and just under 12″ tall. Highly recommended and good value for money.
Hope everyone is having an excellent Canadian Thanksgiving long weekend, if you’re lucky enough to be a Canuck, or a good ordinary weekend if not!
I’ve also just bought new greenstuff putty finally, to replace the very, very old strip of the stuff that’s been hanging around my desk for far too long. The old stuff had the consistency of used old chewing gum and was pretty much impossible to work with; the new stuff (along with a couple of new sculpting tools!) has reminded me how much fun messing around with greenstuff is. There’s a pile of YouTube video tutorials showing basic greenstuff sculpting techniques – one I rather like is The Dizmo’s skull tutorial.
Green Stuff Industries host a good mix of basic messing-with-green-stuff tutorials, including this Sculpting Bas-Relief Flames tutorial that I want to try out sometime soon.
I’m off next week to northern Alberta for three to six weeks of field work, helping run a project up there, so posting might continue to be fairly light but I’m going to take some putty and sculpting stuff with me and practice the art – it should be more forgiving of hotel suite lighting than painting, which I’ve tried in hotel rooms in the past and always quit because even at a hotel room desk the light tends to be lousy…