No, not that Salute. Trumpeter Salute, in Vancouver, Canada. Much smaller, but also a wee touch cheaper for me to attend.
As is my usual, I ran a game – this year was another Under Alien Suns (coop scifi skirmish based on Sellswords & Spellslingers) game. I ended up having 5 players, although running in the Saturday morning block meant it was a bit slow and I thought I wasn’t going to have a game this year.
Karl and the bearA little bear problemA bear solution
The terrain is my forest table, which I’ve detailed construction of on Lead Adventure.
My full album is below:
Lots of fun again, although this year my gaming was slightly curtailed by the reality of having a 4 month old son who takes up a lot of time and so I missed the Saturday evening slot.
The last of this project’s posts until I can show off the painting work in progress photos and all the extra finished photos I didn’t use for the Lead Adventure Forum Build Something Contest 2025!
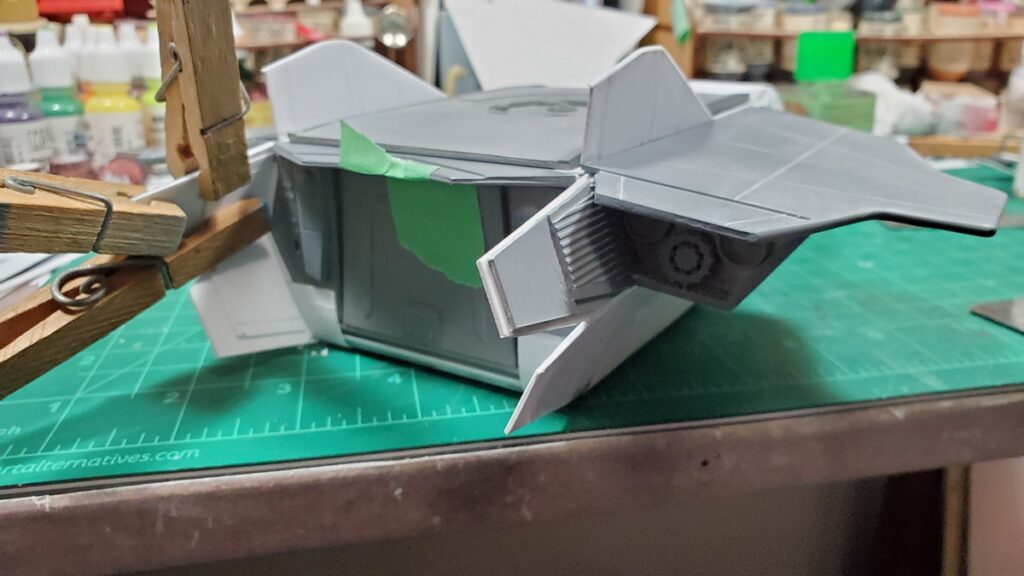
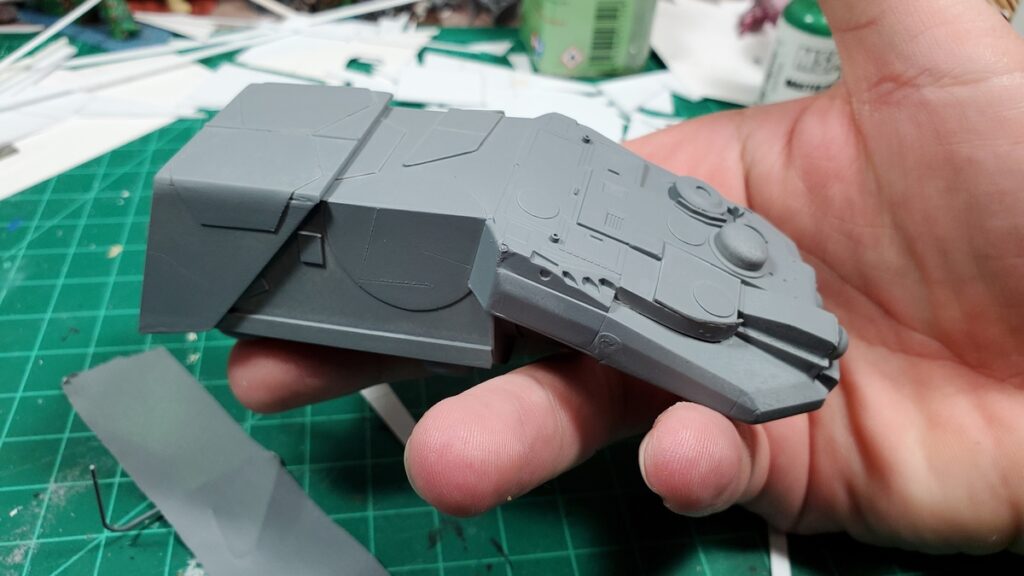
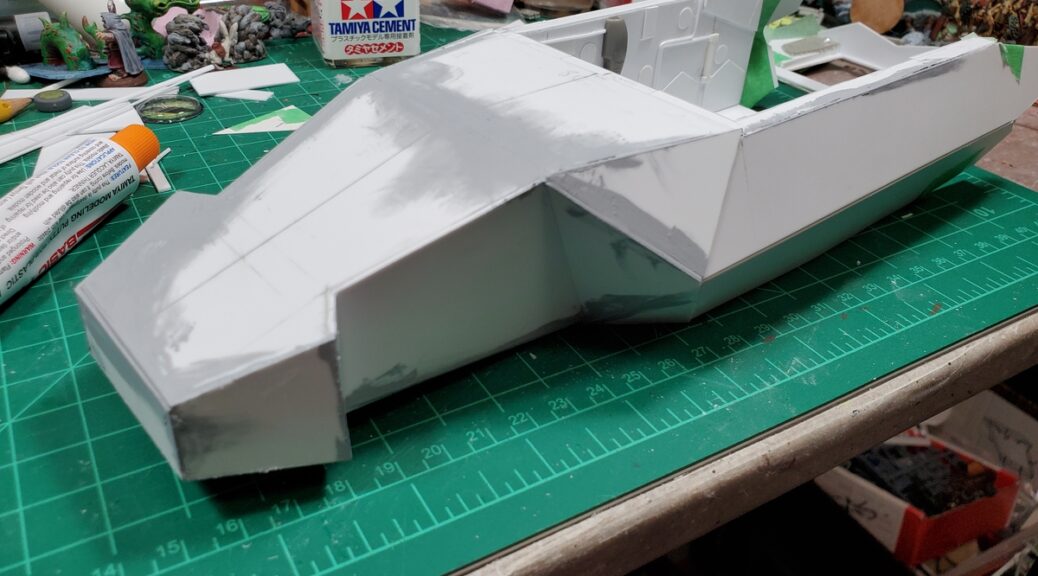
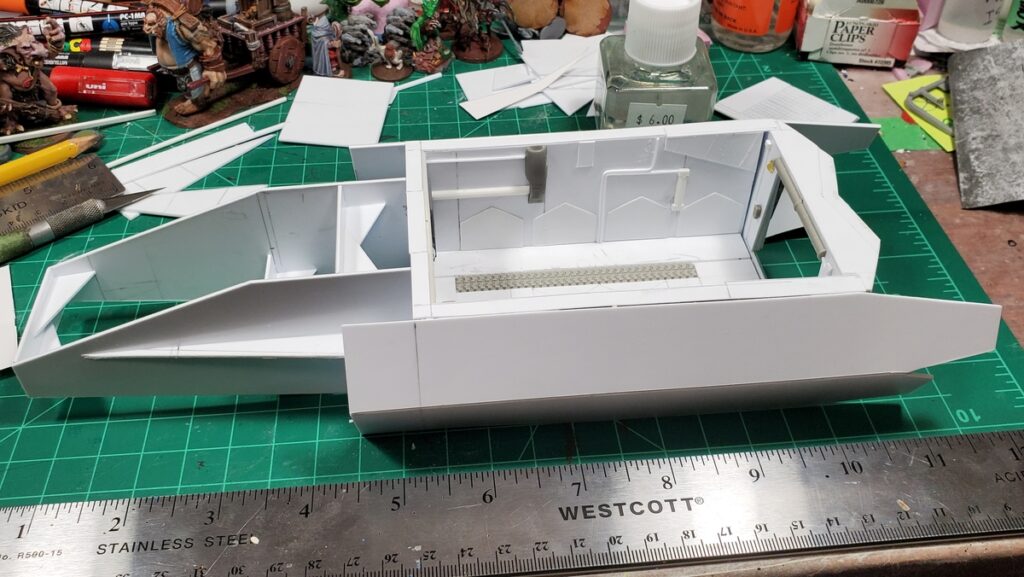
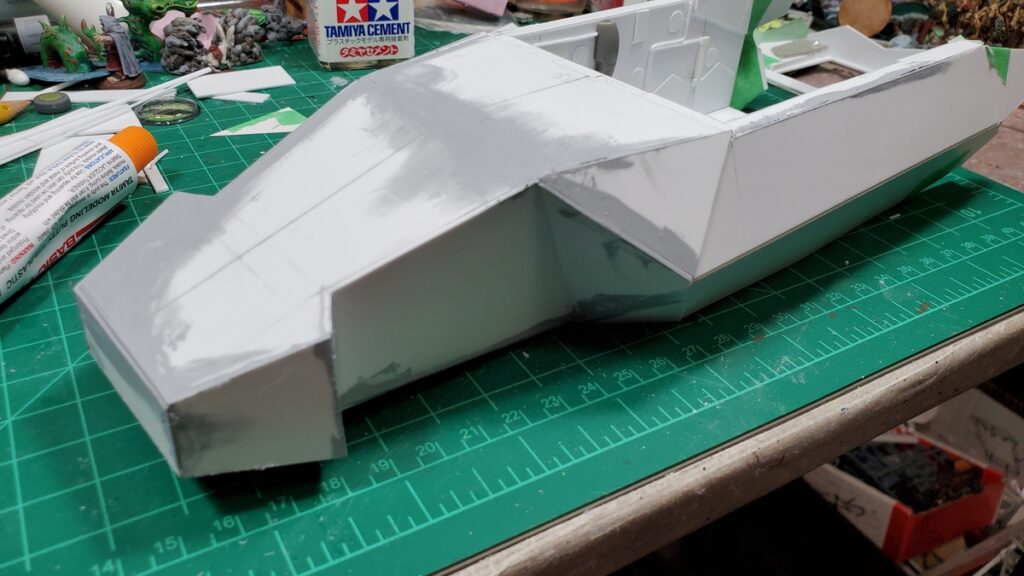
There was a bunch of pre-priming sanding, puttying and fiddling. The side walls of the fuselage pulled slightly skew during construction somehow, so the side rails that hold the roof panel in place had to be custom-fitted on each side.
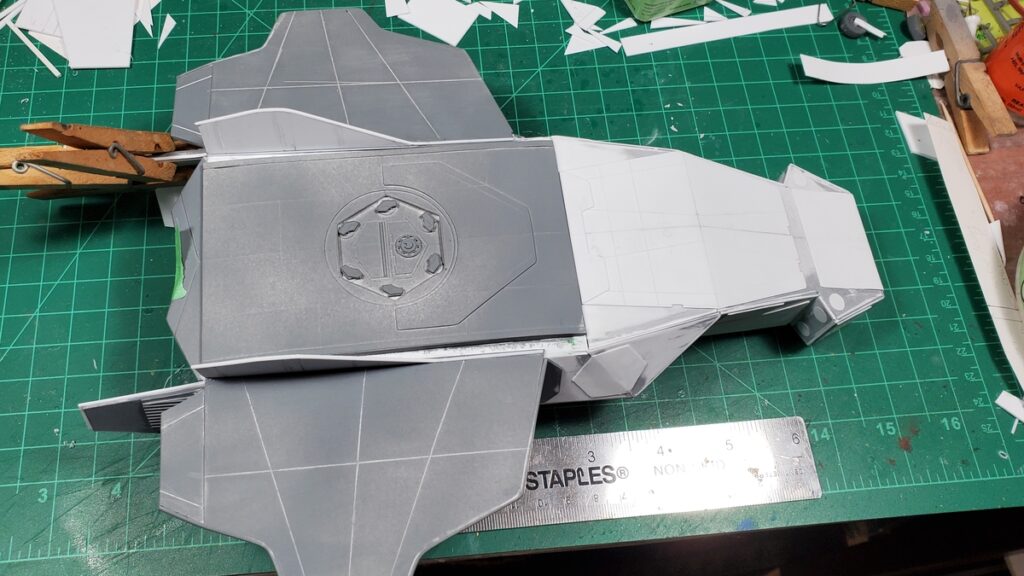
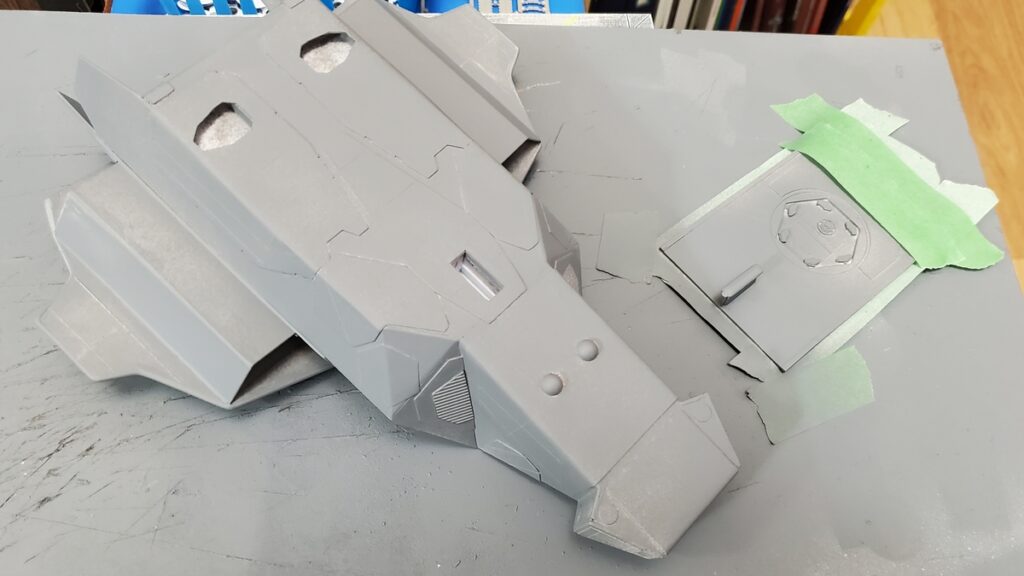
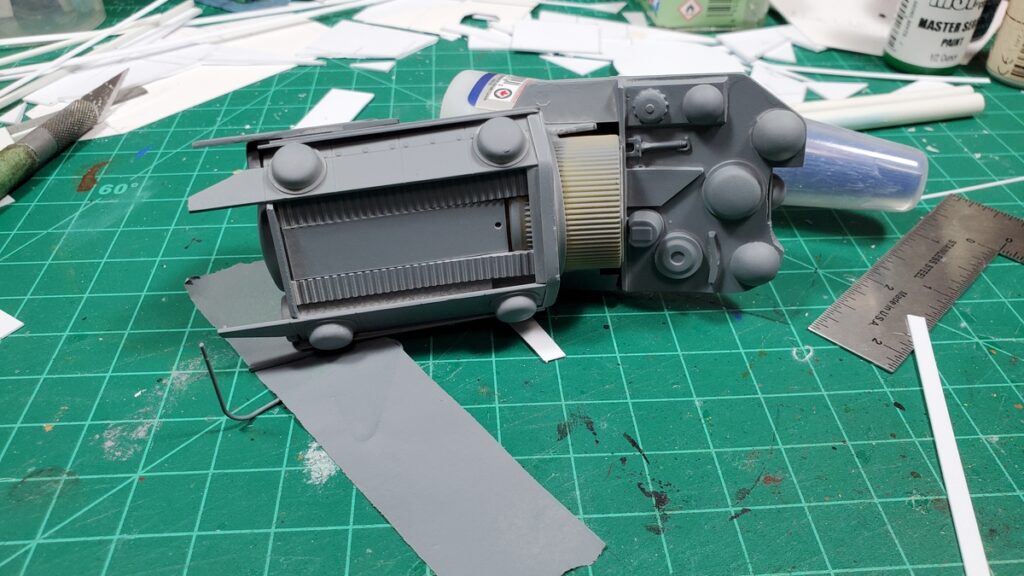
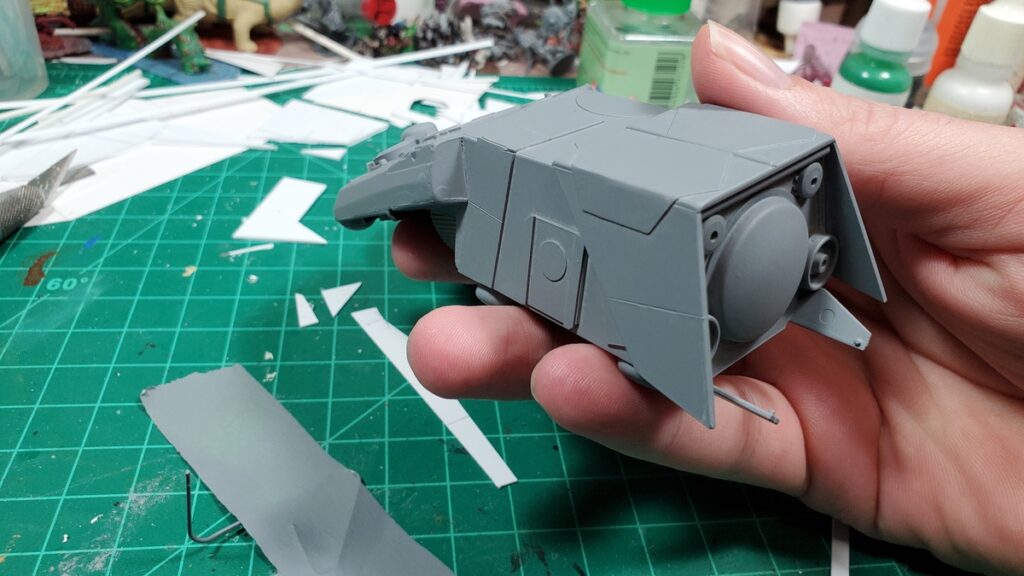
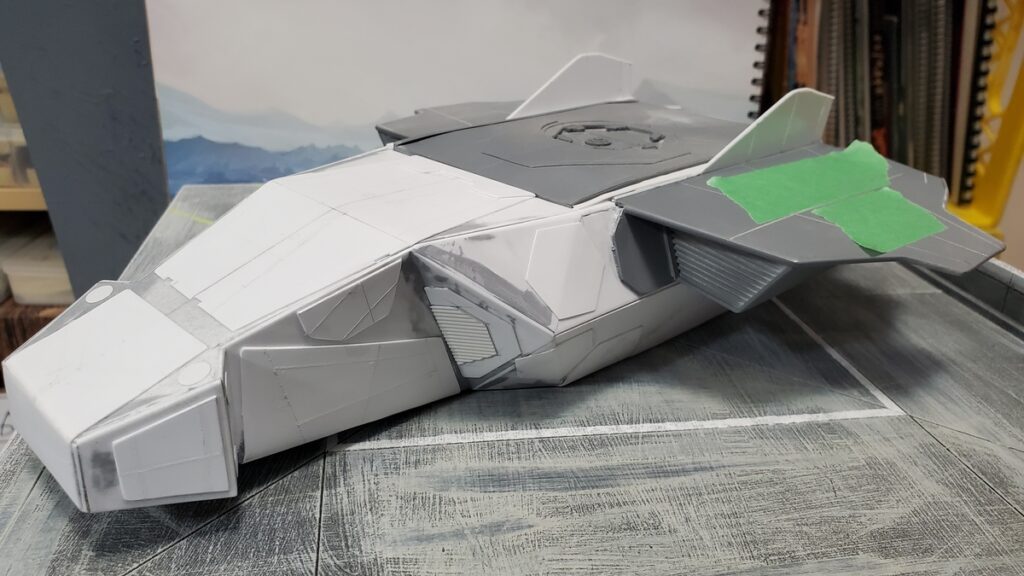
The shuttle, complete except for landing gear and roof rails, front quarter view.Rear view of the shuttle, with some final glueup of one of the rear baffle panels in progress.Top view, showing the engraved panel lines in the wings nicely.PRIMER! Here’s the underside, complete except for landing gear, all primered.Primer, top view, with the already finished, painted, and decaled cargo bay masked off.Proper supervision is essential to all well run projects. Sophie la Floof spent quite a bit of time on the rug under my project bench making sure things went smoothly.
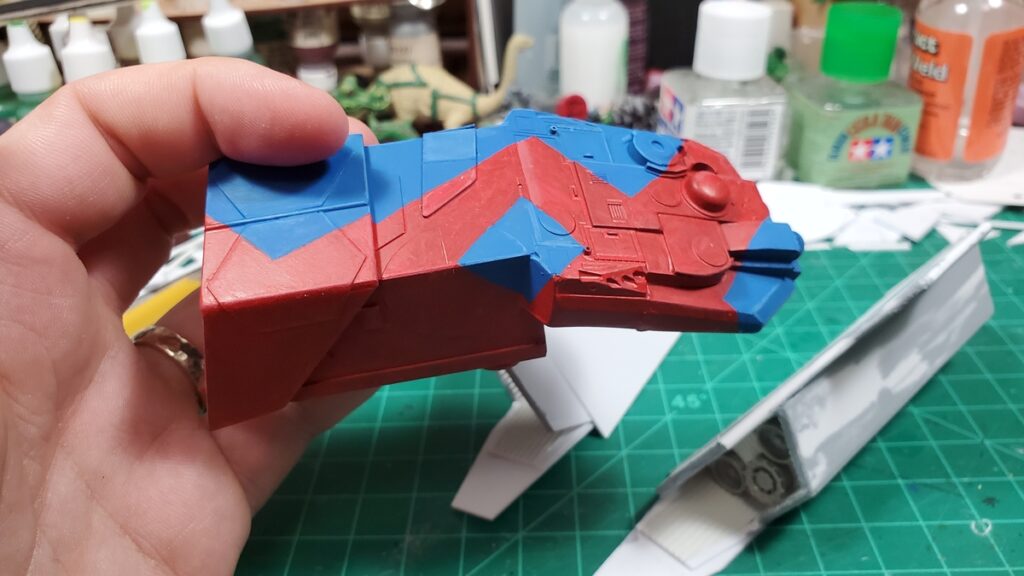
The landing gear only went on after painting, decals, and weathering were all done, so I don’t have any photos of that to show off yet.
By the time this posts audience voting on Build Something Contest 2025 should have started over on Lead Adventure! Go check out all the great entries! BSC rules say no sharing WIP or finished painted pictures until either the contest is over or you’re eliminated from it, so there will be a bit of a pause in shuttle pix here, but I do have a gallery fully of painting photos to show eventually.
If you want something done, give it to a busy person to do is a saying that floats around. It’s often true that when you’re in a certain creative groove, you can spin off other projects much faster than you might otherwise get to them!
I had extra plastic kits parts around from the 1/72 LeClerc MBT kit I bought to pillage for kitbashing parts, I had some rather cool pieces of offcut styrene around, and I wanted a landing pad to stage photos of the shuttle on, so it all came together in a trio of related projects.
The Drone
This started life with the top of the LeClerc turret, the cap off an Angosturna bitters bottle rescued from the recycle bin, some googly eyes and other bits from the dollar store, and various styrene bits.
The angosGMBH Distraction-class Autonomous Sensor Drone is set up for planetary and space surveying and exploration, with various sensor loadouts depending on mission. No crew space is available, although the tiny cargo/sample bay on the port side could accommodate a human-sized sophont in a space suit for a very short, very uncomfortable ride, if it hasn’t been adapted into a drone bay for auxiliary sub-drones. Some Distraction-class are themselves autonomous intelligent citizen-drones, although most have only limited-ML minds, and some platforms are old-fashioned remotely operated vehicles.
The drone went together in a single evening and was primed and painted the next day. I got zero photos of it in raw styrene.
Drone primed, side/top view.Primed, underside view.Primed, rear quarter view.Paint in progress.Paint in progress.Paint finished, no decals or weathering yet.Side profile with paint finished.
The Distraction-class has since been decaled and weathered; I’ll try to remember to get some proper finished photos of it soon and post them.
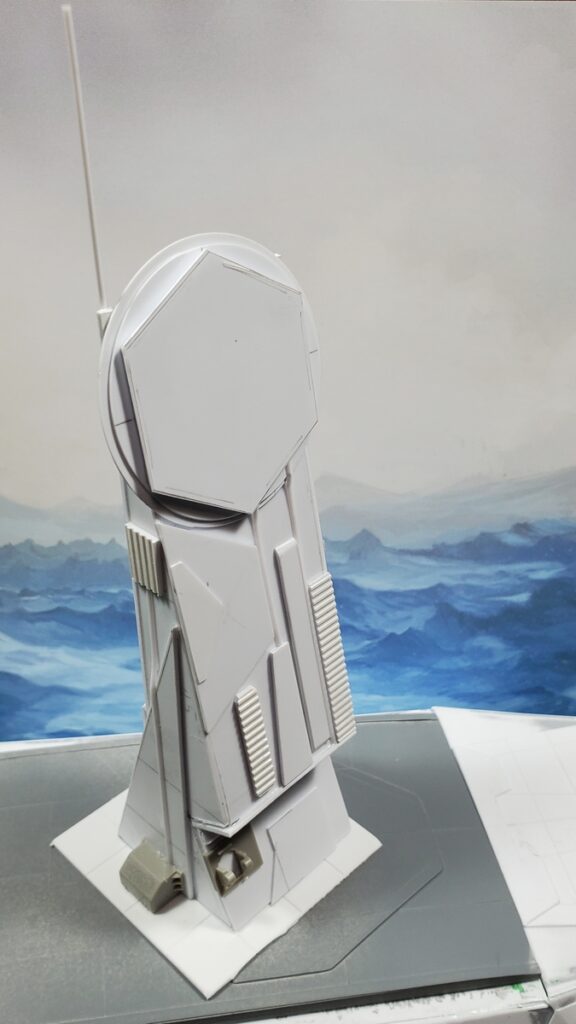
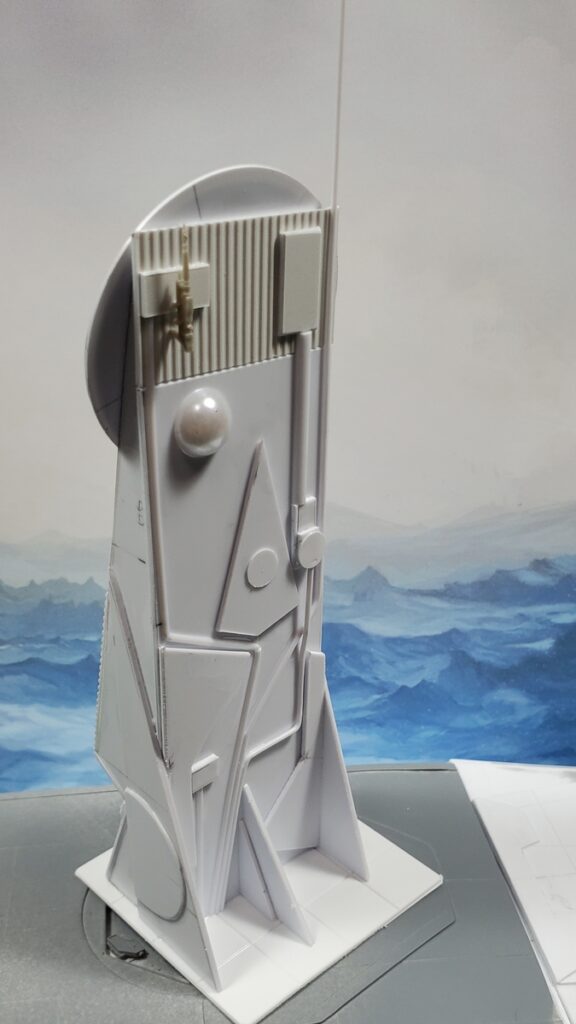
The Sensor/Comms Tower
This started with the increasing amount of styrene offcuts piling up around the edges of my workbench. Many of them were too large and too interesting in shape to just throw away, so I started fiddling around while waiting for solvent cement to cure on the shuttle and built this little tower in a couple of evenings.
It’s about 5″ tall to the top of the actual tower. The side profile is the offcuts from the nose skin of the shuttle, the various circles and hexagons are from building the docking port in the roof of the shuttle. The rest of the thing are either random offcuts from shuttle building or just stuff from my raw materials stash.
The tower, front view, bare styrene.The tower, rear view, in bare styrene.
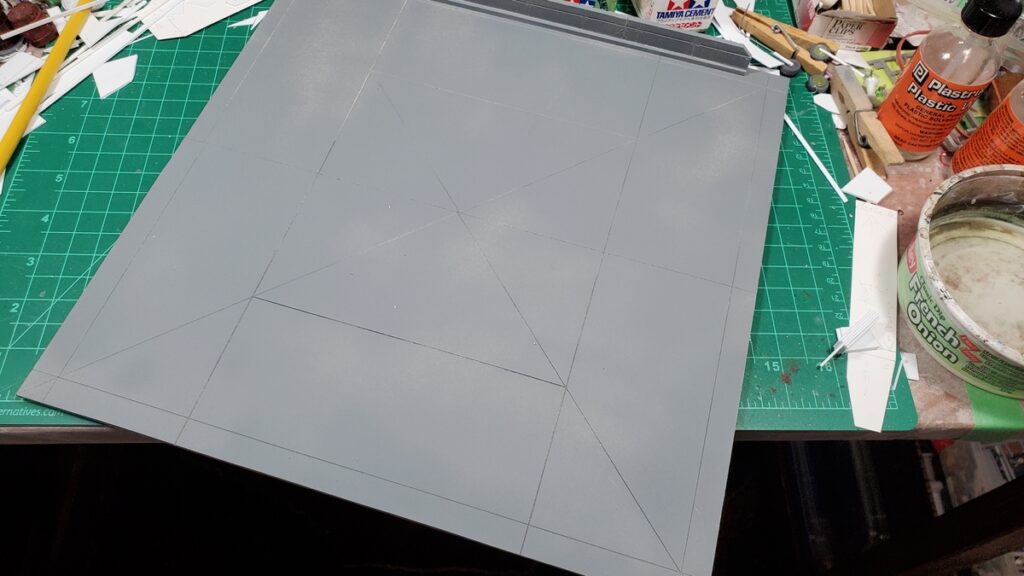
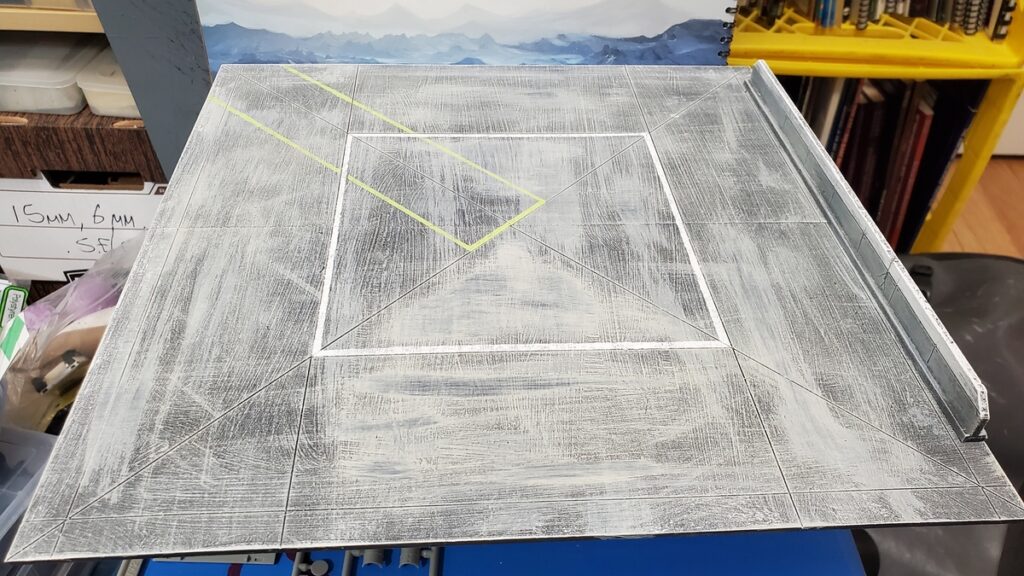
The Landing Pad
This is from the last big piece of 1/8″ foamed PVC in my stash; I’m going to have to go get more from our local signmaking/plastic supply shop because it’s wonderful to work with. Stronger, cleaner, and easier to cut than foamcore, it can be embossed and engraved easily and cleanly, and it’s less murderous on knives too.
The whole thing is 12 inches by 12 inches, assembled from two 12×6 pieces with some connection strips underneath. It got grey primered, then a messy dampbrush/drybrush combo of various tans and greys over that, followed by a few washes in black, grey, and dark blue. There’s expansion cracks engraved right into the PVC, and after the main paint had dried I did a couple of marking lines with tape and a stippling brush in white and bright yellow-green. (Reaper’s Dungeon Slime paint. Highly recommended if you want an obnoxiously bright hazard warning colour!)
I also did a low wall piece with PVC offcuts. It’s 10″ long and about half an inch high. It got the same paint as the pad, with the top third or so painted white when I did the pavement markings on the pad.
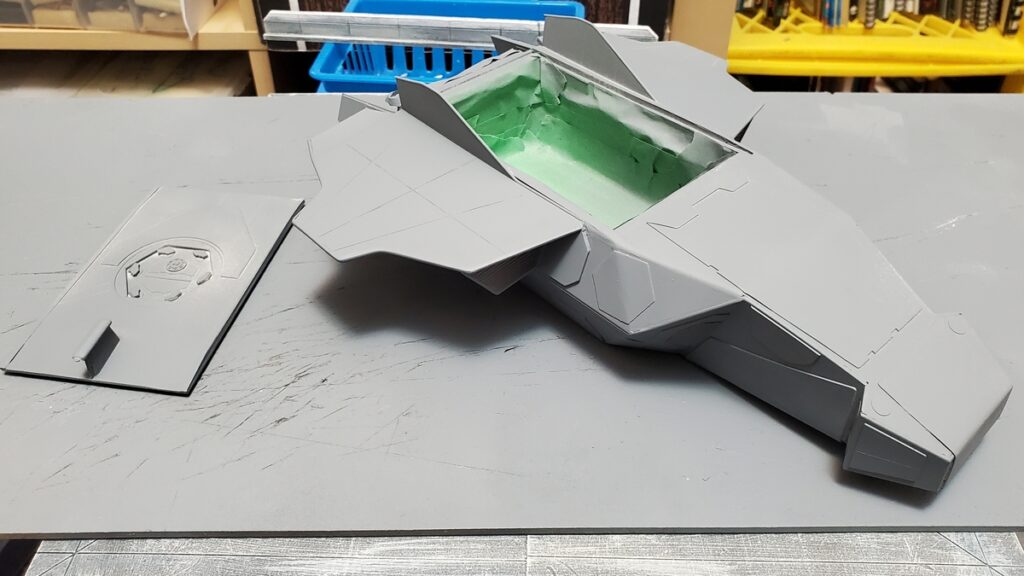
Primed and waiting for paint.Painted and marking lines done. Nice and simple, just a few minutes work over a couple of days. Painted wall piece off to the right.The mostly-complete shuttle posing on the finished landing pad.
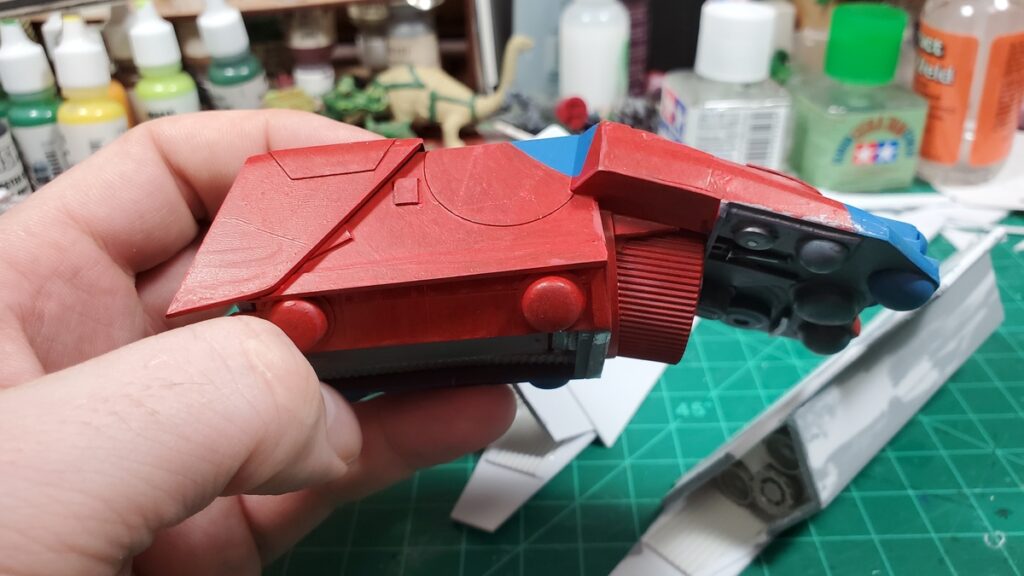
I’ve got a few final complete primered shuttle photos to show off soon, and after the Build Something Contest rules allow, I have a bunch of painting progress photos to post. The shuttle was a big painting project and painting took most of March and the first week of April!
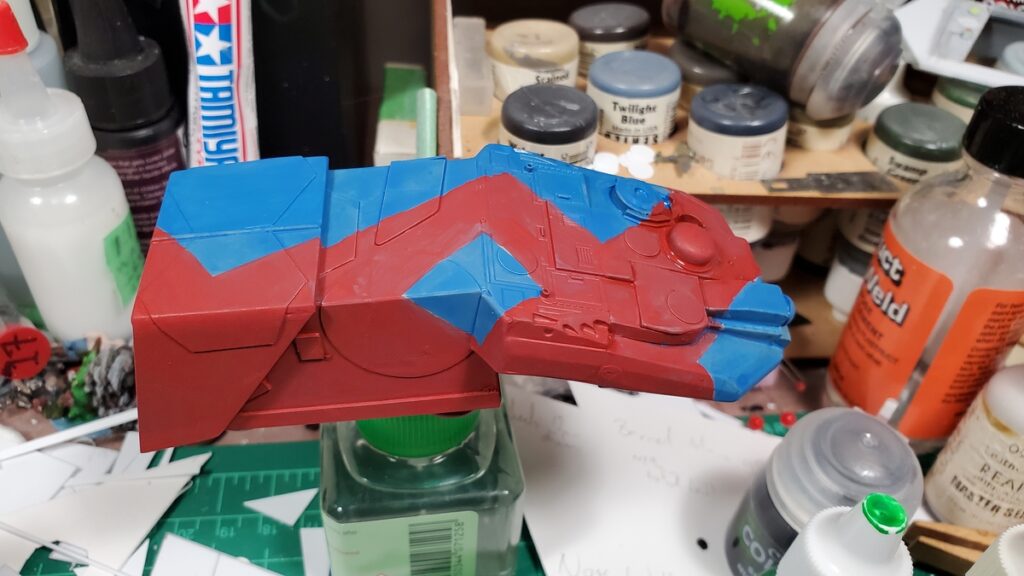
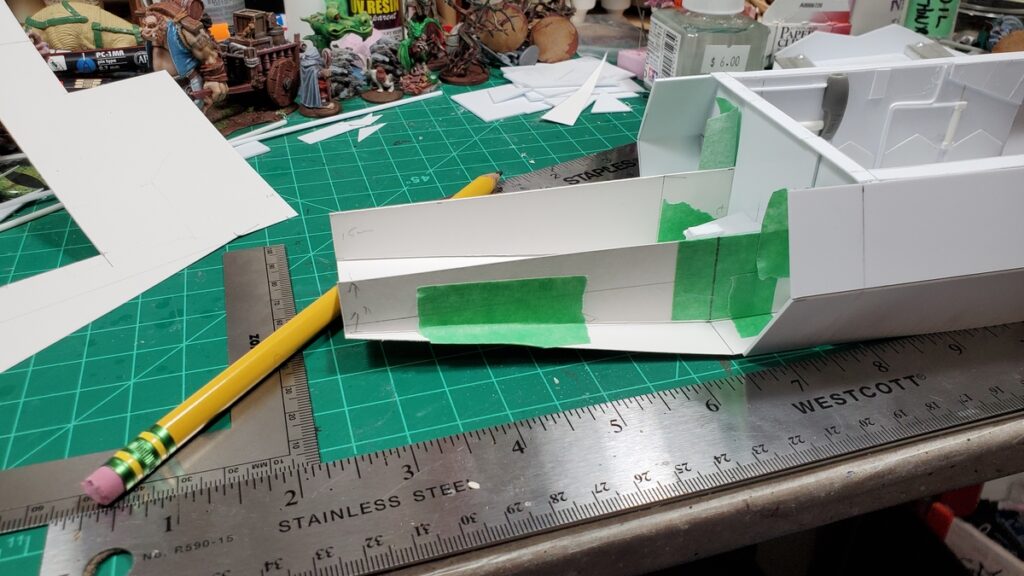
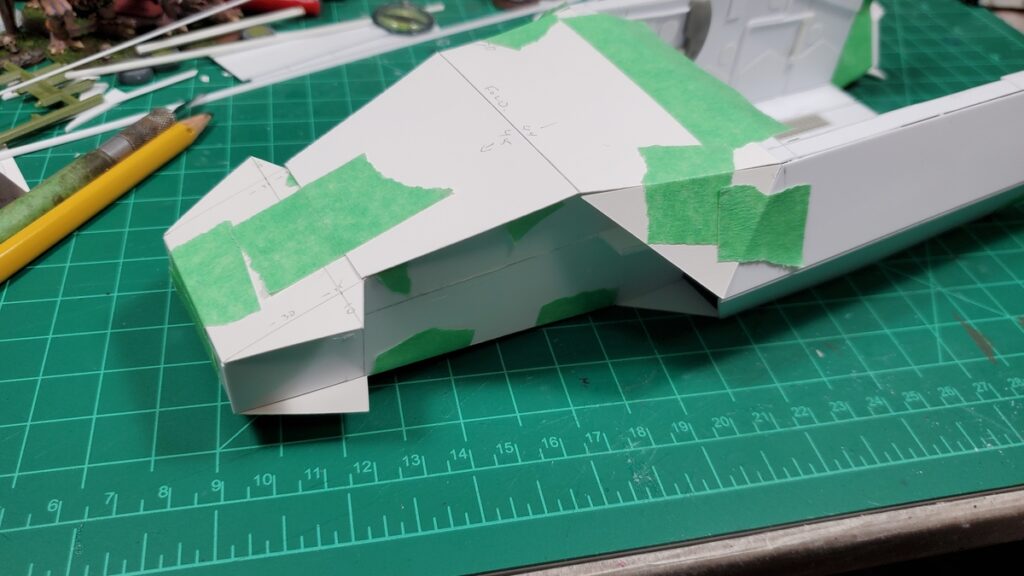
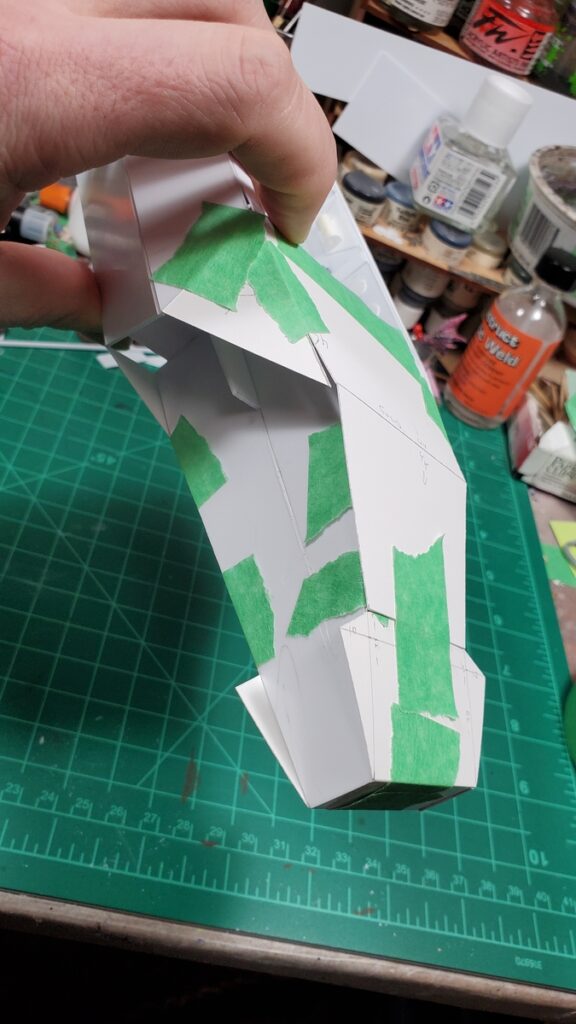
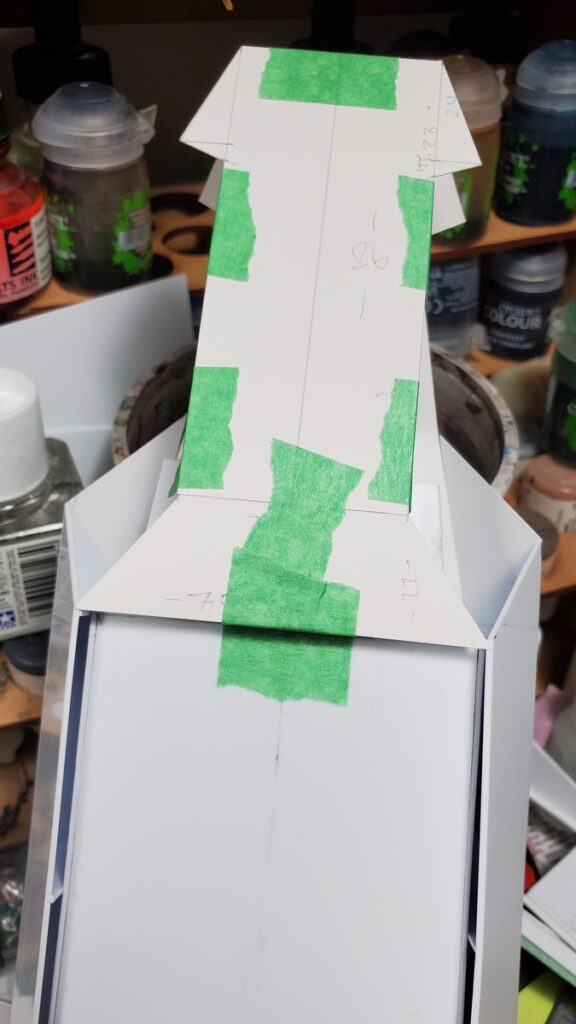
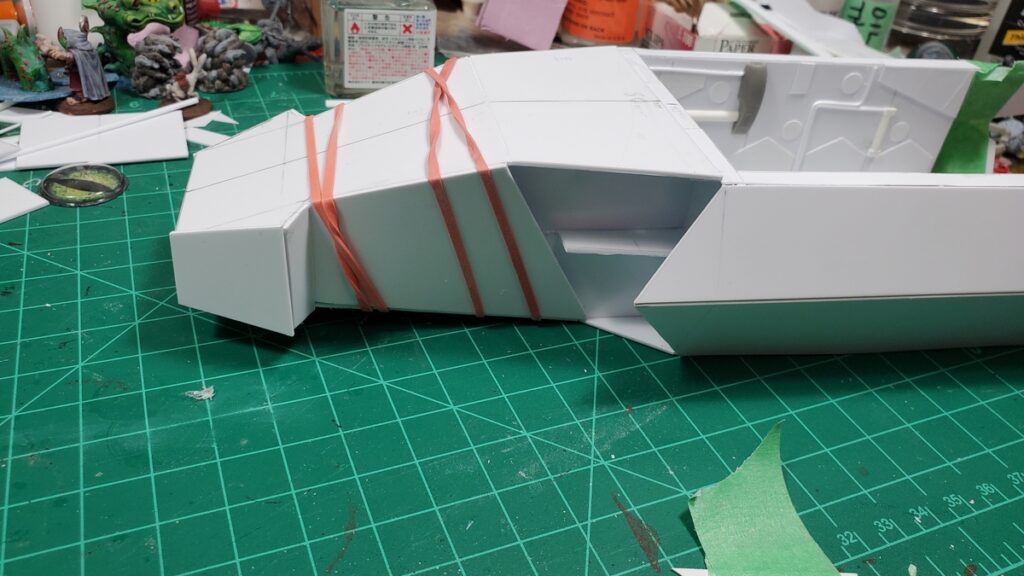
Decided to go with the nose next instead of the wings and engines, and as predicted in my last post, it required a lot of mockup work, in two stages.
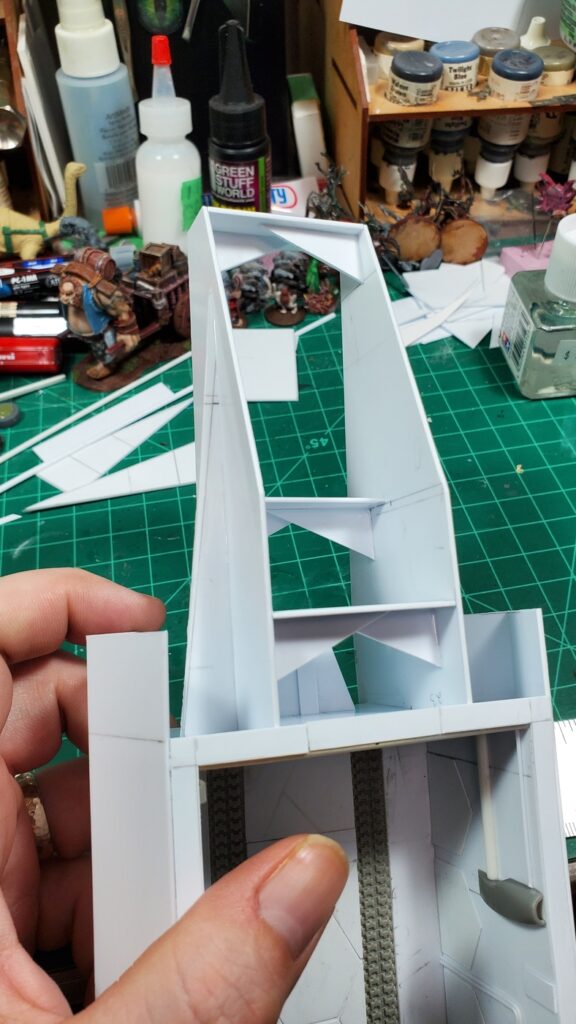
First, I did an internal frame to establish the basic proportions of the nose and give me a nice solid frame to hang the skin from.
I redid parts of the skin mockup three times, including scrapping round three for part of the sides and going back to round two’s ideas. The advantage of all of the fiddling with cardstock and masking tape, of course, is that I knew what I was doing (mostly) when I switched to 1mm sheet styrene and started the real thing.
I also cut back the outer (top/bottom) corners of the sides where they extended forward, and that was the right call, it made integrating the nose and sides easier.
The hammerhead nose was a spur of the moment idea while planning the first mockup piece and I really like how it’s come together; the hammerhead let me play with the angles and bulk of the nose area more than a more straightforward taper would have.
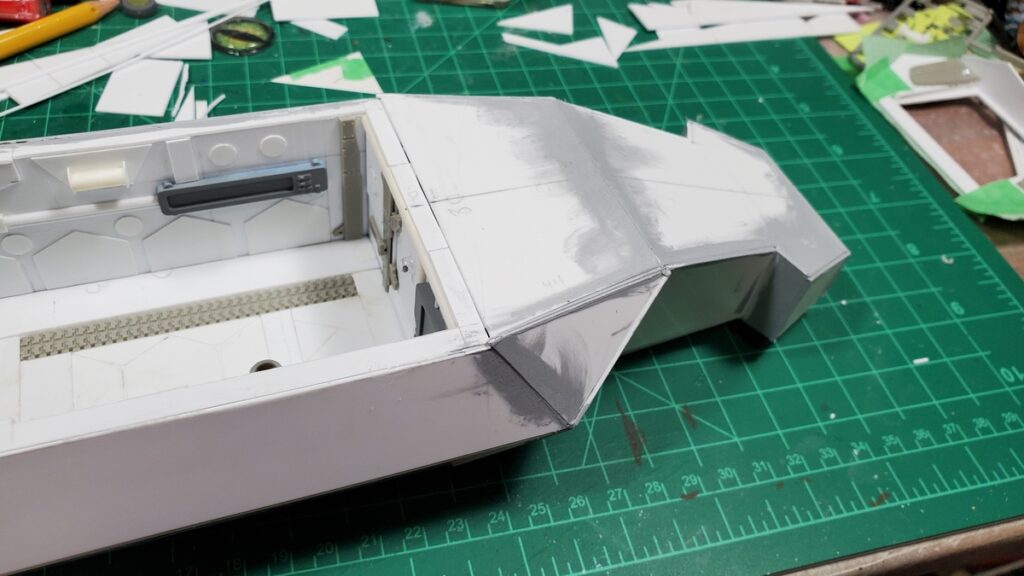
Mockup for the nose frame.Nose frame finished in 1mm styrene. I wound up cutting most of the long thin brace on the outer side off, but all the internal bracing gave me a nice solid, trouble-free start to doing the skin.Finished nose frame. The whole beast is just under 11 inches long, nose to back end, which is perfect.Closeup of the top left with skin mockups in progress.Nose skin mockup in progress, figuring out what to do between the hammerheads and the start of the body/sides.The underside of the nose, mockups in progress.Finally cutting styrene! The big panel behind the hammerheads has a twist to it, so it got anchored down with elastic bands and left for the plastic cement to cure for a bit.Styrene skin in place, sanding and puttying cleanup started. There is going to be a LOT of sanding.Current state of the nose, with putty smeared around a lot of the seams and sanding in progress.
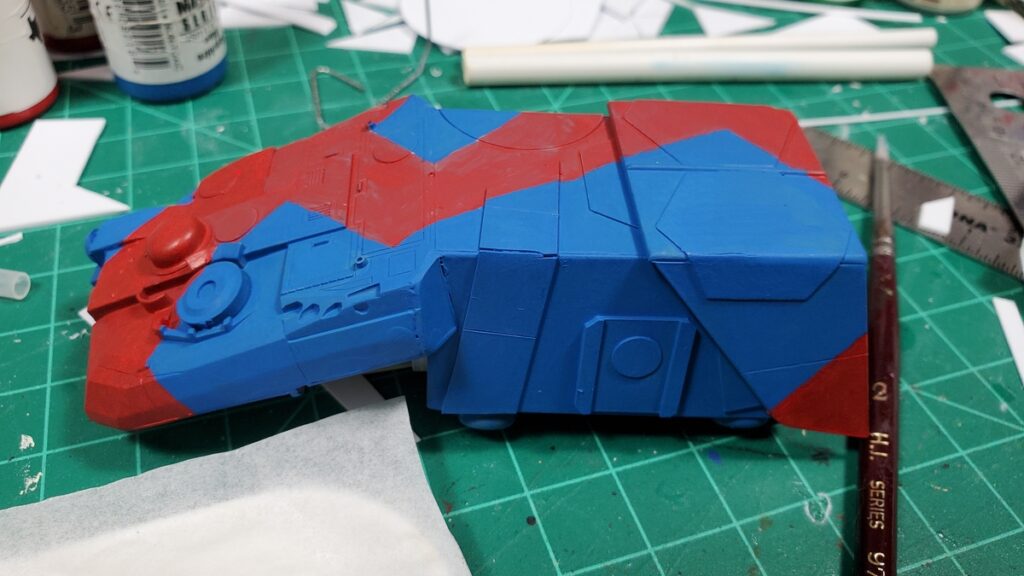
I really like how the whole thing is shaping up, it has a good bulky angular look to it. There’s going to be a round of detail panels over this initial skin, after the endless sanding and puttying is done – some of the seams didn’t come out quite as well fitted as I’d like, so there’s going to be some remediation before detailing can start!
Still to do, in rough order of size/complexity of the subassembly: the engine pods and wings; the roof for the cargo bay; landing gear and landing gear bay doors; skin on the belly.
I’m away this coming long weekend and have some things to get organized before we go away for the long weekend, and as mentioned, the next while is likely to be mostly sanding, so it might be ten days or so before there’s another blog-worthy update to this project!
My Build Something Contest 2025 thread on LAF is here; the rest of the contest has some very cool entries – there’s another couple of shuttles or dropships, some neat magical walking constructs, and a bunch of other cool concepts among the other contestants! Entries just closed on February 8th so everyone who’s in for this year is in!
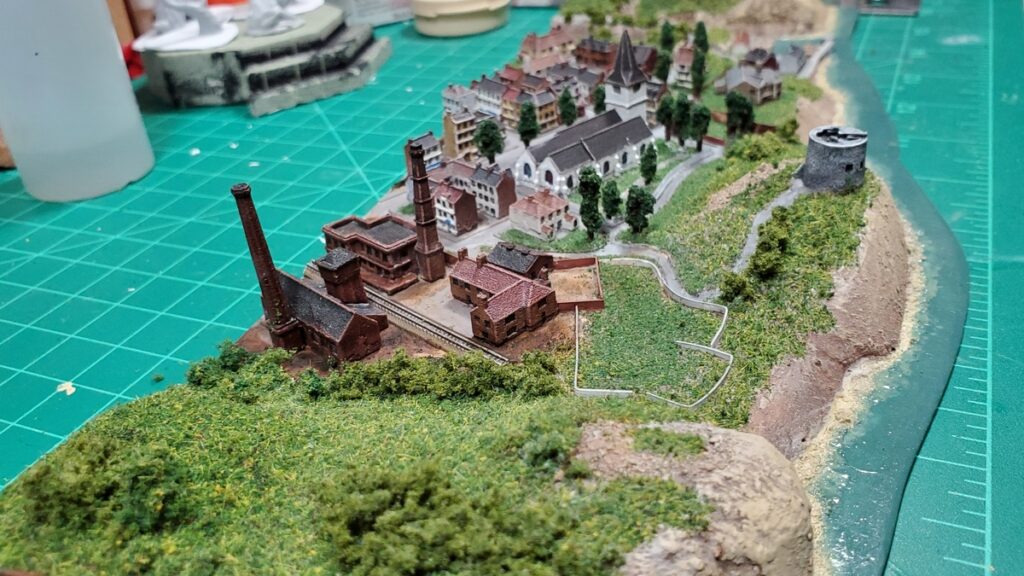
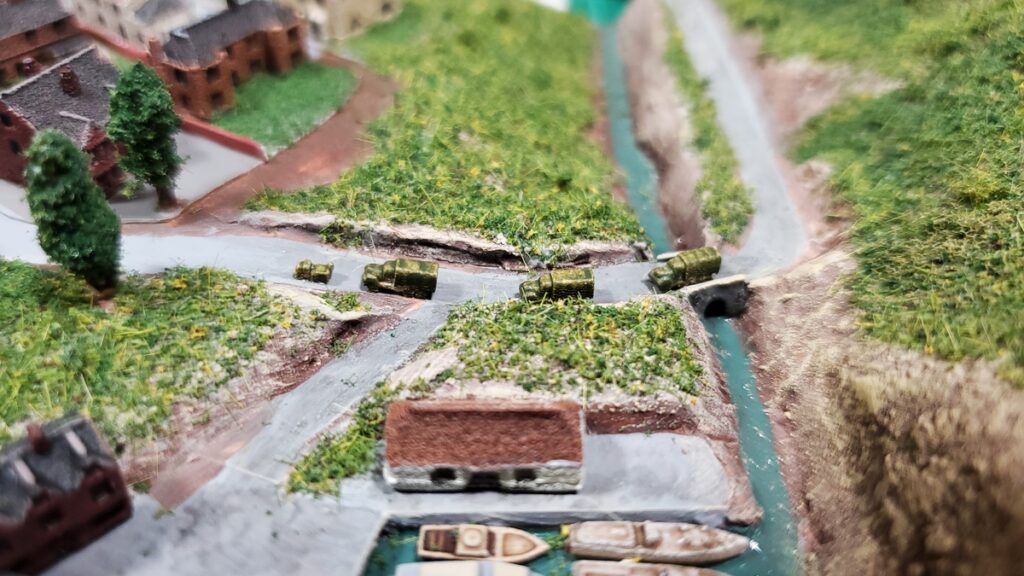
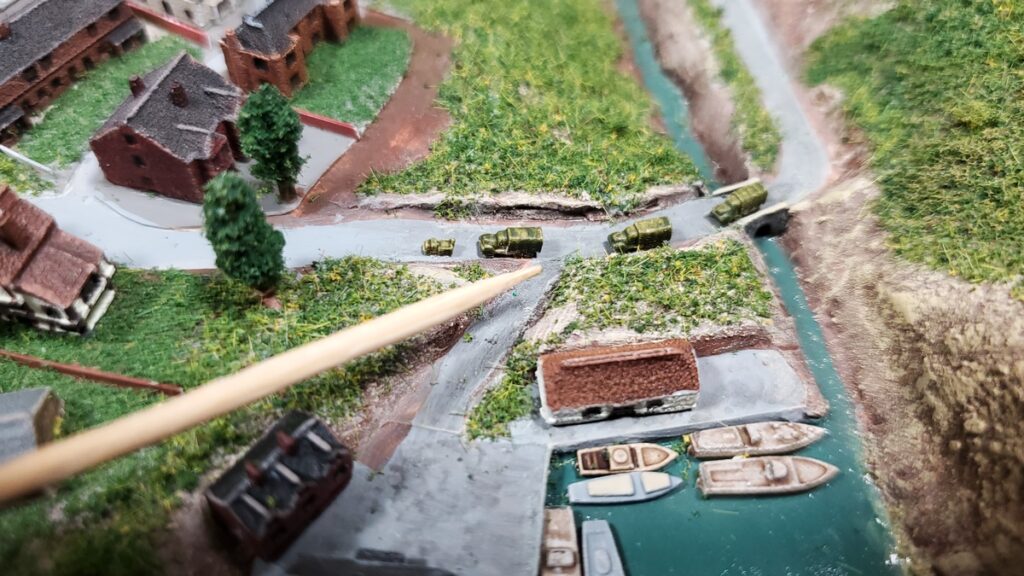
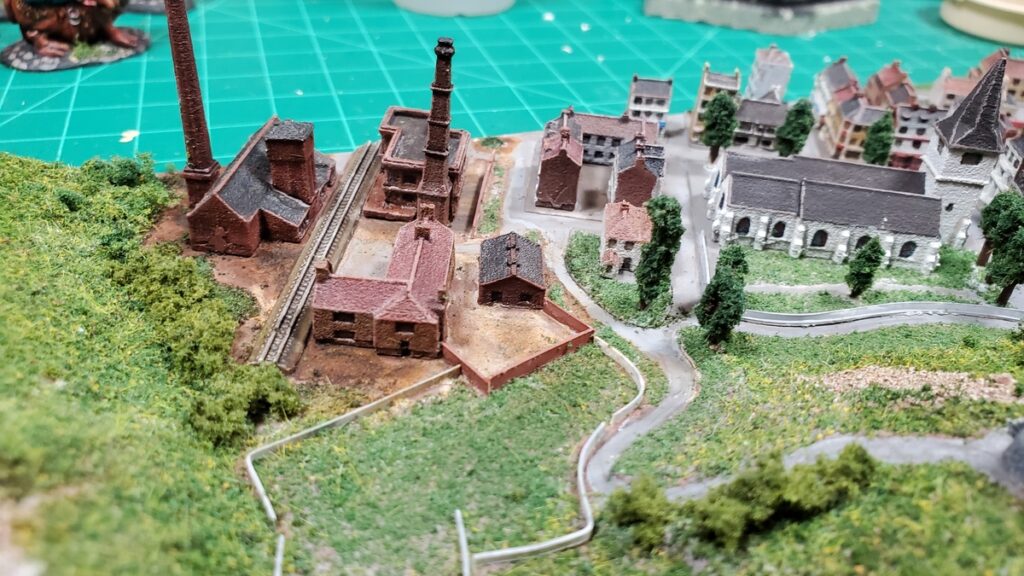
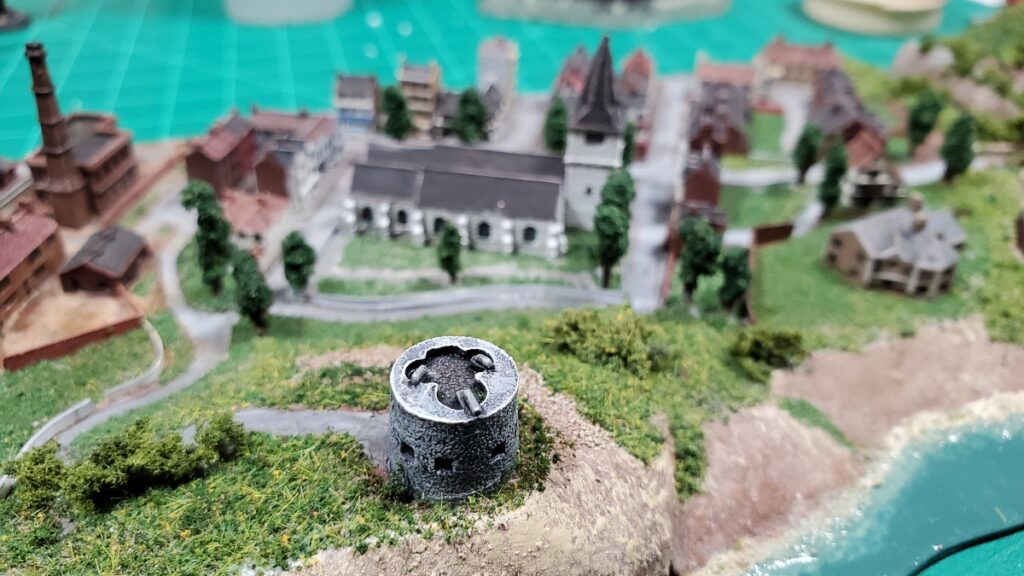
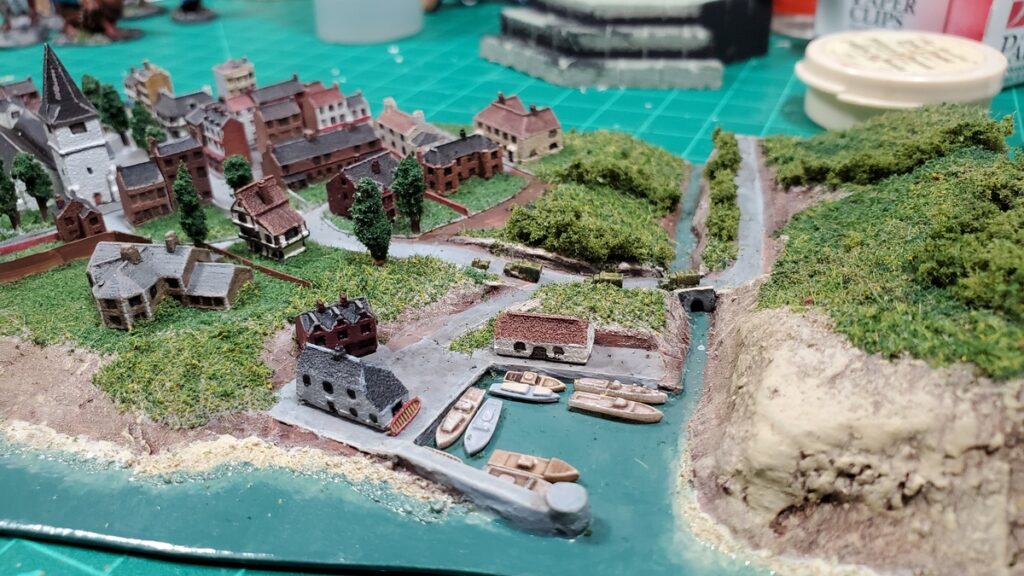
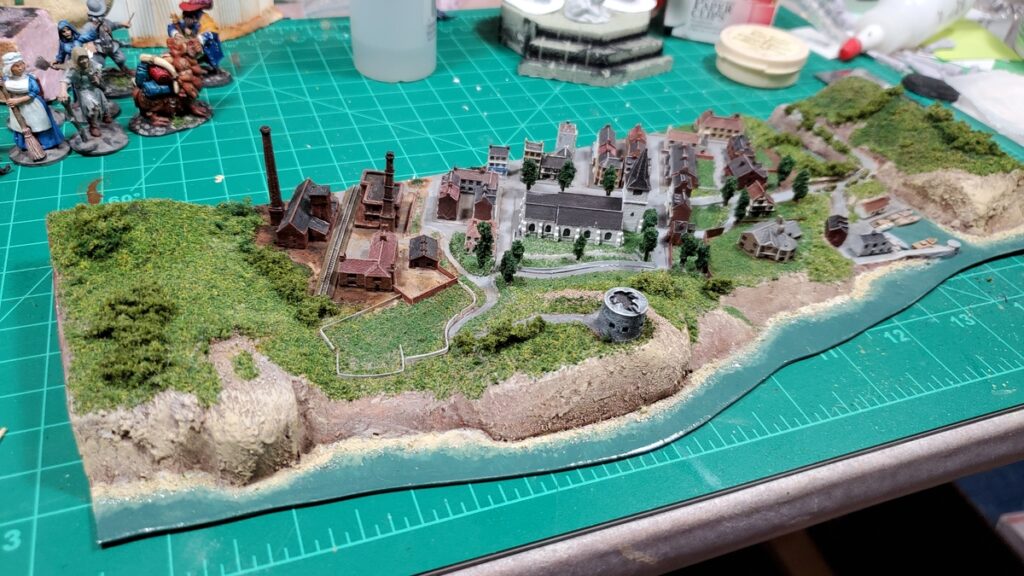
I’ve finally finished another module for my 1/1200 scale coastal naval terrain. This is another 12″ long by 4″ deep piece with part of a reasonable size town on it, and has been sitting around for two years or possibly a bit longer, so it’s nice to get it finished and out of the way!
New coast module from one end, looking into the industrial part of town toward the church. Click for larger.
The other end, looking into the harbour & bridge and down the main street. The breakwater is a bit of sprue from plastic figures, which got me that nice round end and curve. Click for larger.
The construction is my standard setup, written about previously (see other related posts at the bottom or my naval scenery summary post) with a base of 1mm styrene sheet, a mix of materials for the basic ground forms, and a lot of different flocks for ground cover.
The Shapeways trucks, a small military convoy driving into town.With a toothpick for scale.
The one thing I might still add is some more of the marvelous Shapeways vehicles here and there…
Left end, looking from seaward, mostly industrial.The centre, looking over the old Martello tower toward the church and centre of town.The harbour, stream, and bridge end.The whole module from seaward.
I don’t have any immediate plans for more coastal modules… but I do have a lot more buildings and vehicles to put to use, and I was thinking that a coastal gun battery would be an interesting addition – the British coastal batteries seem to have had a pretty quiet war, mostly engaging aircraft, but the Allies reported regular engagements with German batteries especially along the occupied French coast… so maybe a half-length 6″ module with a bit of a headland, some gun pits, and a couple bunkers? We shall see…
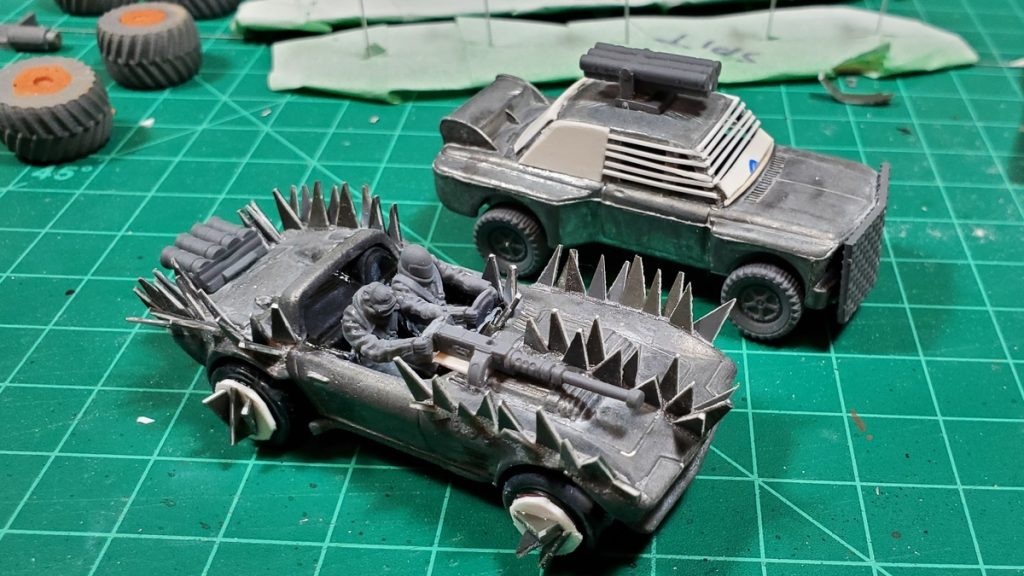
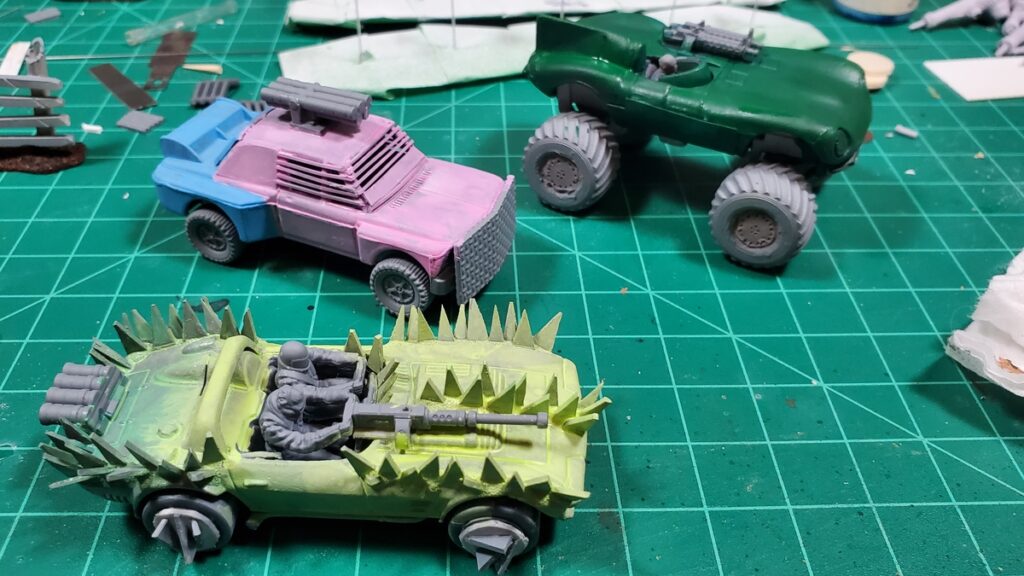
We played a lot of Gaslands in 2020/2021 when COVID restrictions meant we couldn’t game in person, because Gaslands is fairly simple to organize overwebcam, and we kind of burned out on it.
Then we took Gaslands to Trumpeter Salute 2023 back in April, because it’s also really easy to set up pickup games for, and our pair of great chaotic games re-ignited our interest!
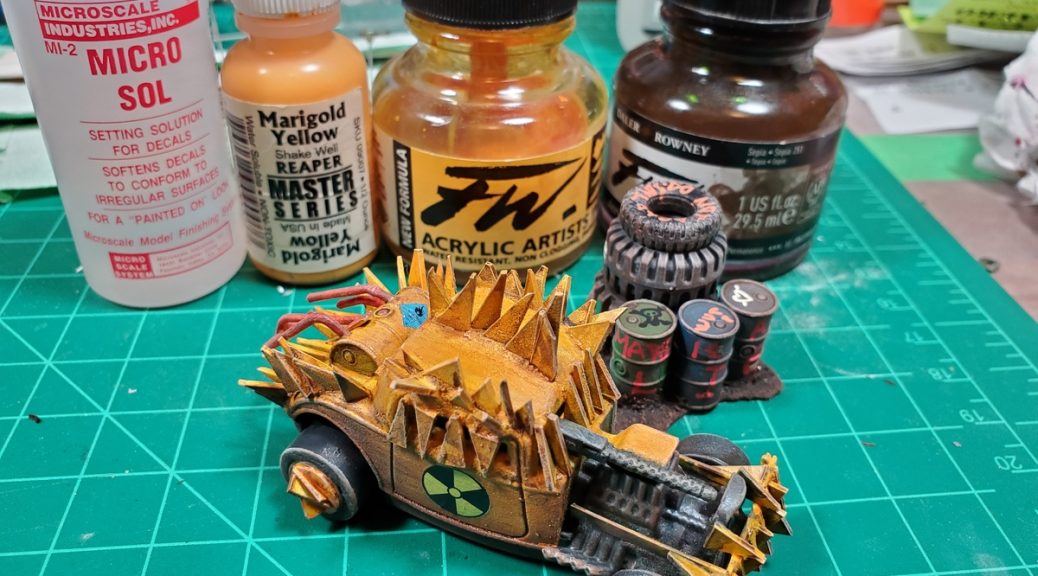
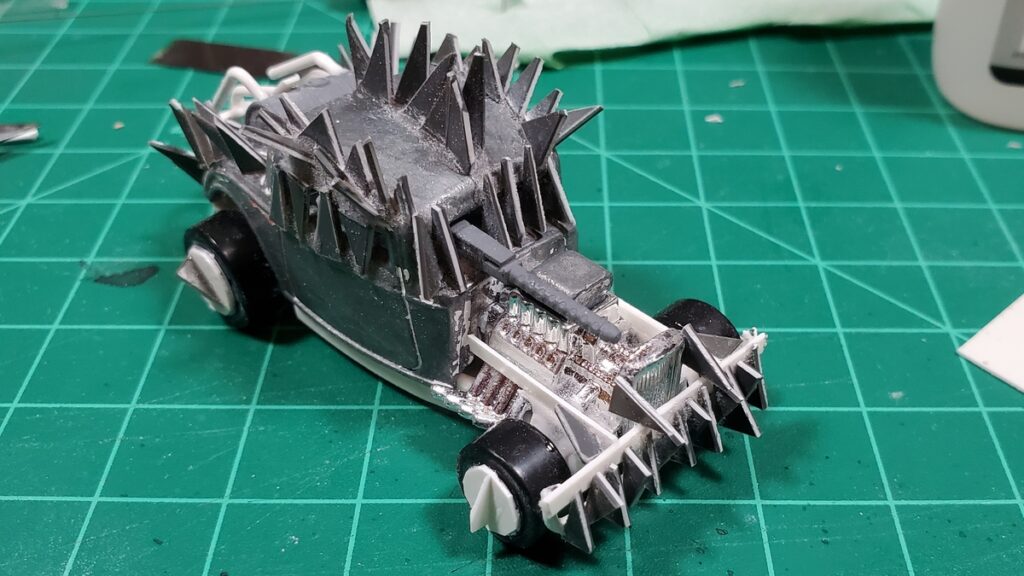
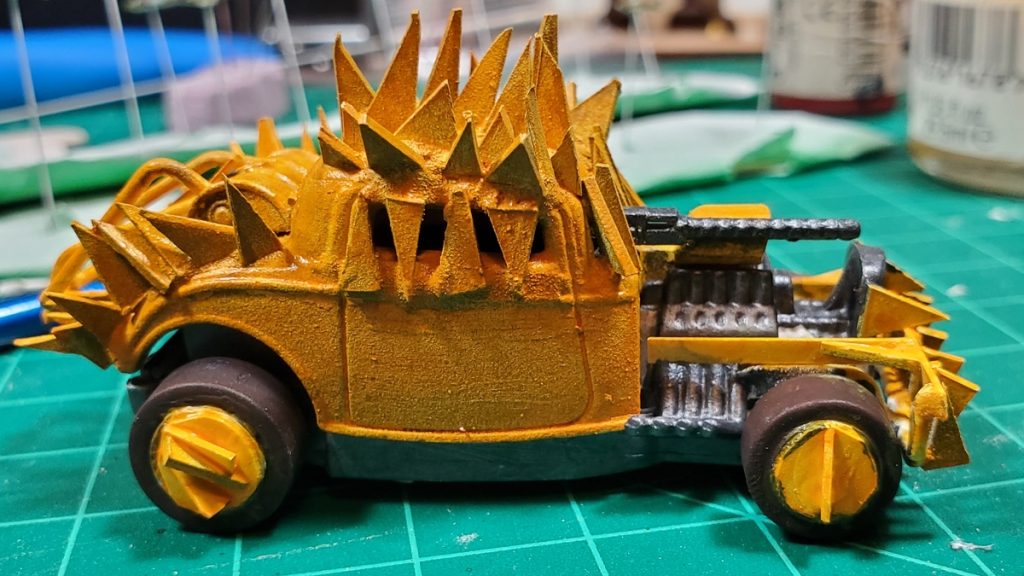
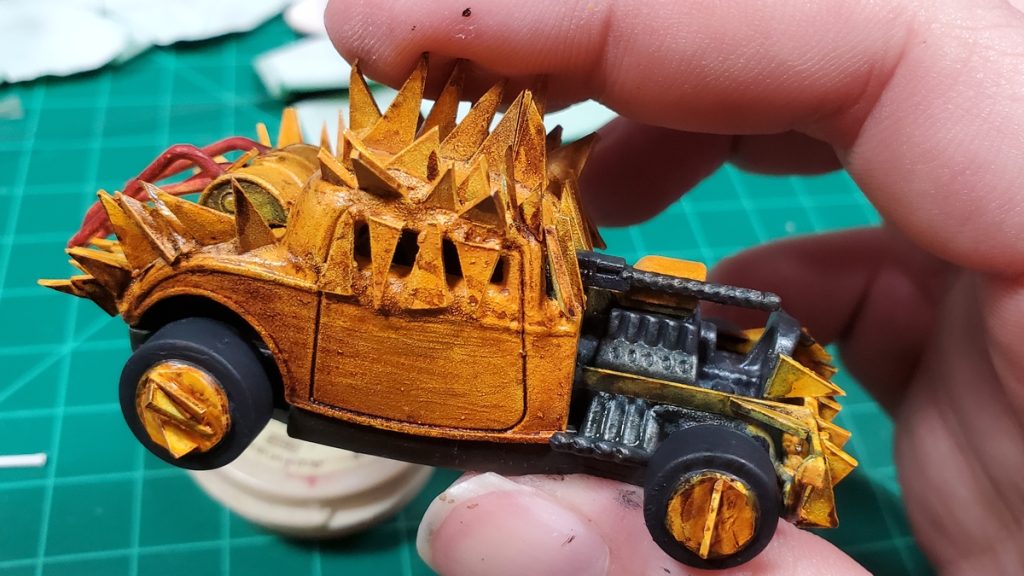
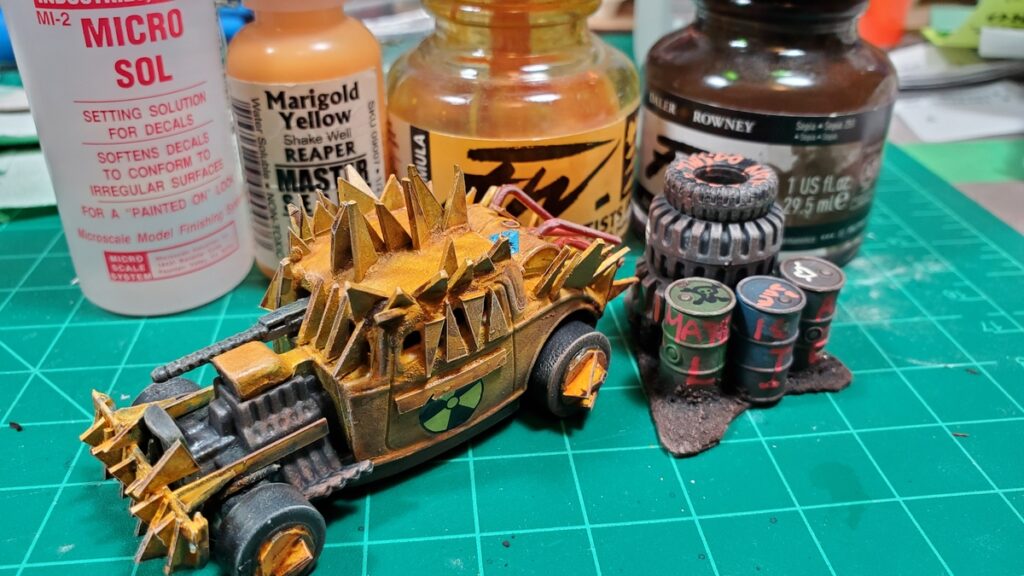
I’ve cranked through a trio of new cars since Salute, and then moved onto a new set of three cars. Two of the first set had been partially converted back in 2020/2021 and then neglected (and apparently I took no photos of them…) and the ’34 Ford hotrod was a new purchase while we were in Vancouver for Trumpeter.
’34 Ford hotrod being Gaslanded.Spikes!Yellow basecoat – paint was Reaper’s Hearth Fire with FW Acrylic Ink Indian Yellow over that.Weathering – mostly FW Acrylic Ink Sepia.Rad symbol wet transfer on the door, just for fun.The right hand side of the critter.’34 Ford conversion.
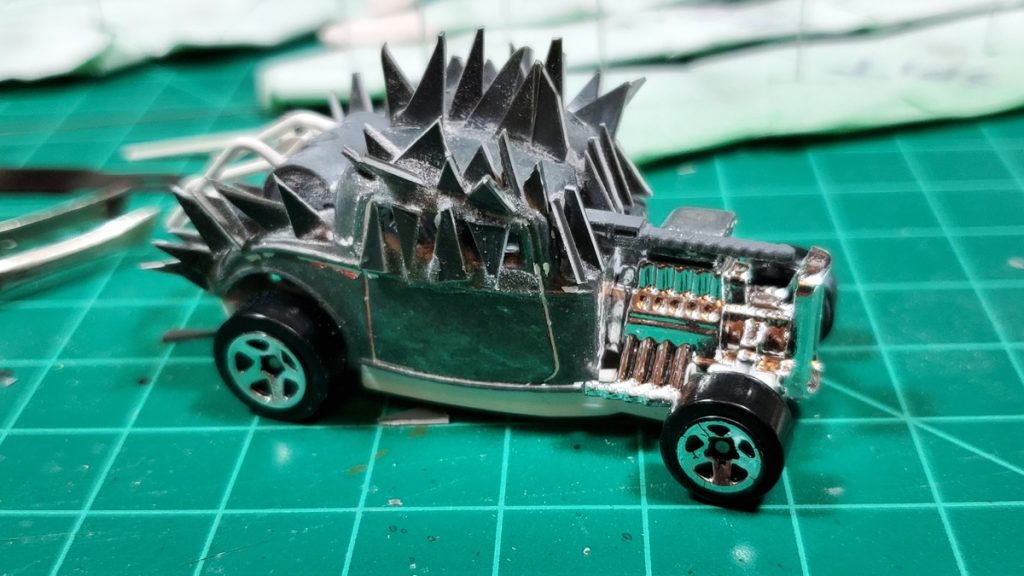
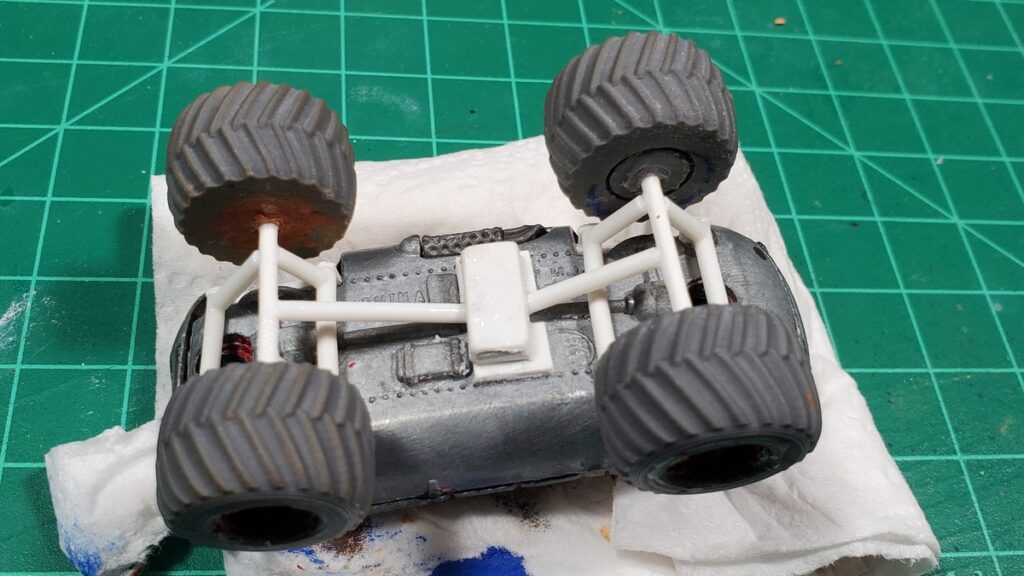
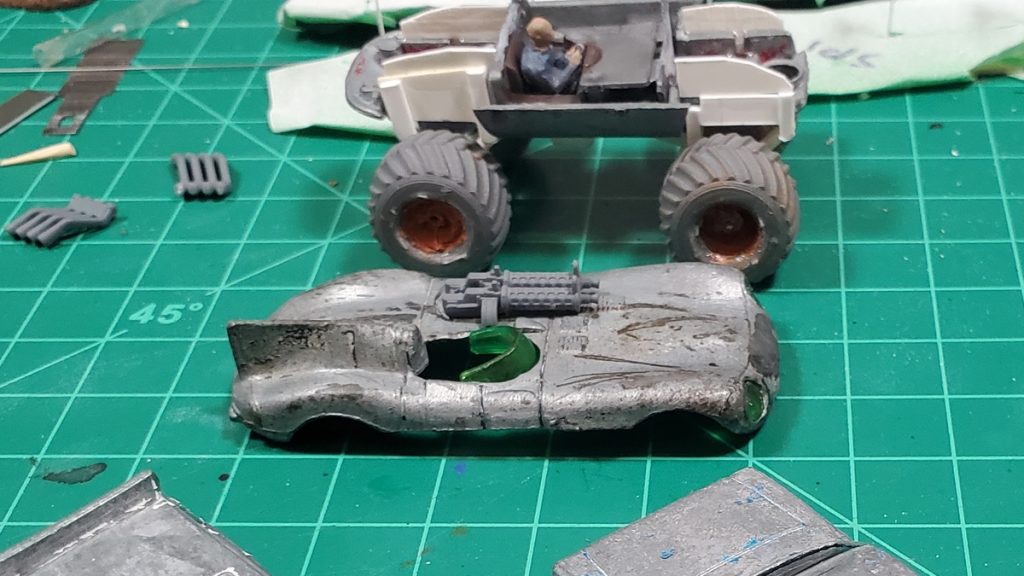
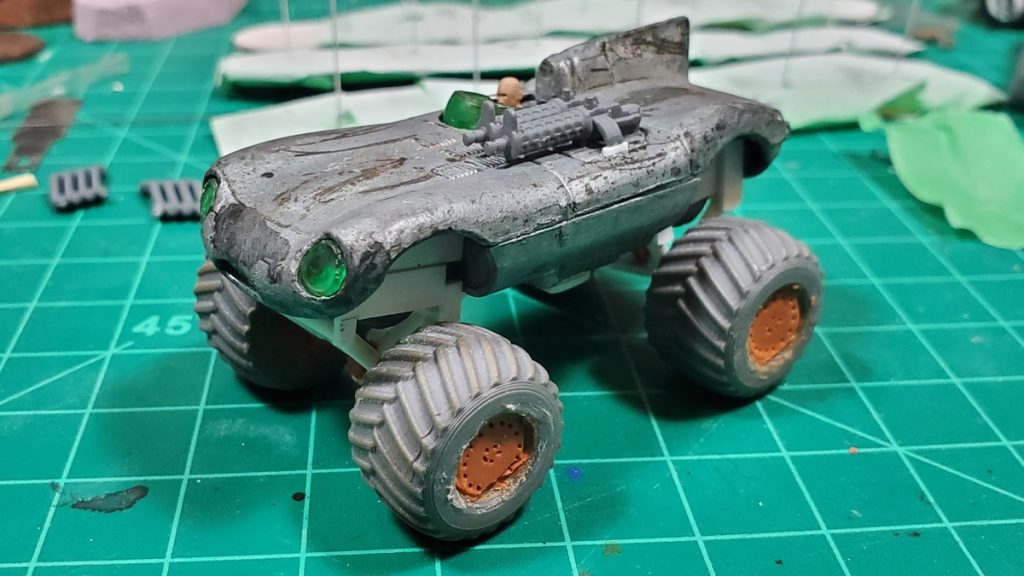
The second trio of cars include another sports car all spiked up, a rally car up-armoured, and a Jaguar D-type converted into a monster truck. The Jag was the most complex conversion I’ve done for Gaslands yet, and started with a set of 3d printed monster truck wheels.
Conversion finished on the rocket rally car and spiked sports car.Underside of the Jag D Type monster truck.Monster truck suspension under the D Type.The D Type in progress.Assembled, just missing the armoured panels on the sides.Paint started!The second batch – spiked sports car, rocket rally car, and the Monster D-type.
The basecoats are coming along nicely. The Jag is starting as British Racing Green, the spiked sports car is a gloriously weird yellow/green that Reaper calls Dungeon Slime, and the rocket rally car seems to have gotten trans pride colours, because why the hell not? Lots of weathering to do still, of course!
These three done will give me eight or so cars, a buggy, and three bikes for Gaslands just in my own collection. I have ideas for a heavy truck conversion starting with mashing together two big American 60s/70s Yank tanks, but I think I’ll switch gears slightly after this trio is done.
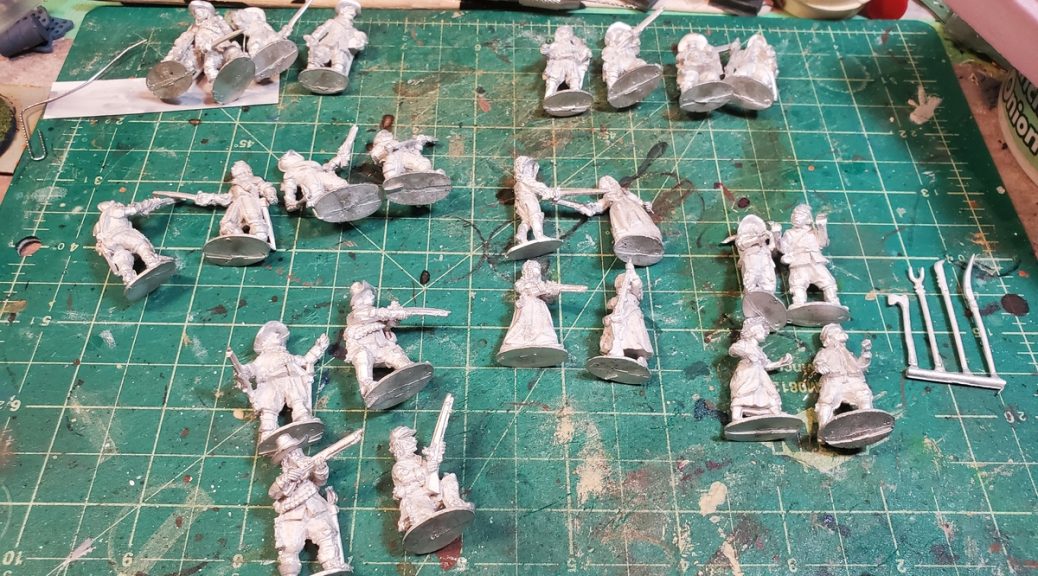
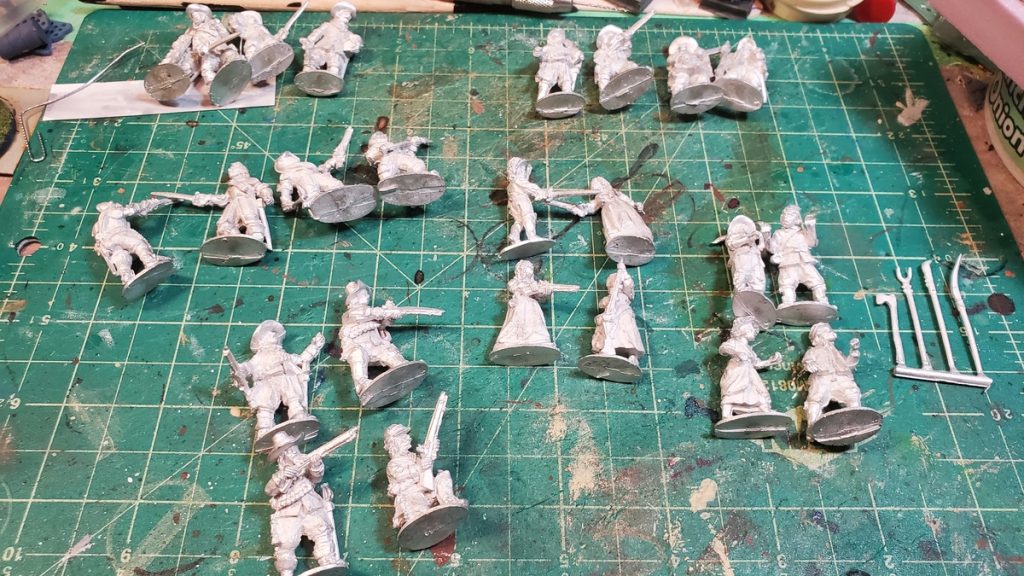
I swear Bloody Miniatures chose their company name just so wargamer’s spouses could say that when the lovely figures show up! Thankfully they really are lovely figures, and if they amuse my wife too, then that’s a bonus.
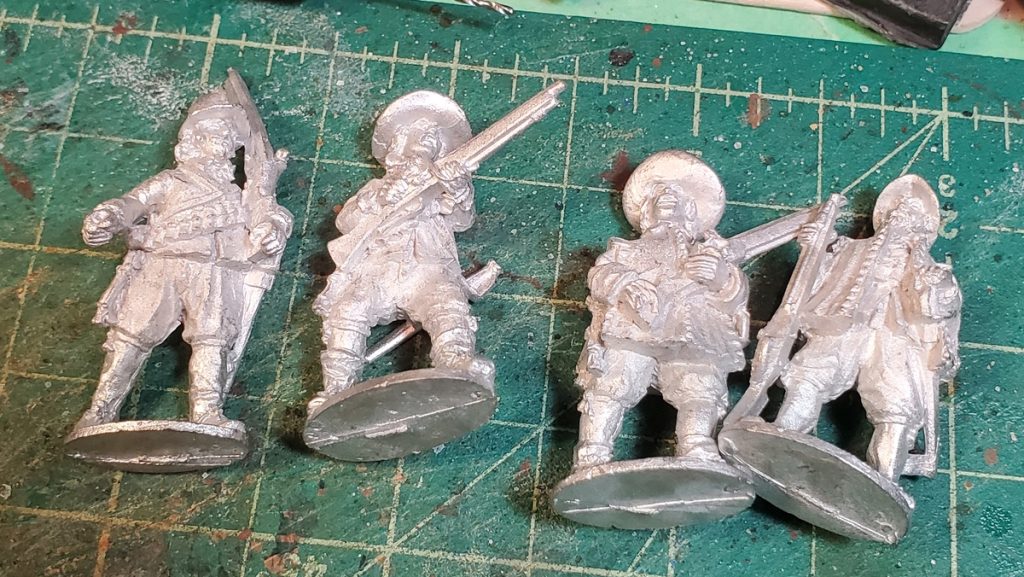
Six packs of Bloody Miniatures – all of their Wave 4 Chorus of Disapproval and two packs from earlier releases.
A few weeks ago I ordered the whole of BM’s Wave 4, A Chorus of Disapproval, plus a couple of individual packs from Waves 2 and 3. They showed up this afternoon and I had to snap a few quick photos to show them off.
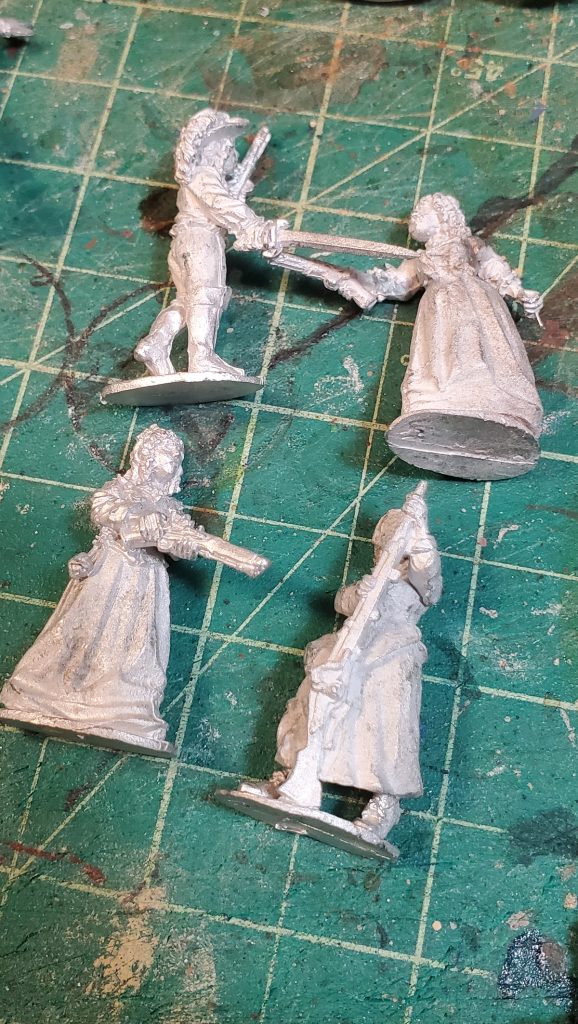
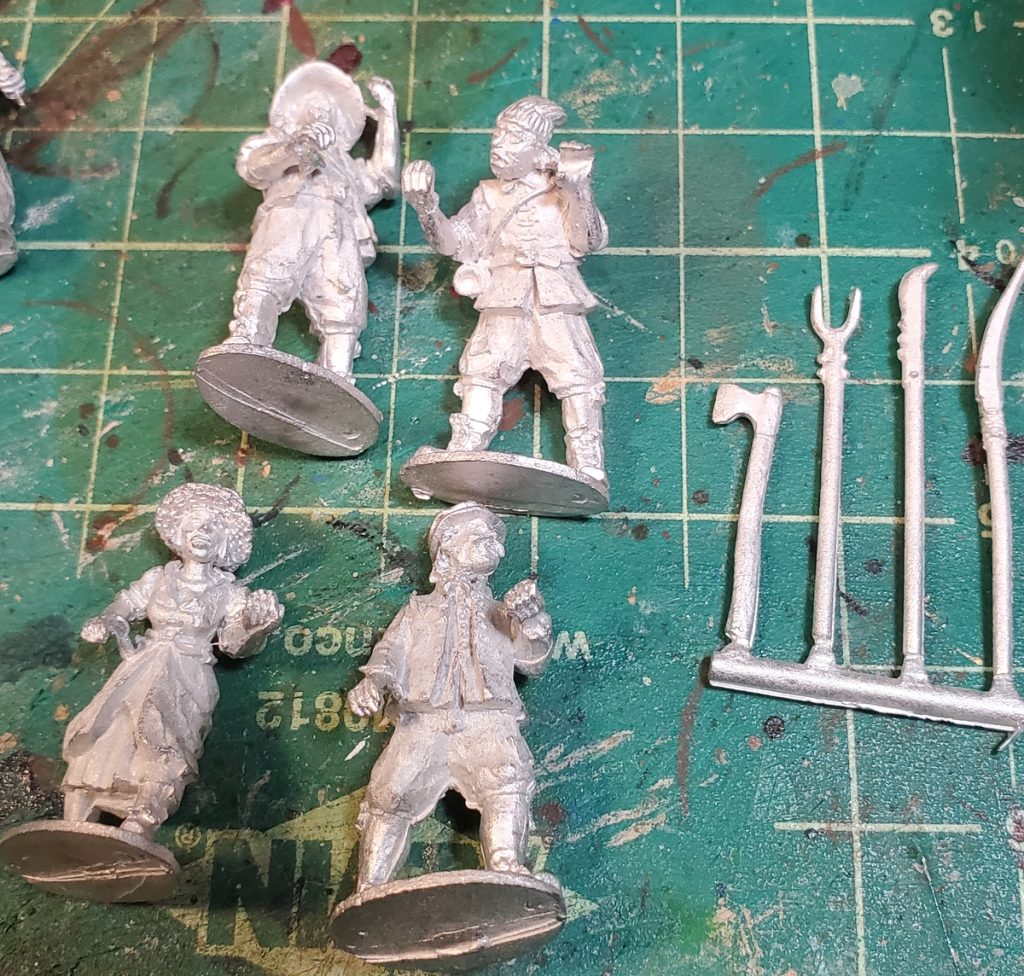
Wave 4 included the only armed female figures for the 17th Century that I’m aware of, which is awesome. There’s also a quartet of scouting dragoons skulking along, four armoured currassier on foot from the other end of the mounted troop spectrum, and finally four ordinary villagers with improvised weapons – axes and agricultural implements.
I also picked up a pack of sentries, and four looters hauling off their ill-gotten gains. Excellent character packs that I’m sure will show up in scenarios eventually! See the gallery below for some quick closeups of all six packs, straight from the box with zero cleanup.
Bloody Miniatures Gallant LadiesBloody Miniatures Night Watch sentriesBM Flying Piquets skulking dragoonsBM Unhorsed CurrassierBM LootersBM Village People armed civilians
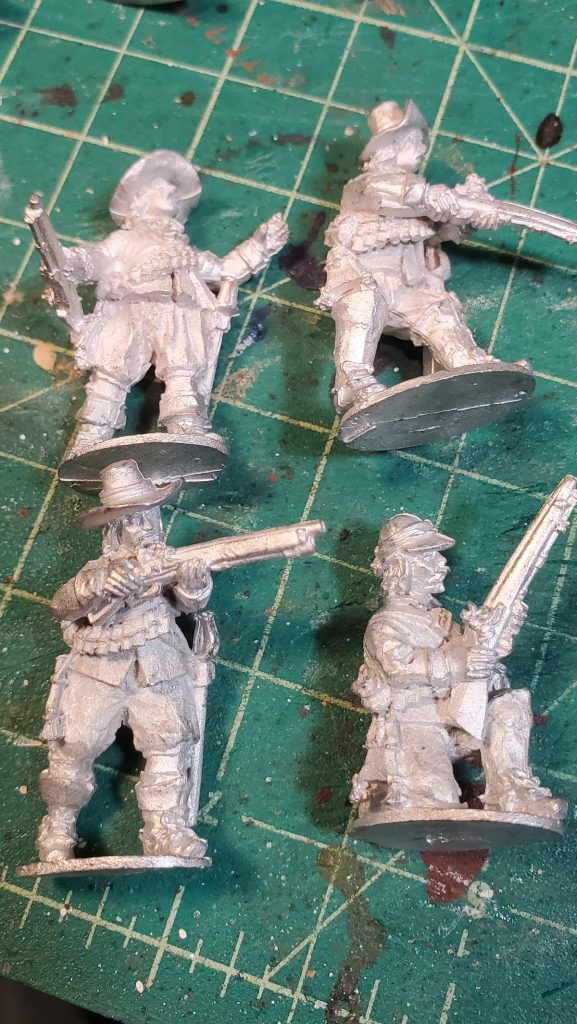
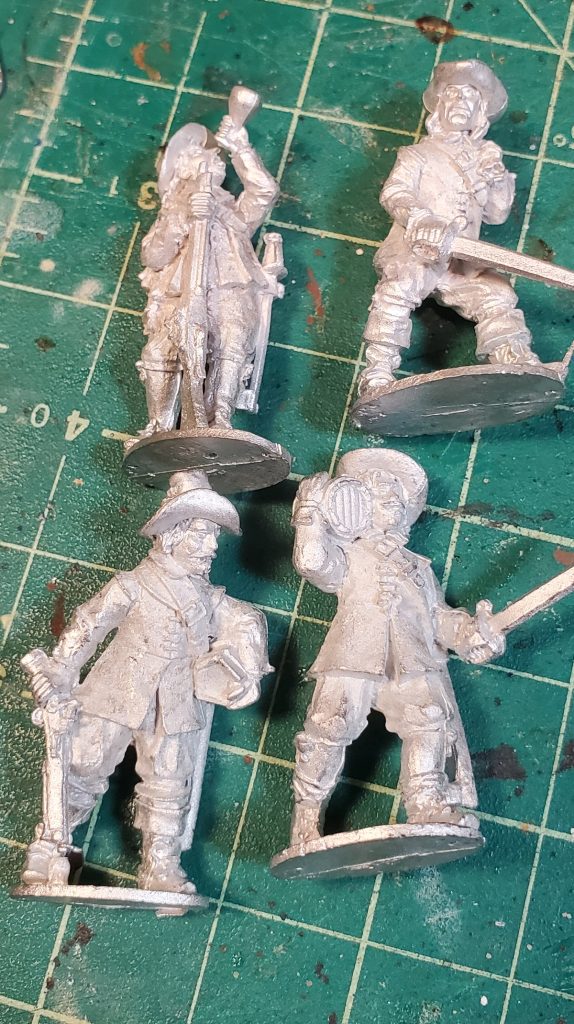
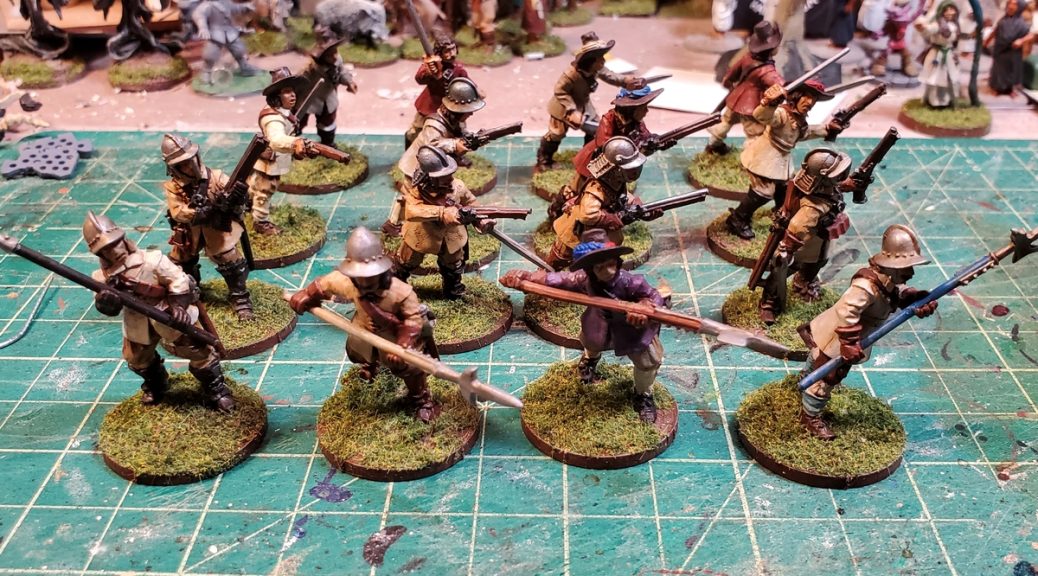
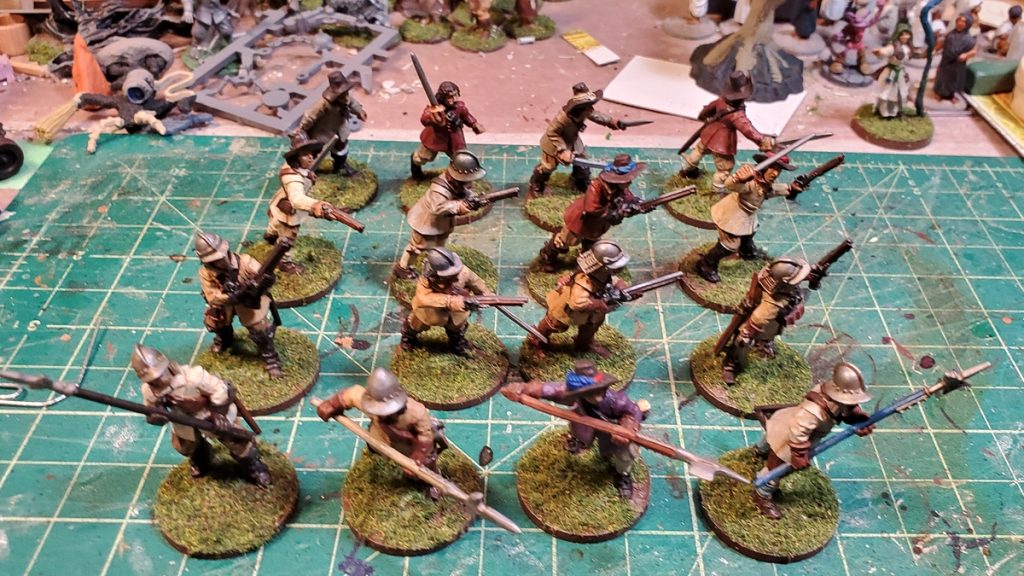
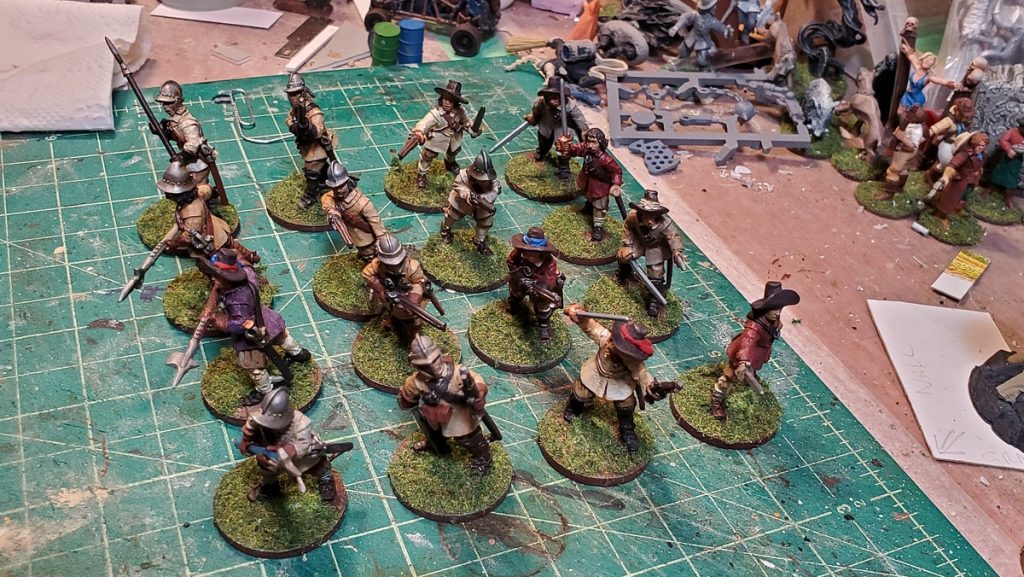
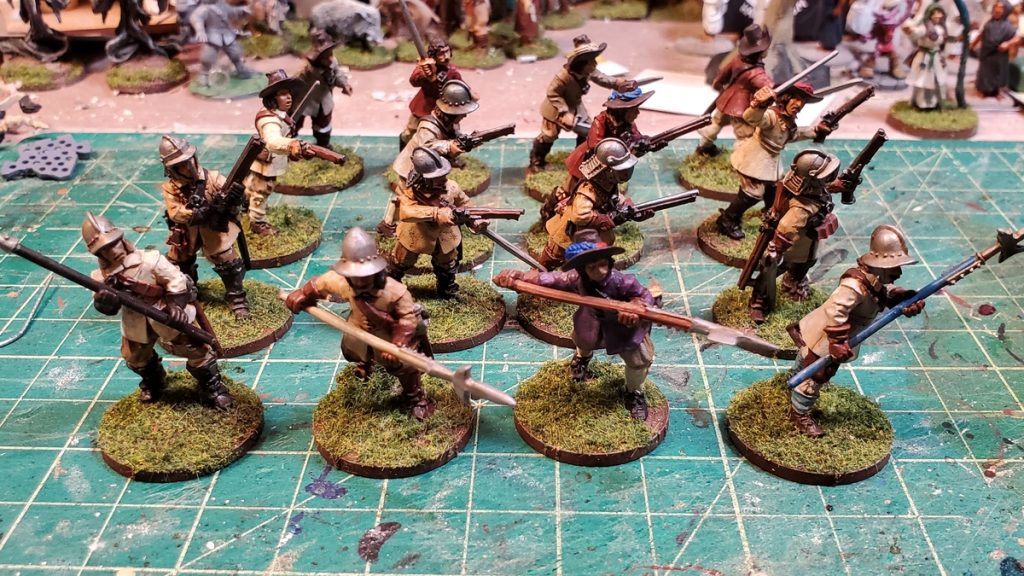
Finally finished the sixteen English Civil War 28mm figures from Bloody Miniatures’ Release 1, The Company of Wolves. I did mine up a bit plainer than the painted examples on the company website, modelling them mostly after some of the county/semi-rural troops from the ECW with mostly plain grey/white jackets (unbleached, undyed wool cloth) or buff coats.
I ordered these back in March 2021 when these sixteen figures were the entirety of BM’s offerings; Releases 2 and 3 are now out, each sixteen figures in four packs of four, and Release 4 is due out sometime soon (September 2022, likely) and includes their first armed female figures!
The Company of Wolves has four figures with polearms, four dismounted cavalrymen, four pistoleers, and four with sword or sword & dagger. Scale-wise they’ve been deliberately designed to fit alongside Warlord, TAG, and Bicorne’s existing ECW figures and they do that very nicely.
Sculpting and casting are very clean, minimal mold lines or flash and no slipped molds or other casting errors.
Although I’d call my paint job workmanlike and table-ready rather than inspired, these are lovely figures, each one an individual with good levels of detail.
One thing that deserves special mention is how well the polearms fit into the open hands of their figures – open hands and weapon options are often a source of frustration and more of a nuisance than they’re worth with metal figures (and sometimes even with plastics!) but these four (sold as The Forlorn Hope) all fit their weapons and hands together amazingly well. No weird gaps around the hands/weapon hafts, no serious issues fitting them in place, and they look good without need gaps filled with greenstuff or other serious intervention! Nicely done to BM’s sculptor and caster on that front!
I’m really looking forward to the upcoming Release 4 mostly for the armed ladies, which basically nobody else makes for 17th C gaming, but I’ll be getting the full set of sixteen as everything Bloody Miniatures has done is well worth it. I will likely even go back and order their previous releases, even though I have more than enough ECW/TYW character figures for skirmish gaming!
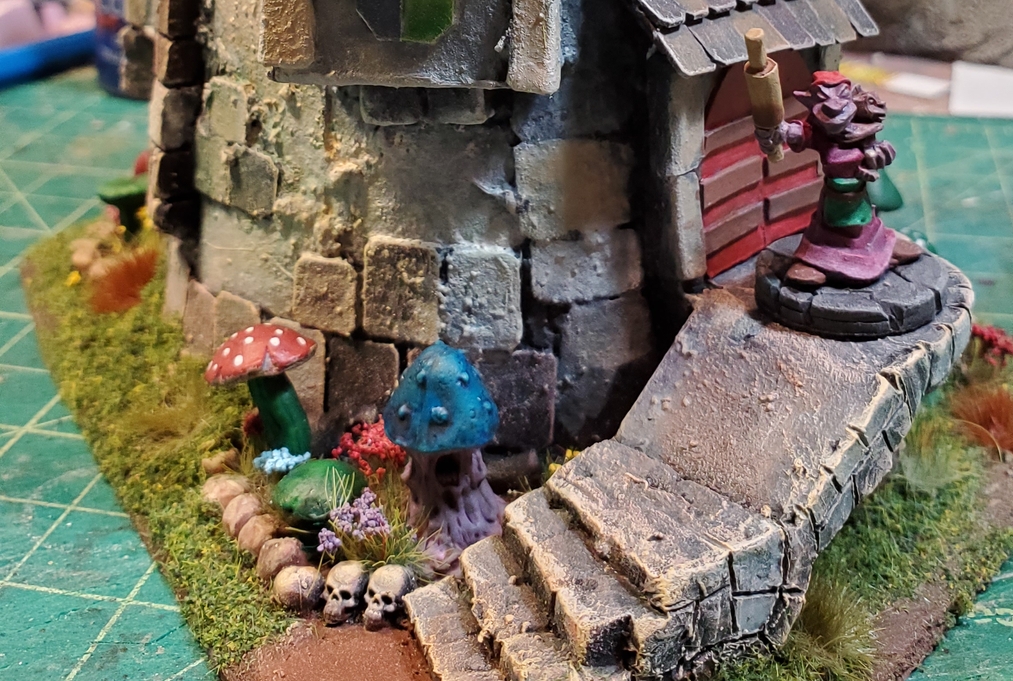
A few days into January I had a fall that destroyed my glasses and injured my shoulder, both of which combined to cut down the amount of time I was able to spend on the computer. The upside of this, as I still needed something to do, was that I started a random construction project and completed it in about three weeks. (glasses have been replaced and shoulder is nicely on the mend, too)
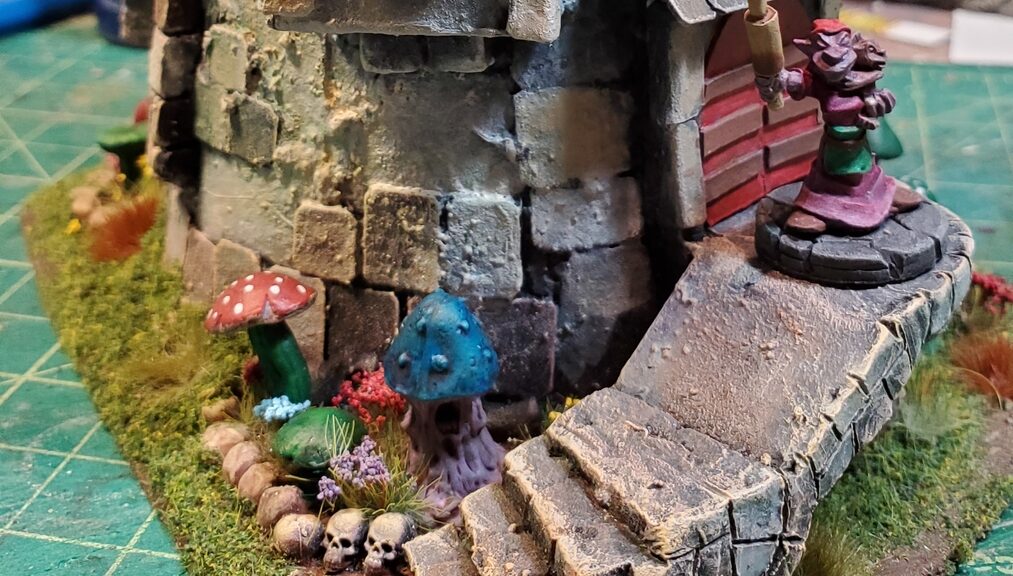
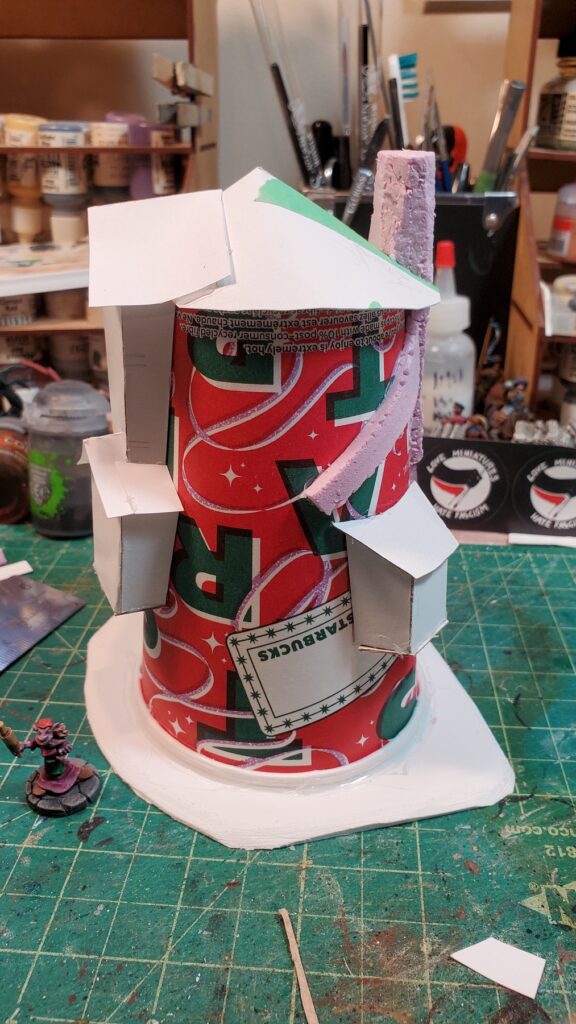
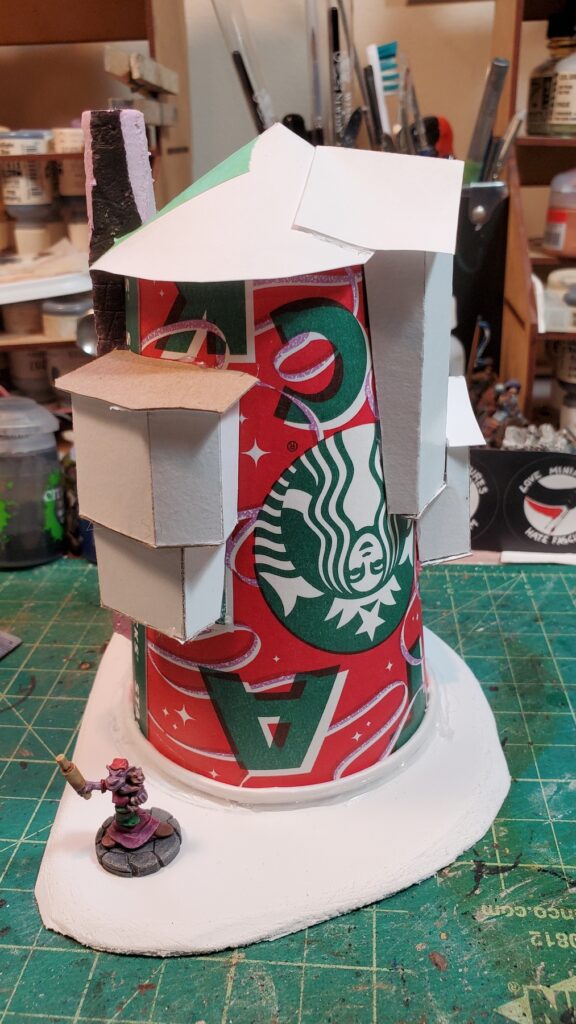
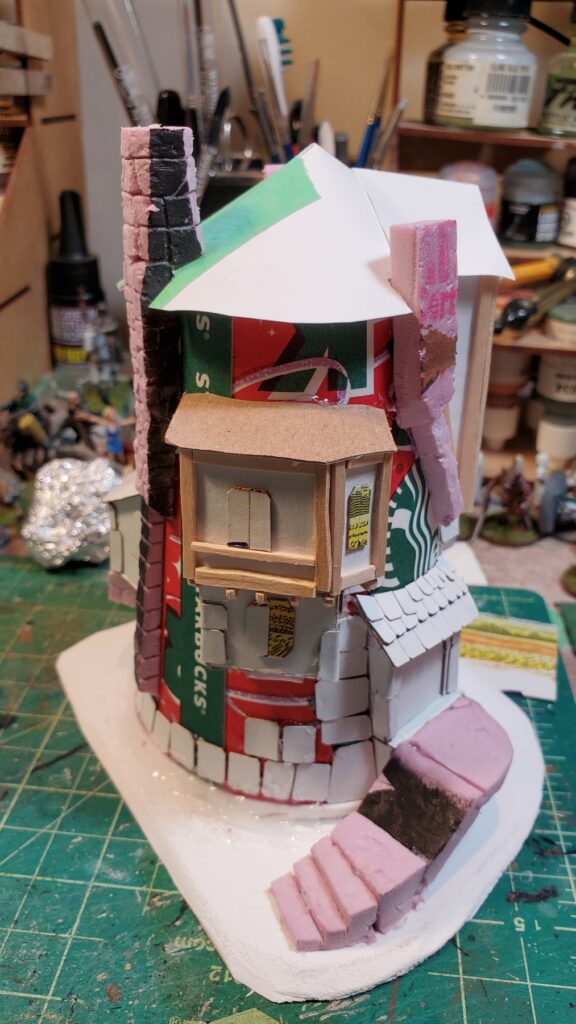
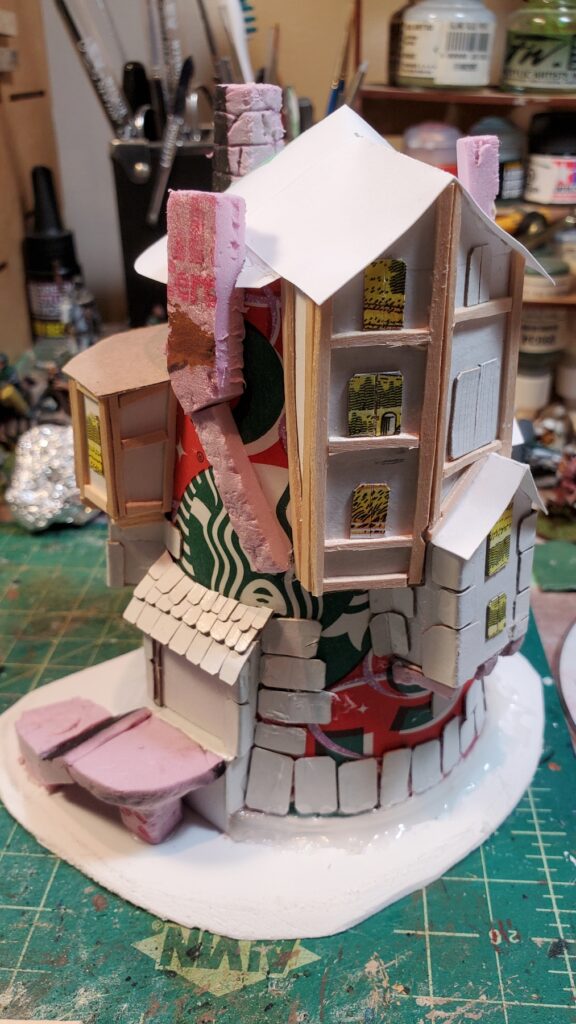
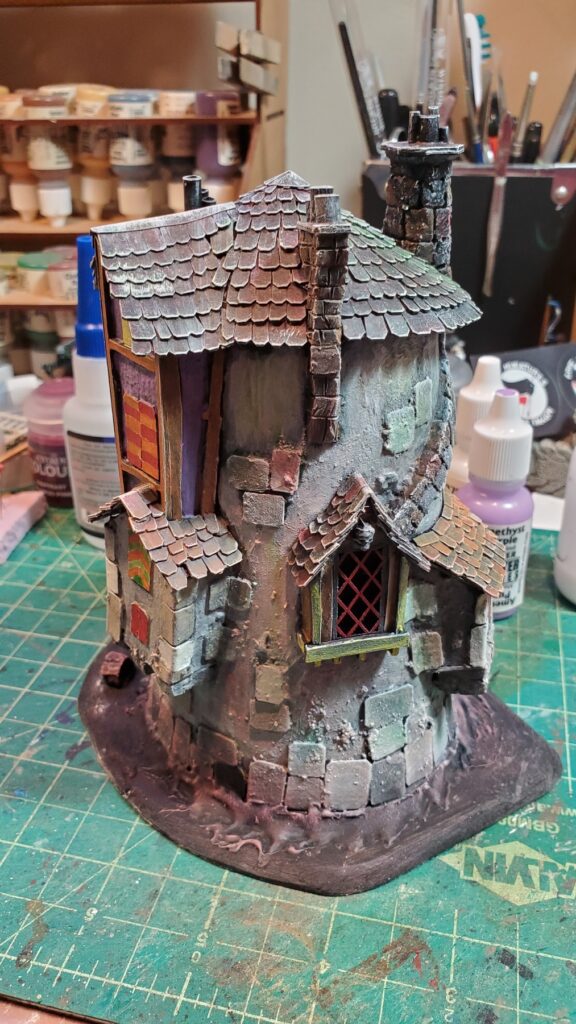
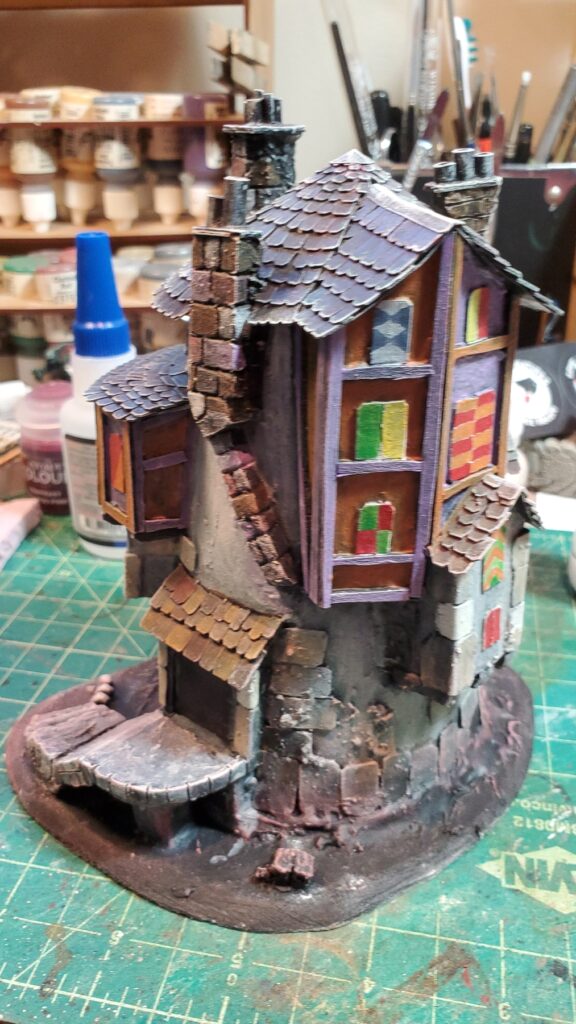
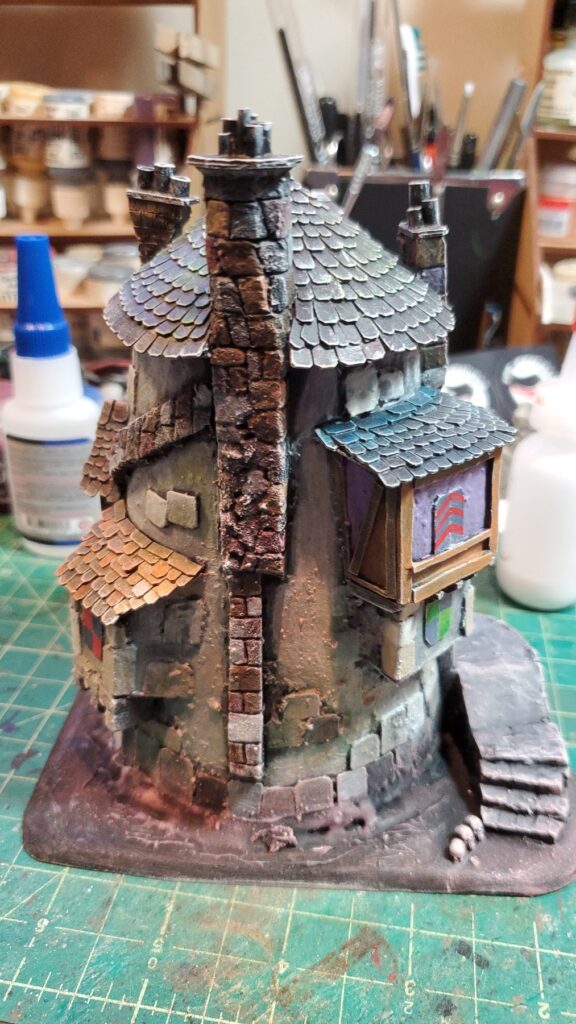
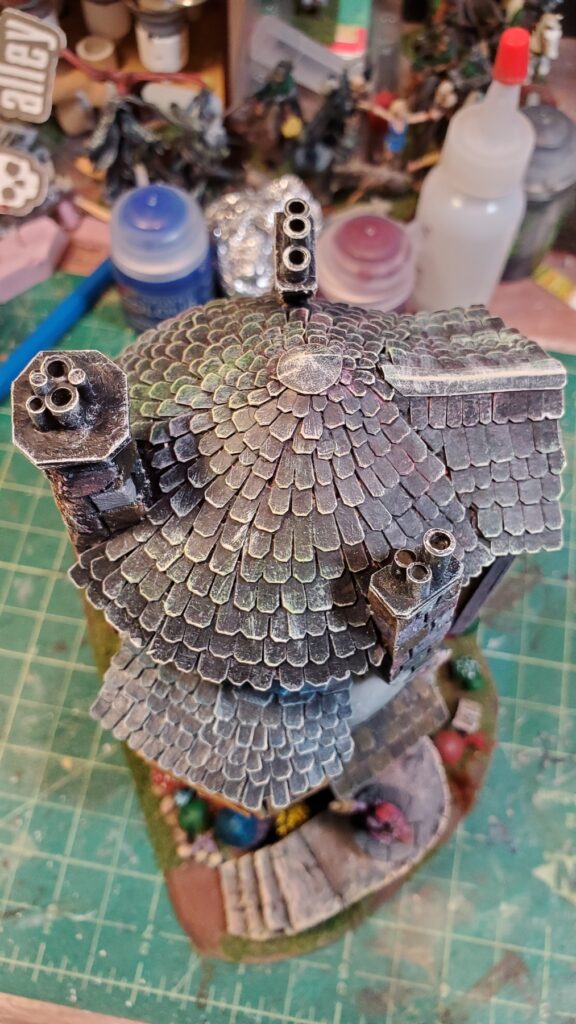
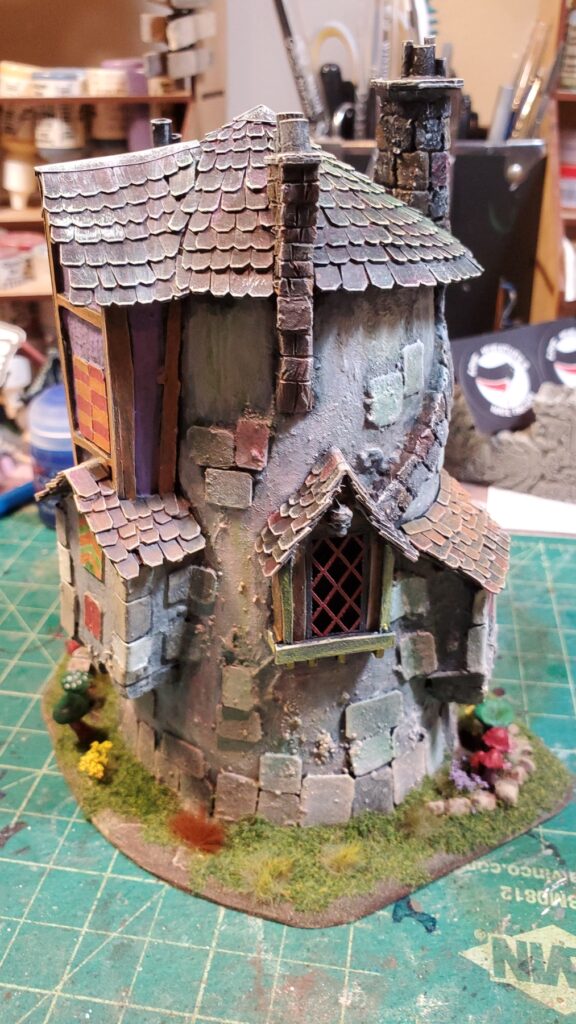
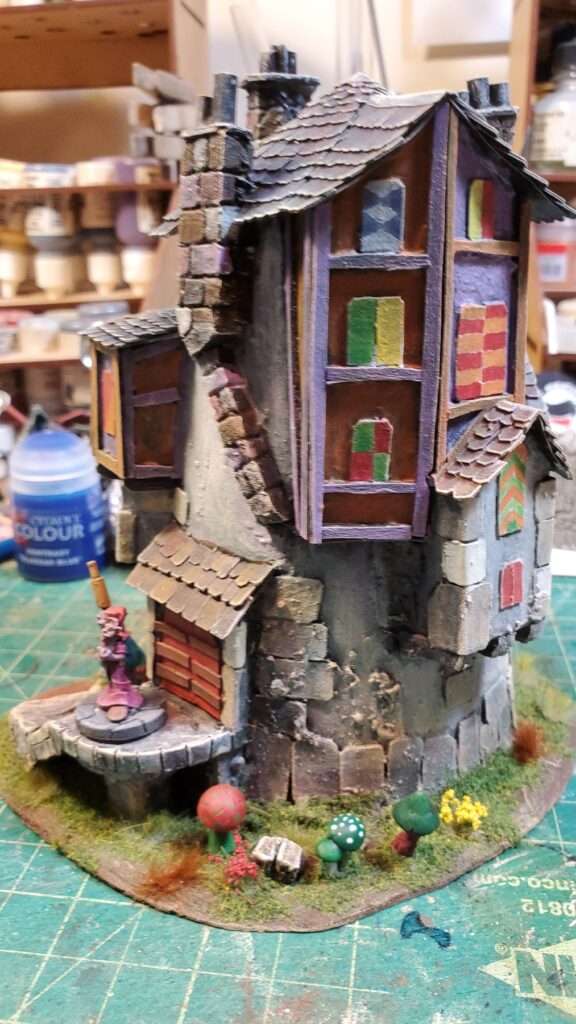
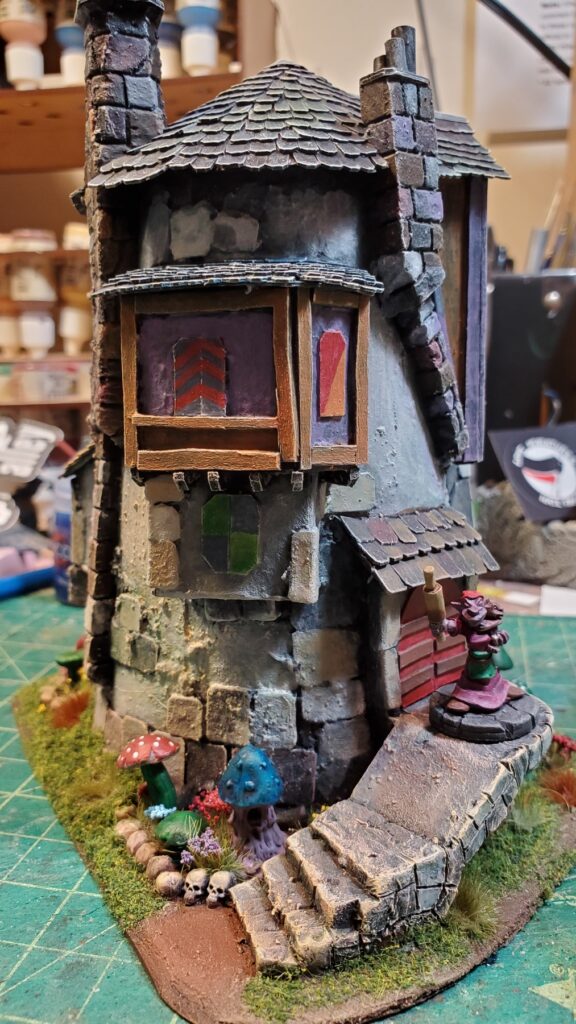
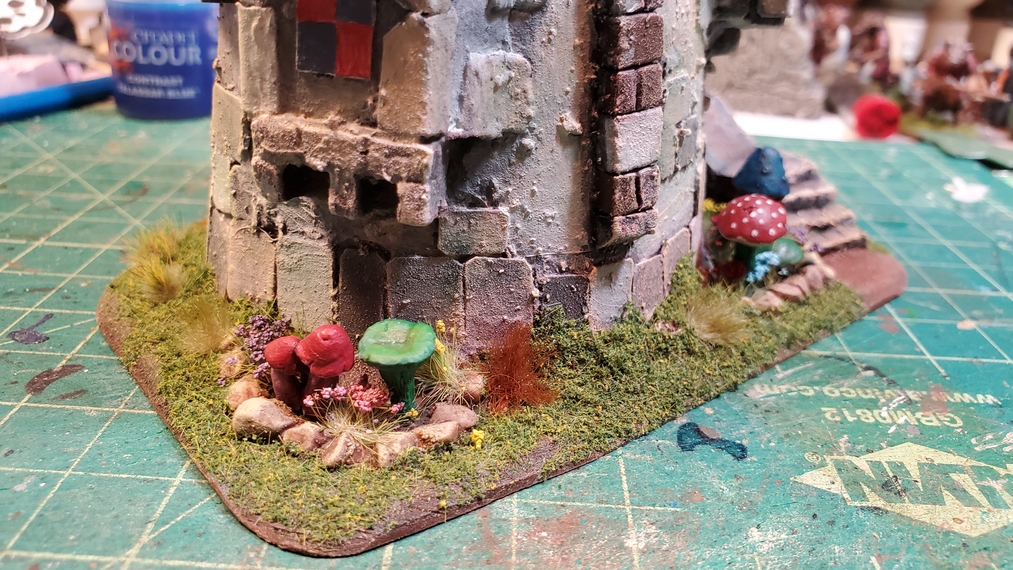
Over the Christmas holidays I had painted up an entire village of really cool Toadstool Brownies from Fenris Games (they’ll get their own post soon) so I decided to trash bash a multi-story tower for them to cause trouble from, a sort of weird fantasy cross between a fortified tower house and a tenement apartment building.
I started with a medium size paper coffee cup from a widely available but deeply mediocre coffee chain, glued that to a scrap of 1/8th PVC sheet a bit bigger than my hand, then started adding details with scrap cardstock, wood coffee stir sticks, bits of styrofoam, paper, and Milliput.
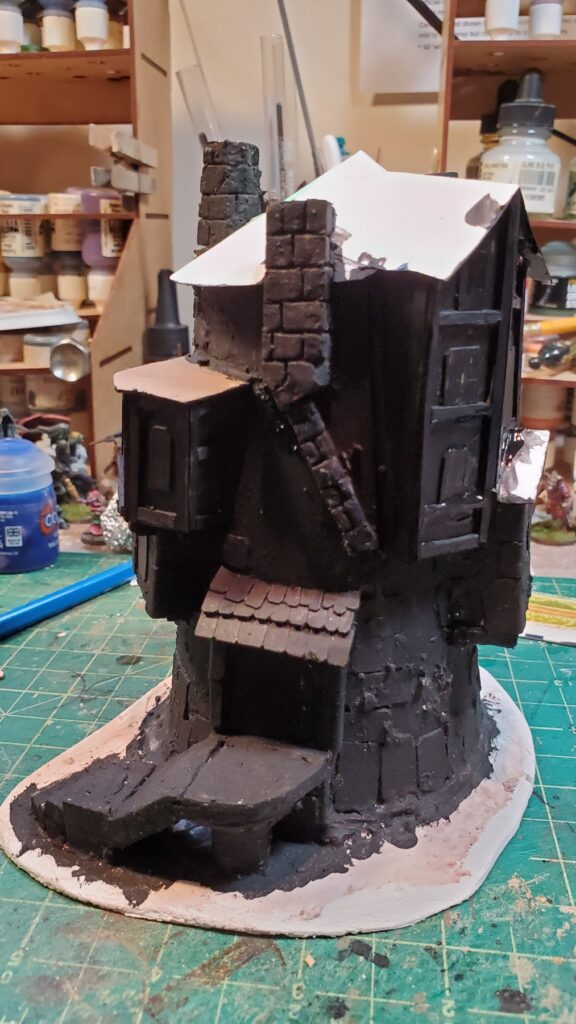
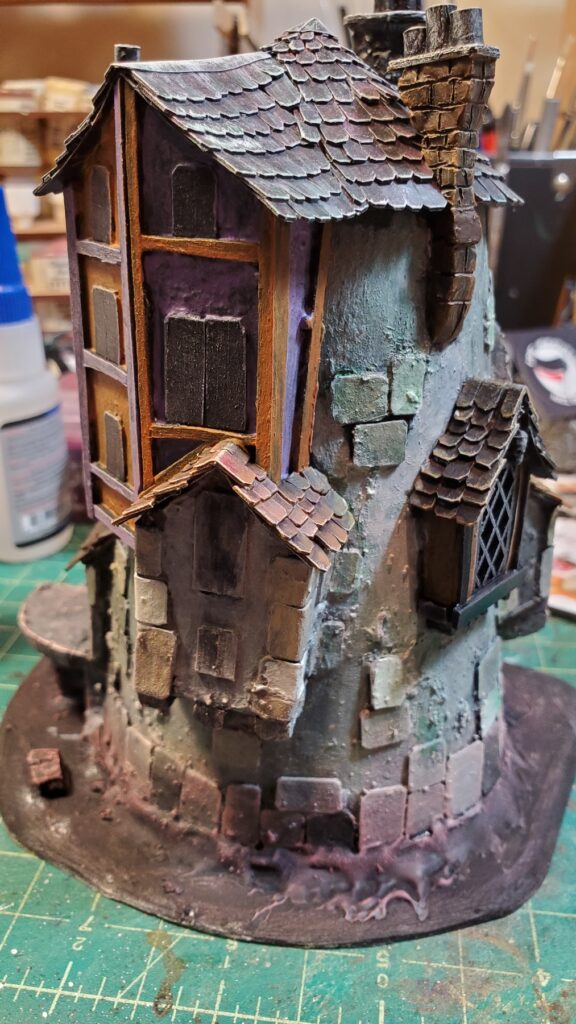
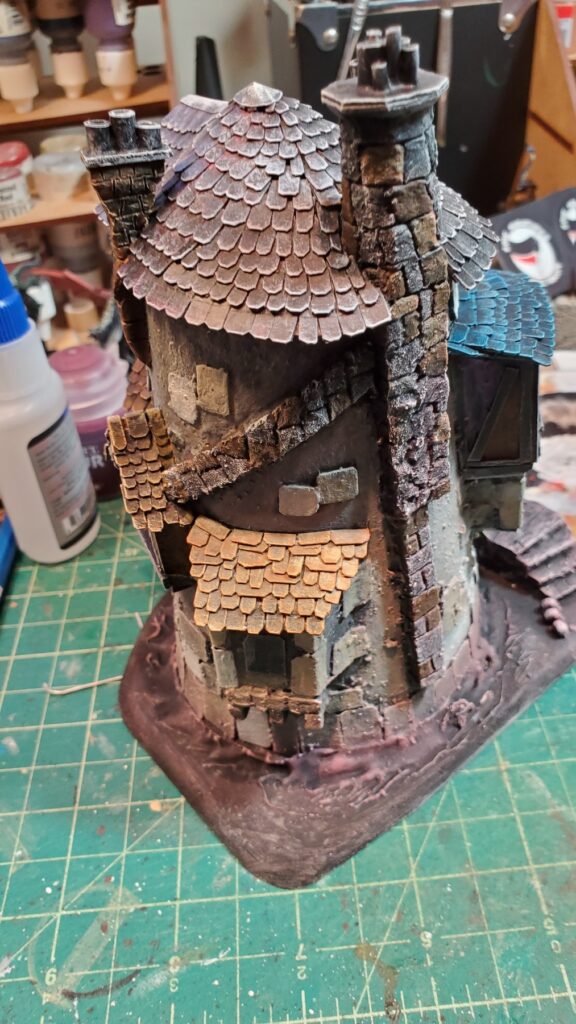
Very early in construction.Very early construction, with Toadstool Brownie on 20mm wide base for scale.Details going on.Shutters in place.Textured with thin plaster and priming started.Paint started, roofs and chimney details done.The skinny chimney on the left is Milliput around a toothpick core, for strength. Nicely gamer-proof, I hope!More paint. I used all sorts of random washes and drybrushing to add texture and character.More paint. Lasercut window and plastic skull above it.Paint on the shutters.The big chimney.Finished tower, view of the main roof.Finished tower, skull window side/back.Finished tower to the right of the door and ramp.Finished tower, door, ramp, and garden.The “back garden”.The front garden, and yes those are skulls…The Toadstool Brownie Tower, construction and finished photos!
This hasn’t actually graced a table yet, but I’m sure it will soon, and I want to write up stats for the Toadstool Brownies as either playable characters or random on-table nuisances for the games we play!
I haven’t done a pure stratchbuild like this in a while, but really want to do more, and weird fantasy builds are SO much fun!
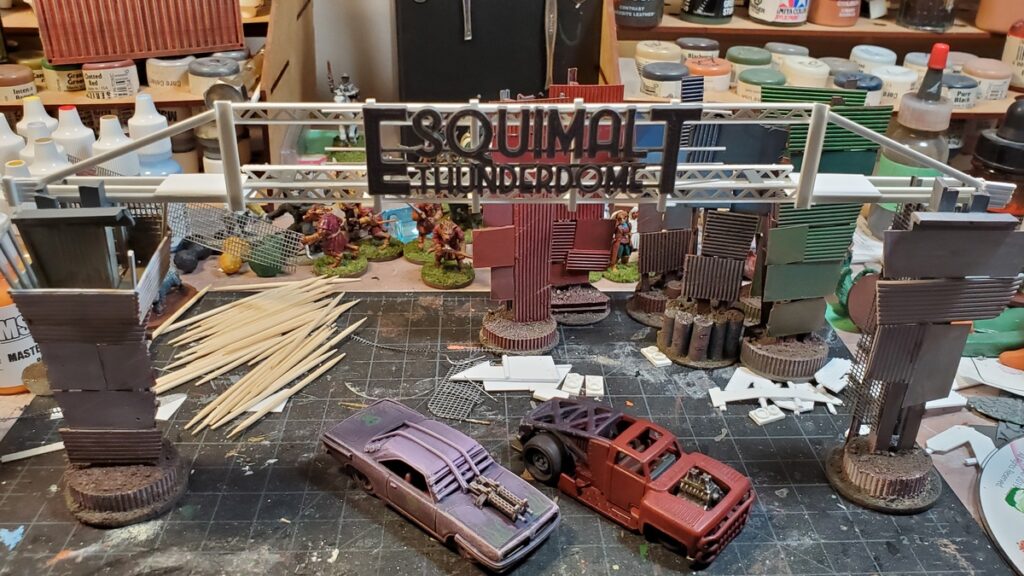
When we last saw our gates they were basecoated but stalled due to missing 3d printed parts. Those arrived, thanks to my brother’s 3d printer, and I was able to move on with the project.
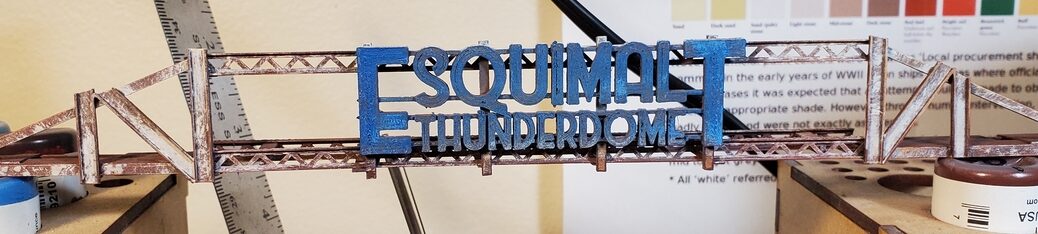
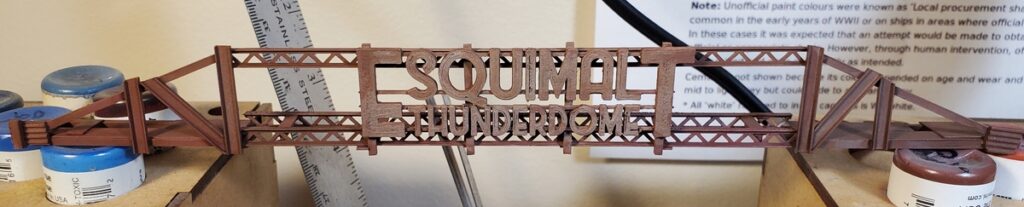
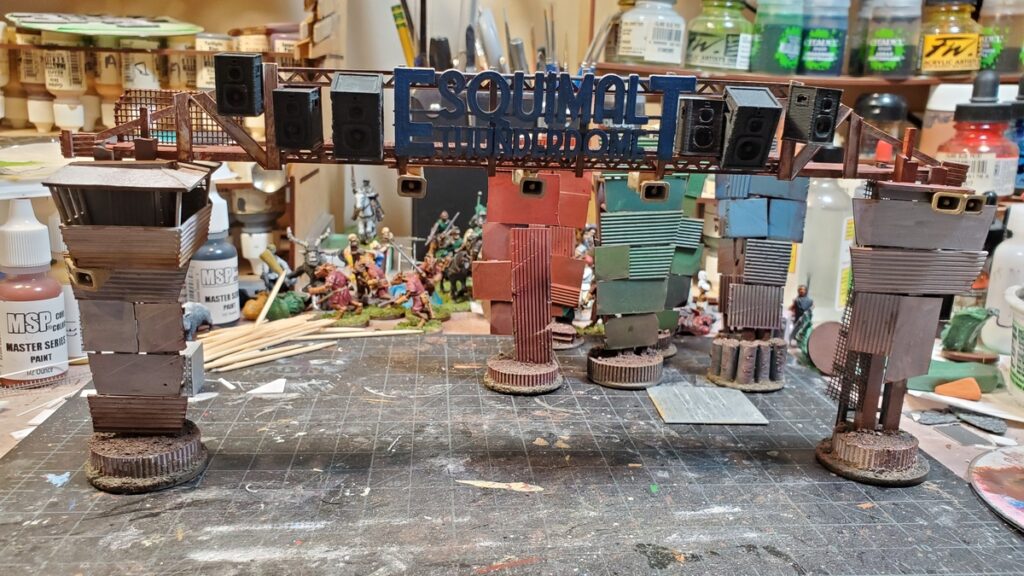
I didn’t want to start the overhead gantry on the Start/Finish gate until I had the 3d printed “Esquimalt Thunderdome” sign in hand, but once I had that the basic construction went together quickly.
The three openwork girders have been in my stash for decades and the packaging is long gone, but they’re from Plastruct – possibly these ones, which seem to be about the right size. You can find all the similar openwork web girders from Plastruct by searching their site for “web”.
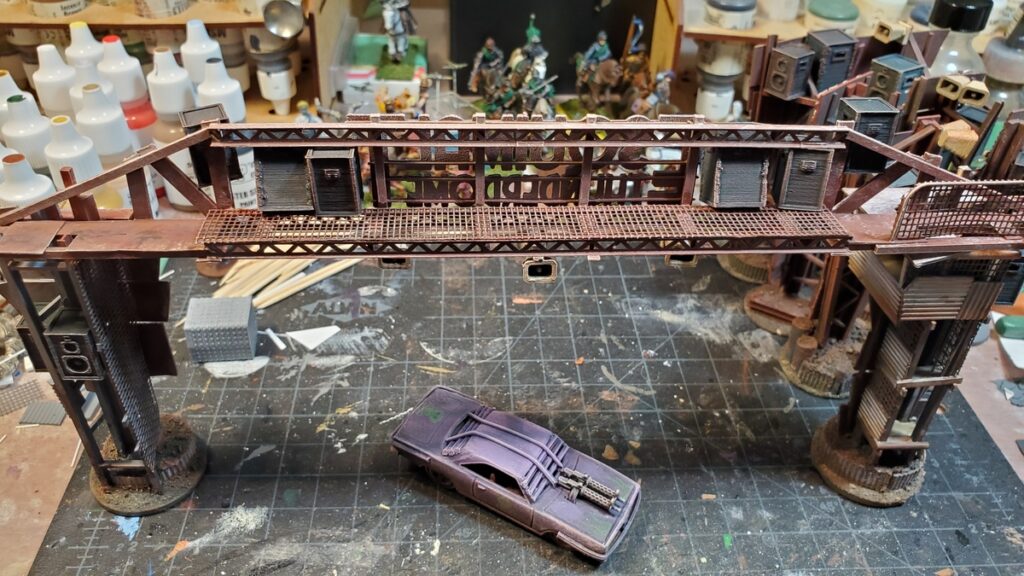
The girders are only six inches long, so I knew I’d need to extend the gantry with other materials as the Gaslands rules call for gates the same width as a Long Straight movement template, which is roughly 7 inches long, and Corey’s Thunderdome racetrack dirt track is roughly 8 inches wide. Fully finished, this gantry is almost 10 inches long, and slots into the roof structure of the two vertical gate towers to hold everything together.
The start of the overhead gantry. I later pulled off the plastic mesh as it was getting in the way of construction and painting, and replaced it much later in the process. Click for larger.
The rest of the gantry was a random scatter of styrene shapes from the stash – there’s some flat C-channel, different T- and H-girder bits, and lots of square or rectangular cross section stuff. It had to both look structurally sound and actually have a certain amount of structural integrity, but the beauty of post-apoc engineering is that it still looks great if you bodge extra bits on to fix earlier problems!
in progress but before priming. You can see here how the gantry’s beams slot into the tops of the two gate towers. Click for larger.
After grey primer I covered the whole thing in a blotchy rust coat using a couple of different shades of browns, reds, and oranges.
Rust coated. Click for larger.
After the rust coat I did a blotchy coat of white, partly drybrushed and partly stippled into place. This came out far better than I’d hoped, and really looks like white paint that’s flaking off as the metal under it rusts and weathers.
Stippled and drybrushed white, and first coats of blue on the sign. Painting of the actual gantry is basically done at this point; the sign got a bunch more weathering and highlighting and touchups. Click for larger.
The speaker cabinets and loudspeaker horns were 3d printed from STLs on Thingiverse, both from a very nice collection of Gaslands parts. The speaker cabinets were printed in two different sizes, which added some visual interest.
Speaker cabinets and loudspeaker horns in place and weathering started. Click for larger.
The speakers got painted a blotchy off-black (Reaper Pure Black with a dot of one of their greys mixed in) and the loudspeakers got one of the many tan off-whites in my collection, I can’t remember which one.
The clutter of speakers and loudspeakers really makes this piece pop, it’s exactly the visual clutter I’d pictured in my head when first thinking these designs up!
I’d like to add some light fixtures, but it seems nobody makes 20mm 3d printable floodlight fixtures, at least not that I can find, and I’d want enough of them that scratchbuilding isn’t really an option unless I can come up with a really simple design…
The back of the gate, with mesh back on the walkway and all the 3d printed stuff getting weathered.
Next up, painting and installing the big “GATE” signs and numbers on the rest of the gates, and loads more weathering. So much weathering…