All posts by Brian Burger

Started this site way, way back in November 1998, when the web was young. It's still here, and so am I.

4Ground Cart Review

As part of an order that arrived this week from Brigade Games I picked up one of 4Ground’s neat looking laser-cut carts. This one is “28-CAW-303 C19th C Horse Drawn Utility Cart”, known on 4Ground’s own site simply as “Horse Cart”! I’ve been meaning to get some of these 4Ground carts & wagons for ages, as carts and wagons are nearly universal scenery and the pewter & resin ones out there tend to go for larger sums than I usually want to spend on waht i

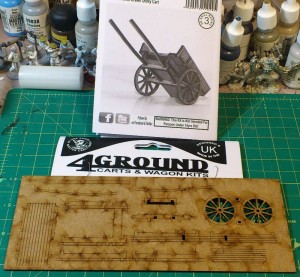
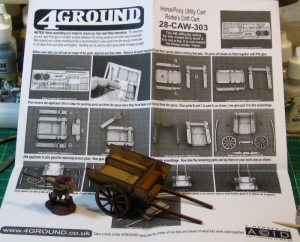
It comes as a 8’x3′ sheet of 2mm MDF, laser-engraved on both sides, with the parts laser-cut except for very tiny sprues holding them into the sheet. There’s an A4 sheet that is both package label and (black and white) instruction sheet. The instructions are all photo illustrated, over a dozen small but clear B&W photos taking you through the assembly.

cart01
Straight from the ziplock bag- instructions at top, cart on it’s MDF sheet below. Bag topper card in the middle, just because. Click for Larger.

The parts are all marked by clearly engraved letters on the sheet, and the photos and text are more than clear enough to take you through the step-by-step assembly. I should note that there is a typo in the last sentence of the written instructions, though, where the letters identifying two parts are duplicated. The photos are clear enough, and by that point you’re down to so few parts it’s reasonably obvious where things are supposed to slot in.

cart02
Finished, with a 28mm Copplestone caveman for scale. Click for Larger.

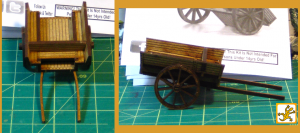
The finished cart is actually fairly substantial. The body is about 2″ long and 1.5″ wide; the whole cart from tailgate to front of the arms that hold the draft horse is 3.5″ long, 2″ wide across the wheel hubs and 1″ high when sitting level. Resting forward on the arms (what are these pieces actually called? I’m sure they have a name in a real cart…) the back end of the cart is about 1.25″ tall.

cart03
Front & side views of the cart. Click for Larger.

I’ve not yet decided how I’m going to, or even if I’m going to, paint this up. I think I’ll experiment this weekend on the offcut pieces of MDF and see how it reacts to washes and other paint. A grey wash and a bit of off-white drybrush might be all it needs to weather the wood a bit and give it a well-used appearance.

Renedra Gravestones WIP

Quick photo of my work-in-progress Renedra gravestones, purchased over Christmas from J&M Miniatures. The bases are leftovers from my long-neglected English Civil War/Thirty Years War forces, which are Warlord sets and come to think of it, also cast by Renedra.

graves13Feb13
Quick and rough late night snapshot of half the Renedra graves. Click for slightly larger.

This is half (one of two identical sprues) of the Renedra gravestone set, and spread out to allow figures between the bases, it comfortably fills my 11″x9″ cutting matt. Adding the second sprue and some other bits like trees and such would give you an extensive graveyard to skulk in!

Links of Interest, 8th Feb 2013

First “Links of Interest” miscellaneous post for 2013, so it’s a long one!

The fantastic blog Wargaming with Silver Whistle is, like I was recently, also making fields. His are spectacular, and might inspire me to re-visit the subject again in the near future! He’s got fields and allotments, large wheatfields, and finally some haystacks, all lavishly illustrated.

TutoFig.com is a multilingual European website that aggregates links to all sorts of tutorials – figure painting, sculpting, terrain, and all sorts of other stuff. Lots of high-quality links there, and I’m flattered they linked to my hot-glue fields tutorial, which is how I discovered them in turn.

Staying with the scenery theme, The DM’s Craft Youtube channel has lots of short terrain videos, focusing on the quick-and-cheap (but effective!) end of terrain making, and especially the many, many uses to which one can put a hot glue gun!

Moving on to the Russian Civil War and World War One, the Photo Palace blog, WW1 & RCW Photos Found is a post about an amazing collection of photos by an American who was working with the YMCA in both France and Russia during World War One, and who then escaped the Russian Revolution via Siberia and China – and he took photos the whole way, as well as buying photo postcards and such as he travelled. There’s only a few photos from the collection up online right now, which is unfortunate, but they’re really neat, atmospheric photos! The same blog also has French WW1 Photos Found Still in Camera, but again, too few of the actual photos posted online so far!

The US Army’s famous West Point Military Academy has, unsurprisingly, a first-rate History Department, who have put online their Atlas of Military History. There’s no maps of the Russian Civil War, despite American forces being involved both in Northern Russian and Siberia as part of Allied Intervention forces, but there are great clear maps of World War One on the Western Front, as well as maps for nearly every other war the Yanks have been involved in.

Looking for information on Russian armoured cars I found PDF archives of the “Armoured Car Journal” from the early/mid 1990s, with several interesting World War One articles, although nothing specifically on the Russian Civil War.

Finally, if you’re doing up artwork, cards or other handouts for gaming, another source of nice textures and background images is always useful, so here’s some Free (CC-BY Licensed) textures collected on Flickr – hat tip to Sidney Roundwood for the link.

GottaCon 2013 Photos

As is often the case at conventions, I got too involved in actually running or playing games to take many photos, but here’s a few pics from GottaCon 2013! These are all over on Flickr in my GottaCon 2013 Photoset.

Friday evening Corey ran and I played his homebrew fast-and-simple pulp racing game. You can read my Friday writeup for details, but basically it was Our Hero being chased by Evil Henchmen down a narrow, twisting country lane. Sheep, other traffic, skunks and an elephant got involved, and pretty much everyone crashed.

Friday night’s pulp racing game. Our Hero in the black car, two Henchpersons in the red & white cars, innocent but explosive NPC fuel truck getting in the way. Click to see larger over on Flickr.

Saturday morning I played a naval board game with a friend I hadn’t seen in at least four years. Great to reconnect with him again, and totally random – I just happened to wander by the board gaming area looking for something to do, because there was nothing in the miniatures or RPG area I was interested in!

Saturday afternoon was, of course, the first running of my Russian Civil War game. See Saturday’s writeup for a few more details; I’m also going to be posting a more detailed writeup on the two games later this week, because from identical starting positions involving identical forces over near-identical terrain, they wound up radically different games! I didn’t get any photos of the second game on Saturday evening, but the terrain involved changed only very slightly, so this overall table view will work for both games.

rcw_table
Looking down the length of my Russian Civil War table. Reds started on the long left edge; the Whites started in the hamlet ahead of the camera. As you can see, I’m a great believer in getting maximum table coverage, even if it’s just open fields with minimal effect on play! Click to see larger over on Flickr.

Sunday morning Corey and I wound up re-running his pulp racing game, with rules slightly tweaked after discussing Friday’s game. We have a draft system for vehicle damage, which is fun and adds to the tension and chaos.

corey-race
Sunday morning’s racing game, with Our Hero in the blue-and-white truck getting clean away to see the elephant. Best not to ask why an elephant, really. Click to see full-sized over on Flickr.

Sunday afternoon I played a short demo game of Infinity. The system is interesting, but the terrain being used was fairly bland, so I didn’t bother taking photos.

So that was GottaCon 2013! Same again next year, only more of it – as I said in my Sunday writeup, I’m pretty sure we’ll both be running more games next year, just to get the kind of gaming we like represented!

GottaCon 2013, Sunday

Short and frankly lazy day of gaming today. Corey and I re-ran our pulp racing homebrew from Friday evening, roping one person in. We’d tweaked the rules slightly, added actual damage to the vehicles, and the mayhem was just as pulpy, daft and destructive as ever!

I spent most of the afternoon being a spectator (and forgetting to take pictures, worse luck) and blowing the last of my GottaCon budget at various vendors. I spent the lion’s share of that at TableTop Scenery on three bases of trees, each base with a pair of threes in the 5-7″ tall range. Trees are the one major pieces of terrain I’ve never gotten around to doing, as good looking, largely gamer-proof trees can be fairly challenging to make. The TableTop trees are “bottlebrush” style, with a wire core and hemp branches shaped and flocked. I also picked up a random scattering of other things – more dice, a Munchkin booster pack, and four or five Reaper fantasy figures that were on clearance at one booth.

I also played a short three-turn demo of Infinity, a game I’ve been intrigued by for a while now. The game seems fast, rules light and incredibly lethal. I scored the free Intro Rules booklet (which seems fairly complete, actually) and a pair of infantry figures from the Nomad faction. I might paint them up soon, actually, just as a change from the Russian Civil War hordes that have lately flooded my painting bench. The nearly insane per-figure cost of the official Infinity figures is discouraging me from actually getting into the game, though. I know you don’t need many figures per team, but still, $10-15 for a single infantry figure puts one off.

Corey spent the afternoon running a D&D 4th Edition Essentials module for three or four teenagers, but didn’t manage to kill every single one of their characters. Pity, that.

I haven’t heard any official estimate of attendance from the guys who run GottaCon, but it felt busier throughout than the last couple of years, and a couple of the repeat vendors I’ve gotten to know in passing said it was a better year than previous ones for them. That bodes well for Victoria’s “big” gaming convention in it’s fifth year.

The one thing that continues to bug me about GottaCon (and has since it started) is the lack of non-tournament miniatures events. I’ve basically come to the conclusion that if GottaCon is going to continue to amuse me, as a gamer, I’m going to have to continue to arrange my own amusement, in coordination with my brother and a few other like-minded gamer friends. I’ll almost certainly be running more stuff next year, possibly making the double-header Russian Civil War games official, as well as working with Corey to bring back our pulp extravaganza games in some form. I may even try to organize an RPG session using Savage Worlds or one of the systems I enjoy, as an alternative to the endless parade of 4E & Pathfinder RPG sessions GottaCon’s roleplaying track is currently clogged with. We shall see!

GottaCon 2013, Saturday

Wound up running my Russian Civil War game twice, after interested spectators asked during the afternoon game if I was running it again during the convention. I said, “Sure, how about this evening?”, checked to see if the table was still free (it was) and wound up running the game again.

Exact same forces, same terrain setup, but two wildly different outcomes. Game one was a hard-fought but unmistakable Red victory against the defending Whites; game two was an utter rout of the attacking Reds, with minimal casualties amongst the Whites. Fascinating to see such different outcomes from the same starting position.

I haven’t even checked my photos from yesterday, but I did manage to get a few photos of the first game, at least. Full game report and photos (assuming they turned out!) later. Off to the Sunday gaming sessions!

GottaCon 2013, Friday

Spent the morning doing a few bits of last minute prep for my Russian Civil War game, mostly putting the finishing touches on the field gun and crew. Headed up to the convention site a few hours before it opened so I could get my pass ahead of time and avoid the 45 minute wait at the official doors time, then loitered in a coffee shop until just before the doors opened.

Going to the will-call pre-con ticketing turned out to be a good plan, as the lines were fairly long at the ticket door!

The evening session was taken up with a fairly quick, highly entertaining game of pulp racing run by Corey; the rules are super light, less than a page, and consist mostly of “roll something and make sh*t up, then everyone crashes!”. Scatter dice, FUDGE dice, card-based activation and possibly averaging dice are involved. Corey claims to have been sober when he wrote the rules, but I have my doubts. I ran over a skunk, an escaped circus elephant narrowly avoided being very large roadkill, one or two sheep weren’t so fortunate, and ultimately Our Hero crashed, his car nudged from behind by a Comically Evil Henchperson, and was unable to prevent the Dastardly Villain from marrying the Tragically Brainwashed Heroine. Pulp silliness ensued, in other words.

I even remembered to take photos, and one or two of them even turned out OK!

pulprace1
Early in the pulp racing game. The oncoming lane is blocked, there’s sheep in the middle of the road, a fuel truck has just pulled out to try to get around the obstacle, and here we come, driving idiotically fast! Standard pulp nonsense, in other words!

See the full GottaCon 2013 photo set on Flickr.

Best Time To Begin A Project…

… is 40-some hours before a convention starts, right?

No?

Fortunately, this is actually a small and achievable project. Earlier this evening I declared “major painting operations” done on the bulk of my latest Russian Civil War figures, except the last two figures of the gun crew, which will need an hour or so of attention tomorrow. Needing a distraction from fiddling with figures, I broke out a couple of offcut pieces of pink 1″ styrofoam, nabbed a serrated knife from the kitchen, and started a new hill.

hill
New hill carved, sanded, covered in sand, and basecoated. Click for larger, as usual.

Sizing the hill to space remaining in my Russian terrain box, I wound up with a roughly 10″ long by 7″ wide hill, with a dirt road climbing up and over it. The road fits with my existing caulk roads. There’s three scrap pieces of styrofoam as the structure, pinned together with snapped off toothpicks and glued with hot glue. I used Milliput to fill the gaps on the top surface of the hill and to add some detail to the banks on either side of the road.

While the Milliput was still tacky I dumped sand over the road and a few other patches of the hill, let that dry an hour or so, and slopped on the brown basecoat you can see above. As usual, there was a generous portion of white glue mixed into the paint.

Milliput is apparently able to dry underwater, so I don’t see a layer of wet paint & glue as a major impediment. If I wake up in the morning and the stuff is still tacky, I’ll have guessed wrong, I suppose…

Full Production Mode

A quick look at my painting bench as a I get ready for Saturday’s Russian Civil War game at GottaCon. On the right, 15 Bolsheviks, a mix of regulars and militia/Red Guard types. Behind them across the back of the cutting matt, a unit of Russian horse. Behind them and currently being ignored, 10 American gunboat sailors from Pulp Figures. On the left of the mat, 14 Bolshevik sailors. Off the mat to the left, a batch of finished Whites from ages ago just waiting to be re-housed as I (yet again) reorganize my figure storage. Centre, a field gun — the crew are lurking behind the Red sailors. The CD has some new greenstuff banners I just primed, and a small pile of ready ammo that will form part of a loaded/unloaded marker for the field gun.

All sorts of things, mostly Russians, being painted. See text for details, and click for larger!

In other convention-related news, I’ve submitted my RCW game to Trumpeter Salute; haven’t had the event confirmed by the organizers yet but it’s nice to have it submitted.

Right, back to the painting mines! Four days to the game!

Look, Up In The Sky…

…it’s a bird, it’s a plane… well, actually, it’s a flying stand to get my existing SPAD and Nieuport fighters onto the table properly!

flyingstand1
Flying stand construction. See text for details, and do click for larger!

The lower part of the base is two 3″ plywood circles from Micheal’s craft store, the lower one with a hole drilled in it wide enough to accommodate the head of the M4 20mm long bolt. The top circle has a smaller hole to let the bolt through, and I used a woodworking rasp to bevel off the edges. The two washers are fairly heavy 2″ fender washers. I used superglue to tack them in place, then ran a bead of Gorilla Glue around the edges to lock them in place and round off the base. The gravel imbedded in the Gorilla Glue adds nicely to the weight of the base, as well.

The base will get a quick paintjob to match the rest of my terrain, then some lichen or foam foliage to break up the outline a bit.

The actual flying stand is a cheap mechanic’s extending inspection mirror from a local auto parts store. The base unscrews and is threaded for a metric M4 bolt – that’s a 20mm bolt coming up from the centre of the base. Once the mirror at the top was removed, the round ball it swivelled on turned out to be easy to shape with 120 grit sandpaper, so I sanded it roughly cubical and tacked the alligator clip (also cheap from the electrical section of a hardware store) on with superglue just to hold it. Then I used fine wire to lash the clip into place, saturating the lashings with superglue after I was done. The result is low profile and more than solid enough to be gamer-proof. I did nearly glue the hinge of the alligator clip shut, though… try not to do this!

The small square of basswood on the handle of the alligator clip is just to make it easier to open all the way; the way it’s mounted on the telescoping rod centres the airplane over the stand – which is a good thing – but the rod gets in the way of your fingertip when you try to open the clip to it’s widest point. The screw I put in the belly of the SPAD turns out to be almost too big for these clips; if you look closely you can see I bent the handle of the clip outward to allow the clip to open just a bit wider. The whole clip has also been bent forward slightly to improve the angle the planes sit at when they’re clamped in.

Total cost of the whole thing is about $10 or $12. The extending inspection mirror is the most expensive part at about $8; four alligator clips were $2 total; four 20mm M4 bolts were about the same; the 2″ fender washers are about 50 cents each; and a package of six 3″ plywood craft discs was $3. If you had a workshop area full of random stuff (which I don’t) and could scrounge bits you could build these for not much more than the basic cost of the inspection mirror.

The whole assembly is just over 20″ tall to the tip of the alligator clip, more than tall enough for my purposes. The telescoping post will still unscrew from the bolt in the base, which I will probably maintain as being able to take it apart makes it much easier to transport, and the telescoping rod and alligator clip is the part most likely to be damaged and need to be swapped out.

My brother has a big 1/48 DH4 that we’re not sure will balance securely on this stand; I might wind up making a larger flying stand, probably based on CDs, for that plane. I’ll eventually make one or two more flight stands this size, too, but given that for the near future there’s never going to be more than one plane over the table at a time, we’re good to go and it was easier than I thought it was going to be to construct a solid flying stand.